Complete Owner's Guide (English)
Page 4
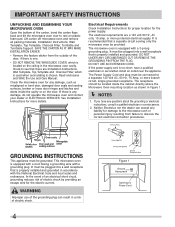
... the electric current. The electrical requirements are Installation Instructions, Wall Template, Top Template and Charcoal Filter, which is properly installed and grounded. NOTES 1. This microwave oven is equipped with a 3-prong grounding plug. WARNING Improper use of the grounding plug can... shock by providing an escape wire for the power supply. Lift carton off microwave oven and remove all packing materials, Installation Instructions, Wall Template, Top Template, Charcoal Filter, Turntable and Turntable Support. If there is too short, have any liability for...
... the electric current. The electrical requirements are Installation Instructions, Wall Template, Top Template and Charcoal Filter, which is properly installed and grounded. NOTES 1. This microwave oven is equipped with a 3-prong grounding plug. WARNING Improper use of the grounding plug can... shock by providing an escape wire for the power supply. Lift carton off microwave oven and remove all packing materials, Installation Instructions, Wall Template, Top Template, Charcoal Filter, Turntable and Turntable Support. If there is too short, have any liability for...
Complete Owner's Guide (English)
Page 8
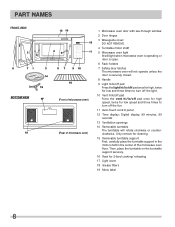
... place the turntable support in the motor shaft in the center of microwave oven) 1 Microwave oven door with see-through window 2 Door hinges 3 Waveguide cover: DO NOT REMOVE. 4 Turntable motor shaft 5 Microwave oven light It will light when microwave oven is operating or door is open. 6 Rack holders 7 Safety...microwave oven will not operate unless the door is securely closed. 8 Handle 9 Light hi/lo/off pad Press the light hi/lo/off pad once for high, twice for low and three times to turn off pad once for high speed, twice for 2-level cooking/ reheating 17 Light cover 18 Grease filters...
... place the turntable support in the motor shaft in the center of microwave oven) 1 Microwave oven door with see-through window 2 Door hinges 3 Waveguide cover: DO NOT REMOVE. 4 Turntable motor shaft 5 Microwave oven light It will light when microwave oven is operating or door is open. 6 Rack holders 7 Safety...microwave oven will not operate unless the door is securely closed. 8 Handle 9 Light hi/lo/off pad Press the light hi/lo/off pad once for high, twice for low and three times to turn off pad once for high speed, twice for 2-level cooking/ reheating 17 Light cover 18 Grease filters...
Complete Owner's Guide (English)
Page 23
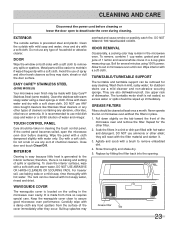
...NOT use any spills or spatters. Keep the waveguide cover clean to the interior surfaces; Never operate the fan or microwave oven without the filters in mild, sudsy water; INTERIOR Cleaning is easy because little heat is precoated steel and plastic. WAVEGUIDE COVER The waveguide...Clean the outside surface is generated to assure good microwave oven performance. Soak the filters in cleaning the touch control panel. Replace by fitting the filter back into the opening. EASY CARE™ STAINLESS STEEL (SOME MODELS) Your microwave oven finish may be wiped up splashes may remain...
...NOT use any spills or spatters. Keep the waveguide cover clean to the interior surfaces; Never operate the fan or microwave oven without the filters in mild, sudsy water; INTERIOR Cleaning is easy because little heat is precoated steel and plastic. WAVEGUIDE COVER The waveguide...Clean the outside surface is generated to assure good microwave oven performance. Soak the filters in cleaning the touch control panel. Replace by fitting the filter back into the opening. EASY CARE™ STAINLESS STEEL (SOME MODELS) Your microwave oven finish may be wiped up splashes may remain...
Complete Owner's Guide (English)
Page 24
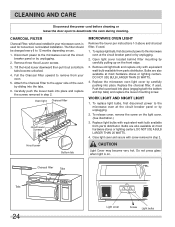
...Disconnect the power cord before cleaning or leave the door open to remove from your microwave oven, is on the light cover. (See illustration.) 3. The filter should be changed every 6 to the microwave oven at the circuit breaker panel or by carefully pulling up on use. 1. ...unplugging. 2. WORK LIGHT AND NIGHT LIGHT 1. Oven light Charcoal filter Hood louver Scrrews Hood louver Bottom tab MICROWAVE OVEN LIGHT Remove the louver per instructions 1-3 above and charcoal filter, if used . Replace light bulbs with screw removed in your oven. 5. DO NOT USE A BULB LARGER THAN...
...Disconnect the power cord before cleaning or leave the door open to remove from your microwave oven, is on the light cover. (See illustration.) 3. The filter should be changed every 6 to the microwave oven at the circuit breaker panel or by carefully pulling up on use. 1. ...unplugging. 2. WORK LIGHT AND NIGHT LIGHT 1. Oven light Charcoal filter Hood louver Scrrews Hood louver Bottom tab MICROWAVE OVEN LIGHT Remove the louver per instructions 1-3 above and charcoal filter, if used . Replace light bulbs with screw removed in your oven. 5. DO NOT USE A BULB LARGER THAN...
Installation Instructions (All Languages)
Page 3
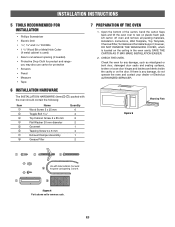
... cavity. Lift carton off oven and remove all packing materials, Installation Instructions, Wall Template, Top Template, Charcoal Filter,Turntable andTurntable Support;however, DO NOT REMOVE THE WAVEGUIDE COVER, which is located on plastic foam pad. If there... 5 x 35 mm Toggle Bolt 3/16" Top Cabinet Screw 5 x 85 mm Flat Washer 30 mm diameter Grommet Tapping Screw 4 x 8 mm Exhaust Damper Assembly Grease Filter Quantity 6 4 2 2 1 4 1 2 7 PREPARATION OF THE OVEN 1. E3 INSTALLATION INSTRUCTIONS 5 TOOLS RECOMMENDED FOR INSTALLATION • Phillips Screwdriver • Electric Drill ...
... cavity. Lift carton off oven and remove all packing materials, Installation Instructions, Wall Template, Top Template, Charcoal Filter,Turntable andTurntable Support;however, DO NOT REMOVE THE WAVEGUIDE COVER, which is located on plastic foam pad. If there... 5 x 35 mm Toggle Bolt 3/16" Top Cabinet Screw 5 x 85 mm Flat Washer 30 mm diameter Grommet Tapping Screw 4 x 8 mm Exhaust Damper Assembly Grease Filter Quantity 6 4 2 2 1 4 1 2 7 PREPARATION OF THE OVEN 1. E3 INSTALLATION INSTRUCTIONS 5 TOOLS RECOMMENDED FOR INSTALLATION • Phillips Screwdriver • Electric Drill ...

Installation Instructions (All Languages)
Page 4
...Box. Put the lead wire into the oven. Attach Fan Cover Bracket to unit with 3 screws, which was installed in your microwave oven, is now rotated for horizontal exhaust operation. 6. Fan Cover Bracket Hood louver Scrrews Back of Wire Box. RECIRCULATING - Follow ... screw from your installation. Be careful not to the back of the unit. Follow installation procedure (A). Follow installation procedure (B). Charcoal Filter, which were removed in the oven before proceeding. The Hood Fan Unit is used for nonvented, recirculated installation. INSTALLATION INSTRUCTIONS 8 ...
...Box. Put the lead wire into the oven. Attach Fan Cover Bracket to unit with 3 screws, which was installed in your microwave oven, is now rotated for horizontal exhaust operation. 6. Fan Cover Bracket Hood louver Scrrews Back of Wire Box. RECIRCULATING - Follow ... screw from your installation. Be careful not to the back of the unit. Follow installation procedure (A). Follow installation procedure (B). Charcoal Filter, which were removed in the oven before proceeding. The Hood Fan Unit is used for nonvented, recirculated installation. INSTALLATION INSTRUCTIONS 8 ...


