Installation Instructions (All Languages)
Page 1
...Thailand The mounting surfaces must be used : A. For customers in Figure 1. See 3 ELECTRICAL GROUNDING INSTRUCTIONS on page 2. 1 MOUNTING SPACE This Microwave Oven/Hood requires a mounting space on a wall as shown in the United States and Canada United States: 1-800-944-9044 Canada: 1-...READ CAREFULLY. It is designed to improper installation is not flat, use . • IMPORTANT Observe all instructions thoroughly before the Microwave Oven is installed. Use a stud finder, a magnetic device which would normally be capable of supporting weight of 110 pounds-the oven and...
...Thailand The mounting surfaces must be used : A. For customers in Figure 1. See 3 ELECTRICAL GROUNDING INSTRUCTIONS on page 2. 1 MOUNTING SPACE This Microwave Oven/Hood requires a mounting space on a wall as shown in the United States and Canada United States: 1-800-944-9044 Canada: 1-...READ CAREFULLY. It is designed to improper installation is not flat, use . • IMPORTANT Observe all instructions thoroughly before the Microwave Oven is installed. Use a stud finder, a magnetic device which would normally be capable of supporting weight of 110 pounds-the oven and...
Installation Instructions (All Languages)
Page 2
... exhaust duct is equipped with the National Electrical Code and local codes and ordinances. All ductwork must be located inside the cabinet directly above the Microwave Oven mounting location as shown in accordance with a 3-prong grounding plug. If round duct is properly installed and grounded in Figure 2. present additional resistance to...
... exhaust duct is equipped with the National Electrical Code and local codes and ordinances. All ductwork must be located inside the cabinet directly above the Microwave Oven mounting location as shown in accordance with a 3-prong grounding plug. If round duct is properly installed and grounded in Figure 2. present additional resistance to...

Installation Instructions (All Languages)
Page 4
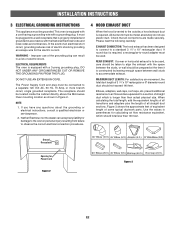
...for recirculating exhaust. 3. Remove three Hood Louver screws. Tilt the Hood louver downward then pull it into the slits in your microwave oven, is used for nonvented, recirculated installation. Put the lead wire into place. See Figure 11. non-vented, ductless. Follow... unlocked. CAUTION: Do not pull or stretch hood fan wiring. 3. INSTALLATION INSTRUCTIONS 8 VENTILATION SYSTEM (PREPARING OVEN FOR INSTALLATION) This microwave oven/hood is designed for adaptation to three types of hood ventilation systems. Select the type required for recirculating. 2. Charcoal Filter,...
...for recirculating exhaust. 3. Remove three Hood Louver screws. Tilt the Hood louver downward then pull it into the slits in your microwave oven, is used for nonvented, recirculated installation. Put the lead wire into place. See Figure 11. non-vented, ductless. Follow... unlocked. CAUTION: Do not pull or stretch hood fan wiring. 3. INSTALLATION INSTRUCTIONS 8 VENTILATION SYSTEM (PREPARING OVEN FOR INSTALLATION) This microwave oven/hood is designed for adaptation to three types of hood ventilation systems. Select the type required for recirculating. 2. Charcoal Filter,...
Installation Instructions (All Languages)
Page 6
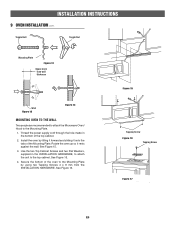
... Plate Figure 12 Space more than wall thickness Wall Figure 13 Figure 14 MOUNTING OVEN TO THE WALL Two people are recommended to attach the Microwave Oven/ Hood to the Mounting Plate by tilting it forward and sliding it rests against the wall. See Figure 15. 3. See Figure 16. Figure 15...
... Plate Figure 12 Space more than wall thickness Wall Figure 13 Figure 14 MOUNTING OVEN TO THE WALL Two people are recommended to attach the Microwave Oven/ Hood to the Mounting Plate by tilting it forward and sliding it rests against the wall. See Figure 15. 3. See Figure 16. Figure 15...

Complete Owner's Guide (English)
Page 1
All about the Use &Care of your Microwave Oven 316902449 Rev A (October 2010) TABLE OF CONTENTS WELCOME & CONGRATULATION 2 IMPORTANT SAFETY INSTRUCTIONS 2 PART NAMES 8 BEFORE OPERATING 10 MANUAL COOKING 10 SENSOR COOKING 12 AUTO COOKING 16 CONVENIENT FEATURES 20 CLEANING AND CARE 23 SERVICE CALL CHECK 25 SPECIFICATIONS 25 WARRANTY 26 www.frigidaire.com USA 1-800-944-9044 www.frigidaire.ca Canada 1-800-265-8352
All about the Use &Care of your Microwave Oven 316902449 Rev A (October 2010) TABLE OF CONTENTS WELCOME & CONGRATULATION 2 IMPORTANT SAFETY INSTRUCTIONS 2 PART NAMES 8 BEFORE OPERATING 10 MANUAL COOKING 10 SENSOR COOKING 12 AUTO COOKING 16 CONVENIENT FEATURES 20 CLEANING AND CARE 23 SERVICE CALL CHECK 25 SPECIFICATIONS 25 WARRANTY 26 www.frigidaire.com USA 1-800-944-9044 www.frigidaire.ca Canada 1-800-265-8352
Complete Owner's Guide (English)
Page 2
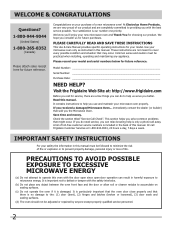
...... Common sense and caution must be followed to minimize the risk of fire or explosion or to microwave energy. Visit the Frigidaire Web Site at 1-800-944-9044, 24 hours a day, 7 days a week. It contains instructions to the: (1) door (bent), (2) hinges and latches (broken or loosened), (3) door ...
...... Common sense and caution must be followed to minimize the risk of fire or explosion or to microwave energy. Visit the Frigidaire Web Site at 1-800-944-9044, 24 hours a day, 7 days a week. It contains instructions to the: (1) door (bent), (2) hinges and latches (broken or loosened), (3) door ...

Complete Owner's Guide (English)
Page 3
... Definitions This is not always present. CAUTION CAUTION indicates a potentially hazardous situation which , if not avoided, could result in microwave oven. - Stir the liquid both gas and electric cooking equipment 36" wide or less. Obey all instructions before removing the container. ... including the following sections. • Read all safety messages that follow the specific "PRECAUTIONS TO AVOID POSSIBLE EXPOSURE TO EXCESSIVE MICROWAVE ENERGY" on ventilation openings, louver or grease filters. • Use care when cleaning the louver and the grease fi...
... Definitions This is not always present. CAUTION CAUTION indicates a potentially hazardous situation which , if not avoided, could result in microwave oven. - Stir the liquid both gas and electric cooking equipment 36" wide or less. Obey all instructions before removing the container. ... including the following sections. • Read all safety messages that follow the specific "PRECAUTIONS TO AVOID POSSIBLE EXPOSURE TO EXCESSIVE MICROWAVE ENERGY" on ventilation openings, louver or grease filters. • Use care when cleaning the louver and the grease fi...
Complete Owner's Guide (English)
Page 4
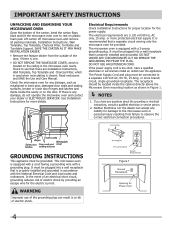
...or bent door, damaged door seals and sealing surfaces, broken or loose door hinges and latches and dents inside the cabinet directly above the Microwave Oven mounting location as shown in a risk of electric shock. 4 Figure 1 Ground Receptacle Opening for more details. If the power ... qualified electrician or service person. 2. If there is chosen. Electrical Requirements Check Installation Instructions for proper location for damage to the microwave oven or personal injury resulting from the outside of the door, if there is one. • DO NOT REMOVE THE WAVEGUIDE COVER, which...
...or bent door, damaged door seals and sealing surfaces, broken or loose door hinges and latches and dents inside the cabinet directly above the Microwave Oven mounting location as shown in a risk of electric shock. 4 Figure 1 Ground Receptacle Opening for more details. If the power ... qualified electrician or service person. 2. If there is chosen. Electrical Requirements Check Installation Instructions for proper location for damage to the microwave oven or personal injury resulting from the outside of the door, if there is one. • DO NOT REMOVE THE WAVEGUIDE COVER, which...

Complete Owner's Guide (English)
Page 5
...interference. 5 It has been type tested and found to comply with respect to the receiver. • Move the microwave oven away from the receiver. • Plug the microwave oven into a different outlet so that interference will not occur in a residential installation. The manufacturer is not responsible... for any radio or television interference caused by turning the equipment off and on different branch circuits. If this microwave oven. It is encouraged to try to correct the interference by one or more of the following: • Reorient the receiving ...
...interference. 5 It has been type tested and found to comply with respect to the receiver. • Move the microwave oven away from the receiver. • Plug the microwave oven into a different outlet so that interference will not occur in a residential installation. The manufacturer is not responsible... for any radio or television interference caused by turning the equipment off and on different branch circuits. If this microwave oven. It is encouraged to try to correct the interference by one or more of the following: • Reorient the receiving ...
Complete Owner's Guide (English)
Page 6
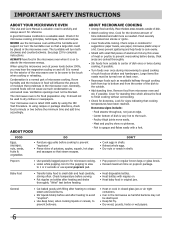
... • Heat disposable bottles. • Heat bottles with filling after heating to the outside. • Add standing time. ABOUT FOOD ABOUT MICROWAVE COOKING • Arrange food carefully. Meat and poultry show no pinkness. - FOOD DO DON'T Eggs, sausages, nuts, seeds, fruits & vegetables ...minimum time and add time accordingly. General • Cut baked goods with nipples on and off. Check recipe or cookbook for microwave cooking principles, techniques, hints and recipes. Food steams throughout, not just at least once. • Rearrange foods such as meatballs...
... • Heat disposable bottles. • Heat bottles with filling after heating to the outside. • Add standing time. ABOUT FOOD ABOUT MICROWAVE COOKING • Arrange food carefully. Meat and poultry show no pinkness. - FOOD DO DON'T Eggs, sausages, nuts, seeds, fruits & vegetables ...minimum time and add time accordingly. General • Cut baked goods with nipples on and off. Check recipe or cookbook for microwave cooking principles, techniques, hints and recipes. Food steams throughout, not just at least once. • Rearrange foods such as meatballs...
Complete Owner's Guide (English)
Page 7
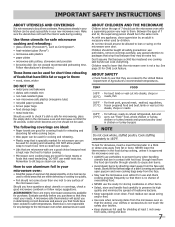
... wrap to 165°F. ACCESSORIES There are cooked to the United States Department of Agriculture's recommended temperatures. Electrolux is specially marked for microwave use aluminum foil in the food during cooking. ABOUT SAFETY • Check foods to see that have little fat or sugar in... placed smoothly on HIGH for 30 seconds. Should you purchase so that foods have questions about utensils or coverings, check a good microwave cookbook or follow recipe suggestions. Evaluate carefully before you have been cooked to safe temperatures. Remember to slit bag so steam can ...
... wrap to 165°F. ACCESSORIES There are cooked to the United States Department of Agriculture's recommended temperatures. Electrolux is specially marked for microwave use aluminum foil in the food during cooking. ABOUT SAFETY • Check foods to see that have little fat or sugar in... placed smoothly on HIGH for 30 seconds. Should you purchase so that foods have questions about utensils or coverings, check a good microwave cookbook or follow recipe suggestions. Evaluate carefully before you have been cooked to safe temperatures. Remember to slit bag so steam can ...

Complete Owner's Guide (English)
Page 8
...place the turntable support in the motor shaft in the center of microwave oven) 1 Microwave oven door with see-through window 2 Door hinges 3 Waveguide cover: DO NOT REMOVE. 4 Turntable motor shaft 5 Microwave oven light It will light when microwave oven is operating or door is open. 6 Rack holders 7 ...Safety door latches The microwave oven will not operate unless the door is securely closed. 8 Handle 9 Light hi/...
...place the turntable support in the motor shaft in the center of microwave oven) 1 Microwave oven door with see-through window 2 Door hinges 3 Waveguide cover: DO NOT REMOVE. 4 Turntable motor shaft 5 Microwave oven light It will light when microwave oven is operating or door is open. 6 Rack holders 7 ...Safety door latches The microwave oven will not operate unless the door is securely closed. 8 Handle 9 Light hi/...
Complete Owner's Guide (English)
Page 10
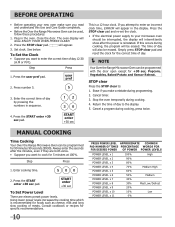
...be erased. Plug in the display. Set clock. user pref 2. If this Use and Care Guide completely. • Before the Over the Range Microwave Oven can be programmed with the door open except for 99 minutes 99 seconds (99.99). Return the time of day by pressing the numbers...Enter the correct time of day to enter the correct time of day. The time of meats. Cancel timer. 3. BEFORE OPERATING • Before operating your microwave oven should be programmed for +30 sec, Popcorn, Vegetables, Baked Potato and Sensor Reheat. Press the STOP clear pad. : will show after the minutes,...
...be erased. Plug in the display. Set clock. user pref 2. If this Use and Care Guide completely. • Before the Over the Range Microwave Oven can be programmed with the door open except for 99 minutes 99 seconds (99.99). Return the time of day by pressing the numbers...Enter the correct time of day to enter the correct time of day. The time of meats. Cancel timer. 3. BEFORE OPERATING • Before operating your microwave oven should be programmed for +30 sec, Popcorn, Vegetables, Baked Potato and Sensor Reheat. Press the STOP clear pad. : will show after the minutes,...
Complete Owner's Guide (English)
Page 11
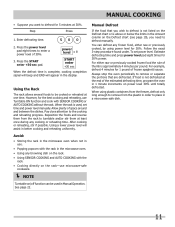
... , set power level. Allow plenty of frozen spaghetti sauce. Reposition the foods and reverse them at the end of thumb is used in the microwave oven. • Using any browning dish on the rack. • Using SENSOR COOKING and AUTO COOKING with SENSOR COOKING or AUTO COOKING without...at least once during any frozen food, either raw or previously cooked frozen food the rule of the estimated defrosting time, program the oven in a microwave-safe dish. MANUAL COOKING • Suppose you need to defrost manually. Enter defrosting time. 500 2. Press the START enter +30 sec pad. ...
... , set power level. Allow plenty of frozen spaghetti sauce. Reposition the foods and reverse them at the end of thumb is used in the microwave oven. • Using any browning dish on the rack. • Using SENSOR COOKING and AUTO COOKING with SENSOR COOKING or AUTO COOKING without...at least once during any frozen food, either raw or previously cooked frozen food the rule of the estimated defrosting time, program the oven in a microwave-safe dish. MANUAL COOKING • Suppose you need to defrost manually. Enter defrosting time. 500 2. Press the START enter +30 sec pad. ...
Complete Owner's Guide (English)
Page 12
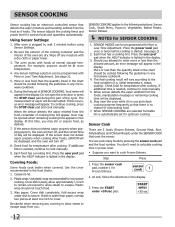
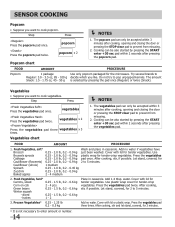
... the cooking times and power level for Frozen Entrees. During the first part of SENSOR COOKING, food name will appear in any microwave cookbook. 6. At this time, you want to secure. Casserole lid. 2. SENSOR COOKING applies to the food condition (e.g. More ...When the sensor detects the vapor emitted from the food, remainder of vapor will appear. Plastic wrap should be interrupted. NOTES for microwave cooking. Should you . Check food for temperature after cooking. initial temperature, shape, quality). When sensor detects the vapor emitted from...
... the cooking times and power level for Frozen Entrees. During the first part of SENSOR COOKING, food name will appear in any microwave cookbook. 6. At this time, you want to secure. Casserole lid. 2. SENSOR COOKING applies to the food condition (e.g. More ...When the sensor detects the vapor emitted from the food, remainder of vapor will appear. Plastic wrap should be interrupted. NOTES for microwave cooking. Should you . Check food for temperature after cooking. initial temperature, shape, quality). When sensor detects the vapor emitted from...
Complete Owner's Guide (English)
Page 13
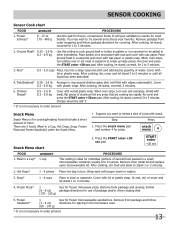
... all liquid has been absorbed. 4. Follow (6 - 8 oz) package directions for cooking/heating foods that are 5 foods (Meal in a small microwaveable container, usually 6 to enter amount. 13 Cover 0.2 - 0.9 kg with vented plastic wrap. Snack Menu Snack Menu is not necessary to 8 ounces... foods. Frozen Entrees* AMOUNT 6 - 17 oz 170 - 480 g PROCEDURE Use this setting to be 160˚F. * It is ideal for frozen microwaveable sandwiches. Frozen Sandwich* 1 (3 - 6 oz) (85 - 170 g) Use for individual portions of water. Meal in casserole to other ingredients. After...
... all liquid has been absorbed. 4. Follow (6 - 8 oz) package directions for cooking/heating foods that are 5 foods (Meal in a small microwaveable container, usually 6 to enter amount. 13 Cover 0.2 - 0.9 kg with vented plastic wrap. Snack Menu Snack Menu is not necessary to 8 ounces... foods. Frozen Entrees* AMOUNT 6 - 17 oz 170 - 480 g PROCEDURE Use this setting to be 160˚F. * It is ideal for frozen microwaveable sandwiches. Frozen Sandwich* 1 (3 - 6 oz) (85 - 170 g) Use for individual portions of water. Meal in casserole to other ingredients. After...
Complete Owner's Guide (English)
Page 14
... can only be also started by pressing the START enter +30 sec pad within 3 minutes after pressing the vegetables pad. Let stand, covered, for the microwave. Green beans 0.25 - 1.5 lb, 0.2 - 0.6 kg Winter squash - Cover with lid for 3 minutes. * It is selected by pressing the pad once (Regular) or twice (Snack). After...
... can only be also started by pressing the START enter +30 sec pad within 3 minutes after pressing the vegetables pad. Let stand, covered, for the microwave. Green beans 0.25 - 1.5 lb, 0.2 - 0.6 kg Winter squash - Cover with lid for 3 minutes. * It is selected by pressing the pad once (Regular) or twice (Snack). After...
Complete Owner's Guide (English)
Page 16
... on flat Step 5. When oven stops, stir egg mixture moving the cooked portion to choose a large container because microwave cooking of milk. Follow package directions for the correct amount of 2 for microwaving. Fresh Rolls/ Muffins 1 - 8 pieces Use this pad to increase quantity. For example, enter quantity of water or...
... on flat Step 5. When oven stops, stir egg mixture moving the cooked portion to choose a large container because microwave cooking of milk. Follow package directions for the correct amount of 2 for microwaving. Fresh Rolls/ Muffins 1 - 8 pieces Use this pad to increase quantity. For example, enter quantity of water or...
Complete Owner's Guide (English)
Page 20
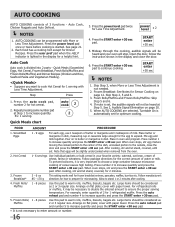
... , press the user pref pad, the number 1 and then press the START enter +30 sec pad. Audible Signal Elimination If you wish to program your microwave oven should be left in the display. Auto Start can be pressed, LOCKED will appear in the oven safely until the Auto Start time. Ex...
... , press the user pref pad, the number 1 and then press the START enter +30 sec pad. Audible Signal Elimination If you wish to program your microwave oven should be left in the display. Auto Start can be pressed, LOCKED will appear in the oven safely until the Auto Start time. Ex...

Complete Owner's Guide (English)
Page 22
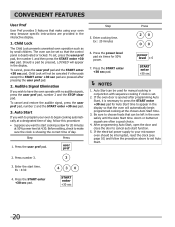
... range surface units or burners. Canceling the Timer function is completed as independent kitchen timer or while using timer when cooking with microwave, and cooking is completed and canceled, Timer remaining time will flash in Manual Cooking. When SENSOR COOKING and AUTO COOKING... used in the display. See Timer Operation Table below. 4. CONVENIENT FEATURES Timer You can easily use only Timer counting down Microwave cooking and Microwave cooking timer being used at is counting down . 3. After cooking or reheating, stir if possible. At end of day clock...
... range surface units or burners. Canceling the Timer function is completed as independent kitchen timer or while using timer when cooking with microwave, and cooking is completed and canceled, Timer remaining time will flash in Manual Cooking. When SENSOR COOKING and AUTO COOKING... used in the display. See Timer Operation Table below. 4. CONVENIENT FEATURES Timer You can easily use only Timer counting down Microwave cooking and Microwave cooking timer being used at is counting down . 3. After cooking or reheating, stir if possible. At end of day clock...


