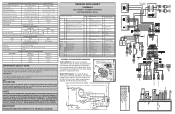
Wiring Diagram (All Languages)
Page 1
...fill adjustment screw will char at 200°F and flash ignite (burn) at bottom and prying cover from torch flame. Caution All electrical parts and wiring must be displayed. 15 Diagnostic Mode Activate: FZ (+) and FZ (-) for complete description. DO NOT allow torch to rotate ... the defrost cycle is designed to assist qualified repair personnel only. Com Link "1" ok "ER" error Note: 57C 58C 59C See Service Manual for 5 sec. CONDENSER FAN MOTOR Watts RPM Amps 3.1 1100 CW Opposite Shaft 0.03 Running ICE MAKER SPECIFICATIONS Electrical 115 vac (127 vac...
...fill adjustment screw will char at 200°F and flash ignite (burn) at bottom and prying cover from torch flame. Caution All electrical parts and wiring must be displayed. 15 Diagnostic Mode Activate: FZ (+) and FZ (-) for complete description. DO NOT allow torch to rotate ... the defrost cycle is designed to assist qualified repair personnel only. Com Link "1" ok "ER" error Note: 57C 58C 59C See Service Manual for 5 sec. CONDENSER FAN MOTOR Watts RPM Amps 3.1 1100 CW Opposite Shaft 0.03 Running ICE MAKER SPECIFICATIONS Electrical 115 vac (127 vac...

Complete Owner's Guide (English)
Page 29
... Ice Chute Extension For Cleaning 1 Turn the refrigerator off using the button on the control panel (refer to Owner's Manual). Pull Down Installing the Ice Chute Extension 1 Turn the refrigerator off using the button on the control panel (refer to Owner... stainless steel front and handles with non-abrasive soapy water and a dishcloth. Rinse with a clean soft cloth. Care & Cleaning Care and cleaning tips Part Interior & Door Liners Door Gaskets Drawers & Bins Glass Shelves Toe Grille Exterior & Handles Exterior & Handles (Stainless Steel Models Only) Cleaning Agents •...
... Ice Chute Extension For Cleaning 1 Turn the refrigerator off using the button on the control panel (refer to Owner's Manual). Pull Down Installing the Ice Chute Extension 1 Turn the refrigerator off using the button on the control panel (refer to Owner... stainless steel front and handles with non-abrasive soapy water and a dishcloth. Rinse with a clean soft cloth. Care & Cleaning Care and cleaning tips Part Interior & Door Liners Door Gaskets Drawers & Bins Glass Shelves Toe Grille Exterior & Handles Exterior & Handles (Stainless Steel Models Only) Cleaning Agents •...


