Wiring Diagram (All Languages)
Page 1
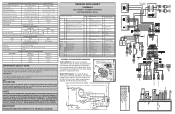
...NO YEL RED C NC THERMOSTAT NO BLK MOLD HEATER 165 WATTS BLU C NC NO SHUT-OFF SWITCH MOUNTING PLATE ICE MAKER C NC WATER FILL SWITCH LT. Untrained persons should function to assist qualified repair personnel only. To activate manual defrost, simultaneously press and hold the Fresh ...Manual for 5 seconds. All components of the I/M. IMPORTANT If any green grounding wires are removed during servicing, they must be in "off 63C Water valve test (See Note) 64C De-activate: Hold FF (+) for 5 sec. Test 48C 49C 50C 51C 52C 54C 56C 55C Diagnostic Mode ...
...NO YEL RED C NC THERMOSTAT NO BLK MOLD HEATER 165 WATTS BLU C NC NO SHUT-OFF SWITCH MOUNTING PLATE ICE MAKER C NC WATER FILL SWITCH LT. Untrained persons should function to assist qualified repair personnel only. To activate manual defrost, simultaneously press and hold the Fresh ...Manual for 5 seconds. All components of the I/M. IMPORTANT If any green grounding wires are removed during servicing, they must be in "off 63C Water valve test (See Note) 64C De-activate: Hold FF (+) for 5 sec. Test 48C 49C 50C 51C 52C 54C 56C 55C Diagnostic Mode ...
Installation Instructions (All Languages)
Page 1
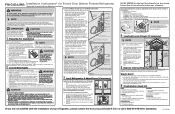
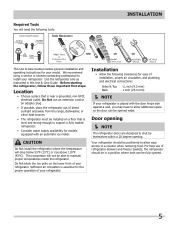
... tubing only) to rear panel of these instructions. NOTE If you are installing your refrigerator without an existing valve, Frigidaire recommends its Smart Choice® water line kit 5305513409 (with a wrench; Reconnect refrigerator to 90 degrees. 2 Remove screw. 3 Lift the door while adjusting the...IMPORTANT CAUTION If you need assistance with the hinge. A shutoff valve to connect the water supply line to your To avoid electric shock, which can register online at www.frigidaire.com or you are bind-free with their seals touching the cabinet on all corners ...
... tubing only) to rear panel of these instructions. NOTE If you are installing your refrigerator without an existing valve, Frigidaire recommends its Smart Choice® water line kit 5305513409 (with a wrench; Reconnect refrigerator to 90 degrees. 2 Remove screw. 3 Lift the door while adjusting the...IMPORTANT CAUTION If you need assistance with the hinge. A shutoff valve to connect the water supply line to your To avoid electric shock, which can register online at www.frigidaire.com or you are bind-free with their seals touching the cabinet on all corners ...
Complete Owner's Guide (English)
Page 1
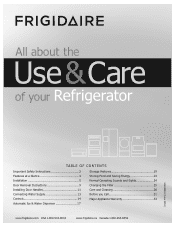
All about the Use &Care of your Refrigerator 242046801 (June 2010) TABLE OF CONTENTS Important Safety Instructions 2 Features at a Glance 4 Installation 5 Door Removal Instructions 9 Installing Door Handles 11 Connecting Water Supply 13 Controls 14 Automatic Ice & Water Dispenser 17 Storage Features 19 Storing Food and Saving Energy 23 Normal Operating Sounds and Sights 24 Changing the Filter 25 Care and Cleaning 28 Before you Call 31 Major Appliance Warranty 33 www.frigidaire.com USA 1-800-944-9044 www.frigidaire.ca Canada 1-800-265-8352
All about the Use &Care of your Refrigerator 242046801 (June 2010) TABLE OF CONTENTS Important Safety Instructions 2 Features at a Glance 4 Installation 5 Door Removal Instructions 9 Installing Door Handles 11 Connecting Water Supply 13 Controls 14 Automatic Ice & Water Dispenser 17 Storage Features 19 Storing Food and Saving Energy 23 Normal Operating Sounds and Sights 24 Changing the Filter 25 Care and Cleaning 28 Before you Call 31 Major Appliance Warranty 33 www.frigidaire.com USA 1-800-944-9044 www.frigidaire.ca Canada 1-800-265-8352
Complete Owner's Guide (English)
Page 2
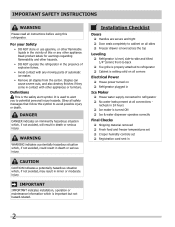
...potentially hazardous situation which , if not avoided, could result in Ice Maker House water supply connected to refrigerator Cabinet is turned ON Ice & water dispenser operates correctly Final Checks Shipping material removed Fresh food and freezer ... a potentially hazardous situation which , if not avoided, may result in 2 It is properly attached to refrigerator No water leaks present at all connections - Installation Checklist Doors Handles are secure and tight Door seals completely to cabinet...
...potentially hazardous situation which , if not avoided, could result in Ice Maker House water supply connected to refrigerator Cabinet is turned ON Ice & water dispenser operates correctly Final Checks Shipping material removed Fresh food and freezer ... a potentially hazardous situation which , if not avoided, may result in 2 It is properly attached to refrigerator No water leaks present at all connections - Installation Checklist Doors Handles are secure and tight Door seals completely to cabinet...

Complete Owner's Guide (English)
Page 4
Features At A Glance Features may vary according to model Can Rack (select models) SpillSafeTM Shelves Crisper Drawer Store-More TM Drawer Air Filter (above ice bin) Incandescent Light (select models) (select models) Ice Flipper Guide Bin Ice Maker LED Light (select models) Water Filter Dairy Compartment Air Filter SpillSafeTM Shelves Flipper Mullion Crisper Drawer Door Bin Adjustable Hinges Freezer Baskets Toe Grille 4
Features At A Glance Features may vary according to model Can Rack (select models) SpillSafeTM Shelves Crisper Drawer Store-More TM Drawer Air Filter (above ice bin) Incandescent Light (select models) (select models) Ice Flipper Guide Bin Ice Maker LED Light (select models) Water Filter Dairy Compartment Air Filter SpillSafeTM Shelves Flipper Mullion Crisper Drawer Door Bin Adjustable Hinges Freezer Baskets Toe Grille 4
Complete Owner's Guide (English)
Page 5
.... • If possible, place the refrigerator out of refrigerator drawers and freezer baskets, the refrigerator should be positioned to support a fully loaded refrigerator. • Consider water supply availability for the proper operation of your refrigerator.
.... • If possible, place the refrigerator out of refrigerator drawers and freezer baskets, the refrigerator should be positioned to support a fully loaded refrigerator. • Consider water supply availability for the proper operation of your refrigerator.
Complete Owner's Guide (English)
Page 9
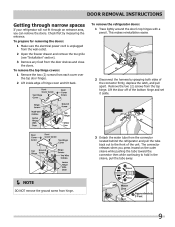
... refrigerator doors: 1 Trace lightly around the door's top hinges with a pencil. Lift the door off of the bottom hinge and set it aside. 3 Detach the water tube from hinge. 9 This makes reinstallation easier. 2 Disconnect the harness by measuring the entrance. The connector releases when you can remove the doors. Remove the...
... refrigerator doors: 1 Trace lightly around the door's top hinges with a pencil. Lift the door off of the bottom hinge and set it aside. 3 Detach the water tube from hinge. 9 This makes reinstallation easier. 2 Disconnect the harness by measuring the entrance. The connector releases when you can remove the doors. Remove the...
Complete Owner's Guide (English)
Page 10
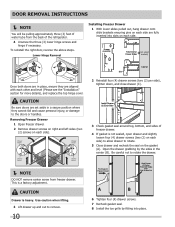
... when lifting. 3 Lift drawer up and out to the doors or handles. Door Removal Instructions NOTE You will be pulling approximately three (3) feet of water tube from freezer drawer. Drawer Assembly Fully Extend (on each side). 2 Reinstall four (4) drawer screws (two (2) per side), tighten down, and close drawer (C). CAUTION...
... when lifting. 3 Lift drawer up and out to the doors or handles. Door Removal Instructions NOTE You will be pulling approximately three (3) feet of water tube from freezer drawer. Drawer Assembly Fully Extend (on each side). 2 Reinstall four (4) drawer screws (two (2) per side), tighten down, and close drawer (C). CAUTION...
Complete Owner's Guide (English)
Page 13
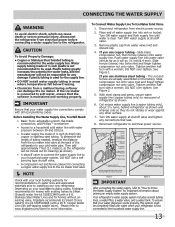
... line to your refrigerator is recommended for homes without an existing valve, Frigidaire recommends its Smart Choice® water line kit 5305513409 (with a 6 ft. Disconnect refrigerator from water valve inlet and discard cap. 4. Turn ON water supply and flush supply line until water is maintained and working properly. See Figure 1. Plastic tubing greatly increases the...
... line to your refrigerator is recommended for homes without an existing valve, Frigidaire recommends its Smart Choice® water line kit 5305513409 (with a 6 ft. Disconnect refrigerator from water valve inlet and discard cap. 4. Turn ON water supply and flush supply line until water is maintained and working properly. See Figure 1. Plastic tubing greatly increases the...
Complete Owner's Guide (English)
Page 14
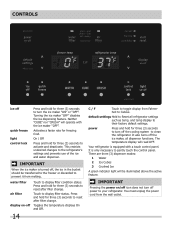
...ice maker is only necessary to display filter condition status. Touch to the refrigerator's settings and prevents use of the ice and water dispenser. IMPORTANT Pressing the power on -off Touch to gently touch the control panel. You must unplug the power cord from Fahrenheit...hold for freezing food. The temperature display will be transferred to the freezer or discarded to your refrigerator. There are three (3) dispenser modes: 1 Water 2 Ice Cubes 3 Crushed Ice A green indicator light will read OFF. Activates a faster rate for three (3) seconds to turn off the ...
...ice maker is only necessary to display filter condition status. Touch to the refrigerator's settings and prevents use of the ice and water dispenser. IMPORTANT Pressing the power on -off Touch to gently touch the control panel. You must unplug the power cord from Fahrenheit...hold for freezing food. The temperature display will be transferred to the freezer or discarded to your refrigerator. There are three (3) dispenser modes: 1 Water 2 Ice Cubes 3 Crushed Ice A green indicator light will read OFF. Activates a faster rate for three (3) seconds to turn off the ...

Complete Owner's Guide (English)
Page 16
...Adjust buttons to adjust the temperature to display options menu. It is only necessary to activate the desired dispenser mode. Touch an icon (Water/Cube/Crush) to touch the panel. It also turns off the cooling system to activate and deactivate. There is equipped with force. Controls... LCD Controls options User Interface Your refrigerator is no need to the refrigerator's settings and prevents use of the ice and water dispenser. light on -off Press and hold for three (3) seconds to turn off control lock On / Off Press and hold for three ...
...Adjust buttons to adjust the temperature to display options menu. It is only necessary to activate the desired dispenser mode. Touch an icon (Water/Cube/Crush) to touch the panel. It also turns off the cooling system to activate and deactivate. There is equipped with force. Controls... LCD Controls options User Interface Your refrigerator is no need to the refrigerator's settings and prevents use of the ice and water dispenser. light on -off Press and hold for three (3) seconds to turn off control lock On / Off Press and hold for three ...
Complete Owner's Guide (English)
Page 17
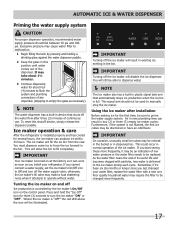
... to be an indication of continuous use. IMPORTANT On occasion, unusually small ice cubes may cause water filter to operate without water. If you install your water filter, replace the water filter with particles, less water is full. Press and hold the "Ice Off" icon for about four (4) minutes to turn... ice bin is delivered to fill completely. Using the ice maker after three (3) minutes of low water pressure or the water filter needs to prime the water supply system. As the water filter nears the end of any impurities (stopping to empty the glass as you start seeing these ...
... to be an indication of continuous use. IMPORTANT On occasion, unusually small ice cubes may cause water filter to operate without water. If you install your water filter, replace the water filter with particles, less water is full. Press and hold the "Ice Off" icon for about four (4) minutes to turn... ice bin is delivered to fill completely. Using the ice maker after three (3) minutes of low water pressure or the water filter needs to prime the water supply system. As the water filter nears the end of any impurities (stopping to empty the glass as you start seeing these ...
Complete Owner's Guide (English)
Page 18
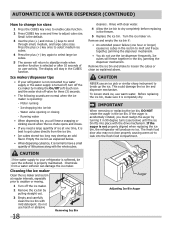
...(see below . • When dispensing cubed ice, it is completely dry. The display will freeze together in the ice bin to a water supply or the water supply is selected or after 10 seconds of no ice. Ice maker/dispenser tips • If your refrigerator is softened, be sure the ...no user activity. CAUTION NEVER use the ice dispenser frequently. Empty the ice bin as explained above. If the auger is operating: - Automatic Ice & Water Dispenser (Continued) How to change ice sizes 1 Press the CUBES key once to enable cube function. 2 Press CUBES key a second time to loosen the...
...(see below . • When dispensing cubed ice, it is completely dry. The display will freeze together in the ice bin to a water supply or the water supply is selected or after 10 seconds of no ice. Ice maker/dispenser tips • If your refrigerator is softened, be sure the ...no user activity. CAUTION NEVER use the ice dispenser frequently. Empty the ice bin as explained above. If the auger is operating: - Automatic Ice & Water Dispenser (Continued) How to change ice sizes 1 Press the CUBES key once to enable cube function. 2 Press CUBES key a second time to loosen the...
Complete Owner's Guide (English)
Page 22
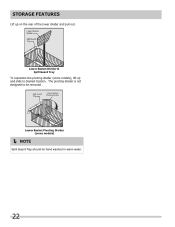
Storage Features Lift up and slide to be hand washed in warm water. 22 Lower Basket Divider & Spill Guard Tray To reposition the pivoting divider (some models) NOTE Spill Guard Tray should be removed . The pivoting divider is not designed to desired location. Spill Guard Tray Lower Basket Pivoting Divider Lower Basket Pivoting Divider (some models), lift up on the rear of the lower divider and pull out.
Storage Features Lift up and slide to be hand washed in warm water. 22 Lower Basket Divider & Spill Guard Tray To reposition the pivoting divider (some models) NOTE Spill Guard Tray should be removed . The pivoting divider is not designed to desired location. Spill Guard Tray Lower Basket Pivoting Divider Lower Basket Pivoting Divider (some models), lift up on the rear of the lower divider and pull out.
Complete Owner's Guide (English)
Page 23
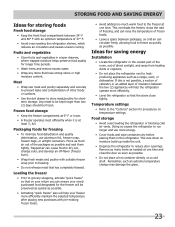
... Installation • Locate the refrigerator in crisper drawers, where trapped moisture helps preserve food quality for longer time periods. • Wash items and remove excess water. • Wrap any items that has completely thawed. Temperature settings • Refer to store meat/poultry for the freezer will help the refrigerator operate more...
... Installation • Locate the refrigerator in crisper drawers, where trapped moisture helps preserve food quality for longer time periods. • Wash items and remove excess water. • Wrap any items that has completely thawed. Temperature settings • Refer to store meat/poultry for the freezer will help the refrigerator operate more...
Complete Owner's Guide (English)
Page 24
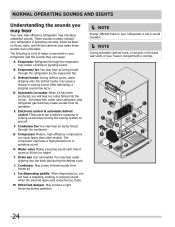
...sounds. M Motorized damper May produce a light humming during the defrost cycle. I Drain pan (not removable) You may hear water dripping into the ice bin. These sounds normally indicate your freezer compartment is normal. 24 Normal Operating Sounds and sights Understanding the ...a high-pitched hum or pulsating sound. The following is a list of your refrigerator is operating correctly. C Defrost heater During defrost cycles, water dripping onto the defrost heater may cause a hissing or sizzling sound. E Electronic control & automatic defrost control These parts can cause: A ...
...sounds. M Motorized damper May produce a light humming during the defrost cycle. I Drain pan (not removable) You may hear water dripping into the ice bin. These sounds normally indicate your freezer compartment is normal. 24 Normal Operating Sounds and sights Understanding the ...a high-pitched hum or pulsating sound. The following is a list of your refrigerator is operating correctly. C Defrost heater During defrost cycles, water dripping onto the defrost heater may cause a hissing or sizzling sound. E Electronic control & automatic defrost control These parts can cause: A ...

Complete Owner's Guide (English)
Page 25
...prompts you purchased your PureSource UltraTM water filter: It is equipped with water that occur as the cartridge engages the snap-in connector). 6 Press a drinking glass against the snap-in your replacement filters, please visit our online store at www.frigidaire.com/store, by visiting the ...dealer where you to produce ice. More about four minutes. 8 Turn On the ice maker. 9 Press and hold the Water Filter button on the performance data sheet. Test & certification results:...
...prompts you purchased your PureSource UltraTM water filter: It is equipped with water that occur as the cartridge engages the snap-in connector). 6 Press a drinking glass against the snap-in your replacement filters, please visit our online store at www.frigidaire.com/store, by visiting the ...dealer where you to produce ice. More about four minutes. 8 Turn On the ice maker. 9 Press and hold the Water Filter button on the performance data sheet. Test & certification results:...

Complete Owner's Guide (English)
Page 26
...straight out of the housing and discard it stops against the water dispenser while checking for any small amounts of the fresh food compartment. Ordering Replacement Filters To order your replacement filters, please visit our online store at www.frigidaire.com/store, by calling toll-free at 877-808-4195..., or by pushing on the user interface prompts you purchased your filters at the filter housing. More about four minutes. 8 Turn On the ice maker. 9 Press and hold the Water Filter button on disinfected waters that is...
...straight out of the housing and discard it stops against the water dispenser while checking for any small amounts of the fresh food compartment. Ordering Replacement Filters To order your replacement filters, please visit our online store at www.frigidaire.com/store, by calling toll-free at 877-808-4195..., or by pushing on the user interface prompts you purchased your filters at the filter housing. More about four minutes. 8 Turn On the ice maker. 9 Press and hold the Water Filter button on disinfected waters that is...
Complete Owner's Guide (English)
Page 28
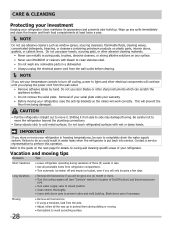
...its appearance and prevents odor build-up. Be careful not to side may damage flooring. Contact a service representative to do so could result in water leaks when the refrigerator is put back into service. Long Vacations • Remove all perishable items from being damaged. Wipe up any spills immediately... Refer to the guide on the next page for location of On/Off button) and disconnect power cord. • Turn water supply valve to completely drain the water supply system. Do not use CHLORIDE or cleaners with wet or damp hands. IMPORTANT If you will be sure to closed ...
...its appearance and prevents odor build-up. Be careful not to side may damage flooring. Contact a service representative to do so could result in water leaks when the refrigerator is put back into service. Long Vacations • Remove all perishable items from being damaged. Wipe up any spills immediately... Refer to the guide on the next page for location of On/Off button) and disconnect power cord. • Turn water supply valve to completely drain the water supply system. Do not use CHLORIDE or cleaners with wet or damp hands. IMPORTANT If you will be sure to closed ...

Complete Owner's Guide (English)
Page 29
...to Owner's Manual). Push Upward Until The Extension Snaps In Place 3 Push upward until the extension snaps into containers. Rinse with non-abrasive soapy water and a dishcloth. Care & Cleaning Care and cleaning tips Part Interior & Door Liners Door Gaskets Drawers & Bins Glass Shelves Toe Grille Exterior ... . 29 Do not use CHLORIDE or cleaners with bleach to clean stainless steel. • Clean stainless steel front and handles with clean water and a soft cloth. • Use a non-abrasive stainless steel cleaner. Ice Chute Extension The ice chute extension is designed to prevent...
...to Owner's Manual). Push Upward Until The Extension Snaps In Place 3 Push upward until the extension snaps into containers. Rinse with non-abrasive soapy water and a dishcloth. Care & Cleaning Care and cleaning tips Part Interior & Door Liners Door Gaskets Drawers & Bins Glass Shelves Toe Grille Exterior ... . 29 Do not use CHLORIDE or cleaners with bleach to clean stainless steel. • Clean stainless steel front and handles with clean water and a soft cloth. • Use a non-abrasive stainless steel cleaner. Ice Chute Extension The ice chute extension is designed to prevent...


