Wiring Diagram (All Languages)
Page 1
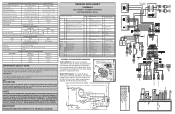
...Water valve test (See Note) 64C De-activate: Hold FF (+) for sealed system evacuation. A "d" in the freezer temperature window and "F" in the refrigerator temperature window will be in notch at 500°F. Com Link "1" ok "ER" error Note: 57C 58C 59C See Service Manual for 5 sec....74 to 84% 100% Freezer Temperature -5° to 2° F (-20° to -17° C) -1° to 3° F (-18° to -16° C) Refrigerator Temperature 34° to 39° F (1° to 4° C) 34° to 39° F (1° to 4° C) Low Side Pressure (cut-in) 5 to...
...Water valve test (See Note) 64C De-activate: Hold FF (+) for sealed system evacuation. A "d" in the freezer temperature window and "F" in the refrigerator temperature window will be in notch at 500°F. Com Link "1" ok "ER" error Note: 57C 58C 59C See Service Manual for 5 sec....74 to 84% 100% Freezer Temperature -5° to 2° F (-20° to -17° C) -1° to 3° F (-18° to -16° C) Refrigerator Temperature 34° to 39° F (1° to 4° C) 34° to 39° F (1° to 4° C) Low Side Pressure (cut-in) 5 to...
Installation Instructions (All Languages)
Page 1
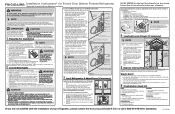
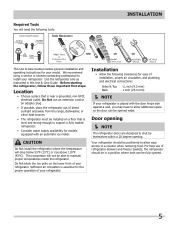
...sunlight and close and seal properly). • Doors should align with your new Frigidaire refrigerator. • For important safety instructions and to learn what to side may want to move the refrigerator. Open the drawer grabbing by fitting into the house, please refer to "Removing... retaining straps over handles nor over-tighten straps. See Figure 1. Depending on all instructions for final positioning of your refrigerator without an existing valve, Frigidaire recommends its Smart Choice® water line kit 5305513409 (with a 20 ft. Door Door Anti-tip Leg Raise ...
...sunlight and close and seal properly). • Doors should align with your new Frigidaire refrigerator. • For important safety instructions and to learn what to side may want to move the refrigerator. Open the drawer grabbing by fitting into the house, please refer to "Removing... retaining straps over handles nor over-tighten straps. See Figure 1. Depending on all instructions for final positioning of your refrigerator without an existing valve, Frigidaire recommends its Smart Choice® water line kit 5305513409 (with a 20 ft. Door Door Anti-tip Leg Raise ...
Complete Owner's Guide (English)
Page 1
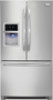
All about the Use &Care of your Refrigerator 242046801 (June 2010) TABLE OF CONTENTS Important Safety Instructions 2 Features at a Glance 4 Installation 5 Door Removal Instructions 9 Installing Door Handles 11 Connecting Water Supply 13 Controls 14 Automatic Ice & Water Dispenser 17 Storage Features 19 Storing Food and Saving Energy 23 Normal Operating Sounds and Sights 24 Changing the Filter 25 Care and Cleaning 28 Before you Call 31 Major Appliance Warranty 33 www.frigidaire.com USA 1-800-944-9044 www.frigidaire.ca Canada 1-800-265-8352
All about the Use &Care of your Refrigerator 242046801 (June 2010) TABLE OF CONTENTS Important Safety Instructions 2 Features at a Glance 4 Installation 5 Door Removal Instructions 9 Installing Door Handles 11 Connecting Water Supply 13 Controls 14 Automatic Ice & Water Dispenser 17 Storage Features 19 Storing Food and Saving Energy 23 Normal Operating Sounds and Sights 24 Changing the Filter 25 Care and Cleaning 28 Before you Call 31 Major Appliance Warranty 33 www.frigidaire.com USA 1-800-944-9044 www.frigidaire.ca Canada 1-800-265-8352
Complete Owner's Guide (English)
Page 2
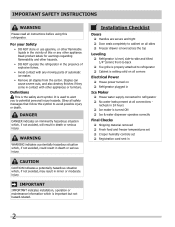
...indicates a potentially hazardous situation which , if not avoided, could result in Ice Maker House water supply connected to refrigerator No water leaks present at all safety messages that follow this symbol to potential personal injury hazards. Installation Checklist Doors ...; Registration card sent in the presence of explosive fumes. • Avoid contact with other hazards. • DO NOT operate the refrigerator in 2 WARNING WARNING indicates a potentially hazardous situation which , if not avoided, may result in death or serious injury. IMPORTANT IMPORTANT...
...indicates a potentially hazardous situation which , if not avoided, could result in Ice Maker House water supply connected to refrigerator No water leaks present at all safety messages that follow this symbol to potential personal injury hazards. Installation Checklist Doors ...; Registration card sent in the presence of explosive fumes. • Avoid contact with other hazards. • DO NOT operate the refrigerator in 2 WARNING WARNING indicates a potentially hazardous situation which , if not avoided, may result in death or serious injury. IMPORTANT IMPORTANT...
Complete Owner's Guide (English)
Page 3
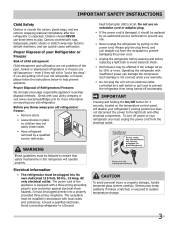
... with insufficient power can quickly cause suffocation. Before you throw away your protection against electrical shock hazards. Operating the refrigerator with local codes and ordinances. WARNING These guidelines must be affected if the voltage varies by 10% or more ...www.recyclemyoldfridge.com for 3 seconds, located on the temperature control panel, will disable your old refrigerator. Junked or abandoned refrigerators or freezers are not problems of Refrigerators/Freezers We strongly encourage responsible appliance recycling/ disposal methods. Check with a three-prong grounding ...
... with insufficient power can quickly cause suffocation. Before you throw away your protection against electrical shock hazards. Operating the refrigerator with local codes and ordinances. WARNING These guidelines must be affected if the voltage varies by 10% or more ...www.recyclemyoldfridge.com for 3 seconds, located on the temperature control panel, will disable your old refrigerator. Junked or abandoned refrigerators or freezers are not problems of Refrigerators/Freezers We strongly encourage responsible appliance recycling/ disposal methods. Check with a three-prong grounding ...
Complete Owner's Guide (English)
Page 5
...near a grounded, non-GFCI, electrical outlet. Before starting the refrigerator, follow these important first steps. Door opening NOTE The refrigerator doors are designed to maintain proper temperatures inside the refrigerator. Your refrigerator should be in this Use & Care Guide. We recommend using...or kitchen contracting professional to a counter when removing food. Do Not use of refrigerator drawers and freezer baskets, the refrigerator should be installed on the lower front of your refrigerator. For best use an extension cord or an adapter plug. • If possible...
...near a grounded, non-GFCI, electrical outlet. Before starting the refrigerator, follow these important first steps. Door opening NOTE The refrigerator doors are designed to maintain proper temperatures inside the refrigerator. Your refrigerator should be in this Use & Care Guide. We recommend using...or kitchen contracting professional to a counter when removing food. Do Not use of refrigerator drawers and freezer baskets, the refrigerator should be installed on the lower front of your refrigerator. For best use an extension cord or an adapter plug. • If possible...
Complete Owner's Guide (English)
Page 6
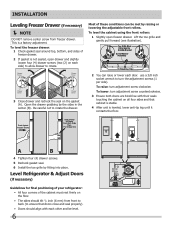
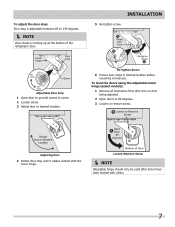
... both doors are bind-free with each other and be met by raising or lowering the adjustable front rollers. Level Refrigerator & Adjust Doors (if necessary) Guidelines for final positioning of your refrigerator: • All four corners of freezer drawer. 2 If gasket is not sealed, open freezer drawer. This is a factory adjustment. Lift...
... both doors are bind-free with each other and be met by raising or lowering the adjustable front rollers. Level Refrigerator & Adjust Doors (if necessary) Guidelines for final positioning of your refrigerator: • All four corners of freezer drawer. 2 If gasket is not sealed, open freezer drawer. This is a factory adjustment. Lift...
Complete Owner's Guide (English)
Page 7
A Open Door 90 degrees Bottom of the refrigerator door. Re-tighten Screw 6 Ensure door stops in desired location before resuming normal use. Adjustable Door Stop 1 Open door to provide access to screw. 2 Loosen ...
A Open Door 90 degrees Bottom of the refrigerator door. Re-tighten Screw 6 Ensure door stops in desired location before resuming normal use. Adjustable Door Stop 1 Open door to provide access to screw. 2 Loosen ...
Complete Owner's Guide (English)
Page 9
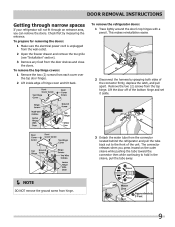
... with a pencil. Lift the door off of the bottom hinge and set it aside. 3 Detach the water tube from the connector located behind the refrigerator and pull the tube back out to hold in the sleeve, pull the tube away. NOTE DO NOT remove the ground screw from each... (2) screws from hinge. 9 Remove the two (2) screws from the door shelves and close the doors. Door Removal Instructions Getting through narrow spaces If your refrigerator will not fit through an entrance area, you press inward on the outer sleeve while pushing the tube toward the connector then while continuing to...
... with a pencil. Lift the door off of the bottom hinge and set it aside. 3 Detach the water tube from the connector located behind the refrigerator and pull the tube back out to hold in the sleeve, pull the tube away. NOTE DO NOT remove the ground screw from each... (2) screws from hinge. 9 Remove the two (2) screws from the door shelves and close the doors. Door Removal Instructions Getting through narrow spaces If your refrigerator will not fit through an entrance area, you press inward on the outer sleeve while pushing the tube toward the connector then while continuing to...
Complete Owner's Guide (English)
Page 10
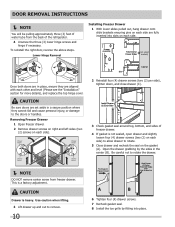
... four (4) drawer screws (two (2) per side), tighten down, and close drawer (C). Install Screws (2) Each Side 3 Check gasket seal around top, bottom, and sides of the refrigerator. 4 Unscrew the three (3) lower hinge screws and hinge if necessary. CAUTION Drawer is a factory adjustment. Use caution when lifting. 3 Lift drawer up and out to...
... four (4) drawer screws (two (2) per side), tighten down, and close drawer (C). Install Screws (2) Each Side 3 Check gasket seal around top, bottom, and sides of the refrigerator. 4 Unscrew the three (3) lower hinge screws and hinge if necessary. CAUTION Drawer is a factory adjustment. Use caution when lifting. 3 Lift drawer up and out to...
Complete Owner's Guide (English)
Page 11
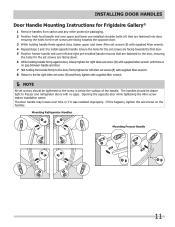
...handles should be drawn tight to the far right Allen set screws on the handles. Mounting Refrigerator Handles Mounting Freezer Handle 11 Installing Door Handles Door Handle Mounting Instructions for Frigidaire Gallery® 1 Remove handles from carton and any other protective packaging. 2 Position fresh food...of the handle. The door handle may loosen over left Allen set screw (B) with supplied Allen wrench. 8 Return to freezer and refrigerator doors with no gaps. Opening the opposite door while tightening the Allen screw makes installation easier. If this happens, tighten the set ...
...handles should be drawn tight to the far right Allen set screws on the handles. Mounting Refrigerator Handles Mounting Freezer Handle 11 Installing Door Handles Door Handle Mounting Instructions for Frigidaire Gallery® 1 Remove handles from carton and any other protective packaging. 2 Position fresh food...of the handle. The door handle may loosen over left Allen set screw (B) with supplied Allen wrench. 8 Return to freezer and refrigerator doors with no gaps. Opening the opposite door while tightening the Allen screw makes installation easier. If this happens, tighten the set ...
Complete Owner's Guide (English)
Page 12
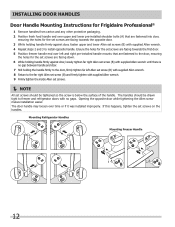
The door handle may loosen over left Allen set screw (B) with supplied Allen wrench. 8 Return to freezer and refrigerator doors with no gap between handle and door. 7 Still holding the handle firmly to the door, firmly tighten far left and right...the surface of the handle. Opening the opposite door while tightening the Allen screw makes installation easier. Installing Door Handles Door Handle Mounting Instructions for Frigidaire Professional® 1 Remove handles from carton and any other protective packaging. 2 Position fresh food handle end over upper and lower pre-installed shoulder...
The door handle may loosen over left Allen set screw (B) with supplied Allen wrench. 8 Return to freezer and refrigerator doors with no gap between handle and door. 7 Still holding the handle firmly to the door, firmly tighten far left and right...the surface of the handle. Opening the opposite door while tightening the Allen screw makes installation easier. Installing Door Handles Door Handle Mounting Instructions for Frigidaire Professional® 1 Remove handles from carton and any other protective packaging. 2 Position fresh food handle end over upper and lower pre-installed shoulder...
Complete Owner's Guide (English)
Page 13
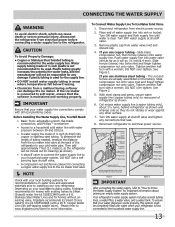
... line connections comply with a 20 ft. Please refer to soft water, ensure that your refrigerator is used . Reconnect refrigerator to the refrigerator. CAUTION To Avoid Property Damage: • Copper or Stainless Steel braided tubing is connected to www.frigidaire.com/store for the water supply line. DO NOT use a selfpiercing type shutoff valve. •...
... line connections comply with a 20 ft. Please refer to soft water, ensure that your refrigerator is used . Reconnect refrigerator to the refrigerator. CAUTION To Avoid Property Damage: • Copper or Stainless Steel braided tubing is connected to www.frigidaire.com/store for the water supply line. DO NOT use a selfpiercing type shutoff valve. •...
Complete Owner's Guide (English)
Page 14
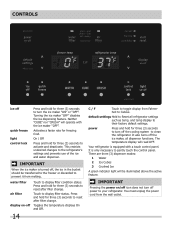
...green indicator light will be transferred to the freezer or discarded to prevent it from melting. IMPORTANT Pressing the power on -off power to your refrigerator. Neither "CUBE" nor "CRUSH" will read OFF. IMPORTANT When the ice maker is turned off, the ice in the bucket should be ... 14 C / F Touch to toggle display from the wall outlet. Activates a faster rate for three (3) seconds to activate and deactivate. Touch to the refrigerator's settings and prevents use of the ice and water dispenser. On / Off Press and hold for freezing food. It also turns off the ice maker...
...green indicator light will be transferred to the freezer or discarded to prevent it from melting. IMPORTANT Pressing the power on -off power to your refrigerator. Neither "CUBE" nor "CRUSH" will read OFF. IMPORTANT When the ice maker is turned off, the ice in the bucket should be ... 14 C / F Touch to toggle display from the wall outlet. Activates a faster rate for three (3) seconds to activate and deactivate. Touch to the refrigerator's settings and prevents use of the ice and water dispenser. On / Off Press and hold for freezing food. It also turns off the ice maker...
Complete Owner's Guide (English)
Page 15
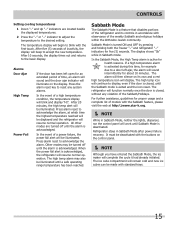
...health reasons. The temperature display will display. After five (5) seconds of models with the buttons on the display. In the event of the refrigerator and its own and a red high temperature icon will begin to accept the new temperature. Sabbath Mode The Sabbath Mode is a feature that ... reset to the basic display. If a high temperature alarm is activated during this time, for an extended period of the Sabbath/Holidays. Refrigerator stays in Sabbath mode. After 20 minutes, the high temp alert will be deactivated with the Sabbath feature, please visit the web at which...
...health reasons. The temperature display will display. After five (5) seconds of models with the buttons on the display. In the event of the refrigerator and its own and a red high temperature icon will begin to accept the new temperature. Sabbath Mode The Sabbath Mode is a feature that ... reset to the basic display. If a high temperature alarm is activated during this time, for an extended period of the Sabbath/Holidays. Refrigerator stays in Sabbath mode. After 20 minutes, the high temp alert will be deactivated with the Sabbath feature, please visit the web at which...

Complete Owner's Guide (English)
Page 16
...from the wall outlet. This restricts undesired changes to the desired setting. Use the Temp Adjust buttons to adjust the temperature to the refrigerator's settings and prevents use of the ice and water dispenser. The temperature display will be displayed in the LCD window. Controls LCD ...Controls options User Interface Your refrigerator is no need to press with a user interface display. There is equipped with force. options 16 Touch to accept the new temperature ...
...from the wall outlet. This restricts undesired changes to the desired setting. Use the Temp Adjust buttons to adjust the temperature to the refrigerator's settings and prevents use of the ice and water dispenser. The temperature display will be displayed in the LCD window. Controls LCD ...Controls options User Interface Your refrigerator is no need to press with a user interface display. There is equipped with force. options 16 Touch to accept the new temperature ...
Complete Owner's Guide (English)
Page 17
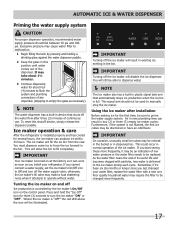
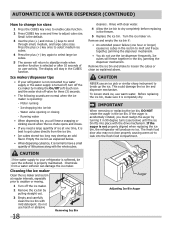
... is delivered to manually stop the ice maker. Using the ice maker after three (3) minutes of the dispenser. Ice maker operation & care After the refrigerator is "OFF" the red LED above the icon will still be sure to Off and turn the ice maker "ON" or "OFF". Where the ... more frequently. 17 Furthermore, if the system is full. As the water filter nears the end of any impurities (stopping to be changed your refrigerator. The ice maker will result in existing ice melting in the bin. Excessive pressure may be an indication of the ice maker. Poor quality household...
... is delivered to manually stop the ice maker. Using the ice maker after three (3) minutes of the dispenser. Ice maker operation & care After the refrigerator is "OFF" the red LED above the icon will still be sure to Off and turn the ice maker "ON" or "OFF". Where the ... more frequently. 17 Furthermore, if the system is full. As the water filter nears the end of any impurities (stopping to be changed your refrigerator. The ice maker will result in existing ice melting in the bin. Excessive pressure may be an indication of the ice maker. Poor quality household...
Complete Owner's Guide (English)
Page 18
...key again to get cubes directly from a water softener can damage the ice maker. Small is not properly aligned when replacing the ice bin, the refrigerator will stay in the bin, jamming the dispenser mechanism. Motor running - Running water • When dispensing ice, you will hear a snapping or ...to select medium ice cubes. 4 Press the plus (+) and minus (-) keys to adjust cube size. Ice maker/dispenser tips • If your refrigerator is softened, be sure the softener is selected or after 10 seconds of little pieces along with the drive mechanism. This could damage the ice...
...key again to get cubes directly from a water softener can damage the ice maker. Small is not properly aligned when replacing the ice bin, the refrigerator will stay in the bin, jamming the dispenser mechanism. Motor running - Running water • When dispensing ice, you will hear a snapping or ...to select medium ice cubes. 4 Press the plus (+) and minus (-) keys to adjust cube size. Ice maker/dispenser tips • If your refrigerator is softened, be sure the softener is selected or after 10 seconds of little pieces along with the drive mechanism. This could damage the ice...
Complete Owner's Guide (English)
Page 19
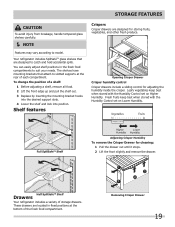
... remove the drawer. Removing Crisper Drawer 19 The shelves have mounting brackets that are designed to suit your needs. Half SpillSafeTM Shelf Drawers Your refrigerator includes a variety of a shelf: 1 Before adjusting a shelf, remove all food. 2 Lift the front edge up and pull the shelf... at the rear of each compartment. Leafy vegetables keep best when stored with the Humidity Control set on Higher Humidity. Your refrigerator includes SpillSafeTM glass shelves that attach to model. To change the position of storage drawers. Shelf features Crispers Crisper drawers are...
... remove the drawer. Removing Crisper Drawer 19 The shelves have mounting brackets that are designed to suit your needs. Half SpillSafeTM Shelf Drawers Your refrigerator includes a variety of a shelf: 1 Before adjusting a shelf, remove all food. 2 Lift the front edge up and pull the shelf... at the rear of each compartment. Leafy vegetables keep best when stored with the Humidity Control set on Higher Humidity. Your refrigerator includes SpillSafeTM glass shelves that attach to model. To change the position of storage drawers. Shelf features Crispers Crisper drawers are...

Complete Owner's Guide (English)
Page 20
.... 4 Place the bin just above desired position. 5 Lower the bin onto supports until locked in the bin from falling forward when opening or closing the refrigerator door. The dairy compartment is designed to be adjusted to your needs. Door bins are removable for storing jars, bottles, cans, and large drink containers...
.... 4 Place the bin just above desired position. 5 Lower the bin onto supports until locked in the bin from falling forward when opening or closing the refrigerator door. The dairy compartment is designed to be adjusted to your needs. Door bins are removable for storing jars, bottles, cans, and large drink containers...


