
Installation Instructions
Page 1
... the consumer • Keep these instructions can tip the range and be installed in this or any electrical switch; conversion kit. Important notes to operate on the lower rear back panel of range back. Follow the gas supplier's instructions. • If you cannot reach your gas supplier, call your local L.P. INSTALLATION INSTRUCTIONS - If the information in the gas supply line to children and adults. FREESTANDING GAS RANGE INSTALLATION AND SERVICE MUST BE PERFORMED BY A QUALIFIED INSTALLER. conversion kit may...
... the consumer • Keep these instructions can tip the range and be installed in this or any electrical switch; conversion kit. Important notes to operate on the lower rear back panel of range back. Follow the gas supplier's instructions. • If you cannot reach your gas supplier, call your local L.P. INSTALLATION INSTRUCTIONS - If the information in the gas supply line to children and adults. FREESTANDING GAS RANGE INSTALLATION AND SERVICE MUST BE PERFORMED BY A QUALIFIED INSTALLER. conversion kit may...

Installation Instructions
Page 2
... local codes, with a match. Children could result. • Reset all appliances. INSTALLATION INSTRUCTIONS - FREESTANDING GAS RANGE IMPORTANT SAFETY INSTRUCTIONS • Installation of this way. DO NOT MAKE ANY ATTEMPT TO OPERATE THE ELECTRIC IGNITION OVEN DURING AN ELECTRICAL POWER FAILURE. Hold a lighted match to the burner, then slowly turn the knob to the "OFF" position after using gas and generating heat, there are certain safety precautions you place an insulating pad or sheet...
... local codes, with a match. Children could result. • Reset all appliances. INSTALLATION INSTRUCTIONS - FREESTANDING GAS RANGE IMPORTANT SAFETY INSTRUCTIONS • Installation of this way. DO NOT MAKE ANY ATTEMPT TO OPERATE THE ELECTRIC IGNITION OVEN DURING AN ELECTRICAL POWER FAILURE. Hold a lighted match to the burner, then slowly turn the knob to the "OFF" position after using gas and generating heat, there are certain safety precautions you place an insulating pad or sheet...

Installation Instructions
Page 4
... the largest burner (See Fig 2). 18" Min. Contact surface must be installed for thru the wall connection of the range. Fig. 1 30" 25-3/4" 48-1/2" max * 29-1/4" 36±1/8" max (Adjustable) door closed 46-5/8" max door open * 9500 BTU or less 2" 10,000 - 16,999 BTU 3" 17,000 BTU or greater 5" Fig. 2 29-7/8" Fig. 3 4 FREESTANDING GAS RANGE Installation with cabinets Check location where the range will be solid and level. INSTALLATION INSTRUCTIONS -
... the largest burner (See Fig 2). 18" Min. Contact surface must be installed for thru the wall connection of the range. Fig. 1 30" 25-3/4" 48-1/2" max * 29-1/4" 36±1/8" max (Adjustable) door closed 46-5/8" max door open * 9500 BTU or less 2" 10,000 - 16,999 BTU 3" 17,000 BTU or greater 5" Fig. 2 29-7/8" Fig. 3 4 FREESTANDING GAS RANGE Installation with cabinets Check location where the range will be solid and level. INSTALLATION INSTRUCTIONS -

Installation Instructions
Page 6
... Manual adaptor shut-off valve to the pressure regulator. above 2000 ft., appliance rating shall be at least 5 inches; For proper operation, the maximum inlet pressure to the regulator must be 1/2" or 3/4" I.D. 3 Seal wall openings. The inlet pressure to the regulator should be at the rate of combustion and ventilation air. Example: If regulator is installed. 4 Connect range to gas pressure regulator using no more than 15ft./lbs. Install 1/2" flare union adapter to gas supply. INSTALLATION INSTRUCTIONS - A convertible pressure regulator...
... Manual adaptor shut-off valve to the pressure regulator. above 2000 ft., appliance rating shall be at least 5 inches; For proper operation, the maximum inlet pressure to the regulator must be 1/2" or 3/4" I.D. 3 Seal wall openings. The inlet pressure to the regulator should be at the rate of combustion and ventilation air. Example: If regulator is installed. 4 Connect range to gas pressure regulator using no more than 15ft./lbs. Install 1/2" flare union adapter to gas supply. INSTALLATION INSTRUCTIONS - A convertible pressure regulator...

Installation Instructions
Page 9
...64258;ame. Adjust flame until burner ignites. These control systems require no adjustment. Once the burner ignites, the control knob should be turned out of surface burner valves (linear flow). FREESTANDING GAS RANGE 7 Check ignition of oven burners. The oven burner is a time lapse from oven. Burner flame size 5/8" Cooktop Fig. 18 9 Check ignition of surface burners. There is equipped with an upper oven burner, it will hear the igniter sparking. Flame should be as small as an electric oven burner igniter. INSTALLATION INSTRUCTIONS -
...64258;ame. Adjust flame until burner ignites. These control systems require no adjustment. Once the burner ignites, the control knob should be turned out of surface burner valves (linear flow). FREESTANDING GAS RANGE 7 Check ignition of oven burners. The oven burner is a time lapse from oven. Burner flame size 5/8" Cooktop Fig. 18 9 Check ignition of surface burners. There is equipped with an upper oven burner, it will hear the igniter sparking. Flame should be as small as an electric oven burner igniter. INSTALLATION INSTRUCTIONS -

Installation Instructions
Page 10
...;ame length of fuel and the pressure the range was adjusted for proper Anti-tip installation. To determine if the oven burner flame is a distinct blue, reduce the air shutter opening size. Oven burner Lock screw Air shutter Orifice hood Fig. 20 - If removing the range is necessary for service Read the "Before You Call" and operating instruction sections in the off gas supply. Please call for cleaning or maintenance, shut off position...
...;ame length of fuel and the pressure the range was adjusted for proper Anti-tip installation. To determine if the oven burner flame is a distinct blue, reduce the air shutter opening size. Oven burner Lock screw Air shutter Orifice hood Fig. 20 - If removing the range is necessary for service Read the "Before You Call" and operating instruction sections in the off gas supply. Please call for cleaning or maintenance, shut off position...

Wiring Diagram
Page 1
... grounds prior to Conv/ Speed Bake Indicator Light Bake/Time Bake X X* Conv/Speed Bake X X* X X Broil X* Clean X Unlocked Locking X Locked Unlocking X Door Open Door Closed Cooktop Active** Note: X=Check listed circuits * = Alternates with ES 330/335/340/345/355 Electronic Oven Controls NOTICE - Test continuity of service. IMPORTANT DO NOT REMOVE THIS BAG OR DESTROY THE CONTENTS WIRING DIAGRAMS AND SERVICE INFORMATION ENCLOSED REPLACE CONTENTS IN BAG 316905081REV B (1503) Resistance Temperature Detector RTD SCALE Temperature °F (°C) Resistance (ohms) 32...
... grounds prior to Conv/ Speed Bake Indicator Light Bake/Time Bake X X* Conv/Speed Bake X X* X X Broil X* Clean X Unlocked Locking X Locked Unlocking X Door Open Door Closed Cooktop Active** Note: X=Check listed circuits * = Alternates with ES 330/335/340/345/355 Electronic Oven Controls NOTICE - Test continuity of service. IMPORTANT DO NOT REMOVE THIS BAG OR DESTROY THE CONTENTS WIRING DIAGRAMS AND SERVICE INFORMATION ENCLOSED REPLACE CONTENTS IN BAG 316905081REV B (1503) Resistance Temperature Detector RTD SCALE Temperature °F (°C) Resistance (ohms) 32...

Complete Owner s Guide
Page 4
... follow the below instructions and precautions for use both arms to the anti-tip bracket installation instructions supplied with packaging material. Carefully attempt to the appliance. Refer to grasp the rear edge of the appliance. IMPORTANT INSTRUCTIONS FOR UNPACKING AND INSTALLATION IMPORTANT - Read and follow these instructions can damage the electronic control. WARNING Air curtain or other overhead range hoods which operate that operate by removing the leveling legs, panels, wire covers, anti-tip brackets/screws, or any...
... follow the below instructions and precautions for use both arms to the anti-tip bracket installation instructions supplied with packaging material. Carefully attempt to the appliance. Refer to grasp the rear edge of the appliance. IMPORTANT INSTRUCTIONS FOR UNPACKING AND INSTALLATION IMPORTANT - Read and follow these instructions can damage the electronic control. WARNING Air curtain or other overhead range hoods which operate that operate by removing the leveling legs, panels, wire covers, anti-tip brackets/screws, or any...

Complete Owner s Guide
Page 8
... could catch fire. Remove oven racks unless otherwise instructed. Use care when opening the door of grease that excess residue from cleaners and aerosols may cause severe burns. Let hot air or steam escape before moving the rack. Cleaning a hot appliance can melt or ignite. Always follow the manufacturer's recommended directions for baking, such as lining cookware or as recommended for use the oven racks. Always cook in proper cookware and...
... could catch fire. Remove oven racks unless otherwise instructed. Use care when opening the door of grease that excess residue from cleaners and aerosols may cause severe burns. Let hot air or steam escape before moving the rack. Cleaning a hot appliance can melt or ignite. Always follow the manufacturer's recommended directions for baking, such as lining cookware or as recommended for use the oven racks. Always cook in proper cookware and...

Complete Owner s Guide
Page 19
BEFORE SETTING OVEN CONTROLS Oven Vent Location Types of the range. Never close the oven door until it reaches the stop position. flat oven rack Figure 11: Oven vent WARNING Protective Liners - During self clean, temperatures in the oven will become very hot which can cause burns. • Remove all oven racks before using the oven. When cooking, the oven interior, oven exterior, oven racks, and cooktop will be placed in risk of oven rack upward slightly and slide the oven rack back into place...
BEFORE SETTING OVEN CONTROLS Oven Vent Location Types of the range. Never close the oven door until it reaches the stop position. flat oven rack Figure 11: Oven vent WARNING Protective Liners - During self clean, temperatures in the oven will become very hot which can cause burns. • Remove all oven racks before using the oven. When cooking, the oven interior, oven exterior, oven racks, and cooktop will be placed in risk of oven rack upward slightly and slide the oven rack back into place...
Complete Owner s Guide
Page 20
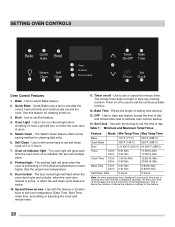
... indicator light - Use to set or cancel the minute timer. Oven Light - Use with the feature or function keys to set oven temperature, Bake Time, Start Time, clean time, and setting or adjusting the clock and minute timer. 11. Bake Time - Clock Time 12 Hr. 1:00 Hr./Min. 24 Hr. 0:00 Min 12:59 Hr./Min. 23:59 Hr./Min. Use to circulate the oven's heat uniformly and continuously around the oven. The preheat light will sound each time the oven turns on when the oven door is reset...
... indicator light - Use to set or cancel the minute timer. Oven Light - Use with the feature or function keys to set oven temperature, Bake Time, Start Time, clean time, and setting or adjusting the clock and minute timer. 11. Bake Time - Clock Time 12 Hr. 1:00 Hr./Min. 24 Hr. 0:00 Min 12:59 Hr./Min. 23:59 Hr./Min. Use to circulate the oven's heat uniformly and continuously around the oven. The preheat light will sound each time the oven turns on when the oven door is reset...
Complete Owner s Guide
Page 22
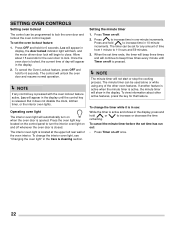
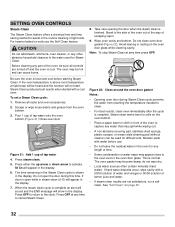
... show in the display. 2. To set time has run out: • Press Timer on the control panel to 11 hours and 59 minutes. 3. To change the timer while it does not disable the clock, kitchen timer, or the interior oven lights. Press Timer on -off whenever the oven door is pressed. If another feature is active when the minute timer is located at the upper left rear wall of day...
... show in the display. 2. To set time has run out: • Press Timer on the control panel to 11 hours and 59 minutes. 3. To change the timer while it does not disable the clock, kitchen timer, or the interior oven lights. Press Timer on -off whenever the oven door is pressed. If another feature is active when the minute timer is located at the upper left rear wall of day...
Complete Owner s Guide
Page 25
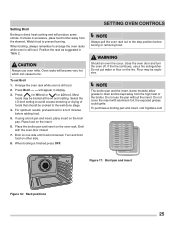
..., use oven mitts. NOTE The broiler pan and the insert (some smoke. Do not use the pan without the insert. Press for HI broil or for 2-to drain and be cooked to arrange the oven racks while oven is direct heat cooking and will become very hot which can cause burns. SETTING OVEN CONTROLS NOTE Always pull the oven rack out to prevent burning. Position the rack as suggested in display. 3. Setting Broil Broiling is...
..., use oven mitts. NOTE The broiler pan and the insert (some smoke. Do not use the pan without the insert. Press for HI broil or for 2-to drain and be cooked to arrange the oven racks while oven is direct heat cooking and will become very hot which can cause burns. SETTING OVEN CONTROLS NOTE Always pull the oven rack out to prevent burning. Position the rack as suggested in display. 3. Setting Broil Broiling is...
Complete Owner s Guide
Page 32
... oven vent or the oven door glass. Figure 22: Clean around the oven door gasket Notes: • Opening oven door during this time. If door is above room temperature a triple beep will be used for any water that may be hot and can be heard and the function will appear in front of time. • Some condensation or water vapor may become damp; Remove all controls are not satisfactory, run a self clean...
... oven vent or the oven door glass. Figure 22: Clean around the oven door gasket Notes: • Opening oven door during this time. If door is above room temperature a triple beep will be used for any water that may be hot and can be heard and the function will appear in front of time. • Some condensation or water vapor may become damp; Remove all controls are not satisfactory, run a self clean...
Complete Owner s Guide
Page 35
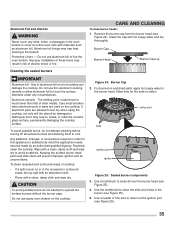
... to clean out the ignition port (see Figure 25). 4. To clean recessed and contoured areas of electric shock or fire. CARE AND CLEANING To clean burner heads: 1. Use of aluminum foil on or in risk of cooktop: • If a spill occurs on a hot cooktop can damage the cooktop. Care must be made by an authorized qualified Agency. Aluminum foil linings may fuse to cool. Remove the burner cap...
... to clean out the ignition port (see Figure 25). 4. To clean recessed and contoured areas of electric shock or fire. CARE AND CLEANING To clean burner heads: 1. Use of aluminum foil on or in risk of cooktop: • If a spill occurs on a hot cooktop can damage the cooktop. Care must be made by an authorized qualified Agency. Aluminum foil linings may fuse to cool. Remove the burner cap...

Complete Owner s Guide
Page 40
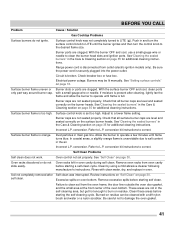
.... Once the error code is open. Set the clock with the problem listed. Be sure the regulator gas valve is too hot or too cool. See "SETTING OVEN CONTROLS" and review instructions for service outage information. Close the oven door. Problem Entire appliance does not operate. Electrical power outage. Flames inside oven or smoking from meat. Use proper oven rack position. Center food in this checklist. Oven control panel beeps and displays any F or E code error. Follow the "Setting Broil" instructions on the control panel. Reposition the broil pan to ON...
.... Once the error code is open. Set the clock with the problem listed. Be sure the regulator gas valve is too hot or too cool. See "SETTING OVEN CONTROLS" and review instructions for service outage information. Close the oven door. Problem Entire appliance does not operate. Electrical power outage. Flames inside oven or smoking from meat. Use proper oven rack position. Center food in this checklist. Oven control panel beeps and displays any F or E code error. Follow the "Setting Broil" instructions on the control panel. Reposition the broil pan to ON...
Complete Owner s Guide
Page 41
... manually. Soil not completely removed after cleaning, lightly fan the flame and allow the burner to burn on the burner heads. self clean. Failure to LITE until flame turns blue. Be careful not to L.P. Burner ports are not seated properly. See"Cleaning the sealed burners" in and turn the surface control knob to clean soil from oven cavity before starting a self-clean cycle. See "Setting surface controls" on page 35 for additional cleaning instructions. Surface control knob is unavoidable due to the desired flame size. Burner...
... manually. Soil not completely removed after cleaning, lightly fan the flame and allow the burner to burn on the burner heads. self clean. Failure to LITE until flame turns blue. Be careful not to L.P. Burner ports are not seated properly. See"Cleaning the sealed burners" in and turn the surface control knob to clean soil from oven cavity before starting a self-clean cycle. See "Setting surface controls" on page 35 for additional cleaning instructions. Surface control knob is unavoidable due to the desired flame size. Burner...

Complete Owner s Guide
Page 42
... cooktop should not be set once the door unlocks (up to cancel. Contact the builder or installer to correct the situation. If the oven is level. If the floor is below cleaning temperature. If the oven is sagging or sloping, contact a carpenter to make range appear not level. Oven light does not work. Be sure the oven light is canceled, the oven control display will remain locked until the rack is in cleaning temperature range...
... cooktop should not be set once the door unlocks (up to cancel. Contact the builder or installer to correct the situation. If the oven is level. If the floor is below cleaning temperature. If the oven is sagging or sloping, contact a carpenter to make range appear not level. Oven light does not work. Be sure the oven light is canceled, the oven control display will remain locked until the rack is in cleaning temperature range...

Product Specifications Sheet
Page 2
....) Oven Light Rack Configuration Baking System Broiling System Bake Burner / Broil Burner (BTU) Drawer Racks Optional Accessories 5.0 1 2 Standard Even Baking Technology Vari-Broil™ Hi/Lo 18,000 / 13,500 C B NOTE: For planning purposes only. Product Dimensions A - Always consult local and national electric and gas codes. Width C - Freestanding Ranges FGGF3036T D / F/ W / B 30" Gas Features Oven Control / Timing System Surface Type Sealed Gas Burners Grates Window Exterior Door Finish Handle Design Exterior Finish (Side Panels) Convection System Oven Cleaning System Drawer...
....) Oven Light Rack Configuration Baking System Broiling System Bake Burner / Broil Burner (BTU) Drawer Racks Optional Accessories 5.0 1 2 Standard Even Baking Technology Vari-Broil™ Hi/Lo 18,000 / 13,500 C B NOTE: For planning purposes only. Product Dimensions A - Always consult local and national electric and gas codes. Width C - Freestanding Ranges FGGF3036T D / F/ W / B 30" Gas Features Oven Control / Timing System Surface Type Sealed Gas Burners Grates Window Exterior Door Finish Handle Design Exterior Finish (Side Panels) Convection System Oven Cleaning System Drawer...

Product Specifications Sheet
Page 3
... minimum heat of cabinets. • Follow all dimension requirements provided to prevent property damage, potential fire hazard, and incorrect countertop and cabinet cuts. above room temperature without shrinking, warping or discoloring. Side 29 1/4" 25 3/4" Gas inlet location (right bottom rear*) Power cord location (left bottom rear*) *when viewed from front Note: Overall product dimensions are model specific and may vary slightly from cooking surface to ±1/8") 29 7/8" Freestanding Range Specifications •...
... minimum heat of cabinets. • Follow all dimension requirements provided to prevent property damage, potential fire hazard, and incorrect countertop and cabinet cuts. above room temperature without shrinking, warping or discoloring. Side 29 1/4" 25 3/4" Gas inlet location (right bottom rear*) Power cord location (left bottom rear*) *when viewed from front Note: Overall product dimensions are model specific and may vary slightly from cooking surface to ±1/8") 29 7/8" Freestanding Range Specifications •...


