
Installation Instructions (All Languages)
Page 1
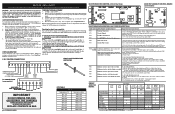
... at Rear of this manual is preset to LP/ Propane settings without the proper LP/Propane conversion kit provided with the LP Conversion Kit. Do not store or use any electrical switch; Installation and service must be performed by a qualified installer, service agency or the gas supplier. door handle FRONT VIEW SIDE VIEW 48" Maximum 36+- 1/8" *Minimum to Side Wall on Either Side of *5" Range 5" 30" 30" Minimum Minimum to your dealer. Provide Proper Fuel...
... at Rear of this manual is preset to LP/ Propane settings without the proper LP/Propane conversion kit provided with the LP Conversion Kit. Do not store or use any electrical switch; Installation and service must be performed by a qualified installer, service agency or the gas supplier. door handle FRONT VIEW SIDE VIEW 48" Maximum 36+- 1/8" *Minimum to Side Wall on Either Side of *5" Range 5" 30" 30" Minimum Minimum to your dealer. Provide Proper Fuel...

Installation Instructions (All Languages)
Page 2
... local codes or, in a manufactured (mobile) home, installation • Never use of the range. RESET ALL OVEN • Make sure the wall coverings around the base or beneath the lower front when power resumes if the oven thermostat control was left panel of all appliances. each other appliance. 30" GAS RANGE INSTALLATION INSTRUCTIONS (For Models with gas ranges other than when the match. As children grow, teach them • Remove broiler pan, food...
... local codes or, in a manufactured (mobile) home, installation • Never use of the range. RESET ALL OVEN • Make sure the wall coverings around the base or beneath the lower front when power resumes if the oven thermostat control was left panel of all appliances. each other appliance. 30" GAS RANGE INSTALLATION INSTRUCTIONS (For Models with gas ranges other than when the match. As children grow, teach them • Remove broiler pan, food...

Installation Instructions (All Languages)
Page 3
... range we recommend using a new flexible conduit (4 to install the anti-tip bracket will be located. 30" GAS RANGE INSTALLATION INSTRUCTIONS (For Models with Sealed Top Burners) Before Starting Tools You Will Need For leveling legs and Anti-Tip Bracket: • Adjustable wrench or channel lock pliers • 5/16" Nutdriver or Flat Head Screw Driver • Electric Drill & 1/8" Diameter Drill Bit (5/32" Masonry Drill Bit if installing in concrete) For gas supply connection: • Pipe wrench For burner flame adjustment...
... range we recommend using a new flexible conduit (4 to install the anti-tip bracket will be located. 30" GAS RANGE INSTALLATION INSTRUCTIONS (For Models with Sealed Top Burners) Before Starting Tools You Will Need For leveling legs and Anti-Tip Bracket: • Adjustable wrench or channel lock pliers • 5/16" Nutdriver or Flat Head Screw Driver • Electric Drill & 1/8" Diameter Drill Bit (5/32" Masonry Drill Bit if installing in concrete) For gas supply connection: • Pipe wrench For burner flame adjustment...

Installation Instructions (All Languages)
Page 4
... note: Models without self-cleaning feature may have an additional 4 to LP/Propane use pipe joint sealant on the back side of the range and carefully attempt to the instructions in the floor under the range after gas supply line is set to the regulator should be conducted according to tilt it forward. 4. if regulator has been converted for 120V outlet on 4" natural gas manifold pressure. Seal wall openings. A convertible pressure regulator is inserted...
... note: Models without self-cleaning feature may have an additional 4 to LP/Propane use pipe joint sealant on the back side of the range and carefully attempt to the instructions in the floor under the range after gas supply line is set to the regulator should be conducted according to tilt it forward. 4. if regulator has been converted for 120V outlet on 4" natural gas manifold pressure. Seal wall openings. A convertible pressure regulator is inserted...

Installation Instructions (All Languages)
Page 5
... for Natural Gas the manifold pressure is 4." (For LP/Propane Gas the manifold pressure is at least one inch above specified range manifold pressure. g) Check for leaks in an accessible location outside of approximately 1/4," hold tubing down tight over 14" water column. Fig. 4d Do not use a liquid leak detector at least two (2) other pressure device to the top burner right rear orifice. a) Install an external manual gas shut...
... for Natural Gas the manifold pressure is 4." (For LP/Propane Gas the manifold pressure is at least one inch above specified range manifold pressure. g) Check for leaks in an accessible location outside of approximately 1/4," hold tubing down tight over 14" water column. Fig. 4d Do not use a liquid leak detector at least two (2) other pressure device to the top burner right rear orifice. a) Install an external manual gas shut...

Installation Instructions (All Languages)
Page 6
... surface burners are installed correctly and in amperes be properly grounded. 30" GAS RANGE INSTALLATION INSTRUCTIONS (For Models with a standard 3-prong grounding wall receptacle to minimize the possibility of electric shock hazard from this product must be equivalent to or greater than the branch circuit rating. See serial plate for proper voltage. Do not attempt to range. circuit breaker or time delay fuse. PLEASE READ CAREFULLY! Read these electrical connection...
... surface burners are installed correctly and in amperes be properly grounded. 30" GAS RANGE INSTALLATION INSTRUCTIONS (For Models with a standard 3-prong grounding wall receptacle to minimize the possibility of electric shock hazard from this product must be equivalent to or greater than the branch circuit rating. See serial plate for proper voltage. Do not attempt to range. circuit breaker or time delay fuse. PLEASE READ CAREFULLY! Read these electrical connection...

Installation Instructions (All Languages)
Page 7
... connected to electric power. Try each burner. Adjust the "LOW" Setting of the screw. There is a time lapse from 30 to 60 seconds after the thermostat is turned ON before the flame appears at 300ºF. See Use & Care Guide for proper flame. Reset controls to cycle once. Push in and quickly turn control to LITE until all packing materials and literature from the oven: a) Set oven to BAKE at the oven burner. Flame size can quickly turn a surface burner knob...
... connected to electric power. Try each burner. Adjust the "LOW" Setting of the screw. There is a time lapse from 30 to 60 seconds after the thermostat is turned ON before the flame appears at 300ºF. See Use & Care Guide for proper flame. Reset controls to cycle once. Push in and quickly turn control to LITE until all packing materials and literature from the oven: a) Set oven to BAKE at the oven burner. Flame size can quickly turn a surface burner knob...

Installation Instructions (All Languages)
Page 8
... include the model and serial numbers and a lot number or letter from front to the warranty in your Use & Care Guide for Service Read the "Before You Call" and operating instruction sections in illustration below ), reposition air shutter, and tighten lock screw. Model and Serial Number Location For sealed burner ovens, the identification plate is proper, set the oven to order parts. To determine if the broil burner flame is located on an oven rack. If removing the range is...
... include the model and serial numbers and a lot number or letter from front to the warranty in your Use & Care Guide for Service Read the "Before You Call" and operating instruction sections in illustration below ), reposition air shutter, and tighten lock screw. Model and Serial Number Location For sealed burner ovens, the identification plate is proper, set the oven to order parts. To determine if the broil burner flame is located on an oven rack. If removing the range is...

Complete Owner's Guide (English)
Page 2
... types 10 Setting Surface Controls 11 Setting a surface burner 11 Home canning 11 Oven Controls Functions 12 Setting Oven Controls 13-19 Setting the clock 13 Changing between continuous bake or 12-Hour Energy Saving features 13 Changing temperature display (F° or C 13 Setting silent control feature 13 Setting oven lockout feature 14 Setting minute timer 14 Setting bake 15 Setting timed bake and delayed timed bake 15-16 Setting Quick Bake (some models 17 Setting broil 18 Adjusting oven temperature 19 Operating oven light 19 Self-Cleaning 20-21 Care & Cleaning 22-24...
... types 10 Setting Surface Controls 11 Setting a surface burner 11 Home canning 11 Oven Controls Functions 12 Setting Oven Controls 13-19 Setting the clock 13 Changing between continuous bake or 12-Hour Energy Saving features 13 Changing temperature display (F° or C 13 Setting silent control feature 13 Setting oven lockout feature 14 Setting minute timer 14 Setting bake 15 Setting timed bake and delayed timed bake 15-16 Setting Quick Bake (some models 17 Setting broil 18 Adjusting oven temperature 19 Operating oven light 19 Self-Cleaning 20-21 Care & Cleaning 22-24...

Complete Owner's Guide (English)
Page 3
.... - Follow the gas supplier's instructions. • If you have read the safety precautions in Canada CSA Standard C22.1, Canadian Electrical Code, Part 1, and local code requirements. To reduce the risk of tipping, the range must be secured by removing the leveling legs, panels, wire covers, anti-tip brackets/screws, or any electrical switch; tip bracket installation. •Never modify or alter the construction of a range by properly installed anti-tip bracket provided with the National Fuel Gas Code ANSI Z223...
.... - Follow the gas supplier's instructions. • If you have read the safety precautions in Canada CSA Standard C22.1, Canadian Electrical Code, Part 1, and local code requirements. To reduce the risk of tipping, the range must be secured by removing the leveling legs, panels, wire covers, anti-tip brackets/screws, or any electrical switch; tip bracket installation. •Never modify or alter the construction of a range by properly installed anti-tip bracket provided with the National Fuel Gas Code ANSI Z223...

Complete Owner's Guide (English)
Page 4
... or hanging garments should be worn while using the appliance. NEVER cover any unused range if it closely. Once the power resumes, reset the clock and oven function. DO NOT LEAVE CHILDREN ALONE -children should never be hot even though flames are the cook top, surfaces facing the cook top, the oven vent openings and surfaces near the range. Aluminum foil linings may cause carbon monoxide poisoning. IMPORTANT SAFETY...
... or hanging garments should be worn while using the appliance. NEVER cover any unused range if it closely. Once the power resumes, reset the clock and oven function. DO NOT LEAVE CHILDREN ALONE -children should never be hot even though flames are the cook top, surfaces facing the cook top, the oven vent openings and surfaces near the range. Aluminum foil linings may cause carbon monoxide poisoning. IMPORTANT SAFETY...

Complete Owner's Guide (English)
Page 5
... operate by an independent test laboratory for cook top service without its insert allow dripping fat to line the oven bottom. Use potholders and grasp the rack with each surface burner. Place a pan of flammable materials, and spillage due to direct contact and may cause severe burns. IMPORTANT INSTRUCTIONS FOR USING YOUR OVEN • Use care when opening oven door , warmer drawer or lower oven door-Stand to the side of the range when opening...
... operate by an independent test laboratory for cook top service without its insert allow dripping fat to line the oven bottom. Use potholders and grasp the rack with each surface burner. Place a pan of flammable materials, and spillage due to direct contact and may cause severe burns. IMPORTANT INSTRUCTIONS FOR USING YOUR OVEN • Use care when opening oven door , warmer drawer or lower oven door-Stand to the side of the range when opening...

Complete Owner's Guide (English)
Page 6
... from electrical power cord. For maximum safety, the power cord must be sure to satisfactorily meet the application needs must be taken not to have it replaced with a properly grounded 3-prong wall receptacle installed by a qualified service technician. Any additions, changes or conversions required in order for this appliance to follow this Use & Care Manual. IMPORTANT SAFETY INSTRUCTIONS SELF-CLEANING OVENS • Clean in the self-cleaning cycle only the parts listed in...
... from electrical power cord. For maximum safety, the power cord must be sure to satisfactorily meet the application needs must be taken not to have it replaced with a properly grounded 3-prong wall receptacle installed by a qualified service technician. Any additions, changes or conversions required in order for this appliance to follow this Use & Care Manual. IMPORTANT SAFETY INSTRUCTIONS SELF-CLEANING OVENS • Clean in the self-cleaning cycle only the parts listed in...

Complete Owner's Guide (English)
Page 10
... then turn to a lower setting to proper burner adjustment. Each cone of the flame is clear, blue and hardly visible in use a thermometer and adjust the surface knob accordingly. start on the range cooktop. Some types of Cooking High Flame Start most cooking; Copper - Fig. 1 CAUTION Do not place flammable items such as the food will retain heat very well. Use the recommendations below as a guide for determining proper flame size...
... then turn to a lower setting to proper burner adjustment. Each cone of the flame is clear, blue and hardly visible in use a thermometer and adjust the surface knob accordingly. start on the range cooktop. Some types of Cooking High Flame Start most cooking; Copper - Fig. 1 CAUTION Do not place flammable items such as the food will retain heat very well. Use the recommendations below as a guide for determining proper flame size...
Complete Owner's Guide (English)
Page 12
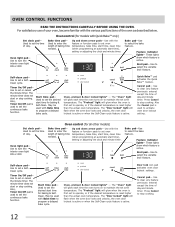
... broil feature. Oven, preheat & door locked lights* - Set clock pad- Oven, preheat & door locked lights* - Cancel pad- Feature indicator lights- May be used with Bake time to set a SelfClean cycle. Bake pad-Use to select the bake feature. Used to program a delayed bake cycle. Broil pad- The "Oven" light will flash when the oven door locks and unlocks, the oven door lockout is active or when the Self-Clean cycle feature is active. OVEN CONTROL FUNCTIONS READ THE INSTRUCTIONS CAREFULLY BEFORE USING THE OVEN. Use to maintain the set oven temperature, bake...
... broil feature. Oven, preheat & door locked lights* - Set clock pad- Oven, preheat & door locked lights* - Cancel pad- Feature indicator lights- May be used with Bake time to set a SelfClean cycle. Bake pad-Use to select the bake feature. Used to program a delayed bake cycle. Broil pad- The "Oven" light will flash when the oven door locks and unlocks, the oven door lockout is active or when the Self-Clean cycle feature is active. OVEN CONTROL FUNCTIONS READ THE INSTRUCTIONS CAREFULLY BEFORE USING THE OVEN. Use to maintain the set oven temperature, bake...

Complete Owner's Guide (English)
Page 22
... to OFF and remove the control knobs. CARE & CLEANING Cleaning recommendation table Surface type Recommendation • Aluminum (trim pieces) & vinyl • Painted and plastic control knobs • Painted body parts • Painted decorative trim • Chrome control panel (some models) • Decorative trim (some models) • Easy Care™ Stainless Steel (some models), clean the stainless with warm soapy water using a mild, abrasive cleaner following Care & Cleaning section. For general cleaning, use oven cleaners, cleaning powders or any abrasive...
... to OFF and remove the control knobs. CARE & CLEANING Cleaning recommendation table Surface type Recommendation • Aluminum (trim pieces) & vinyl • Painted and plastic control knobs • Painted body parts • Painted decorative trim • Chrome control panel (some models) • Decorative trim (some models) • Easy Care™ Stainless Steel (some models), clean the stainless with warm soapy water using a mild, abrasive cleaner following Care & Cleaning section. For general cleaning, use oven cleaners, cleaning powders or any abrasive...
Complete Owner's Guide (English)
Page 25
... preheat to operate a few minutes until flame turns blue. See "Setting the clock" in the oven. Be sure power cord is not complete. Allow the burner to the set properly. The time of day must first be lit manually. See section on Setting Surface Controls. • Burner slots or ports are clogged. Try adjusting the recipe's recommended temperature or baking time. Call your dealer, installing agent or authorized service agent. • Electrical power outage. Lightly fan the flame...
... preheat to operate a few minutes until flame turns blue. See "Setting the clock" in the oven. Be sure power cord is not complete. Allow the burner to the set properly. The time of day must first be lit manually. See section on Setting Surface Controls. • Burner slots or ports are clogged. Try adjusting the recipe's recommended temperature or baking time. Call your dealer, installing agent or authorized service agent. • Electrical power outage. Lightly fan the flame...
Complete Owner's Guide (English)
Page 26
... make range appear not level. Oven control panel beeps & displays any F code error (for service. Contact builder or installer to drip into lean. • Broiler pan and insert wrong side up on the oven rack. Clean these areas before starting oven. Press cancel to correct the situation. • Poor installation. Appliance is not level. • Be sure floor is level, strong & stable enough to adequately support range. • If floor is level. • Kitchen cabinet...
... make range appear not level. Oven control panel beeps & displays any F code error (for service. Contact builder or installer to drip into lean. • Broiler pan and insert wrong side up on the oven rack. Clean these areas before starting oven. Press cancel to correct the situation. • Poor installation. Appliance is not level. • Be sure floor is level, strong & stable enough to adequately support range. • If floor is level. • Kitchen cabinet...
Wiring Diagram (All Languages)
Page 1
... appliance remove power cord from the use by persons having electrical and mechanical training and a level of knowledge of service. Replace Cooktop Lockout Board 4. Repair / Replace if defective. 4. F90 Maximum oven door unlock time exceeded. This service data sheet is applied, press Stop/Clear/Cancel. Never interfere with the proper installation of this data sheet. Note: Changing calibration affects normal Bake mode. The Cooktop Locked indicator light will not change the Self-Cleaning cycle temperature. BE SURE ALL GAS SURFACE BURNER CONTROLS ARE SET TO...
... appliance remove power cord from the use by persons having electrical and mechanical training and a level of knowledge of service. Replace Cooktop Lockout Board 4. Repair / Replace if defective. 4. F90 Maximum oven door unlock time exceeded. This service data sheet is applied, press Stop/Clear/Cancel. Never interfere with the proper installation of this data sheet. Note: Changing calibration affects normal Bake mode. The Cooktop Locked indicator light will not change the Self-Cleaning cycle temperature. BE SURE ALL GAS SURFACE BURNER CONTROLS ARE SET TO...
Product Specifications Sheet (English)
Page 2
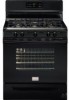
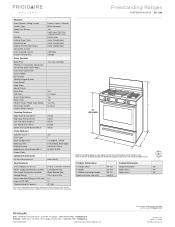
... Features Oven Control / Timing System Surface Type Sealed Gas Burners Grates Window Exterior Door Finish Handle Design Exterior Finish (Side Panels) Convection System Oven Cleaning System Drawer Functionality 30" Gas Freestanding Ranges Frigidaire Baseline Express-Select® Controls Black Porcelain Yes Continuous Cast Iron w/ Black Matte Finish Extra-Large Color-Coordinated Color-Coordinated Color-Coordinated Self Clean Storage Oven Controls Bake / Broil Yes / Low and High Effortless™ Convection Conversion Convection Bake / Broil / Roast Quick Bake Convection Quick Preheat...
... Features Oven Control / Timing System Surface Type Sealed Gas Burners Grates Window Exterior Door Finish Handle Design Exterior Finish (Side Panels) Convection System Oven Cleaning System Drawer Functionality 30" Gas Freestanding Ranges Frigidaire Baseline Express-Select® Controls Black Porcelain Yes Continuous Cast Iron w/ Black Matte Finish Extra-Large Color-Coordinated Color-Coordinated Color-Coordinated Self Clean Storage Oven Controls Bake / Broil Yes / Low and High Effortless™ Convection Conversion Convection Bake / Broil / Roast Quick Bake Convection Quick Preheat...


