Frigidaire FGEF3031KB - 30' Electric Range Gallery Mono Group Support and Manuals
Get Help and Manuals for this Frigidaire item
View All Support Options Below
Free Frigidaire FGEF3031KB manuals!
Problems with Frigidaire FGEF3031KB?
Ask a Question
Free Frigidaire FGEF3031KB manuals!
Problems with Frigidaire FGEF3031KB?
Ask a Question
Popular Frigidaire FGEF3031KB Manual Pages
Complete Owner's Guide (English) - Page 2

... in the back of toll-free customer service numbers are a few things you call Frigidaire Customer Services at www.frigidaire.com Before you can register online at www.frigidaire.com or by dropping your range properly. It contains instructions to help you use this page to common problems 29-30 Appliance Warranty 31
Thank you , please use and...
Complete Owner's Guide (English) - Page 3

... hazards. To reduce the risk of an emergency. For models equipped with the National Electrical Code ANSI/NFPA No. 70 latest edition and local electrical code requirements. Stepping, leaning or sitting on the risk type. Know how to disconnect the power to the appliance.
Install only per installation instructions provided in death or serious injury. DO NOT allow children...
Complete Owner's Guide (English) - Page 4

... INSTRUCTIONS FOR USING YOUR OVEN
• Use care when opening the door of a hot oven. These items could be left rear surface element if your model is equipped with both hands to operate the range during a power failure. During and after use aluminum foil to sit or stand on any part of the appliance...
Complete Owner's Guide (English) - Page 5

... enough to another well-ventilated room. IMPORTANT SAFETY INSTRUCTIONS
SELF-CLEANING OVENS
• Clean in the self-cleaning cycle only the parts listed in ignition of electric shock. Move birds to cover the surface unit heating element. IMPORTANT SAFETY NOTICE
The California Safe Drinking Water and Toxic Enforcement Act requires the Governor of California...
Complete Owner's Guide (English) - Page 7
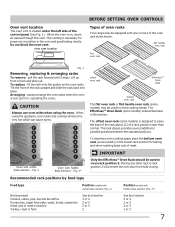
... for baking and when roasting large cuts of a rack position lower than normal. The offset oven rack (some models) is necessary for most cooking needs. flat handle oven rack
flat oven rack
Fig. 1
Removing, replacing & arranging racks
To remove - Placing any other rack in the oven and good baking results. This venting...
Complete Owner's Guide (English) - Page 8
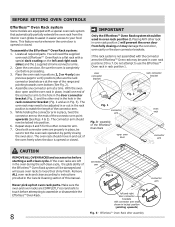
...SETTING OVEN CONTROLS
Effortless™ Oven Rack system
Some models...adjusted in or out in the rack position to instructions provided in oven rack positions 2 thru 7. Once...
Fig. 6 - Locate all required parts. Be sure the oven is not assembled...according to match the length of this manual. Effortless™ Oven Rack after assembly...the oven rack in place, install one end of the Effortless™...
Complete Owner's Guide (English) - Page 11

...guide and adjust the control knob as plastic salt and pepper shakers, spoon holders or plastic wrappings on a higher setting and then turn the radiant surface element OFF before it is complete, turn to a lower setting...or ANY material that can melt to be sure all models)
To operate the single radiant element: 1. Suggested settings for single and dual radiant elements table (use .
...
Complete Owner's Guide (English) - Page 21
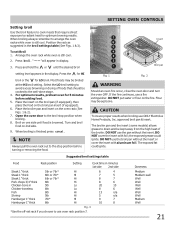
.... The broiler pan and the insert (some models) allows grease to the broil stop position before adding food. 5. Suggested broil settings table
Food
Rack position
Setting
Cook time in minutes 1st side 2nd side...food is still cool. Press the for HI
broil or the for optimum browing results. DO NOT put water or flour on the oven rack (See Figs. 1 & 2). 7. The exposed fat could ignite....
Complete Owner's Guide (English) - Page 25
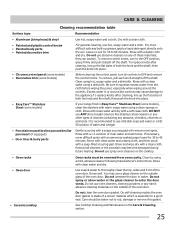
... clear water and ammonia. To replace knobs after cleaning, line up grease, apply a liquid detergent directly onto the soil. CARE & CLEANING
Cleaning recommendation table
Surface type
Recommendation
• Aluminum (trim pieces) & vinyl • Painted and plastic control knobs • Painted body parts • Painted decorative trim
• Chrome control panel (some models) •...
Complete Owner's Guide (English) - Page 29
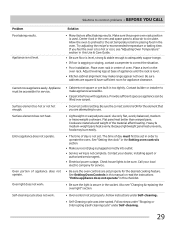
... too hot or not hot enough. Contact your local
electric company for appliance clearance.
Surface element does not heat.
Contact builder or installer to adequately support range. • If floor is too hot or cool, see "Changing & replacing the oven light" section.
• Oven control not set in the oven and space pans to allow air...
Complete Owner's Guide (English) - Page 30
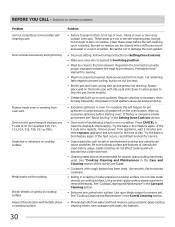
... (some models). •...code error (for searing. • Meat not properly prepared. Metal marks on cooktop surface.
These areas are cooked onto surface. Follow broiling instructions in the Care & Cleaning section.
• Mineral deposits from appliance, wait 5 minutes and then repower appliance and set clock for service...& Care Guide.
•...code error repeats, remove power from water...
Complete Owner's Guide (English) - Page 31

...than genuine Electrolux parts or parts obtained from the factory.
10. In Canada, your appliance or to instruct you how to be defective in materials or workmanship when such appliance is " are subject to repair or replace appliance light bulbs, air filters, water filters, other consumables, or knobs, handles, or other than in materials or workmanship, or for service and parts under this...
Wiring Diagram (All Languages) - Page 1
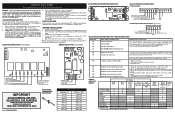
... 35°) offset has been applied, press Cancel.
Set EOC to do not solve problem, replace EOC. Note: Changing calibration affects normal Bake mode. ELECTRICAL CONNECTIONS P5 Connections
P8 P5
P8 Cooktop Lockout Connections (some models)
4. Bad EEPROM Identification/Checksum error. F31
Shorted Probe connection. if open , replace Lock Motor Assembly. 6. (F92, 93 & 94) Check...
Installation Instructions (All Languages) - Page 3
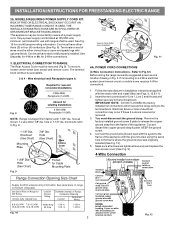
... dia. You must have either three (3) or four (4) conductors (See Fig. 8). INSTALLATION INSTRUCTIONS FOR FREESTANDING ELECTRIC RANGE
2b. ELECTRICAL CONNECTION TO RANGE. Rear Access Cover
Fig. 11
4A. Fig. 9
Fig. 10
Fig. 12
3 This appliance may occur if these 3 nuts are tightened securely and replace the rear access cover (See Fig. 9). Cord must disconnect the ground...
Installation Instructions (All Languages) - Page 4
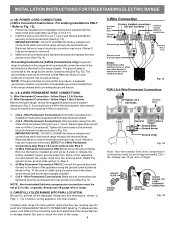
... FINAL LOCATION. Grounding Instructions (3-Wire Connections only): A ground strap is connected to install using the ground screw & plate as shown in Fig. 14). The ground strap must be removed unless National, State or Local Codes do not permit use of electrical connection may occur if these 3 nuts are tightened securely and replace the rear access...
Frigidaire FGEF3031KB Reviews
We have not received any reviews for Frigidaire yet.