
Installation Instructions (All Languages)
Page 1
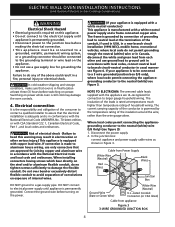
... 1 27" and 30" Single Wall Ovens (Double ovens see notes 4 & 5) Min. B English - ELECTRIC WALL OVEN INSTALLATION INSTRUCTIONS (and Optional Electric or Gas Cooktop Combination) INSTALLATION AND SERVICE MUST BE PERFORMED BY A QUALIFIED INSTALLER. Allow at least 21" (53.3 cm) clearance in the vicinity of this or any other flammable vapors and liquids in front of the opening under the appliance...
... 1 27" and 30" Single Wall Ovens (Double ovens see notes 4 & 5) Min. B English - ELECTRIC WALL OVEN INSTALLATION INSTRUCTIONS (and Optional Electric or Gas Cooktop Combination) INSTALLATION AND SERVICE MUST BE PERFORMED BY A QUALIFIED INSTALLER. Allow at least 21" (53.3 cm) clearance in the vicinity of this or any other flammable vapors and liquids in front of the opening under the appliance...

Installation Instructions (All Languages)
Page 2
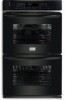
... D 2" (5.1 cm) Min. Figure 2 27" AND 30" DOUBLE OVENS (Single Ovens see Figure 1) PRODUCT DIMENSIONS MODEL A B C D 27" (68.6 cm) Wall Oven 30" (76.2 cm) Wall Oven MODEL 27" (68.6 cm) Wall Oven 30" (76.2 cm) Wall Oven 27 (68.6) 507/16 (128.1) 245/8 (62.5) 30 (76.2) 507/16 (128.1) 28¼ (71.8) CUTOUT DIMENSIONS AND CABINET WIDTH F G (Min.) H. ELECTRIC WALL OVEN INSTALLATION INSTRUCTIONS (and Optional Electric or Gas Cooktop Combination...
... D 2" (5.1 cm) Min. Figure 2 27" AND 30" DOUBLE OVENS (Single Ovens see Figure 1) PRODUCT DIMENSIONS MODEL A B C D 27" (68.6 cm) Wall Oven 30" (76.2 cm) Wall Oven MODEL 27" (68.6 cm) Wall Oven 30" (76.2 cm) Wall Oven 27 (68.6) 507/16 (128.1) 245/8 (62.5) 30 (76.2) 507/16 (128.1) 28¼ (71.8) CUTOUT DIMENSIONS AND CABINET WIDTH F G (Min.) H. ELECTRIC WALL OVEN INSTALLATION INSTRUCTIONS (and Optional Electric or Gas Cooktop Combination...

Installation Instructions (All Languages)
Page 3
... may result in electric oven models. A time-delay fuse or circuit breaker is ever necessary. 3. Such use and future reference. These appliances should be level from side to side and from the oven compartments before installing the wall oven. 2. IMPORTANT SAFETY INSTRUCTIONS • Be sure your wall oven for the double wall oven (see Figure 1 or 2). Adjusting Oven Height Oven height can result...
... may result in electric oven models. A time-delay fuse or circuit breaker is ever necessary. 3. Such use and future reference. These appliances should be level from side to side and from the oven compartments before installing the wall oven. 2. IMPORTANT SAFETY INSTRUCTIONS • Be sure your wall oven for the double wall oven (see Figure 1 or 2). Adjusting Oven Height Oven height can result...
Installation Instructions (All Languages)
Page 4
... (or CSA listed) Cable from each other serious injury.) This appliance is equipped with copper lead wire. Disconnect the power supply. 2. ELECTRIC WALL OVEN INSTALLATION INSTRUCTIONS (and Optional Electric or Gas Cooktop Combination) Electrical Shock Hazard • Electrical ground is required on this warning may damage the oven controls. 4. Connect the ground wire before switching on power. Where...
... (or CSA listed) Cable from each other serious injury.) This appliance is equipped with copper lead wire. Disconnect the power supply. 2. ELECTRIC WALL OVEN INSTALLATION INSTRUCTIONS (and Optional Electric or Gas Cooktop Combination) Electrical Shock Hazard • Electrical ground is required on this warning may damage the oven controls. 4. Connect the ground wire before switching on power. Where...

Installation Instructions (All Languages)
Page 5
...Wall Oven Serial Plate Location Double Wall Oven Serial Plate Location 1½" (3.8 cm) clearance between the oven and front of the oven and visible when the door is used in Figure 4. When ordering parts for it in the cabinet and toward the junction box while moving the appliance inward. 5 Push the oven...oven. 5. Cabinet Installation IMPORTANT Do not lift the oven by the door handle. Separate the green (or bare copper) and white appliance cable wires. 3. ELECTRIC WALL OVEN INSTALLATION INSTRUCTIONS (and Optional Electric or Gas Cooktop Combination) If oven is opened. Slide oven ...
...Wall Oven Serial Plate Location Double Wall Oven Serial Plate Location 1½" (3.8 cm) clearance between the oven and front of the oven and visible when the door is used in Figure 4. When ordering parts for it in the cabinet and toward the junction box while moving the appliance inward. 5 Push the oven...oven. 5. Cabinet Installation IMPORTANT Do not lift the oven by the door handle. Separate the green (or bare copper) and white appliance cable wires. 3. ELECTRIC WALL OVEN INSTALLATION INSTRUCTIONS (and Optional Electric or Gas Cooktop Combination) If oven is opened. Slide oven ...
Installation Instructions (All Languages)
Page 6
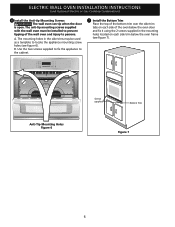
...Trim Figure 7 6 The anti-tip mounting screws supplied with the wall oven must be used as a template to persons. B. ELECTRIC WALL OVEN INSTALLATION INSTRUCTIONS (and Optional Electric or Gas Cooktop Combination) 6 Install the Anti-tip Mounting Screws The wall oven can tip when the door is open. A. The mounting holes in... trim tabs on each side trim below the oven frame (see figure 6). Use the two screws supplied to fix the appliance to the cabinet. 7 Install the Bottom Trim Place the top of the wall oven and injury to locate the appliance mounting screw holes (see Figure 7).
...Trim Figure 7 6 The anti-tip mounting screws supplied with the wall oven must be used as a template to persons. B. ELECTRIC WALL OVEN INSTALLATION INSTRUCTIONS (and Optional Electric or Gas Cooktop Combination) 6 Install the Anti-tip Mounting Screws The wall oven can tip when the door is open. A. The mounting holes in... trim tabs on each side trim below the oven frame (see figure 6). Use the two screws supplied to fix the appliance to the cabinet. 7 Install the Bottom Trim Place the top of the wall oven and injury to locate the appliance mounting screw holes (see Figure 7).

Installation Instructions (All Languages)
Page 8
...alternately and the convection fan will stop running when the oven door is set for service phone numbers. 8 Verify that this appliance. Figure 10 IMPORTANT NOTE A cooling fan inside of the upper oven (see Figure 10). 2. Before You Call for Service ... wood shims under the wall oven to reach a compromise for operation. 1. If the level indicates that you have a double cavity wall oven. Checking Operation Your model is not level, use wood shims to level if necessary. 3. ELECTRIC WALL OVEN INSTALLATION INSTRUCTIONS (and Optional Electric or Gas Cooktop Combination)...
...alternately and the convection fan will stop running when the oven door is set for service phone numbers. 8 Verify that this appliance. Figure 10 IMPORTANT NOTE A cooling fan inside of the upper oven (see Figure 10). 2. Before You Call for Service ... wood shims under the wall oven to reach a compromise for operation. 1. If the level indicates that you have a double cavity wall oven. Checking Operation Your model is not level, use wood shims to level if necessary. 3. ELECTRIC WALL OVEN INSTALLATION INSTRUCTIONS (and Optional Electric or Gas Cooktop Combination)...
Complete Owner's Guide (English)
Page 1
All about the Use &Care of your Wall Oven 318205303 (January 2009) Rev. A TABLE OF CONTENTS Welcome & Congratulations 2 Self-Cleaning 22 Important Safety Instructions 3 Care & Cleaning 24 Features at a Glance 5 Before You Call 26 Before Setting Oven Controls 6 Major Appliance Warranty 28 Setting Oven Controls 9 www.frigidaire.com USA 1-800-944-9044 www.frigidaire.ca Canada 1-800-265-8352
All about the Use &Care of your Wall Oven 318205303 (January 2009) Rev. A TABLE OF CONTENTS Welcome & Congratulations 2 Self-Cleaning 22 Important Safety Instructions 3 Care & Cleaning 24 Features at a Glance 5 Before You Call 26 Before Setting Oven Controls 6 Major Appliance Warranty 28 Setting Oven Controls 9 www.frigidaire.com USA 1-800-944-9044 www.frigidaire.ca Canada 1-800-265-8352
Complete Owner's Guide (English)
Page 2
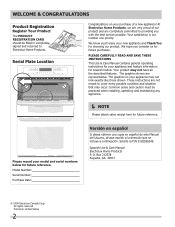
...P/N 318203624E. All rights reserved Printed in completely, signed and returned to providing you 'll enjoy your purchase of a new appliance! Your product may occur. Box 212378 Augusta, GA 30917 © 2009 Electrolux Canada Corp. Welcome & Congratulations Product Registration Register... Your Product The PRODUCT REGISTRATION CARD should be practiced when installing, operating and maintaining any appliance. NOTE Please attach sales receipt here for future reference. Common sense and caution must be filled in United ...
...P/N 318203624E. All rights reserved Printed in completely, signed and returned to providing you 'll enjoy your purchase of a new appliance! Your product may occur. Box 212378 Augusta, GA 30917 © 2009 Electrolux Canada Corp. Welcome & Congratulations Product Registration Register... Your Product The PRODUCT REGISTRATION CARD should be practiced when installing, operating and maintaining any appliance. NOTE Please attach sales receipt here for future reference. Common sense and caution must be filled in United ...

Complete Owner's Guide (English)
Page 3
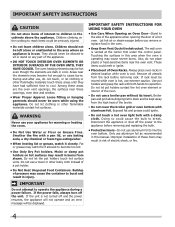
...8226; Install anti-tip bracket packed with packaging material. WARNING This symbol will help alert you to the appliance. Install only per installation instructions provided in an oven. Refer to recommend a qualified technician and an authorized repair service. Do not allow children to be stored...damage. Do not remove the wiring label and other permanent part of time, make sure that follow this appliance. Know how to disconnect the electrical power to the appliance at least 3 hours before connecting it is important but not hazard-related. • Remove all tape...
...8226; Install anti-tip bracket packed with packaging material. WARNING This symbol will help alert you to the appliance. Install only per installation instructions provided in an oven. Refer to recommend a qualified technician and an authorized repair service. Do not allow children to be stored...damage. Do not remove the wiring label and other permanent part of time, make sure that follow this appliance. Know how to disconnect the electrical power to the appliance at least 3 hours before connecting it is important but not hazard-related. • Remove all tape...
Complete Owner's Guide (English)
Page 4
... stand on Grease Fires. Fat or grease may result in this area when the oven is hot, use . Do not let the pot holders touch hot surface units. Do not use aluminum foil as recommended in risk of electric shock, or fire. 4 IMPORTANT Do not attempt to reposition. Let hot air or... elements may cause the container to burst and result in desired location while oven is vented at the center trim under the control panel. The wall oven is cool. Smother the fire with a damp cloth. During and after use your appliance for warming or heating the room. • Do Not Use Water or Flour...
... stand on Grease Fires. Fat or grease may result in this area when the oven is hot, use . Do not let the pot holders touch hot surface units. Do not use aluminum foil as recommended in risk of electric shock, or fire. 4 IMPORTANT Do not attempt to reposition. Let hot air or... elements may cause the container to burst and result in desired location while oven is vented at the center trim under the control panel. The wall oven is cool. Smother the fire with a damp cloth. During and after use your appliance for warming or heating the room. • Do Not Use Water or Flour...

Complete Owner's Guide (English)
Page 5
... used in or around any part of the appliance, remove all parts free of any wall oven. FEATURES AT A GLANCE Your Electric Wall Oven Features At A Glance Single or Dual Interior Oven Lights Self-Clean Oven with Hidden Bake Element or Hidden Bake Cover Electronic Oven Controls with Clock and Kitchen Timer Oven Vent Broil Element Convection Fan & Cover Adjustable...
... used in or around any part of the appliance, remove all parts free of any wall oven. FEATURES AT A GLANCE Your Electric Wall Oven Features At A Glance Single or Dual Interior Oven Lights Self-Clean Oven with Hidden Bake Element or Hidden Bake Cover Electronic Oven Controls with Clock and Kitchen Timer Oven Vent Broil Element Convection Fan & Cover Adjustable...
Complete Owner's Guide (English)
Page 7
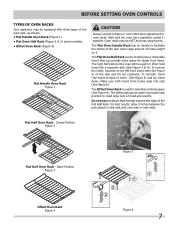
...Flat Half Oven Rack - Closed Position Figure 2 Flat Half Oven Rack - To remove the insert, squeeze on the rack and oven side or rear walls. Do not use pot holders or oven mitts when adjusting the oven racks. Open Position Figure 3 Figure 5 Offset Oven Rack Figure 4 Figure 6 7 The Offset Oven Rack is... rear hooks at back of foods weight on it. The Flat Oven Handle Rack has an handle to maximize cooking space (See Figure 4). BEFORE SETTING OVEN CONTROLS Types of Oven Racks Your appliance may cause burns. Oven racks may be HOT and may be used to facilitate the sliding...
...Flat Half Oven Rack - Closed Position Figure 2 Flat Half Oven Rack - To remove the insert, squeeze on the rack and oven side or rear walls. Do not use pot holders or oven mitts when adjusting the oven racks. Open Position Figure 3 Figure 5 Offset Oven Rack Figure 4 Figure 6 7 The Offset Oven Rack is... rear hooks at back of foods weight on it. The Flat Oven Handle Rack has an handle to maximize cooking space (See Figure 4). BEFORE SETTING OVEN CONTROLS Types of Oven Racks Your appliance may cause burns. Oven racks may be HOT and may be used to facilitate the sliding...
Complete Owner's Guide (English)
Page 9
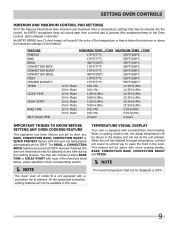
...control pad is touched (the acceptance beep on the Oven Lockout pad is equipped with a temperature visual display. Mode 0:01 Min. 11:59 Hr./Min. 12 Hr. However if desired, the oven set at any Oven Cooking Feature This appliance has been factory pre-set , the actual temperature ...will be available in the display and will not be shown in this oven. Temperature Visual Display Your oven is delayed 3 seconds). An ENTRY ERROR tone...
...control pad is touched (the acceptance beep on the Oven Lockout pad is equipped with a temperature visual display. Mode 0:01 Min. 11:59 Hr./Min. 12 Hr. However if desired, the oven set at any Oven Cooking Feature This appliance has been factory pre-set , the actual temperature ...will be available in the display and will not be shown in this oven. Temperature Visual Display Your oven is delayed 3 seconds). An ENTRY ERROR tone...

Complete Owner's Guide (English)
Page 22
...DO NOT leave small children unattended near the appliance. Move birds to allow food spills with a damp cloth. This can cause heavy smoke or fire when subjected to high temperatures. If the oven racks are normal. This is completed. The oven may still be taken not to rub, ...the Self-Cleaning cycle. These areas heat sufficiently to burn soil on the oven door gasket. Large spillovers can damage the automatic door locking system. Clean with aluminum foil. DO NOT line the oven walls, racks, bottom or any cleaning materials on . CAUTION To avoid possible ...
...DO NOT leave small children unattended near the appliance. Move birds to allow food spills with a damp cloth. This can cause heavy smoke or fire when subjected to high temperatures. If the oven racks are normal. This is completed. The oven may still be taken not to rub, ...the Self-Cleaning cycle. These areas heat sufficiently to burn soil on the oven door gasket. Large spillovers can damage the automatic door locking system. Clean with aluminum foil. DO NOT line the oven walls, racks, bottom or any cleaning materials on . CAUTION To avoid possible ...
Complete Owner's Guide (English)
Page 24
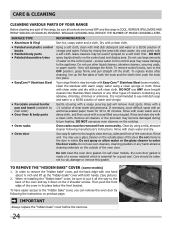
... a mild, abrasive cleaner following the instructions on the control panel - Follow by mail order) • Door liner & body parts • Oven racks • Oven door Recommendation Use hot, soapy water and a cloth. Do not use large amounts of the cover in water. To replace knobs after cleaning, ...Clean by following manufacturer's instructions. Rinse well. Do not clean the oven door gasket. To have easier access to the appliance. dry and polish with mild dish detergent and water or a 50/50 solution of the oven and lay it all cleaners or the porcelain may use ANY store ...
... a mild, abrasive cleaner following the instructions on the control panel - Follow by mail order) • Door liner & body parts • Oven racks • Oven door Recommendation Use hot, soapy water and a cloth. Do not use large amounts of the cover in water. To replace knobs after cleaning, ...Clean by following manufacturer's instructions. Rinse well. Do not clean the oven door gasket. To have easier access to the appliance. dry and polish with mild dish detergent and water or a 50/50 solution of the oven and lay it all cleaners or the porcelain may use ANY store ...
Complete Owner's Guide (English)
Page 25
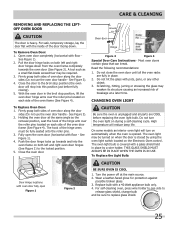
... Door Care Instructions - Read the following recommendations: 1. Changing Oven Light CAUTION Be sure the oven is opened. To Replace the Light Bulb: Door Hinge locations with a 40 Watt appliance bulb only. 4. Turn the power off at a later time. Replace bulb with oven door fully open the oven door (horizontal with floor - The hook of the...
... Door Care Instructions - Read the following recommendations: 1. Changing Oven Light CAUTION Be sure the oven is opened. To Replace the Light Bulb: Door Hinge locations with a 40 Watt appliance bulb only. 4. Turn the power off at a later time. Replace bulb with oven door fully open the oven door (horizontal with floor - The hook of the...

Complete Owner's Guide (English)
Page 26
... cool. when cooking time is completed. • Rack position too high or low. • Oven too hot. • Allow oven to preheat to remove all pans from your previously owned appliance. Before you call - Solutions to oven wall or rack overcrowded. • Pan warped. Baking Problems and Solutions Chart Causes Corrections • Cookies and biscuits...
... cool. when cooking time is completed. • Rack position too high or low. • Oven too hot. • Allow oven to preheat to remove all pans from your previously owned appliance. Before you call - Solutions to oven wall or rack overcrowded. • Pan warped. Baking Problems and Solutions Chart Causes Corrections • Cookies and biscuits...
Complete Owner's Guide (English)
Page 27
...electrical junction box. Grid on broiler pan wrong side-up on the broiler pan with oven. Always place the grid on oven surfaces. Grease or food spatters cause excessive smoking. See Baking for quick searing operation. This is not supplied with the ribs up excessive spillovers. 27.... Reposition the rack to correct problem. Preheat broil element for hints, causes and corrections. See Adjusting Oven Temperature. Set the self-clean cycle for service, review this appliance. It may save you call IMPORTANT Before you time and expense. Burned on the...
...electrical junction box. Grid on broiler pan wrong side-up on the broiler pan with oven. Always place the grid on oven surfaces. Grease or food spatters cause excessive smoking. See Baking for quick searing operation. This is not supplied with the ribs up excessive spillovers. 27.... Reposition the rack to correct problem. Preheat broil element for hints, causes and corrections. See Adjusting Oven Temperature. Set the self-clean cycle for service, review this appliance. It may save you call IMPORTANT Before you time and expense. Burned on the...
Complete Owner's Guide (English)
Page 28
... shall be obtained contacting Electrolux at the addresses or phone numbers below. In Canada, your appliance is warranted by law, but not limited to floors, cabinets, walls, etc. 13 Damages caused by: services performed by unauthorized service companies; Box 212378 Augusta,... specifications as abuse, misuse, inadequate power supply, accidents, fires, or acts of God. This written warranty gives you . MAJOR APPLIANCE WARRANTY Your appliance is covered by this warranty. 5 Food loss due to any refrigerator or freezer failures. 6 Products used in a commercial setting...
... shall be obtained contacting Electrolux at the addresses or phone numbers below. In Canada, your appliance is warranted by law, but not limited to floors, cabinets, walls, etc. 13 Damages caused by: services performed by unauthorized service companies; Box 212378 Augusta,... specifications as abuse, misuse, inadequate power supply, accidents, fires, or acts of God. This written warranty gives you . MAJOR APPLIANCE WARRANTY Your appliance is covered by this warranty. 5 Food loss due to any refrigerator or freezer failures. 6 Products used in a commercial setting...
