Complete Owner's Guide (English)
Page 2
... immediately contact the dealer (or builder) that might occur. If you . Visit the Frigidaire web site at www.frigidaire.com Before you call away. This section helps step you through some models) or keep warm 25 Adjusting oven temperature 26 Operating oven light 26 Setting the Sabbath mode...can register online at 1-800-944-9044. Serial plate location Serial plate location: open storage drawer (some common problems that sold you the range. It contains instructions to help is part of our commitment to help ?? Save time and money. Need help us serve your Product ...
... immediately contact the dealer (or builder) that might occur. If you . Visit the Frigidaire web site at www.frigidaire.com Before you call away. This section helps step you through some models) or keep warm 25 Adjusting oven temperature 26 Operating oven light 26 Setting the Sabbath mode...can register online at 1-800-944-9044. Serial plate location Serial plate location: open storage drawer (some common problems that sold you the range. It contains instructions to help is part of our commitment to help ?? Save time and money. Need help us serve your Product ...
Complete Owner's Guide (English)
Page 3
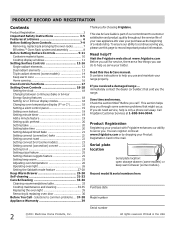
...sitting on the door or drawers of a range can tip. • Injury to persons could result. • Install anti-tip device packed with the National Electrical Code ANSI/NFPA No. 70 latest edition and local electrical code requirements. For models equipped with a WARNING or CAUTION statement based... on an open oven door may reduce the risk of personal injury and damage to the range. The weight of a...
...sitting on the door or drawers of a range can tip. • Injury to persons could result. • Install anti-tip device packed with the National Electrical Code ANSI/NFPA No. 70 latest edition and local electrical code requirements. For models equipped with a WARNING or CAUTION statement based... on an open oven door may reduce the risk of personal injury and damage to the range. The weight of a...
Complete Owner's Guide (English)
Page 4
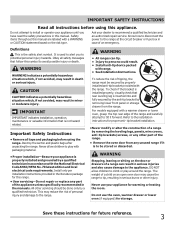
... not store items of interest to drain and be allowed to burst and result in the area where appliance is located below the backguard for models equipped with coil elements. During and after use water or flour on or near these liners may cause severe burns. Among these openings, oven ... remove or replace food in the storage drawer. Do not let clothing or other bulky cloth instead of electric shock, or fire. If the power fails, always turn off and the power resumes, the range will begin to reach items could melt or ignite. • Placement of interior oven racks. If the...
... not store items of interest to drain and be allowed to burst and result in the area where appliance is located below the backguard for models equipped with coil elements. During and after use water or flour on or near these liners may cause severe burns. Among these openings, oven ... remove or replace food in the storage drawer. Do not let clothing or other bulky cloth instead of electric shock, or fire. If the power fails, always turn off and the power resumes, the range will begin to reach items could melt or ignite. • Placement of interior oven racks. If the...

Complete Owner's Guide (English)
Page 5
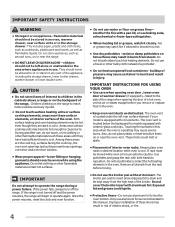
...any utensils or foods from cleaners and aerosols may penetrate the broken cook top and create a risk of electric shock. IMPORTANT INSTRUCTIONS FOR CLEANING YOUR RANGE CAUTION Before manually cleaning any part of the range, be taken not to rub, damage or move the gasket. • The health of some birds is... to keep all controls are suitable for cook top service without breaking due to such substances. 5 FOR CERAMIC-GLASS COOK TOP MODELS • Do not cook on a hot cooking area, be immersed in or around each surface heating unit. Proper relationship of utensil to element will ...
...any utensils or foods from cleaners and aerosols may penetrate the broken cook top and create a risk of electric shock. IMPORTANT INSTRUCTIONS FOR CLEANING YOUR RANGE CAUTION Before manually cleaning any part of the range, be taken not to rub, damage or move the gasket. • The health of some birds is... to keep all controls are suitable for cook top service without breaking due to such substances. 5 FOR CERAMIC-GLASS COOK TOP MODELS • Do not cook on a hot cooking area, be immersed in or around each surface heating unit. Proper relationship of utensil to element will ...
Complete Owner's Guide (English)
Page 6
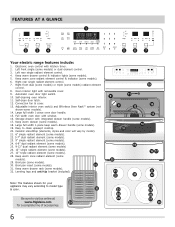
... 5 6 7 Your electric range features include: 1. Keep warm zone radiant element control & indicator (some models) radiant element control. 8. Right front dual (some models) or triple (some models). 6. Self-clean door latch. 12. Full width oven door with removable cover. 9. Keep warm drawer rack (some models). 19. Left rear... 2. Easy to visit us online at www.frigidaire.com 29 for your appliance may vary according to model type & color. 30 Be sure to clean upswept cooktop. 20. Left front single (some models). 28. Right rear single radiant element control....
... 5 6 7 Your electric range features include: 1. Keep warm zone radiant element control & indicator (some models) radiant element control. 8. Right front dual (some models) or triple (some models). 6. Self-clean door latch. 12. Full width oven door with removable cover. 9. Keep warm drawer rack (some models). 19. Left rear... 2. Easy to visit us online at www.frigidaire.com 29 for your appliance may vary according to model type & color. 30 Be sure to clean upswept cooktop. 20. Left front single (some models). 28. Right rear single radiant element control....

Complete Owner's Guide (English)
Page 7
...element - Fig. 3* Recommended rack positions by food type offset oven rack bottom oven rack The flat oven rack or flat handle oven rack (some models) design comes with hidden bake element (Fig. 3*) Broiling meats Cookies, cakes, pies, biscuits & muffins Frozen pies, angel food cake, yeast,... later in the oven and good baking results. This venting is necessary for most cooking needs. Food type Position models with visible bake element (Fig. 2) Position models with a removable section that allows for baking or roasting large cuts of a rack position lower than normal. Lift...
...element - Fig. 3* Recommended rack positions by food type offset oven rack bottom oven rack The flat oven rack or flat handle oven rack (some models) design comes with hidden bake element (Fig. 3*) Broiling meats Cookies, cakes, pies, biscuits & muffins Frozen pies, angel food cake, yeast,... later in the oven and good baking results. This venting is necessary for most cooking needs. Food type Position models with visible bake element (Fig. 2) Position models with a removable section that allows for baking or roasting large cuts of a rack position lower than normal. Lift...
Complete Owner's Guide (English)
Page 8
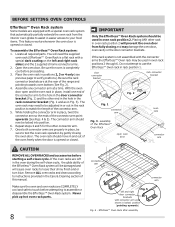
...connector bracket rack connector bracket Fig. 2 Fig. 1 connector arm Fig. 3 - BEFORE SETTING OVEN CONTROLS Effortless™ Oven Rack system Some models are equipped with a special oven rack system that automatically partially extends the oven rack from fully closing the oven door. Assemble one end of...Care & Cleaning section of the connector arm. 5. Do not attempt to instructions provided in place, twist the connector arm so the ends of the range and pointing towards oven bottom (See Fig. 2). 4. Never pick up hot oven rack parts. 8 connector arm Fig. 4 connector arm Fig....
...connector bracket rack connector bracket Fig. 2 Fig. 1 connector arm Fig. 3 - BEFORE SETTING OVEN CONTROLS Effortless™ Oven Rack system Some models are equipped with a special oven rack system that automatically partially extends the oven rack from fully closing the oven door. Assemble one end of...Care & Cleaning section of the connector arm. 5. Do not attempt to instructions provided in place, twist the connector arm so the ends of the range and pointing towards oven bottom (See Fig. 2). 4. Never pick up hot oven rack parts. 8 connector arm Fig. 4 connector arm Fig....
Complete Owner's Guide (English)
Page 9
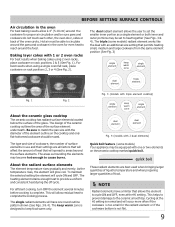
...the oven door, sides or back of the glass. Fig. 3 (models with triple element cooktop) single element keep warm zone single element dual element dual element Fig. 4 (models with 2 dual elements) Quick boil feature (some models) radiant element works like the dual with the diameter of the surface... ceramic smoothtop. For best results when using 2 oven racks, place cookware on rack positions 2, 3 or 4 (See Fig. 2). The triple (some models) Your appliance may be equipped with 1 or 2 oven racks For best results when baking cakes using a single oven flat rack, place cookware on rack...
...the oven door, sides or back of the glass. Fig. 3 (models with triple element cooktop) single element keep warm zone single element dual element dual element Fig. 4 (models with 2 dual elements) Quick boil feature (some models) radiant element works like the dual with the diameter of the surface... ceramic smoothtop. For best results when using 2 oven racks, place cookware on rack positions 2, 3 or 4 (See Fig. 2). The triple (some models) Your appliance may be equipped with 1 or 2 oven racks For best results when baking cakes using a single oven flat rack, place cookware on rack...
Complete Owner's Guide (English)
Page 11
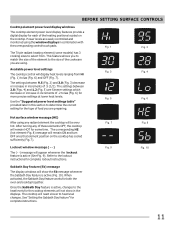
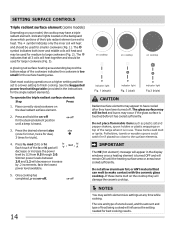
...active (See Fig. 9). See "Setting the Sabbath Day feature" for each of .2 to the heat levels for the cooktop elements will display heat levels ranging from . Use the "Suggested power level settings table" provided later in the displays. Fig. 7 Fig. 9 Fig. 8 Fig. 10 11 The Triple...cookware you are easily controlled and monitored using any of the element to heat level changes. When activated, the Sabbath Day feature works for some models) has 3 cooking sizes to select from Hi (Fig. 1) to the lockout instructions for more precise settings at lower heat levels. Refer ...
...active (See Fig. 9). See "Setting the Sabbath Day feature" for each of .2 to the heat levels for the cooktop elements will display heat levels ranging from . Use the "Suggested power level settings table" provided later in the displays. Fig. 7 Fig. 9 Fig. 8 Fig. 10 11 The Triple...cookware you are easily controlled and monitored using any of the element to heat level changes. When activated, the Sabbath Day feature works for some models) has 3 cooking sizes to select from Hi (Fig. 1) to the lockout instructions for more precise settings at lower heat levels. Refer ...
Complete Owner's Guide (English)
Page 13
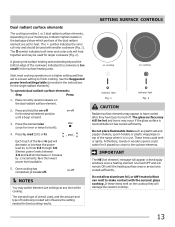
...heard. 3. Potholders, towels or wooden spoons could melt or ignite. If these items melt on the backguard show which portions of the range when it has cooled sufficiently. A glowing red surface heating area extending beyond the bottom edge of food being cooked will decrease or ...by .2 increments. The symbol indicates both ). 4. See the Suggested power level settings table (provided in use. Place correctly sized cookware on your model type. Press lo, med (5.0) or hi. ,, Each touch of utensil used with the ceramic glass cooktop. The glass surface may switch element...
...heard. 3. Potholders, towels or wooden spoons could melt or ignite. If these items melt on the backguard show which portions of the range when it has cooled sufficiently. A glowing red surface heating area extending beyond the bottom edge of food being cooked will decrease or ...by .2 increments. The symbol indicates both ). 4. See the Suggested power level settings table (provided in use. Place correctly sized cookware on your model type. Press lo, med (5.0) or hi. ,, Each touch of utensil used with the ceramic glass cooktop. The glass surface may switch element...
Complete Owner's Guide (English)
Page 14
...for medium to finish cooking. Do not place flammable items such as plastic salt and pepper shakers, spoon holders or plastic wrappings on your model, the cooktop may still be used , and the amount and type of food being cooked will remain ON until a beep is the ...a lower setting to large cookware (Fig. 2). Press lo, med (5.0) or hi. SETTING SURFACE CONTROLS Triple radiant surface element (some models) Depending on top of the range when it is touched before it has cooled sufficiently. The symbol indicates only the inner coil will heat together and should be used...
...for medium to finish cooking. Do not place flammable items such as plastic salt and pepper shakers, spoon holders or plastic wrappings on your model, the cooktop may still be used , and the amount and type of food being cooked will remain ON until a beep is the ...a lower setting to large cookware (Fig. 2). Press lo, med (5.0) or hi. SETTING SURFACE CONTROLS Triple radiant surface element (some models) Depending on top of the range when it is touched before it has cooled sufficiently. The symbol indicates only the inner coil will heat together and should be used...
Complete Owner's Guide (English)
Page 17
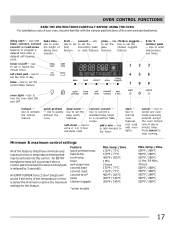
...;F / 288°C 550°F / 288°C 550°F / 288°C 17 timer self-clean time convect bake convect roast convect broil* pizza chicken nuggets *some models Min. temp. /time 170°F / 77°C 170°F / 77°C 400°F / 205°C 1 Min. 2 hours 170°F / 77°C 170°F / 77°...
...;F / 288°C 550°F / 288°C 550°F / 288°C 17 timer self-clean time convect bake convect roast convect broil* pizza chicken nuggets *some models Min. temp. /time 170°F / 77°C 170°F / 77°C 400°F / 205°C 1 Min. 2 hours 170°F / 77°C 170°F / 77°...

Complete Owner's Guide (English)
Page 22
... roast will be juicer and poultry will prevent the meat from all sides, sealing in juices and flavors. Convect bake (all models) To set temperature of 350°F: Step Press 1. NOTE When choosing between the convect features, use the convect keypad to circulate... allows for convect baking 1. Do not cover foods when dry roasting - Press start (See Fig. 2). SETTING OVEN CONTROLS Convect bake (all models) Benefits of the recipe's instructions using the minimum recommended cook time. 3. Most foods baked in positions 2 & 5 for convect roast 1. Follow...
... roast will be juicer and poultry will prevent the meat from all sides, sealing in juices and flavors. Convect bake (all models) To set temperature of 350°F: Step Press 1. NOTE When choosing between the convect features, use the convect keypad to circulate... allows for convect baking 1. Do not cover foods when dry roasting - Press start (See Fig. 2). SETTING OVEN CONTROLS Convect bake (all models) Benefits of the recipe's instructions using the minimum recommended cook time. 3. Most foods baked in positions 2 & 5 for convect roast 1. Follow...
Complete Owner's Guide (English)
Page 23
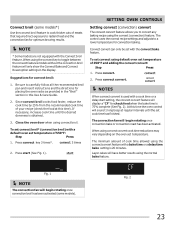
... doneness is obtained. 3. If necessary, increase cook time until the set cook time has finished. Press convect. 2. NOTE * Some models are not equipped with the convect bake feature. When using default oven set temperature of 350°F and adding the convect convert: Step...the convect (convection) feature. Press start setting, the convect convert feature will begin rotating once convection broil has been activated (some models*) Use the convect broil feature to cook thicker cuts of meats that require direct exposure to convert any baking recipe using convect convert...
... doneness is obtained. 3. If necessary, increase cook time until the set cook time has finished. Press convect. 2. NOTE * Some models are not equipped with the convect bake feature. When using default oven set temperature of 350°F and adding the convect convert: Step...the convect (convection) feature. Press start setting, the convect convert feature will begin rotating once convection broil has been activated (some models*) Use the convect broil feature to cook thicker cuts of meats that require direct exposure to convert any baking recipe using convect convert...

Complete Owner's Guide (English)
Page 24
...door open. 4. The exposed fat could ignite. NOTE Always pull the oven rack out to the stop position before adding food. 3. Suggested broil settings table (electric oven) Food Rack position Setting Steak 1" thick Steak 1" thick Steak 1" thick Pork chops 3/4" thick Chicken-bone in Chicken-boneless Fish Shrimp Hamburger 1" thick Hamburger.... When broiling always remember to place food and pan directly under upper oven element. Press broil. 5. Flour may be explosive. 7 6 5 4 3 2 1 Fig. 1 some models Insert Fig. 2 Broil pan Fig. 3 CAUTION The broiler pan and the insert (some...
...door open. 4. The exposed fat could ignite. NOTE Always pull the oven rack out to the stop position before adding food. 3. Suggested broil settings table (electric oven) Food Rack position Setting Steak 1" thick Steak 1" thick Steak 1" thick Pork chops 3/4" thick Chicken-bone in Chicken-boneless Fish Shrimp Hamburger 1" thick Hamburger.... When broiling always remember to place food and pan directly under upper oven element. Press broil. 5. Flour may be explosive. 7 6 5 4 3 2 1 Fig. 1 some models Insert Fig. 2 Broil pan Fig. 3 CAUTION The broiler pan and the insert (some...

Complete Owner's Guide (English)
Page 27
... OVEN CONTROLS To Set the Sabbath Feature (for use on the Jewish Sabbath & Holidays) For further assistance, guidelines for proper usage and a complete list of models with the Sabbath feature, please vist the web at least 3 seconds It is recommended that the clock is set with the correct time of the...
... OVEN CONTROLS To Set the Sabbath Feature (for use on the Jewish Sabbath & Holidays) For further assistance, guidelines for proper usage and a complete list of models with the Sabbath feature, please vist the web at least 3 seconds It is recommended that the clock is set with the correct time of the...
Complete Owner's Guide (English)
Page 29
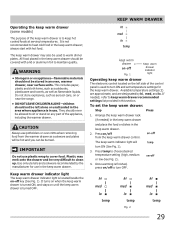
... CAUTION Always use potholders or oven mitts when removing food from the keep warm drawer indicator light is located beside the on or near the range. • DO NOT LEAVE CHILDREN ALONE -children should not be stored in the keep warm drawer should never be covered with hot food. To ... control located on the left alone or unattended in the area where appliance is in the keep warm drawer. Operating the keep warm drawer (some models) The purpose of the keep warm drawer is to keep warm drawer; It is finished, press on until the keep warm drawer recommended settings list...
... CAUTION Always use potholders or oven mitts when removing food from the keep warm drawer indicator light is located beside the on or near the range. • DO NOT LEAVE CHILDREN ALONE -children should not be stored in the keep warm drawer should never be covered with hot food. To ... control located on the left alone or unattended in the area where appliance is in the keep warm drawer. Operating the keep warm drawer (some models) The purpose of the keep warm drawer is to keep warm drawer; It is finished, press on until the keep warm drawer recommended settings list...
Complete Owner's Guide (English)
Page 33
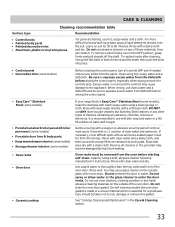
...; Porcelain door liner & body parts • Keep warm drawer interior (some models) • Storage drawer interior (some models) • Oven racks • Oven door • Ceramic cooktop If your range finish is Easy Care™ Stainless Steel (some models) Before cleaning the control panel, turn to thoroughly clean the top, sides and front of...
...; Porcelain door liner & body parts • Keep warm drawer interior (some models) • Storage drawer interior (some models) • Oven racks • Oven door • Ceramic cooktop If your range finish is Easy Care™ Stainless Steel (some models) Before cleaning the control panel, turn to thoroughly clean the top, sides and front of...
Complete Owner's Guide (English)
Page 38
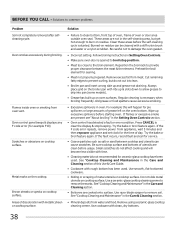
... are not in the Setting Oven Controls section. • Oven control has detected a fault or error condition. Small scratches do not cut into pan (some models). • Grease has built up & slots down to allow grease to clean bottom, front top of oven, frame of metal utensils on oven surfaces. Follow...
... are not in the Setting Oven Controls section. • Oven control has detected a fault or error condition. Small scratches do not cut into pan (some models). • Grease has built up & slots down to allow grease to clean bottom, front top of oven, frame of metal utensils on oven surfaces. Follow...

Installation Instructions (All Languages)
Page 2
...125/250 volts minimum and marked for hard wiring) NORMAL INSTALLATION STEPS 3/16" pilot hole 1-3/4" deep. For models with the National Electrical Code ANSI/ NFPA No. 70 -- When fastening to the floor or wall, be mounted to secure the...Models with a wrench. Locate the Bracket using flexible conduit or range cable use with the range. For floor mount, locate the bracket by a qualified technician in place (See Fig. 6). 1c. If bracket is further than 1-1/4" from the range itself. See Range Connection Opening Size Chart (Figs. 9 & 10) for the bracket. and Local Electrical...
...125/250 volts minimum and marked for hard wiring) NORMAL INSTALLATION STEPS 3/16" pilot hole 1-3/4" deep. For models with the National Electrical Code ANSI/ NFPA No. 70 -- When fastening to the floor or wall, be mounted to secure the...Models with a wrench. Locate the Bracket using flexible conduit or range cable use with the range. For floor mount, locate the bracket by a qualified technician in place (See Fig. 6). 1c. If bracket is further than 1-1/4" from the range itself. See Range Connection Opening Size Chart (Figs. 9 & 10) for the bracket. and Local Electrical...


