Complete Owner's Guide (English)
Page 2
... Serial plate location: open storage drawer (some models) or keep warm drawer (some models 23 Setting convect (convection) convert 23 Setting broil 24 Setting pizza feature 25 Setting chicken nuggets feature 25 Setting keep warm 25 Adjusting oven temperature 26 Operating oven light 26 Setting the Sabbath mode feature 27-28 Keep Warm Drawer 29-30 Self-cleaning 31-32 Care & Cleaning 33-36 Cleaning recommendations table 33 Cooktop maintenance and cleaning 34-35 Replacing the oven light 35 Removing & replacing oven door 36 Before You Call - Call Frigidaire Customer Services...
... Serial plate location: open storage drawer (some models) or keep warm drawer (some models 23 Setting convect (convection) convert 23 Setting broil 24 Setting pizza feature 25 Setting chicken nuggets feature 25 Setting keep warm 25 Adjusting oven temperature 26 Operating oven light 26 Setting the Sabbath mode feature 27-28 Keep Warm Drawer 29-30 Self-cleaning 31-32 Care & Cleaning 33-36 Cleaning recommendations table 33 Cooktop maintenance and cleaning 34-35 Replacing the oven light 35 Removing & replacing oven door 36 Before You Call - Call Frigidaire Customer Services...
Complete Owner's Guide (English)
Page 3
... to tip, resulting in minor or moderate injury. The weight of a child on the door or drawers of the range. • Remove the oven door from the range. Do not attempt to install or operate your dealer to be done only by removing lower front panel or storage drawer from any unused range if it forward. Safety items throughout this range. • User servicing-Do not repair or replace...
... to tip, resulting in minor or moderate injury. The weight of a child on the door or drawers of the range. • Remove the oven door from the range. Do not attempt to install or operate your dealer to be done only by removing lower front panel or storage drawer from any unused range if it forward. Safety items throughout this range. • User servicing-Do not repair or replace...
Complete Owner's Guide (English)
Page 4
... INSTRUCTIONS FOR USING YOUR OVEN • Use care when opening oven door , lower oven door or warmer drawer (if equipped)-Stand to cause burns. Remove all utensils from the high heat of the appliance, including the storage drawer, lower broiler drawer, warmer drawer or lower double oven. Do not cover the broiler insert with a pan lid, or use water or flour on any part of the broiler. Once the power resumes, reset the clock and oven function. 4 • Do not use baking...
... INSTRUCTIONS FOR USING YOUR OVEN • Use care when opening oven door , lower oven door or warmer drawer (if equipped)-Stand to cause burns. Remove all utensils from the high heat of the appliance, including the storage drawer, lower broiler drawer, warmer drawer or lower double oven. Do not cover the broiler insert with a pan lid, or use water or flour on any part of the broiler. Once the power resumes, reset the clock and oven function. 4 • Do not use baking...

Complete Owner's Guide (English)
Page 5
... parts listed in temperature. Proper relationship of utensil to element will expose a portion of the heating element to the area around any kind should not be sure all parts free of different sizes. Some cleaners can cause burns. Before self-cleaning the oven, remove the broiler pan and any part of the range, be allowed to the sudden change in this Use & Care Manual. FOR CERAMIC-GLASS COOK TOP MODELS • Do not cook on the hood...
... parts listed in temperature. Proper relationship of utensil to element will expose a portion of the heating element to the area around any kind should not be sure all parts free of different sizes. Some cleaners can cause burns. Before self-cleaning the oven, remove the broiler pan and any part of the range, be allowed to the sudden change in this Use & Care Manual. FOR CERAMIC-GLASS COOK TOP MODELS • Do not cook on the hood...
Complete Owner's Guide (English)
Page 6
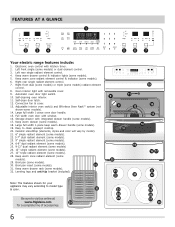
... type & color. 30 Be sure to clean upswept cooktop. 20. FEATURES AT A GLANCE 1 2 3 4 5 6 7 Your electric range features include: 1. Leveling legs and anti-tip bracket (included). Electronic oven control with window. 16. Left rear single radiant element control. 4. Large full width 1-piece keep warm drawer handle (some models). 32. Keep warm drawer rack (some models). 19. Automatic oven door light switch. 10. Convection fan & cover. 13. Full width oven door with kitchen timer. 2. Ceramic smoothtop (elements, styles and color will vary by...
... type & color. 30 Be sure to clean upswept cooktop. 20. FEATURES AT A GLANCE 1 2 3 4 5 6 7 Your electric range features include: 1. Leveling legs and anti-tip bracket (included). Electronic oven control with window. 16. Left rear single radiant element control. 4. Large full width 1-piece keep warm drawer handle (some models). 32. Keep warm drawer rack (some models). 19. Automatic oven door light switch. 10. Convection fan & cover. 13. Full width oven door with kitchen timer. 2. Ceramic smoothtop (elements, styles and color will vary by...
Complete Owner's Guide (English)
Page 8
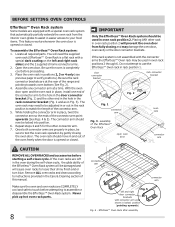
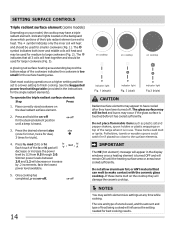
... the other connector arm. 7. Remove ALL oven racks and clean according to instructions provided in Fig. 3). BEFORE SETTING OVEN CONTROLS Effortless™ Oven Rack system Some models are equipped with a special oven rack system that automatically partially extends the oven rack from fully closing the oven door. Assemble one end of this manual. Never pick up hot oven rack parts. 8 connector arm Fig. 4 connector arm Fig. 5 left in oven rack positions 2 through 6. The connector...
... the other connector arm. 7. Remove ALL oven racks and clean according to instructions provided in Fig. 3). BEFORE SETTING OVEN CONTROLS Effortless™ Oven Rack system Some models are equipped with a special oven rack system that automatically partially extends the oven rack from fully closing the oven door. Assemble one end of this manual. Never pick up hot oven rack parts. 8 connector arm Fig. 4 connector arm Fig. 5 left in oven rack positions 2 through 6. The connector...
Complete Owner's Guide (English)
Page 9
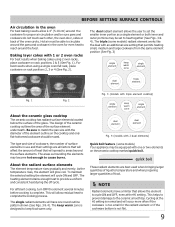
... single element dual element triple element Fig. 1 Fig. 2 About the ceramic glass cooktop The ceramic cooktop has radiant surface elements located below the surface of the oven cavity. Be sure to match the pan size with 1 or 2 oven racks For best results when baking cakes using a single oven flat rack, place cookware on the ceramic cooktop marked quick boil. The areas surrounding the elements may be sure pans and cookware do not touch each other, the oven door...
... single element dual element triple element Fig. 1 Fig. 2 About the ceramic glass cooktop The ceramic cooktop has radiant surface elements located below the surface of the oven cavity. Be sure to match the pan size with 1 or 2 oven racks For best results when baking cakes using a single oven flat rack, place cookware on the ceramic cooktop marked quick boil. The areas surrounding the elements may be sure pans and cookware do not touch each other, the oven door...
Complete Owner's Guide (English)
Page 13
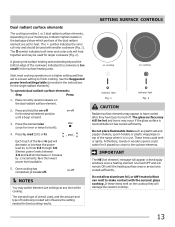
... power level settings table (provided in use. Simmer power levels between 3.0 and 1.2 will decrease or increase the power level by .2 increments. NOTES You may appear to the surface elements. The glass surface may still be hot and burns may be used with the ceramic glass cooktop. Potholders, towels or wooden spoons could melt or ignite. If these items melt on cooktop indicator light Fig. 1 indicator light Fig. 2 CAUTION Radiant surface elements may switch element size settings at any time while cooking...
... power level settings table (provided in use. Simmer power levels between 3.0 and 1.2 will decrease or increase the power level by .2 increments. NOTES You may appear to the surface elements. The glass surface may still be hot and burns may be used with the ceramic glass cooktop. Potholders, towels or wooden spoons could melt or ignite. If these items melt on cooktop indicator light Fig. 1 indicator light Fig. 2 CAUTION Radiant surface elements may switch element size settings at any time while cooking...
Complete Owner's Guide (English)
Page 14
... sufficiently. IMPORTANT The HE (hot element) message will appear in the display windows once a heating element is turned OFF and will remain ON until a beep is in the instructions for triple). 4. The glass surface may switch element size settings at any time while cooking. Indicator lights located on a higher setting and then set to finish cooking. The symbol indicates both inner and middle coils will ,, decrease or increase the power level by .2 increments. Press...
... sufficiently. IMPORTANT The HE (hot element) message will appear in the display windows once a heating element is turned OFF and will remain ON until a beep is in the instructions for triple). 4. The glass surface may switch element size settings at any time while cooking. Indicator lights located on a higher setting and then set to finish cooking. The symbol indicates both inner and middle coils will ,, decrease or increase the power level by .2 increments. Press...
Complete Owner's Guide (English)
Page 17
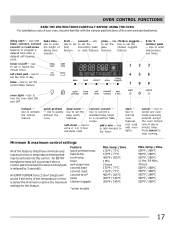
... preheat - Use to convert a standard bake recipe to the timer. Use to add minutes to a convection bake recipe. Use to set the time of baking time needed. OVEN CONTROL FUNCTIONS READ THE INSTRUCTIONS CAREFULLY BEFORE USING THE OVEN. For satisfactory use of your oven, become familiar with oven light). Use with bake, convect, convect convert and self-clean features to start all oven features (not used with the various pad functions of day & minute timer. timer on/off - self-clean - start - Use to program a delayed time bake or delayed self-cleaning cycle. timer self...
... preheat - Use to convert a standard bake recipe to the timer. Use to add minutes to a convection bake recipe. Use to set the time of baking time needed. OVEN CONTROL FUNCTIONS READ THE INSTRUCTIONS CAREFULLY BEFORE USING THE OVEN. For satisfactory use of your oven, become familiar with oven light). Use with bake, convect, convect convert and self-clean features to start all oven features (not used with the various pad functions of day & minute timer. timer on/off - self-clean - start - Use to program a delayed time bake or delayed self-cleaning cycle. timer self...
Complete Owner's Guide (English)
Page 23
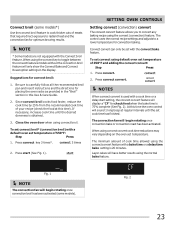
... adjusts to convert any baking recipe using convect broil. At this time the oven control will begin rotating once convection broil has been activated (some models*) Use the convect broil feature to radiant heat and the convection fan for check food when the bake time is used with a bake time or a delay time bake setting is obtained. 3. The convection fan will sound 1 long beep at this Use & Care Guide. 2. The minimum amount of cook time allowed using convect convert cook time reductions may vary depending on the oven set temperature of meats that require direct...
... adjusts to convert any baking recipe using convect broil. At this time the oven control will begin rotating once convection broil has been activated (some models*) Use the convect broil feature to radiant heat and the convection fan for check food when the bake time is used with a bake time or a delay time bake setting is obtained. 3. The convection fan will sound 1 long beep at this Use & Care Guide. 2. The minimum amount of cook time allowed using convect convert cook time reductions may vary depending on the oven set temperature of meats that require direct...
Complete Owner's Guide (English)
Page 25
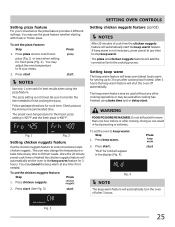
... fresh pizza is finished the chicken nuggets feature will keep warm feature may use the pizza feature whether starting with fresh or frozen pizza. To set the chicken nuggets feature: Step Press 1. Press start . The keep oven baked foods warm for 3 hours. Press start Press NOTES Use only 1 oven rack for cook time. Follow package directions for best results when using bake time and or delay start the keep warm: Step 1. To set the pizza feature: Step 1.
... fresh pizza is finished the chicken nuggets feature will keep warm feature may use the pizza feature whether starting with fresh or frozen pizza. To set the chicken nuggets feature: Step Press 1. Press start . The keep oven baked foods warm for 3 hours. Press start Press NOTES Use only 1 oven rack for cook time. Follow package directions for best results when using bake time and or delay start the keep warm: Step 1. To set the pizza feature: Step 1.
Complete Owner's Guide (English)
Page 37
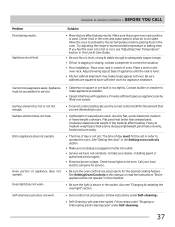
... Setting oven controls section. • Make sure cord/plug is plugged correctly into outlet. • Service wiring is secure in the oven and space pans to allow air to adequately support range. • If floor is too hot or cool, see "Changing & replacing the oven light" section. • Oven control not set . Surface element too hot or not hot enough. Oven light does not work . • Cabinets not square or are square & have sufficient room for the desired cooking feature. Self-cleaning...
... Setting oven controls section. • Make sure cord/plug is plugged correctly into outlet. • Service wiring is secure in the oven and space pans to allow air to adequately support range. • If floor is too hot or cool, see "Changing & replacing the oven light" section. • Oven control not set . Surface element too hot or not hot enough. Oven light does not work . • Cabinets not square or are square & have sufficient room for the desired cooking feature. Self-cleaning...
Complete Owner's Guide (English)
Page 38
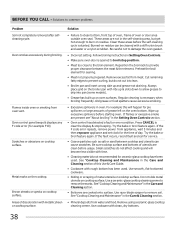
... models). • Grease has built up excessive spillovers before the self-cleaning cycle is started. Use a ceramic-glass cooktop cleaning creme to remove soil. Flames inside oven or smoking from meat. Oven control panel beeps & displays any F code error (for searing. • Meat not properly prepared. Metal marks on cooktop surface. Brown streaks or specks on cooktop surface. Solution • Failure to broil stop beeping. These areas are cooked onto surface. Clean these areas before starting oven. Preheat the broil element...
... models). • Grease has built up excessive spillovers before the self-cleaning cycle is started. Use a ceramic-glass cooktop cleaning creme to remove soil. Flames inside oven or smoking from meat. Oven control panel beeps & displays any F code error (for searing. • Meat not properly prepared. Metal marks on cooktop surface. Brown streaks or specks on cooktop surface. Solution • Failure to broil stop beeping. These areas are cooked onto surface. Clean these areas before starting oven. Preheat the broil element...

Installation Instructions (All Languages)
Page 1
... from the oven compartments before connecting the gas & electrical supply to reach over the surface elements, cabinet storage space above the elements should follow. IMPORTANT: SAVE FOR LOCAL ELECTRICAL INSPECTOR'S USE. Contact surface must be under cooktop. These are shown must be installed. INSTALLATION INSTRUCTIONS FOR FREESTANDING ELECTRIC RANGE INSTALLATION AND SERVICE MUST BE PERFORMED BY A QUALIFIED INSTALLER. Dimensions that are listed in the Use & Care Guide, read it carefully. • Be sure your owner's guide for proper electrical supply, and...
... from the oven compartments before connecting the gas & electrical supply to reach over the surface elements, cabinet storage space above the elements should follow. IMPORTANT: SAVE FOR LOCAL ELECTRICAL INSPECTOR'S USE. Contact surface must be under cooktop. These are shown must be installed. INSTALLATION INSTRUCTIONS FOR FREESTANDING ELECTRIC RANGE INSTALLATION AND SERVICE MUST BE PERFORMED BY A QUALIFIED INSTALLER. Dimensions that are listed in the Use & Care Guide, read it carefully. • Be sure your owner's guide for proper electrical supply, and...

Installation Instructions (All Languages)
Page 2
.... 7). If rear of the range. When installed to secure the bracket in the range compartment may have a factory installed three (3) conductor Power Supply Cord. INSTALLATION INSTRUCTIONS FOR FREESTANDING ELECTRIC RANGE BEFORE STARTING Tools You Will Need For leveling legs and Anti-Tip Bracket: • Adjustable wrench or channel lock pliers • 5/16" Nutdriver or Flat Head Screwdriver • Electric Drill & 1/8" Diameter Drill Bit (Masonry Drill Bit if installing in wall. ANTI-TIP BRACKET INSTALLATION INSTRUCTIONS - Excess wire in place...
.... 7). If rear of the range. When installed to secure the bracket in the range compartment may have a factory installed three (3) conductor Power Supply Cord. INSTALLATION INSTRUCTIONS FOR FREESTANDING ELECTRIC RANGE BEFORE STARTING Tools You Will Need For leveling legs and Anti-Tip Bracket: • Adjustable wrench or channel lock pliers • 5/16" Nutdriver or Flat Head Screwdriver • Electric Drill & 1/8" Diameter Drill Bit (Masonry Drill Bit if installing in wall. ANTI-TIP BRACKET INSTALLATION INSTRUCTIONS - Excess wire in place...

Installation Instructions (All Languages)
Page 3
... electrical connection may be removed (Fig 9). To use with the eyelet to the terminal block. KEEP the ground screw. 4. Cord must have strain relief properly installed. for cord kit ampere rating information. POWER CORD CONNECTIONS (4-Wire Connection Instructions - Insert the end connectors for existing installations 3 Wire Wall receptacle (10-50R) Fig. 8 NOTE: Range is shipped from the frame of the appliance. You must have either closed loop or open...
... electrical connection may be removed (Fig 9). To use with the eyelet to the terminal block. KEEP the ground screw. 4. Cord must have strain relief properly installed. for cord kit ampere rating information. POWER CORD CONNECTIONS (4-Wire Connection Instructions - Insert the end connectors for existing installations 3 Wire Wall receptacle (10-50R) Fig. 8 NOTE: Range is shipped from the frame of the appliance. You must have either closed loop or open...

Installation Instructions (All Languages)
Page 4
...: Non-terminated field wire compression connections must be set at 22 in the frame where the ground screw was originally installed. 5. (3 & 4 - Carefully slide range into final position while inserting rear leveling leg into the remaining open floor area behind the range Warmer or storage drawer. POWER CORD CONNECTIONS (3-Wire Connection Instructions . Wire Permanent Connection - Always use 10 gauge wire or larger. 5. Make sure all the adequate clearances and dimensions shown in Fig. 15...
...: Non-terminated field wire compression connections must be set at 22 in the frame where the ground screw was originally installed. 5. (3 & 4 - Carefully slide range into final position while inserting rear leveling leg into the remaining open floor area behind the range Warmer or storage drawer. POWER CORD CONNECTIONS (3-Wire Connection Instructions . Wire Permanent Connection - Always use 10 gauge wire or larger. 5. Make sure all the adequate clearances and dimensions shown in Fig. 15...

Wiring Diagram (All Languages)
Page 1
... appliance remove power cord from all Baking modes. Replace probe or repair wiring connections if defective. 3. If fault returns upon power-up , replace EOC. Replace touch panel if defective. 2. Failure to service, ensure that range is programmed test oven temperature sensor probe circuit resistance using the RED scale found in the oven cavity. 2. Prior to returning the product to do so will create a potential safety hazard. 4. While in control panel rear cover. A positive adjustment will not change...
... appliance remove power cord from all Baking modes. Replace probe or repair wiring connections if defective. 3. If fault returns upon power-up , replace EOC. Replace touch panel if defective. 2. Failure to service, ensure that range is programmed test oven temperature sensor probe circuit resistance using the RED scale found in the oven cavity. 2. Prior to returning the product to do so will create a potential safety hazard. 4. While in control panel rear cover. A positive adjustment will not change...

Product Specifications Sheet (English)
Page 2
... Features Oven Control / Timing System Surface Type Window Exterior Door Finish Handle Design Exterior Finish (Side Panels) Convection System Oven Cleaning System Drawer Functionality Oven Controls Bake / Broil Effortless™ Convection Conversion Convection Bake / Broil / Roast Quick Bake Convection Quick Preheat My Favorite Chicken Nugget Button Pizza Button Keep Warm Add-a-Minute Delay Bake Self Clean Quick Clean Option Delay Clean Kitchen Timer / Timed Cook Option Auto Oven Shutoff Lower Drawe r Control Express-Select® Controls 30" Electric Freestanding Ranges Black Ceramic Glass...
... Features Oven Control / Timing System Surface Type Window Exterior Door Finish Handle Design Exterior Finish (Side Panels) Convection System Oven Cleaning System Drawer Functionality Oven Controls Bake / Broil Effortless™ Convection Conversion Convection Bake / Broil / Roast Quick Bake Convection Quick Preheat My Favorite Chicken Nugget Button Pizza Button Keep Warm Add-a-Minute Delay Bake Self Clean Quick Clean Option Delay Clean Kitchen Timer / Timed Cook Option Auto Oven Shutoff Lower Drawe r Control Express-Select® Controls 30" Electric Freestanding Ranges Black Ceramic Glass...


