
Installation Instructions (All Languages)
Page 1
... range.) 7 ICEMAKER Ensure icemaker is setting solid on all connections - Use adjustable wrench to adjust front rollers. The refrigerator should slope ¼" to ½" from doors only after installation is complete INSTALLATION CHECKOFF LIST Doors Handles are secure ... SUPPLY Connect water supply - To level cabinet or change door height: 1. Remove toe grille. 2. check for additional information about your refrigerator. 5 LEVELING AND ADJUSTING All four corners of installation, proper air circulation, and plumbing and electrical connections: • Sides & Top..........3/8"...
... range.) 7 ICEMAKER Ensure icemaker is setting solid on all connections - Use adjustable wrench to adjust front rollers. The refrigerator should slope ¼" to ½" from doors only after installation is complete INSTALLATION CHECKOFF LIST Doors Handles are secure ... SUPPLY Connect water supply - To level cabinet or change door height: 1. Remove toe grille. 2. check for additional information about your refrigerator. 5 LEVELING AND ADJUSTING All four corners of installation, proper air circulation, and plumbing and electrical connections: • Sides & Top..........3/8"...
Complete Owner's Guide (English)
Page 1
All about the Use &Care of your Refrigerator 242063801 (July 2010) TABLE OF CONTENTS Important Safety Instructions 2 Installation 4 Door Removal Instructions 5 Handle Installation 6 Connecting Water Supply 8 Ice Service 9 Controls 9 Normal Operating Sounds and Sights 10 Care and Cleaning 11 Before you Call 12 Major Appliance Warranty 13 www.frigidaire.com USA 1-800-944-9044 www.frigidaire.ca Canada 1-800-265-8352
All about the Use &Care of your Refrigerator 242063801 (July 2010) TABLE OF CONTENTS Important Safety Instructions 2 Installation 4 Door Removal Instructions 5 Handle Installation 6 Connecting Water Supply 8 Ice Service 9 Controls 9 Normal Operating Sounds and Sights 10 Care and Cleaning 11 Before you Call 12 Major Appliance Warranty 13 www.frigidaire.com USA 1-800-944-9044 www.frigidaire.ca Canada 1-800-265-8352
Complete Owner's Guide (English)
Page 2
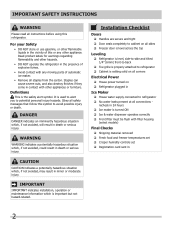
...or other flammable liquids in minor or moderate injury. Definitions This is used to alert you to refrigerator No water leaks present at all instructions before using this refrigerator. Important Safety Instructions WARNING Please read all connections - It is the safety alert symbol. Installation ...secure and tight Door seals completely to cabinet on all sides Freezer door is level across the top Leveling Refrigerator is level, side-to-side and tilted 1/4" (6mm) front-to-back Toe grille is properly attached to avoid possible injury or...
...or other flammable liquids in minor or moderate injury. Definitions This is used to alert you to refrigerator No water leaks present at all instructions before using this refrigerator. Important Safety Instructions WARNING Please read all connections - It is the safety alert symbol. Installation ...secure and tight Door seals completely to cabinet on all sides Freezer door is level across the top Leveling Refrigerator is level, side-to-side and tilted 1/4" (6mm) front-to-back Toe grille is properly attached to avoid possible injury or...
Complete Owner's Guide (English)
Page 3
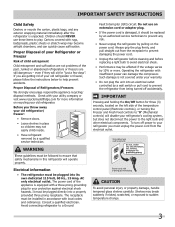
...bulb to avoid electrical shock. • Performance may be affected if the voltage varies by a qualified service technician. Junked or abandoned refrigerators or freezers are not problems of the appliance is equipped with a three-prong grounding plug for three (3) seconds, located on the ... the temperature control panel (Electronic controls), or turning the Freezer and Fresh Food controls to "0" (Mechanical controls) will disable your refrigerator's cooling system, but does not disconnect the power to help prevent accidents. Shelves may become airtight chambers, and can damage the ...
...bulb to avoid electrical shock. • Performance may be affected if the voltage varies by a qualified service technician. Junked or abandoned refrigerators or freezers are not problems of the appliance is equipped with a three-prong grounding plug for three (3) seconds, located on the ... the temperature control panel (Electronic controls), or turning the Freezer and Fresh Food controls to "0" (Mechanical controls) will disable your refrigerator's cooling system, but does not disconnect the power to help prevent accidents. Shelves may become airtight chambers, and can damage the ...
Complete Owner's Guide (English)
Page 4
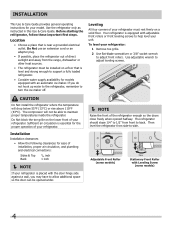
... the front of direct sunlight and away from the range, dishwasher or other heat sources. • The refrigerator must be able to back. Use adjustable wrench to support a fully loaded refrigerator. • Consider water supply availability for models equipped with adjustable front rollers or front leveling screws to ... Leveling Screw (some models) Raise Stationary Front Roller with the door hinge side against a wall, you do not hook up water to the refrigerator, remember to turn the ice maker off. The compressor will drop below 55°F (13°C) or rise above 110°F (43&#...
... the front of direct sunlight and away from the range, dishwasher or other heat sources. • The refrigerator must be able to back. Use adjustable wrench to support a fully loaded refrigerator. • Consider water supply availability for models equipped with adjustable front rollers or front leveling screws to ... Leveling Screw (some models) Raise Stationary Front Roller with the door hinge side against a wall, you do not hook up water to the refrigerator, remember to turn the ice maker off. The compressor will drop below 55°F (13°C) or rise above 110°F (43&#...

Complete Owner's Guide (English)
Page 5
... two outside screws enough to allow hinge and shim to slide out. Ensure plastic washer stays on next page). 11 Move freezer and refrigerator door stops to help align hinge hole. 13 Tighten center hinge pin with a soft lead pencil. Door Removal Instructions Top Hinge Cover Front...Bottom Hinge Screw AND Phillips™ Head OR Socket Wrench Set OR Adjustable Wrench 3/8" Fixed Wrench NOTE The direction in which your refrigerator doors open (door swing) can be performed by a qualified person. Move hinge pin to opposite side. 15 Lower freezer door onto center ...
... two outside screws enough to allow hinge and shim to slide out. Ensure plastic washer stays on next page). 11 Move freezer and refrigerator door stops to help align hinge hole. 13 Tighten center hinge pin with a soft lead pencil. Door Removal Instructions Top Hinge Cover Front...Bottom Hinge Screw AND Phillips™ Head OR Socket Wrench Set OR Adjustable Wrench 3/8" Fixed Wrench NOTE The direction in which your refrigerator doors open (door swing) can be performed by a qualified person. Move hinge pin to opposite side. 15 Lower freezer door onto center ...

Complete Owner's Guide (English)
Page 6
... instructions in the Use & Care Guide to installing the handles. Your model will have either a right hand or left hand door swing. To attach metal refrigerator handle: 1 Place rounded part of handle onto shoulder screw on the rounded part of the handle until the handle is flush with the two (2) holes...
... instructions in the Use & Care Guide to installing the handles. Your model will have either a right hand or left hand door swing. To attach metal refrigerator handle: 1 Place rounded part of handle onto shoulder screw on the rounded part of the handle until the handle is flush with the two (2) holes...
Complete Owner's Guide (English)
Page 7
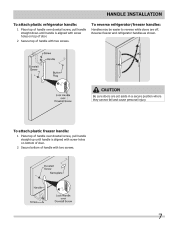
... up until handle is aligned with screw holes on top of door. 2 Secure top of handle with two screws. Reverse freezer and refrigerator handles as shown. To reverse refrigerator/freezer handles: Handles may be easier to reverse while doors are set aside in a secure position where they cannot fall and cause personal...
... up until handle is aligned with screw holes on top of door. 2 Secure top of handle with two screws. Reverse freezer and refrigerator handles as shown. To reverse refrigerator/freezer handles: Handles may be easier to reverse while doors are set aside in a secure position where they cannot fall and cause personal...
Complete Owner's Guide (English)
Page 8
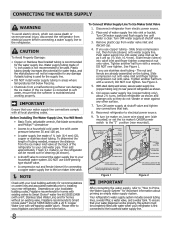
...the ice maker inlet valve at the back of the refrigerator to electrical power source. 9. Then add approximately 7 feet (2.1 meters), so the refrigerator can be completely filled with water when your local/state building codes, Frigidaire recommends for the supply line. • DO NOT... install water supply tubing in loop to allow moving refrigerator out for recommendations on , lower wire signal ...
...the ice maker inlet valve at the back of the refrigerator to electrical power source. 9. Then add approximately 7 feet (2.1 meters), so the refrigerator can be completely filled with water when your local/state building codes, Frigidaire recommends for the supply line. • DO NOT... install water supply tubing in loop to allow moving refrigerator out for recommendations on , lower wire signal ...

Complete Owner's Guide (English)
Page 9
... air in the ON position. To turn ice maker OFF by lifting the wire signal arm until it with the wire signal arm in the refrigerator and freezer compartments. This is full. For good circulation, do not block cold air vents with the doors closed for at any time. Turning your... Off To stop the ice maker, lift the wire signal arm until it clicks and locks in the UP position. Ice service Controls If your refrigerator has an automatic ice maker, no usage, it as far back as needed. NOTE Automatic ice makers are also optional accessories that may have...
... air in the ON position. To turn ice maker OFF by lifting the wire signal arm until it with the wire signal arm in the refrigerator and freezer compartments. This is full. For good circulation, do not block cold air vents with the doors closed for at any time. Turning your... Off To stop the ice maker, lift the wire signal arm until it clicks and locks in the UP position. Ice service Controls If your refrigerator has an automatic ice maker, no usage, it as far back as needed. NOTE Automatic ice makers are also optional accessories that may have...
Complete Owner's Guide (English)
Page 10
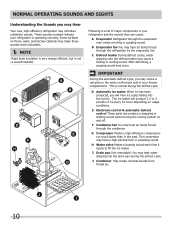
...and sights Understanding the Sounds you may notice a red glow in the vents on usage conditions. These sounds normally indicate your refrigerator and the sounds they can produce a snapping or clicking sound when turning the cooling system on floors, walls, and kitchen cabinets...into the ice bin. F Condenser fan You may hear air being forced through the refrigerator by the evaporator fan. G Compressor Modern, high-efficiency compressors run much faster than in your refrigerator is normal during the defrost cycle. E Electronic control & automatic defrost control These parts ...
...and sights Understanding the Sounds you may notice a red glow in the vents on usage conditions. These sounds normally indicate your refrigerator and the sounds they can produce a snapping or clicking sound when turning the cooling system on floors, walls, and kitchen cabinets...into the ice bin. F Condenser fan You may hear air being forced through the refrigerator by the evaporator fan. G Compressor Modern, high-efficiency compressors run much faster than in your refrigerator is normal during the defrost cycle. E Electronic control & automatic defrost control These parts ...

Complete Owner's Guide (English)
Page 11
...soapy water and a dishcloth. DO NOT use razor blades or other electrical components will continue until you store or move the refrigerator beyond the plumbing connections. • Damp objects stick to clean smooth handles. Use same wattage when replacing bulb 11 Contact a...; Do not remove the serial plate. Remove toe grille (see Installation Instructions). Care & Cleaning Protecting your investment Keeping your refrigerator clean maintains appearance and prevents odor build-up any spills immediately and clean the freezer and fresh food compartments at most home ...
...soapy water and a dishcloth. DO NOT use razor blades or other electrical components will continue until you store or move the refrigerator beyond the plumbing connections. • Damp objects stick to clean smooth handles. Use same wattage when replacing bulb 11 Contact a...; Do not remove the serial plate. Remove toe grille (see Installation Instructions). Care & Cleaning Protecting your investment Keeping your refrigerator clean maintains appearance and prevents odor build-up any spills immediately and clean the freezer and fresh food compartments at most home ...
Complete Owner's Guide (English)
Page 12
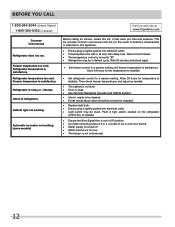
... plug is tightly pushed into electrical outlet. • Light switch may save you time and expense. Allow 24 hours for temperature to "O". • Refrigerator may be stuck. Common Occurrences Refrigerator does not run. Odors in UP position. • Ice maker should be covered or wrapped. • Replace light bulb. • Ensure plug.... • The freezer is turned to stabilize. Before You Call 1-800-944-9044 (United States) 1-800-265-8352 (Canada) Visit our web site at www.frigidaire.com. Refrigerator temperature is satisfactory.
... plug is tightly pushed into electrical outlet. • Light switch may save you time and expense. Allow 24 hours for temperature to "O". • Refrigerator may be stuck. Common Occurrences Refrigerator does not run. Odors in UP position. • Ice maker should be covered or wrapped. • Replace light bulb. • Ensure plug.... • The freezer is turned to stabilize. Before You Call 1-800-944-9044 (United States) 1-800-265-8352 (Canada) Visit our web site at www.frigidaire.com. Refrigerator temperature is satisfactory.

Complete Owner's Guide (English)
Page 13
... Mississauga, Ontario, Canada L5V 3E4 13 Rust on the interior or exterior of appliance or home incurred during installation, including but not limited to, any refrigerator or freezer failures. 6. Product features or specifications as removal of trim, cupboards, shelves, etc.,which do not involve malfunction or defects in ordinary household use...
... Mississauga, Ontario, Canada L5V 3E4 13 Rust on the interior or exterior of appliance or home incurred during installation, including but not limited to, any refrigerator or freezer failures. 6. Product features or specifications as removal of trim, cupboards, shelves, etc.,which do not involve malfunction or defects in ordinary household use...


