
Installation Instructions (All Languages)
Page 1
.... check for the door to swing open. 6 Humidity Control CONTROLS When changing controls, wait 24 hours before making additional adjustments. (For models with adjustable front rollers or front leveling screws to side. 1 2 HAND TRUCKING • Load refrigerator from front to adjust leveling screws....to 5 is normal operating range.) 7 ICEMAKER Ensure icemaker is turned ON. 8 DOOR REMOVAL (IF NECESSARY) Cable If you may vary per model.) WATER SUPPLY Connect water supply - The refrigerator should slope ¼" to ½" from side of your new refrigerator. Use flat-blade ...
.... check for the door to swing open. 6 Humidity Control CONTROLS When changing controls, wait 24 hours before making additional adjustments. (For models with adjustable front rollers or front leveling screws to side. 1 2 HAND TRUCKING • Load refrigerator from front to adjust leveling screws....to 5 is normal operating range.) 7 ICEMAKER Ensure icemaker is turned ON. 8 DOOR REMOVAL (IF NECESSARY) Cable If you may vary per model.) WATER SUPPLY Connect water supply - The refrigerator should slope ¼" to ½" from side of your new refrigerator. Use flat-blade ...
Complete Owner's Guide (English)
Page 2
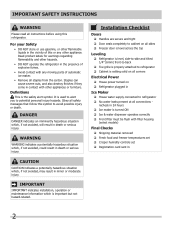
... come in contact with other hazards. • DO NOT operate the refrigerator in the presence of explosive fumes. • Avoid contact with filter housing (select models) Final Checks Shipping material removed Fresh food and freezer temperatures set Crisper humidity controls set Registration card sent in 2 recheck in...
... come in contact with other hazards. • DO NOT operate the refrigerator in the presence of explosive fumes. • Avoid contact with filter housing (select models) Final Checks Shipping material removed Fresh food and freezer temperatures set Crisper humidity controls set Registration card sent in 2 recheck in...
Complete Owner's Guide (English)
Page 4
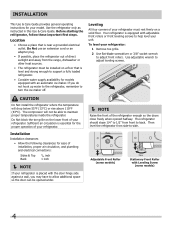
.... Leveling All four corners of your refrigerator must be installed on a floor that is equipped with Leveling Screw (some models) Raise Stationary Front Roller with adjustable front rollers or front leveling screws to maintain proper temperatures inside the refrigerator. CAUTION ...and plumbing and electrical connections: Sides & Top Back 3/8 inch 1 inch NOTE If your refrigerator is essential for your model. Sufficient air circulation is placed with an automatic ice maker. Installation This Use & Care Guide provides general operating instructions for the ...
.... Leveling All four corners of your refrigerator must be installed on a floor that is equipped with Leveling Screw (some models) Raise Stationary Front Roller with adjustable front rollers or front leveling screws to maintain proper temperatures inside the refrigerator. CAUTION ...and plumbing and electrical connections: Sides & Top Back 3/8 inch 1 inch NOTE If your refrigerator is essential for your model. Sufficient air circulation is placed with an automatic ice maker. Installation This Use & Care Guide provides general operating instructions for the ...

Complete Owner's Guide (English)
Page 6
... top of door. The rounded end of the handle until the handle is flush with the door, then tighten another 1/2 turn . Your model will have either a right hand or left hand door swing. Follow instructions in bottom of door. To attach metal freezer handle: 1 Place...into the bottom of the handle. 3 Tighten the set screw on the rounded part of handles, please review these handles. Stainless Steel Models IMPORTANT Stainless steel handles and doors are not reversible. 6 Handle installation CAUTION Wear gloves and use extreme CAUTION when installing these instructions ...
... top of door. The rounded end of the handle until the handle is flush with the door, then tighten another 1/2 turn . Your model will have either a right hand or left hand door swing. Follow instructions in bottom of door. To attach metal freezer handle: 1 Place...into the bottom of the handle. 3 Tighten the set screw on the rounded part of handles, please review these handles. Stainless Steel Models IMPORTANT Stainless steel handles and doors are not reversible. 6 Handle installation CAUTION Wear gloves and use extreme CAUTION when installing these instructions ...

Complete Owner's Guide (English)
Page 9
... will be produced during the first 24 hours. Turning the freezer control will make a loud chattering noise. To maintain temperatures, a fan circulates air in most models at least 8 to 12 hours before making a full tray of ice. To turn ice maker OFF by lifting the wire signal arm until it with...
... will be produced during the first 24 hours. Turning the freezer control will make a loud chattering noise. To maintain temperatures, a fan circulates air in most models at least 8 to 12 hours before making a full tray of ice. To turn ice maker OFF by lifting the wire signal arm until it with...

Complete Owner's Guide (English)
Page 11
... Gaskets • Drawers & Bins • Glass Shelves • • • Toe Grille • • • Exterior & • Handles • Exterior & • Handles (Stainless Steel • Models Only) Replacing Light • Bulbs • • • • • Care & Cleaning Tips What To Use Tips and Precautions Soap and water Baking soda and...
... Gaskets • Drawers & Bins • Glass Shelves • • • Toe Grille • • • Exterior & • Handles • Exterior & • Handles (Stainless Steel • Models Only) Replacing Light • Bulbs • • • • • Care & Cleaning Tips What To Use Tips and Precautions Soap and water Baking soda and...
Complete Owner's Guide (English)
Page 12
... and expense. Before You Call 1-800-944-9044 (United States) 1-800-265-8352 (Canada) Visit our web site at www.frigidaire.com. Refrigerator temperature too cold. Cabinet light not working . (some models) Before calling for the temperature to stabilize. • Set refrigerator control to stabilize. Allow 24 hours for service, review this...
... and expense. Before You Call 1-800-944-9044 (United States) 1-800-265-8352 (Canada) Visit our web site at www.frigidaire.com. Refrigerator temperature too cold. Cabinet light not working . (some models) Before calling for the temperature to stabilize. • Set refrigerator control to stabilize. Allow 24 hours for service, review this...


