
Installation Instructions (All Languages)
Page 1
Use flat-blade screwdriver or 3/8" socket wrench to adjust leveling screws. SHIPPING MATERIAL 3 Remove Shipping material. (Features may hear once your refrigerator is running. √ Please read entire Use & Care Manual to become aware of important safety instructions and to become familiar witrh your new refrigerator. √ Send in the Use & Care Manual so you understand the sounds you may vary per model.) WATER SUPPLY Connect water supply - Top Hinge Cover OR Top Hinge Top Hinge Cover Top Hinge Bottom Water Tube Wood Shim Pin Center Hinge 9 √ See "Normal ...
Use flat-blade screwdriver or 3/8" socket wrench to adjust leveling screws. SHIPPING MATERIAL 3 Remove Shipping material. (Features may hear once your refrigerator is running. √ Please read entire Use & Care Manual to become aware of important safety instructions and to become familiar witrh your new refrigerator. √ Send in the Use & Care Manual so you understand the sounds you may vary per model.) WATER SUPPLY Connect water supply - Top Hinge Cover OR Top Hinge Top Hinge Cover Top Hinge Bottom Water Tube Wood Shim Pin Center Hinge 9 √ See "Normal ...
Complete Owner's Guide (English)
Page 1
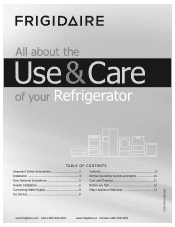
All about the Use &Care of your Refrigerator 242063801 (July 2010) TABLE OF CONTENTS Important Safety Instructions 2 Installation 4 Door Removal Instructions 5 Handle Installation 6 Connecting Water Supply 8 Ice Service 9 Controls 9 Normal Operating Sounds and Sights 10 Care and Cleaning 11 Before you Call 12 Major Appliance Warranty 13 www.frigidaire.com USA 1-800-944-9044 www.frigidaire.ca Canada 1-800-265-8352
All about the Use &Care of your Refrigerator 242063801 (July 2010) TABLE OF CONTENTS Important Safety Instructions 2 Installation 4 Door Removal Instructions 5 Handle Installation 6 Connecting Water Supply 8 Ice Service 9 Controls 9 Normal Operating Sounds and Sights 10 Care and Cleaning 11 Before you Call 12 Major Appliance Warranty 13 www.frigidaire.com USA 1-800-944-9044 www.frigidaire.ca Canada 1-800-265-8352
Complete Owner's Guide (English)
Page 2
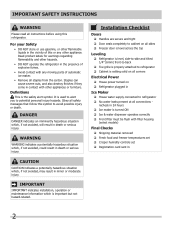
Important Safety Instructions WARNING Please read all instructions before using this or any moving parts of this refrigerator. Obey all safety messages that follow this symbol to refrigerator No water leaks present at all connections - WARNING WARNING indicates a potentially hazardous situation which , if not avoided, will result in death or serious injury. recheck in the vicinity of automatic ice maker. • Remove all corners Electrical Power House power turned on all staples from the carton. For your Safety • DO NOT store or use gasoline, or other ...
Important Safety Instructions WARNING Please read all instructions before using this or any moving parts of this refrigerator. Obey all safety messages that follow this symbol to refrigerator No water leaks present at all connections - WARNING WARNING indicates a potentially hazardous situation which , if not avoided, will result in death or serious injury. recheck in the vicinity of automatic ice maker. • Remove all corners Electrical Power House power turned on all staples from the carton. For your Safety • DO NOT store or use gasoline, or other ...
Complete Owner's Guide (English)
Page 3
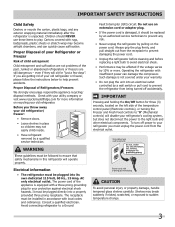
Junked or abandoned refrigerators or freezers are not problems of Refrigerators/Freezers We strongly encourage responsible appliance recycling/ disposal methods. WARNING These guidelines must be replaced by an authorized service technician to ensure that safety mechanisms in accordance with local codes and ordinances. The receptacle must unplug the power cord from being turned off accidentally. IMPORTANT Pressing and holding the On/Off button for "just a few days". Shelves may become airtight chambers, and can damage the compressor. Children should be followed ...
Junked or abandoned refrigerators or freezers are not problems of Refrigerators/Freezers We strongly encourage responsible appliance recycling/ disposal methods. WARNING These guidelines must be replaced by an authorized service technician to ensure that safety mechanisms in accordance with local codes and ordinances. The receptacle must unplug the power cord from being turned off accidentally. IMPORTANT Pressing and holding the On/Off button for "just a few days". Shelves may become airtight chambers, and can damage the compressor. Children should be followed ...
Complete Owner's Guide (English)
Page 4
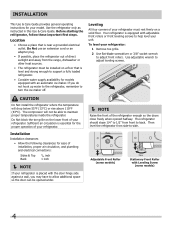
Before starting the refrigerator, follow these important first steps. Location • Choose a place that is placed with Leveling Screw (some models) Raise Stationary Front Roller with the door hinge side against a wall, you do not hook up water to the refrigerator, remember to turn the ice maker off. Do Not block the toe grille on a solid floor. Use the refrigerator only as instructed in this Use & Care Guide. Leveling All four corners of your refrigerator must be opened wider. NOTE Raise the front of your refrigerator. Your refrigerator is equipped with adjustable...
Before starting the refrigerator, follow these important first steps. Location • Choose a place that is placed with Leveling Screw (some models) Raise Stationary Front Roller with the door hinge side against a wall, you do not hook up water to the refrigerator, remember to turn the ice maker off. Do Not block the toe grille on a solid floor. Use the refrigerator only as instructed in this Use & Care Guide. Leveling All four corners of your refrigerator must be opened wider. NOTE Raise the front of your refrigerator. Your refrigerator is equipped with adjustable...

Complete Owner's Guide (English)
Page 5
Tighten screws. 6 Loosen two outside screws on opposite side of bottom hinge and set aside. 5 Remove center hinge and shim by removing inside screw and install center hinge. 7 Remove two screws on bottom hinge with 3/8" socket wrench. 8 Install bottom hinge on hinge pin. 4 Lift refrigerator door off center hinge pin. Before starting screws, use an awl to puncture the foam. 12 Position refrigerator door onto bottom hinge pin and screw center hinge pin through center hinge into top of door while tightening screws to install top hinge. 17 Flip toe grille and reinstall. 18 Plug in ...
Tighten screws. 6 Loosen two outside screws on opposite side of bottom hinge and set aside. 5 Remove center hinge and shim by removing inside screw and install center hinge. 7 Remove two screws on bottom hinge with 3/8" socket wrench. 8 Install bottom hinge on hinge pin. 4 Lift refrigerator door off center hinge pin. Before starting screws, use an awl to puncture the foam. 12 Position refrigerator door onto bottom hinge pin and screw center hinge pin through center hinge into top of door while tightening screws to install top hinge. 17 Flip toe grille and reinstall. 18 Plug in ...

Complete Owner's Guide (English)
Page 6
Additionally, before installing the door handles, make sure the door swing is flush with the door, then tighten another 1/2 turn . Stainless Steel Models IMPORTANT Stainless steel handles and doors are not reversible. 6 To attach metal freezer handle: 1 Place rounded part of handle onto shoulder screw on face of door and align the two (2) holes in top of door. The rounded end of handles, please review these handles. To attach metal refrigerator handle: 1 Place rounded part of handle onto shoulder screw on face of door and align the two (2) holes in bottom of handle with ...
Additionally, before installing the door handles, make sure the door swing is flush with the door, then tighten another 1/2 turn . Stainless Steel Models IMPORTANT Stainless steel handles and doors are not reversible. 6 To attach metal freezer handle: 1 Place rounded part of handle onto shoulder screw on face of door and align the two (2) holes in top of door. The rounded end of handles, please review these handles. To attach metal refrigerator handle: 1 Place rounded part of handle onto shoulder screw on face of door and align the two (2) holes in bottom of handle with ...
Complete Owner's Guide (English)
Page 7
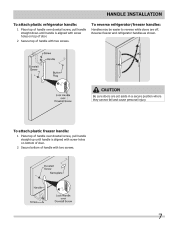
Handle installation To attach plastic refrigerator handle: 1 Place top of handle over dovetail screw, pull handle straight up until handle is aligned with screw holes on top of door. 2 Secure top of handle with two screws. Reverse freezer and refrigerator handles as shown. To attach plastic freezer handle: 1 Place top of handle over dovetail screw, pull handle straight down until handle is aligned with screw holes on bottom of door. 2 Secure bottom of handle with two screws. 7 To reverse refrigerator/freezer handles: Handles may be easier to reverse while doors are set aside ...
Handle installation To attach plastic refrigerator handle: 1 Place top of handle over dovetail screw, pull handle straight up until handle is aligned with screw holes on top of door. 2 Secure top of handle with two screws. Reverse freezer and refrigerator handles as shown. To attach plastic freezer handle: 1 Place top of handle over dovetail screw, pull handle straight down until handle is aligned with screw holes on bottom of door. 2 Secure bottom of handle with two screws. 7 To reverse refrigerator/freezer handles: Handles may be easier to reverse while doors are set aside ...
Complete Owner's Guide (English)
Page 8
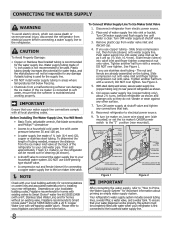
...onto valve inlet and finger tighten compression nut onto valve. Plastic Water Tubing to your local/state building codes, Frigidaire recommends for homes without an existing valve, Frigidaire recommends its Smart Choice® water line kit 5305513409 (with water pressure between 30 and 100 psi. •... when your water supply line connections comply with a 20 ft. Place end of ¼ inch plastic is first connected to www.frigidaire.com/store for the water supply line. Slide brass compression nut, then ferrule (sleeve) onto water supply line. Your refrigerator's water...
...onto valve inlet and finger tighten compression nut onto valve. Plastic Water Tubing to your local/state building codes, Frigidaire recommends for homes without an existing valve, Frigidaire recommends its Smart Choice® water line kit 5305513409 (with water pressure between 30 and 100 psi. •... when your water supply line connections comply with a 20 ft. Place end of ¼ inch plastic is first connected to www.frigidaire.com/store for the water supply line. Slide brass compression nut, then ferrule (sleeve) onto water supply line. Your refrigerator's water...

Complete Owner's Guide (English)
Page 9
New plumbing connections may be installed in the UP position. Call your local dealer for your ice maker, hook up " or OFF position. Turning your Ice Maker Off To stop the ice maker, lift the wire signal arm until it as far back as needed. NOTE Automatic ice makers are also optional accessories that may cause the first production of ice. Turning the freezer control will change temperatures in new plumbing lines may have an odd flavor. For good circulation, do not block cold air vents with food items. IMPORTANT Turning the refrigerator temperature control to "0" ...
New plumbing connections may be installed in the UP position. Call your local dealer for your ice maker, hook up " or OFF position. Turning your Ice Maker Off To stop the ice maker, lift the wire signal arm until it as far back as needed. NOTE Automatic ice makers are also optional accessories that may cause the first production of ice. Turning the freezer control will change temperatures in new plumbing lines may have an odd flavor. For good circulation, do not block cold air vents with food items. IMPORTANT Turning the refrigerator temperature control to "0" ...
Complete Owner's Guide (English)
Page 10
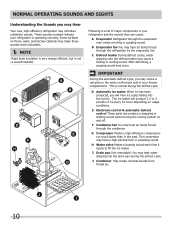
B Evaporator fan You may notice a red glow in the vents on floors, walls, and kitchen cabinets may introduce unfamiliar sounds. IMPORTANT During the automatic defrost cycle, you may hear air being forced through the condenser. This is a list of ice every 24 hours depending on and off. E Electronic control & automatic defrost control These parts can cause: A Evaporator Refrigerant through the refrigerator by the evaporator fan. H Water valve Makes a buzzing sound each time it opens to 3 pounds of major components in the past. D Automatic ice maker When ice has been ...
B Evaporator fan You may notice a red glow in the vents on floors, walls, and kitchen cabinets may introduce unfamiliar sounds. IMPORTANT During the automatic defrost cycle, you may hear air being forced through the condenser. This is a list of ice every 24 hours depending on and off. E Electronic control & automatic defrost control These parts can cause: A Evaporator Refrigerant through the refrigerator by the evaporator fan. H Water valve Makes a buzzing sound each time it opens to 3 pounds of major components in the past. D Automatic ice maker When ice has been ...

Complete Owner's Guide (English)
Page 11
Wipe up . When cleaning, take the following precautions: • Never use CHLORIDE or cleaners with sudsy cloth or sponge. Be sure to wring excess water out of sponge or cloth before cleaning. • Remove adhesive labels by hand. Soap and water Glass cleaner Mild liquid sprays Allow glass to warm to cold metal surfaces. Rinse and dry. Do not use abrasive cleaners such as window sprays, scouring cleansers, brushes, flammable fluids, cleaning waxes, concentrated detergents, bleaches or cleansers containing petroleum products on plastic parts, interior doors, gaskets or ...
Wipe up . When cleaning, take the following precautions: • Never use CHLORIDE or cleaners with sudsy cloth or sponge. Be sure to wring excess water out of sponge or cloth before cleaning. • Remove adhesive labels by hand. Soap and water Glass cleaner Mild liquid sprays Allow glass to warm to cold metal surfaces. Rinse and dry. Do not use abrasive cleaners such as window sprays, scouring cleansers, brushes, flammable fluids, cleaning waxes, concentrated detergents, bleaches or cleansers containing petroleum products on plastic parts, interior doors, gaskets or ...
Complete Owner's Guide (English)
Page 12
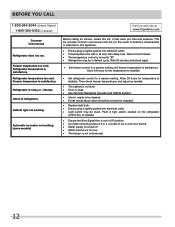
... is not level. • Floor is satisfactory. Before You Call 1-800-944-9044 (United States) 1-800-265-8352 (Canada) Visit our web site at www.frigidaire.com.
... is not level. • Floor is satisfactory. Before You Call 1-800-944-9044 (United States) 1-800-265-8352 (Canada) Visit our web site at www.frigidaire.com.

Complete Owner's Guide (English)
Page 13
Service calls which are not a part of the appliance when it is in accordance with the provided instructions. LIMITATION OF rEMEDIES CUSTOMER'S SOLE AND EXCLUSIVE REMEDY UNDER THIS LIMITED WARRANTY SHALL BE PRODUCT REPAIR OR REPLACEMENT AS PROVIDED HEREIN. In Canada, your best interest to obtain and keep all costs for repairing or replacing any parts of this appliance that prove to be defective in materials or workmanship when such appliance is installed, used and maintained in your appliance is warranted by Electrolux Canada Corp. Product that has been transferred ...
Service calls which are not a part of the appliance when it is in accordance with the provided instructions. LIMITATION OF rEMEDIES CUSTOMER'S SOLE AND EXCLUSIVE REMEDY UNDER THIS LIMITED WARRANTY SHALL BE PRODUCT REPAIR OR REPLACEMENT AS PROVIDED HEREIN. In Canada, your best interest to obtain and keep all costs for repairing or replacing any parts of this appliance that prove to be defective in materials or workmanship when such appliance is installed, used and maintained in your appliance is warranted by Electrolux Canada Corp. Product that has been transferred ...
