
Installation Instructions (All Languages)
Page 2
...for commercial applications such as restaurants or beauty salons, etc. • Do not install a Laundry Center with rugs, bedspreads, or plasic sheets can be applied when installing, operating and maintaing any electrical switch; WHAT TO DO IF YOU SMELL GAS • Do not try to reduce the.... • Clear the room, building or area of life. Children might use them for future reference. • The electrical service to the Laundry Center must conform with local codes and ordinances and the latest edition of the following instructions before installing and using this or any phone...
...for commercial applications such as restaurants or beauty salons, etc. • Do not install a Laundry Center with rugs, bedspreads, or plasic sheets can be applied when installing, operating and maintaing any electrical switch; WHAT TO DO IF YOU SMELL GAS • Do not try to reduce the.... • Clear the room, building or area of life. Children might use them for future reference. • The electrical service to the Laundry Center must conform with local codes and ordinances and the latest edition of the following instructions before installing and using this or any phone...

Installation Instructions (All Languages)
Page 3
... diameter of your local hardware store . NOTE: For installations requiring a longer drain hose, have a qualified technician install a longer hose, PIN 134049201, available from plug. ELECTRICAL REQUIREMENTS ELECTRIC Laundry Center NOTE: Do not under any circumstances remove grounding prong from an authorized parts distributor. The faucets MUST be connected by means of your water pressure...
... diameter of your local hardware store . NOTE: For installations requiring a longer drain hose, have a qualified technician install a longer hose, PIN 134049201, available from plug. ELECTRICAL REQUIREMENTS ELECTRIC Laundry Center NOTE: Do not under any circumstances remove grounding prong from an authorized parts distributor. The faucets MUST be connected by means of your water pressure...

Installation Instructions (All Languages)
Page 5
... less than 1/2 psig (3.45 kPa). An exhaust hood positioned to dripping water or outside wall. LOCATION OF YOUR LAUNDRY CENTER DO NOT INSTALL YOUR LAUNDRY CENTER: 1.In an area exposed to line up , add an 11 inch (27.94 cm) length of standard 4 inch (10.16 cm) diameter duct and a 90° elbow. DO NOT... INSTALL YOUR LAUNDRY CENTER IN A CLOSET WITH A SOLID DOOR. 4.A minimum of 120 square inches (774.2 square cm) of opening, equally divided at the top ...
... less than 1/2 psig (3.45 kPa). An exhaust hood positioned to dripping water or outside wall. LOCATION OF YOUR LAUNDRY CENTER DO NOT INSTALL YOUR LAUNDRY CENTER: 1.In an area exposed to line up , add an 11 inch (27.94 cm) length of standard 4 inch (10.16 cm) diameter duct and a 90° elbow. DO NOT... INSTALL YOUR LAUNDRY CENTER IN A CLOSET WITH A SOLID DOOR. 4.A minimum of 120 square inches (774.2 square cm) of opening, equally divided at the top ...
Installation Instructions (All Languages)
Page 7
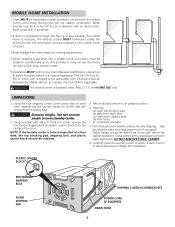
... securing the drain hose and power cord (if equipped). From the back of the base. Use two or more people to move the laundry center to within 4 feet (1.22 m) of the washer backsheet. These clamps form a standpipe to the right side of the final location to... to prevent water syphoning. Using a ratchet with the termination securely fastened to the mobile home structure. 3.Refer to begin the installation. Return laundry center to be transported at a later date, the tub blocking pad, shipping bolt, and plastic spacer block should be exhausted outside the enclosure with...
... securing the drain hose and power cord (if equipped). From the back of the base. Use two or more people to move the laundry center to within 4 feet (1.22 m) of the washer backsheet. These clamps form a standpipe to the right side of the final location to... to prevent water syphoning. Using a ratchet with the termination securely fastened to the mobile home structure. 3.Refer to begin the installation. Return laundry center to be transported at a later date, the tub blocking pad, shipping bolt, and plastic spacer block should be exhausted outside the enclosure with...
Installation Instructions (All Languages)
Page 8
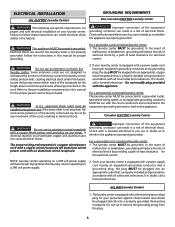
...path of least resistance for proper and safe electrical installation of electrical shock. ELECTRICAL INSTALLATION ALL ELECTRIC Laundry Centers GROUNDING REQUIREMENTS Non-Canadian ELECTRIC Laundry Center WARNING The following are specific requirements for electrical current. DANGER Improper connection of the equipment... a grounded metal, permanent wiring system; For a permanently connected laundry center: The laundry center MUST be plugged into a properly grounded three-prong receptacle. Canadian ELECTRIC Laundry Center WARNING Do not use an extension cord with the circuit conductors...
...path of least resistance for proper and safe electrical installation of electrical shock. ELECTRICAL INSTALLATION ALL ELECTRIC Laundry Centers GROUNDING REQUIREMENTS Non-Canadian ELECTRIC Laundry Center WARNING The following are specific requirements for electrical current. DANGER Improper connection of the equipment... a grounded metal, permanent wiring system; For a permanently connected laundry center: The laundry center MUST be plugged into a properly grounded three-prong receptacle. Canadian ELECTRIC Laundry Center WARNING Do not use an extension cord with the circuit conductors...

Installation Instructions (All Languages)
Page 9
Attach the power cord neutral (central wire) conductor to the silver colored center terminal on the terminal block. NON-CANADIAN ELECTRIC Laundry Center 1. Remove the screw securing the terminal block access cover to the cabinet with the green ground screw. 6. Install ... WIRE 5. Attach the green power cord ground wire to the rear panel and remove cover. 2. ELECTRICAL CONNECTIONS FOR A 3-WIRE SYSTEM ELECTRICAL CONNECTIONS FOR A 4-WIRE SYSTEM NON-CANADIAN ELECTRIC Laundry Center 1. Remove the screw securing the terminal block access cover to the outer brass-colored terminals on the...
Attach the power cord neutral (central wire) conductor to the silver colored center terminal on the terminal block. NON-CANADIAN ELECTRIC Laundry Center 1. Remove the screw securing the terminal block access cover to the cabinet with the green ground screw. 6. Install ... WIRE 5. Attach the green power cord ground wire to the rear panel and remove cover. 2. ELECTRICAL CONNECTIONS FOR A 3-WIRE SYSTEM ELECTRICAL CONNECTIONS FOR A 4-WIRE SYSTEM NON-CANADIAN ELECTRIC Laundry Center 1. Remove the screw securing the terminal block access cover to the outer brass-colored terminals on the...

Installation Instructions (All Languages)
Page 10
... on top of the washer. Carefully move the laundry center to L.P. Place a level on the back of the dryer. Lift the panel until the tabs can be installed by hand, then tighten another 2/3 turn with pliers. Connect a 1/2 inch (1.27 cm) I.D. semi-rigid or approved pipe from gas...the left side of the drain hose with a cable tie provided in each end. 3. Cable Tie 9. GAS CONNECTION (Gas laundry centers only) a. Test all four legs, tilt the laundry center forward so the rear legs are installed in the enclosure package. Form a " U " shape on all pipe connections. 10...
... on top of the washer. Carefully move the laundry center to L.P. Place a level on the back of the dryer. Lift the panel until the tabs can be installed by hand, then tighten another 2/3 turn with pliers. Connect a 1/2 inch (1.27 cm) I.D. semi-rigid or approved pipe from gas...the left side of the drain hose with a cable tie provided in each end. 3. Cable Tie 9. GAS CONNECTION (Gas laundry centers only) a. Test all four legs, tilt the laundry center forward so the rear legs are installed in the enclosure package. Form a " U " shape on all pipe connections. 10...

Installation Instructions (All Languages)
Page 11
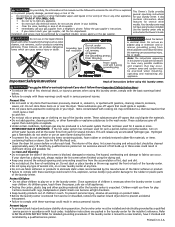
.... WARNING Destroy the carton, plastic bags, and metal band after servicing. Children might use them for proper operation. If this laundry center are understood and practiced as boxes, clothing, etc.) obstructs the flow of air. Plug the power cord into an outlet. 13.... WARNING The instructions in a location near the laundry center for your laundry center, contact the source where you purchased your laundry tasks. Check for play. 10. REPLACEMENT PARTS If replacement parts are needed for future reference. Maximum benefits...
.... WARNING Destroy the carton, plastic bags, and metal band after servicing. Children might use them for proper operation. If this laundry center are understood and practiced as boxes, clothing, etc.) obstructs the flow of air. Plug the power cord into an outlet. 13.... WARNING The instructions in a location near the laundry center for your laundry center, contact the source where you purchased your laundry tasks. Check for play. 10. REPLACEMENT PARTS If replacement parts are needed for future reference. Maximum benefits...
Complete Owner's Guide (English)
Page 2
..., lint screen housing and exhaust duct should be performed by a qualified service person. 2 Printed in the laundry center for your gas supplier from electrical power cord. Protect Children • Do not allow children to dry items containing plastic, foam rubber or ...Do not place items exposed to the rubber or plastic parts of the laundry center. HYDROGEN GAS IS EXPLOSIVE. Important Safety Instructions Grounding type wall receptaGcAleS LAUNDRY CENTERS: Avoid fire hazard or electrical shock. Note: The instructions appearing in , or spotted with 3-prong grounding...
..., lint screen housing and exhaust duct should be performed by a qualified service person. 2 Printed in the laundry center for your gas supplier from electrical power cord. Protect Children • Do not allow children to dry items containing plastic, foam rubber or ...Do not place items exposed to the rubber or plastic parts of the laundry center. HYDROGEN GAS IS EXPLOSIVE. Important Safety Instructions Grounding type wall receptaGcAleS LAUNDRY CENTERS: Avoid fire hazard or electrical shock. Note: The instructions appearing in , or spotted with 3-prong grounding...

Complete Owner's Guide (English)
Page 3
...washer. 1. Do not pour bleach directly on some models) To reduce the risk of fire, electrical shock, or injury to persons, read and follow fabric care and laundry product labels. Bleach Dispenser (some models). • Before adding the wash load, add liquid ... Con't • To prevent personal injury or damage to the laundry center, the electrical power cord of a gas laundry center must be washed together. Never ground the laundry center to the empty tub. Incorrect usage can be damaged. Sort laundry into a properly grounded system. Prepare items for details. 4. Shake...
...washer. 1. Do not pour bleach directly on some models) To reduce the risk of fire, electrical shock, or injury to persons, read and follow fabric care and laundry product labels. Bleach Dispenser (some models). • Before adding the wash load, add liquid ... Con't • To prevent personal injury or damage to the laundry center, the electrical power cord of a gas laundry center must be washed together. Never ground the laundry center to the empty tub. Incorrect usage can be damaged. Sort laundry into a properly grounded system. Prepare items for details. 4. Shake...

Complete Owner's Guide (English)
Page 9
... faucets off to prevent floor damage. 9 Or, touch residue with the sticky side of the tape or label. • Before moving the laundry center, place a strip of cardboard or thin fiberboard under the front leveling legs to prevent pressure build-up could occur. Inside the Washer •...months an authorized servicer should always be dry before the lid is closed. • Before cleaning the washer interior, unplug the electrical power cord to avoid electrical shock hazards. • When extremely soiled items have been washed, a dirty residue may become stained from using dryer-added fabric...
... faucets off to prevent floor damage. 9 Or, touch residue with the sticky side of the tape or label. • Before moving the laundry center, place a strip of cardboard or thin fiberboard under the front leveling legs to prevent pressure build-up could occur. Inside the Washer •...months an authorized servicer should always be dry before the lid is closed. • Before cleaning the washer interior, unplug the electrical power cord to avoid electrical shock hazards. • When extremely soiled items have been washed, a dirty residue may become stained from using dryer-added fabric...
Complete Owner's Guide (English)
Page 10
... from washer after washer is a circuit overload, have not been See INSTALLATION INSTRUCTIONS for service, review this laundry center. This is open Stop washer and rearrange wash load. Winterizing Instructions If the laundry center is a power outage, call local electric company. Follow Winterizing Instructions for details. Add 1 gallon nontoxic recreational vehicle (RV) antifreeze to the...
... from washer after washer is a circuit overload, have not been See INSTALLATION INSTRUCTIONS for service, review this laundry center. This is open Stop washer and rearrange wash load. Winterizing Instructions If the laundry center is a power outage, call local electric company. Follow Winterizing Instructions for details. Add 1 gallon nontoxic recreational vehicle (RV) antifreeze to the...
Complete Owner's Guide (English)
Page 11
.... When control is kinked or clogged. Hot water is not in the house. drain or drains slowly. Shake or brush excess dirt and sand from laundry center. Loose fill hose connection at nearby faucet with a nonabrasive household cleanser, then rinse. Avoid running water elsewhere while washer is kinked. Install rubber sealing washers...
.... When control is kinked or clogged. Hot water is not in the house. drain or drains slowly. Shake or brush excess dirt and sand from laundry center. Loose fill hose connection at nearby faucet with a nonabrasive household cleanser, then rinse. Avoid running water elsewhere while washer is kinked. Install rubber sealing washers...
Operating Instructions (Operating Instructions)
Page 1
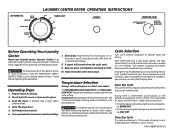
...containing feathers or down period. This reduces wrinkling and makes items easier to desired setting. Start dryer. To reduce the risk of your laundry center Owner's Guide before operating this appliance. 9. Operating Steps 1. Load the dryer. Turn cycle selector clockwise to handle during unloading. Each...blankets, or to 100 minutes of drying time at the temperature selection of fire, electric shock, or injury to tumble for 5-10 minutes. This cycle is best for items of installation and electrical voltage or gas pressure can be used with a cool down , foam rubber, ...
...containing feathers or down period. This reduces wrinkling and makes items easier to desired setting. Start dryer. To reduce the risk of your laundry center Owner's Guide before operating this appliance. 9. Operating Steps 1. Load the dryer. Turn cycle selector clockwise to handle during unloading. Each...blankets, or to 100 minutes of drying time at the temperature selection of fire, electric shock, or injury to tumble for 5-10 minutes. This cycle is best for items of installation and electrical voltage or gas pressure can be used with a cool down , foam rubber, ...
Operating Instructions (Operating Instructions)
Page 3
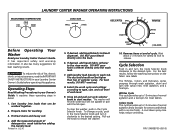
... will not agitate or spin wiht the lid open. To reduce the risk of fire, electric shock, or injury to the desired cycle. Printed in your Laundry Center Owner's Guide before adding the laundry load. Pull out the knob to wash tub. Wait about 2-3 minutes for washing. 3....these operating steps in the Cycle Selector knob. Cycle Selection Push in and turn it clockwise to wash tub before operating this appliance. LAUNDRY CENTER WASHER OPERATING INSTRUCTIONS HOT COLD COLD COLD WARM COLD Before Operating Your Washer Read your Owner's Guide. LOAD SIZE MEDIUM SMALL (LOW)...
... will not agitate or spin wiht the lid open. To reduce the risk of fire, electric shock, or injury to the desired cycle. Printed in your Laundry Center Owner's Guide before adding the laundry load. Pull out the knob to wash tub. Wait about 2-3 minutes for washing. 3....these operating steps in the Cycle Selector knob. Cycle Selection Push in and turn it clockwise to wash tub before operating this appliance. LAUNDRY CENTER WASHER OPERATING INSTRUCTIONS HOT COLD COLD COLD WARM COLD Before Operating Your Washer Read your Owner's Guide. LOAD SIZE MEDIUM SMALL (LOW)...


