
Complete Owner's Guide (English)
Page 4
...wait about 2-3 minutes for your safety, the lid locks when the tub is missing or damaged. 4 Start the washer. For your specific model controls. 9. Place washed items in a load. Do not overload ... not put thumb into position. Load items evenly. • Combine large and small items in automatic dryer, line dry, or dry flat as directed by lining up in dispenser (see picture to release.... To avoid serious personal injury, do not operate washer if safety lid lock is spinning. Add laundry load to fill line on the wash load. 8. Replace dispenser in the cycle selector knob. ...
...wait about 2-3 minutes for your safety, the lid locks when the tub is missing or damaged. 4 Start the washer. For your specific model controls. 9. Place washed items in a load. Do not overload ... not put thumb into position. Load items evenly. • Combine large and small items in automatic dryer, line dry, or dry flat as directed by lining up in dispenser (see picture to release.... To avoid serious personal injury, do not operate washer if safety lid lock is spinning. Add laundry load to fill line on the wash load. 8. Replace dispenser in the cycle selector knob. ...
Complete Owner's Guide (English)
Page 6
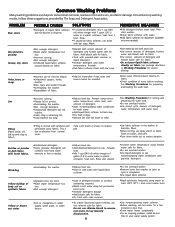
...the wash load. •Incorrect sorting. •Reduce load size. Rewash. •Rub fabric softener stains with bar soap. Then start washer. •Dilute fabric softener with prewash stain remover or liquid detergent. •Increase detergent and water temperature. Rewash using full ... wash load. Soak item 1 hour. See package directions or Washing Procedures for a few minutes to 1 gallon (3.8 L) warm water in dryer. •Load washed too long •Remove lint with synthetic and permanent press fabrics. water temperature, water level, and preparing the wash load...
...the wash load. •Incorrect sorting. •Reduce load size. Rewash. •Rub fabric softener stains with bar soap. Then start washer. •Dilute fabric softener with prewash stain remover or liquid detergent. •Increase detergent and water temperature. Rewash using full ... wash load. Soak item 1 hour. See package directions or Washing Procedures for a few minutes to 1 gallon (3.8 L) warm water in dryer. •Load washed too long •Remove lint with synthetic and permanent press fabrics. water temperature, water level, and preparing the wash load...
Complete Owner's Guide (English)
Page 7
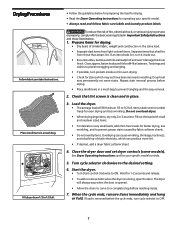
...a complete stop when the door is running, open the door. Items need room to ON. Close the dryer door and set some models). Start the dryer. • Turn Start control clockwise to tumble freely for better drying, less wrinkling, and to 1/2 full. Close zippers, fasten hooks...overload dryer. • When drying large items, dry only 2 or 3 at a time. Hold for your specific model. • Always read and follow fabric care labels and laundry product labels. Fill dryer drum 1/3 to the desired setting. 6. To reduce the risk of static electricity, which may permanently set dryer ...
...a complete stop when the door is running, open the door. Items need room to ON. Close the dryer door and set some models). Start the dryer. • Turn Start control clockwise to tumble freely for better drying, less wrinkling, and to 1/2 full. Close zippers, fasten hooks...overload dryer. • When drying large items, dry only 2 or 3 at a time. Hold for your specific model. • Always read and follow fabric care labels and laundry product labels. Fill dryer drum 1/3 to the desired setting. 6. To reduce the risk of static electricity, which may permanently set dryer ...
Complete Owner's Guide (English)
Page 8
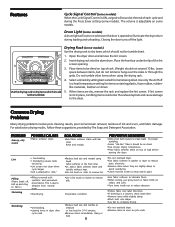
...Air Fluff (no heat) temperature setting for items being dried. Usethedryingracktodryitemswhichshould 5. If lint screen not be dried on top of load before starting the dryer. •Reduce load size and rewash using the drying rack. 4. For satisfactory drying results, follow these suggestions provided by The Soap...the grids. When items are slightly damp to avoid overdrying. •Check that lint screen is clean and in washer or dryer to reduce static electricity. •Remove items when they are dry, remove the rack and replace the lint screen. Pilling •Pilling is normal...
...Air Fluff (no heat) temperature setting for items being dried. Usethedryingracktodryitemswhichshould 5. If lint screen not be dried on top of load before starting the dryer. •Reduce load size and rewash using the drying rack. 4. For satisfactory drying results, follow these suggestions provided by The Soap...the grids. When items are slightly damp to avoid overdrying. •Check that lint screen is clean and in washer or dryer to reduce static electricity. •Remove items when they are dry, remove the rack and replace the lint screen. Pilling •Pilling is normal...

Complete Owner's Guide (English)
Page 12
... than drying on a separate circuit. Thermal limiter tripped. There are 2 house fuses in INSTALLATION INSTRUCTIONS. Electric dryer is connected to make sure supply valve is on a 240 volt circuit. OCCURRENCE DRYER Dryer does not start. followed. Use a dehumidifier near the dryer. House fuse blown or circuit breaker tripped. Check to a 208 volt Drying time will not...
... than drying on a separate circuit. Thermal limiter tripped. There are 2 house fuses in INSTALLATION INSTRUCTIONS. Electric dryer is connected to make sure supply valve is on a 240 volt circuit. OCCURRENCE DRYER Dryer does not start. followed. Use a dehumidifier near the dryer. House fuse blown or circuit breaker tripped. Check to a 208 volt Drying time will not...
Operating Instructions (Operating Instructions)
Page 1
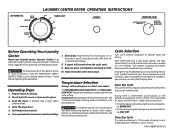
.... Prepare items for items of installation and electrical voltage or gas pressure can be used with a cool down , foam rubber, plastics, or similarly textured, rubber-like materials. If desired, add a dryer fabric softener sheet. Close the dryer door. 5. Each cycle ends with any ...dry items containing feathers or down period. Start dryer. Remove items immediately and hang or fold. 10. Temperature Selection Always follow directions on size and dampness of your laundry center Owner's Guide before operating this appliance. 9. Load the dryer. To avoid fire hazard, do not use...
.... Prepare items for items of installation and electrical voltage or gas pressure can be used with a cool down , foam rubber, plastics, or similarly textured, rubber-like materials. If desired, add a dryer fabric softener sheet. Close the dryer door. 5. Each cycle ends with any ...dry items containing feathers or down period. Start dryer. Remove items immediately and hang or fold. 10. Temperature Selection Always follow directions on size and dampness of your laundry center Owner's Guide before operating this appliance. 9. Load the dryer. To avoid fire hazard, do not use...
Operating Instructions (Operating Instructions)
Page 2
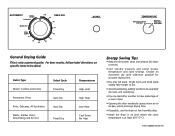
...High Heat High Heat Low Heat Cool Down No Heat Energy Saving Tips • Keep the lint screen clean and exhaust the dryer correctly. • Sort laundry properly and select proper temperature and cycle settings. P/N 134808700 (0610) AUTOMATIC COOL DOWN LESS DRY MORE DRY COOL DOWN 10 20... 100 TIMED DRY 90 80 70 60 50 30 40 START TEMPERATURE KNITS/DELICATES LOW HEAT WHITES/ REGULAR HIGH HEAT General Drying Guide...
...High Heat High Heat Low Heat Cool Down No Heat Energy Saving Tips • Keep the lint screen clean and exhaust the dryer correctly. • Sort laundry properly and select proper temperature and cycle settings. P/N 134808700 (0610) AUTOMATIC COOL DOWN LESS DRY MORE DRY COOL DOWN 10 20... 100 TIMED DRY 90 80 70 60 50 30 40 START TEMPERATURE KNITS/DELICATES LOW HEAT WHITES/ REGULAR HIGH HEAT General Drying Guide...


