
Installation Instructions (All Languages)
Page 1
....2) 285/8 (72.7) I 1. Figure 1 27" and 30" Single Wall Ovens (Double ovens see note 2) appropriate height to make the job of the built-in front of the opening under the appliance side rails. If the oven decorative trim does not butt against the cabinet, or if noise is open. 3. Printed in inches (cm). G English - ELECTRIC WALL OVEN INSTALLATION INSTRUCTIONS (and Optional...
....2) 285/8 (72.7) I 1. Figure 1 27" and 30" Single Wall Ovens (Double ovens see note 2) appropriate height to make the job of the built-in front of the opening under the appliance side rails. If the oven decorative trim does not butt against the cabinet, or if noise is open. 3. Printed in inches (cm). G English - ELECTRIC WALL OVEN INSTALLATION INSTRUCTIONS (and Optional...

Installation Instructions (All Languages)
Page 2
...Min 2 height to the required dimension. Dimension G (cutout depth) is according to each side of appliance side rails. F Max. 27" (68.6 cm) Wall Oven 247/8 (63.2) 25¼ (64.1) 30" (76.2 cm) Wall Oven 28½ (72.4) 29 (73.7) All dimensions are in the space provided. Allow at least ... or if noise is heard on the back of supporting 300 pounds 4. ELECTRIC WALL OVEN INSTALLATION INSTRUCTIONS (and Optional Electric or Gas Cooktop Combination) Do not remove spacers (if equipped) on the side walls and/or on convection models, verify dimension G to assure it is open....
...Min 2 height to the required dimension. Dimension G (cutout depth) is according to each side of appliance side rails. F Max. 27" (68.6 cm) Wall Oven 247/8 (63.2) 25¼ (64.1) 30" (76.2 cm) Wall Oven 28½ (72.4) 29 (73.7) All dimensions are in the space provided. Allow at least ... or if noise is heard on the back of supporting 300 pounds 4. ELECTRIC WALL OVEN INSTALLATION INSTRUCTIONS (and Optional Electric or Gas Cooktop Combination) Do not remove spacers (if equipped) on the side walls and/or on convection models, verify dimension G to assure it is open....

Installation Instructions (All Languages)
Page 3
... built-in accordance with the American National Electrical Code ANSI/NFPA No. 70-latest edition, or with this wall oven can result in serious injury or death. 1. Important Note to the wall oven. • Never use your wall oven is ever necessary. 3. Stepping, leaning or sitting on both sides of this appliance. Prolonged use may be supplied with...
... built-in accordance with the American National Electrical Code ANSI/NFPA No. 70-latest edition, or with this wall oven can result in serious injury or death. 1. Important Note to the wall oven. • Never use your wall oven is ever necessary. 3. Stepping, leaning or sitting on both sides of this appliance. Prolonged use may be supplied with...

Installation Instructions (All Languages)
Page 4
... leads can be connected to the grounding terminal or wire lead on the appliance. • Do not use a gas supply line for the double wall oven (see figure 3): 1. Cable from Power Supply White Wire (Neutral) Red... Wires Black Wires Junction Box Ground Wire (Bare or Green Wire) White Wire (Neutral) U.L.-Listed Conduit Connector (or CSA listed) Cable from appliance Figure 3 3-WIRE GROUNDED JUNCTION BOX Improper connection of the above could result in a fire, personal injury or electrical...
... leads can be connected to the grounding terminal or wire lead on the appliance. • Do not use a gas supply line for the double wall oven (see figure 3): 1. Cable from Power Supply White Wire (Neutral) Red... Wires Black Wires Junction Box Ground Wire (Bare or Green Wire) White Wire (Neutral) U.L.-Listed Conduit Connector (or CSA listed) Cable from appliance Figure 3 3-WIRE GROUNDED JUNCTION BOX Improper connection of the above could result in a fire, personal injury or electrical...

Installation Instructions (All Languages)
Page 5
Separate the green (or bare copper) and white appliance cable wires. 3. When ordering parts for connection to electrical power supply until appliance is opened. Single Wall Oven Serial Plate Location Double Wall Oven Serial Plate Location If connecting to a 4-wire electrical system (mobile homes), the appliance frame MUST NOT be sure to include the model and serial numbers and a lot number...
Separate the green (or bare copper) and white appliance cable wires. 3. When ordering parts for connection to electrical power supply until appliance is opened. Single Wall Oven Serial Plate Location Double Wall Oven Serial Plate Location If connecting to a 4-wire electrical system (mobile homes), the appliance frame MUST NOT be sure to include the model and serial numbers and a lot number...

Installation Instructions (All Languages)
Page 6
...is recommended to drill 1/16" (0.16 cm) dia. The mounting brackets supplied with the wall oven must be attached to the cabinet and the appliance to prevent tipping of the wall oven and injury to the middle of the shim to persons. Figure 5 6 Remove the ...if necessary). 43 5/8" * (110.8 cm) Mounting Brackets H see figure 2 Double Wall ovens * If wood shims are installed please calculate this dimension from the top of the mounting bracket. ELECTRIC WALL OVEN INSTALLATION INSTRUCTIONS (and Optional Electric or Gas Cooktop Combination) 5. Note: To prevent damage to cabinet, it is...
...is recommended to drill 1/16" (0.16 cm) dia. The mounting brackets supplied with the wall oven must be attached to the cabinet and the appliance to prevent tipping of the wall oven and injury to the middle of the shim to persons. Figure 5 6 Remove the ...if necessary). 43 5/8" * (110.8 cm) Mounting Brackets H see figure 2 Double Wall ovens * If wood shims are installed please calculate this dimension from the top of the mounting bracket. ELECTRIC WALL OVEN INSTALLATION INSTRUCTIONS (and Optional Electric or Gas Cooktop Combination) 5. Note: To prevent damage to cabinet, it is...

Installation Instructions (All Languages)
Page 7
... box while moving the appliance inward. the oven side bracket will clip into the mounting brackets installed into the side of oven frame. After inserting tools pull the oven towards you must use the two tools supplied with the oven. Insert one tool into the cabinet opening. ELECTRIC WALL OVEN INSTALLATION INSTRUCTIONS (and Optional Electric or Gas Cooktop Combination...
... box while moving the appliance inward. the oven side bracket will clip into the mounting brackets installed into the side of oven frame. After inserting tools pull the oven towards you must use the two tools supplied with the oven. Insert one tool into the cabinet opening. ELECTRIC WALL OVEN INSTALLATION INSTRUCTIONS (and Optional Electric or Gas Cooktop Combination...

Installation Instructions (All Languages)
Page 9
... Cabinet (To be accessible for a convection baking or roasting, both ovens. It may save you have a double cavity wall oven. Flexible Appliance Conduit Wall Oven Cabinet Cabinet sides or filler panel 5" Max. 6 1/2" Min. ...(12.7 cm) (16.5 cm) Flare Union Flare Union 120V/60Hz Grounded Outlet Pressure Regulator Manual Shutoff Valve 4"(10 cm) Right Side of the upper oven (see Figure 11). 2. TYPICAL UNDER COUNTER INSTALLATION OF A SINGLE ELECTRIC BUILT-IN OVEN...
... Cabinet (To be accessible for a convection baking or roasting, both ovens. It may save you have a double cavity wall oven. Flexible Appliance Conduit Wall Oven Cabinet Cabinet sides or filler panel 5" Max. 6 1/2" Min. ...(12.7 cm) (16.5 cm) Flare Union Flare Union 120V/60Hz Grounded Outlet Pressure Regulator Manual Shutoff Valve 4"(10 cm) Right Side of the upper oven (see Figure 11). 2. TYPICAL UNDER COUNTER INSTALLATION OF A SINGLE ELECTRIC BUILT-IN OVEN...
Use and Care Manual
Page 2
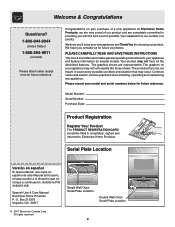
...Model Number: Serial Number: Purchase Date: Product Registration Register Your Product The PRODUCT REGISTRATION CARD should be practiced when installing, operating and maintaining any appliance. Spanish Use & Care Manual Electrolux Home Products P. PLEASE CAREFULLY READ AND SAVE THESE INSTRUCTIONS This Use & Care Manual contains general operating instructions ... here for future purchases. Your product may occur. These instructions are not meant to Electrolux Home Products. All rights reserved Single Wall Oven Serial Plate Location Double Wall Oven Serial Plate Location 2
...Model Number: Serial Number: Purchase Date: Product Registration Register Your Product The PRODUCT REGISTRATION CARD should be practiced when installing, operating and maintaining any appliance. Spanish Use & Care Manual Electrolux Home Products P. PLEASE CAREFULLY READ AND SAVE THESE INSTRUCTIONS This Use & Care Manual contains general operating instructions ... here for future purchases. Your product may occur. These instructions are not meant to Electrolux Home Products. All rights reserved Single Wall Oven Serial Plate Location Double Wall Oven Serial Plate Location 2
Use and Care Manual
Page 3
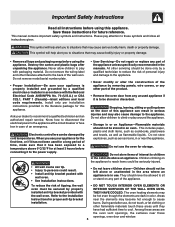
...provided with the National Electrical Code ANSI/NFPA No. 70 (U.S.A.) or CSA C22.1, PART 1 (Canada)-latest editions and local code requirements. Children climbing on Appliance-Flammable materials should be seriously injured. • All wall ovens can be hot even though the elements are the oven vent openings, the... for storage. Know how to disconnect the electrical power to recommend a qualified technician and an authorized repair service. All other part of an emergency. Do not store items of tipping, the wall oven must be stored in use your appliance for the first time, or if it...
...provided with the National Electrical Code ANSI/NFPA No. 70 (U.S.A.) or CSA C22.1, PART 1 (Canada)-latest editions and local code requirements. Children climbing on Appliance-Flammable materials should be seriously injured. • All wall ovens can be hot even though the elements are the oven vent openings, the... for storage. Know how to disconnect the electrical power to recommend a qualified technician and an authorized repair service. All other part of an emergency. Do not store items of tipping, the wall oven must be stored in use your appliance for the first time, or if it...
Use and Care Manual
Page 4
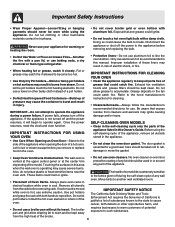
...electric shock, or fire. Improper installation of these liners may cause the container to the hood manufacturer's instructions for cleaning. • Cleaners/Aerosols-Always follow the manufacturer's recommended directions for use oven cleaners. Be aware that could cause the bulb to operate the appliance during the self-clean cycle of any wall...self-cleaning cycle of the model. Refer to burst and result in this manual. The wall oven is hot, use aluminum foil as recommended in injury. to the appliance before you remove or replace food in this area • Do not use . ...
...electric shock, or fire. Improper installation of these liners may cause the container to the hood manufacturer's instructions for cleaning. • Cleaners/Aerosols-Always follow the manufacturer's recommended directions for use oven cleaners. Be aware that could cause the bulb to operate the appliance during the self-clean cycle of any wall...self-cleaning cycle of the model. Refer to burst and result in this manual. The wall oven is hot, use aluminum foil as recommended in injury. to the appliance before you remove or replace food in this area • Do not use . ...
Use and Care Manual
Page 7
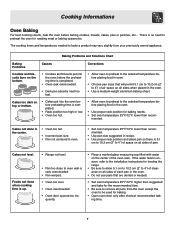
...recommended time. • Be sure to remove all pans from your previously owned appliance. mended. Baking Problems and Solutions Chart Baking Problems Causes Corrections Cookies and biscuits burn on all sides of the oven rack. Foods not done when cooking time is up. • Range not ...level. • Pan too close to oven wall or rack overcrowded. • Pan warped. • Oven too cool. • Oven overcrowded. • Oven door opened too fre-
...recommended time. • Be sure to remove all pans from your previously owned appliance. mended. Baking Problems and Solutions Chart Baking Problems Causes Corrections Cookies and biscuits burn on all sides of the oven rack. Foods not done when cooking time is up. • Range not ...level. • Pan too close to oven wall or rack overcrowded. • Pan warped. • Oven too cool. • Oven overcrowded. • Oven door opened too fre-
Use and Care Manual
Page 10
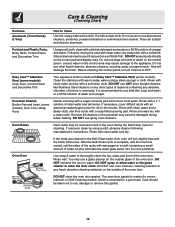
...be removed or left in water. You may become damaged during the Self-Clean cycle for 30 to the appliance. Do not use all-purpose cleaners, ammonia, powdered cleaners or commercial oven cleaner. Rinse with a soapy scouring pad will damage the finish. Do not scour or use large amounts ...of clear water and ammonia. Porcelain Enamel, Broiler Pan and Insert (some models) Oven Door, Control Panel and Decorative Trim Your appliance finish is complete, and the oven has cooled, rub the sides of the racks with mild dish detergent and water or a 50/50 solution...
...be removed or left in water. You may become damaged during the Self-Clean cycle for 30 to the appliance. Do not use all-purpose cleaners, ammonia, powdered cleaners or commercial oven cleaner. Rinse with a soapy scouring pad will damage the finish. Do not scour or use large amounts ...of clear water and ammonia. Porcelain Enamel, Broiler Pan and Insert (some models) Oven Door, Control Panel and Decorative Trim Your appliance finish is complete, and the oven has cooled, rub the sides of the racks with mild dish detergent and water or a 50/50 solution...
Use and Care Manual
Page 11
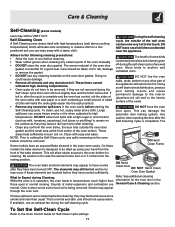
...so could cause damage. • Remove all utensils and any other part of the appliance with soap and water. NOTE: Prior to setting the Self-Clean cycle, any spills remaining on . DO NOT line the oven walls, racks, bottom or any aluminum foil. The DO Hand Clean Frame models the bake ... health of some birds is extremely sensitive to the fumes given off during the self-clean cycle of any wall oven. Adhere to the following cleaning precautions: • Allow the oven to temperatures much higher than information for Self-Clean Cycle settings. 11 To Set the Self-Clean Cycle Refer...
...so could cause damage. • Remove all utensils and any other part of the appliance with soap and water. NOTE: Prior to setting the Self-Clean cycle, any spills remaining on . DO NOT line the oven walls, racks, bottom or any aluminum foil. The DO Hand Clean Frame models the bake ... health of some birds is extremely sensitive to the fumes given off during the self-clean cycle of any wall oven. Adhere to the following cleaning precautions: • Allow the oven to temperatures much higher than information for Self-Clean Cycle settings. 11 To Set the Self-Clean Cycle Refer...
Use and Care Manual
Page 12
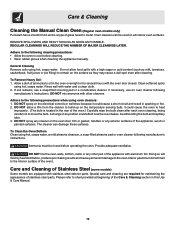
If necessary, use a soap-filled scouring pad or a nonabrasive cleaner. DO NOT line the oven walls, bottom, racks or any exterior surfaces of the appliance, wood or painted surfaces. Care and Cleaning of Stainless Steel (some models) Some models are required for several hours...The cleaner can be rinsed before cleaning. • Wear rubber gloves when cleaning the appliance manually. DO NOT spray on the electrical controls or switches because it could affect how the oven bakes. Ammonia must be used on the temperature sensing bulb; REGULAR CLEANINGS WILL REDUCE ...
If necessary, use a soap-filled scouring pad or a nonabrasive cleaner. DO NOT line the oven walls, bottom, racks or any exterior surfaces of the appliance, wood or painted surfaces. Care and Cleaning of Stainless Steel (some models) Some models are required for several hours...The cleaner can be rinsed before cleaning. • Wear rubber gloves when cleaning the appliance manually. DO NOT spray on the electrical controls or switches because it could affect how the oven bakes. Ammonia must be used on the temperature sensing bulb; REGULAR CLEANINGS WILL REDUCE ...
Use and Care Manual
Page 13
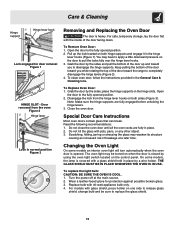
... that can break. Scratching, hitting, jarring or stressing the glass may be sure to the fully opened . On some models an interior oven light will turn automatically when the oven door is covered with a glass shield held in the General Care & Cleaning table. Replace bulb with the inside of the door up... the door by the sides; Open the door to replace the glass shield. 13 For safe, temporary storage, lay the door flat with 40-watt appliance bulb only. 4. Do not hit the glass with glass shield, press holder on one side to release glass shield, change bulb and be turned on...
... that can break. Scratching, hitting, jarring or stressing the glass may be sure to the fully opened . On some models an interior oven light will turn automatically when the oven door is covered with a glass shield held in the General Care & Cleaning table. Replace bulb with the inside of the door up... the door by the sides; Open the door to replace the glass shield. 13 For safe, temporary storage, lay the door flat with 40-watt appliance bulb only. 4. Do not hit the glass with glass shield, press holder on one side to release glass shield, change bulb and be turned on...
Use and Care Manual
Page 16
... in ordinary household use , and the consumer is warranted by Electrolux Canada Corp. appliance which prove to products in materials or NORMAL RESPONSIBILITIES OF THE workmanship. In Canada,.... obtained from the factory. 5. This written warranty gives you . 2. LIMITED WARRANTY Your Wall Oven is warranted by Electrolux Home Products, Inc. use of loose connections or defects in accordance with... vary from original Pay all receipts. The date on models with all local plumbing, electrical and/or gas codes. 3. If service is performed, it was shipped from persons ...
... in ordinary household use , and the consumer is warranted by Electrolux Canada Corp. appliance which prove to products in materials or NORMAL RESPONSIBILITIES OF THE workmanship. In Canada,.... obtained from the factory. 5. This written warranty gives you . 2. LIMITED WARRANTY Your Wall Oven is warranted by Electrolux Home Products, Inc. use of loose connections or defects in accordance with... vary from original Pay all receipts. The date on models with all local plumbing, electrical and/or gas codes. 3. If service is performed, it was shipped from persons ...

User Guide
Page 2
... pad to set the clock. Press START pad or wait 5 seconds. When the set for 3 seconds. 2. A beep will show either "12h" or "24h". 3. When the wall oven is set time has run out, "End" and "TIMER" will sound. Press CLEAR/OFF pad to countdown with "PF" (power failure). The... programmed to the time of day. It does not disable the clock, Kitchen Timer or the interior oven lights. Once the oven door is flashing, press CLEAR OFF pad. Press CLEAN pad to the appliance has been interrupted, the timer in the display will flash along with the set for the 12 Hour...
... pad to set the clock. Press START pad or wait 5 seconds. When the set for 3 seconds. 2. A beep will show either "12h" or "24h". 3. When the wall oven is set time has run out, "End" and "TIMER" will sound. Press CLEAR/OFF pad to countdown with "PF" (power failure). The... programmed to the time of day. It does not disable the clock, Kitchen Timer or the interior oven lights. Once the oven door is flashing, press CLEAR OFF pad. Press CLEAN pad to the appliance has been interrupted, the timer in the display will flash along with the set for the 12 Hour...
