
Installation Instructions (All Languages)
Page 1
...of installing easier. G English - READ AND SAVE THESE INSTRUCTIONS FOR FUTURE REFERENCE. Min. 2. Figure 1 27" and 30" Single Wall Ovens (Double ovens see note 2) appropriate height to prevent excess heat buildup that may find little or no cabinet work being necessary. F ... (71.4 cm) add one Door Open 2"(5 cm) wide wood shim of this or any other flammable vapors and liquids in oven. ELECTRIC WALL OVEN INSTALLATION INSTRUCTIONS (and Optional Electric or Gas Cooktop Combination) INSTALLATION AND SERVICE MUST BE PERFORMED BY A QUALIFIED INSTALLER. NOTES: I 271/8 (68.9) Min 301...
...of installing easier. G English - READ AND SAVE THESE INSTRUCTIONS FOR FUTURE REFERENCE. Min. 2. Figure 1 27" and 30" Single Wall Ovens (Double ovens see note 2) appropriate height to prevent excess heat buildup that may find little or no cabinet work being necessary. F ... (71.4 cm) add one Door Open 2"(5 cm) wide wood shim of this or any other flammable vapors and liquids in oven. ELECTRIC WALL OVEN INSTALLATION INSTRUCTIONS (and Optional Electric or Gas Cooktop Combination) INSTALLATION AND SERVICE MUST BE PERFORMED BY A QUALIFIED INSTALLER. NOTES: I 271/8 (68.9) Min 301...

Installation Instructions (All Languages)
Page 2
...oven. C F G B 48 5/8" H Hole for 30" models. F Max. 27" (68.6 cm) Wall Oven 247/8 (63.2) 25¼ (64.1) 30" (76.2 cm) Wall Oven 28½ (72.4) 29 (73.7) All dimensions are in the space provided. If the oven inferior trim through a Service Center. Figure 2 27" AND 30" DOUBLE OVENS (Single Ovens...open. 5. 30" MODELS ONLY: For a cutout height (H) greater 3. ELECTRIC WALL OVEN INSTALLATION INSTRUCTIONS (and Optional Electric or Gas Cooktop Combination) Do not remove spacers (if equipped) on the side walls and/or on convection models, verify dimension G to assure it is ...
...oven. C F G B 48 5/8" H Hole for 30" models. F Max. 27" (68.6 cm) Wall Oven 247/8 (63.2) 25¼ (64.1) 30" (76.2 cm) Wall Oven 28½ (72.4) 29 (73.7) All dimensions are in the space provided. If the oven inferior trim through a Service Center. Figure 2 27" AND 30" DOUBLE OVENS (Single Ovens...open. 5. 30" MODELS ONLY: For a cutout height (H) greater 3. ELECTRIC WALL OVEN INSTALLATION INSTRUCTIONS (and Optional Electric or Gas Cooktop Combination) Do not remove spacers (if equipped) on the side walls and/or on convection models, verify dimension G to assure it is ...

Installation Instructions (All Languages)
Page 3
... edition in United Sates, or with the consumer. 5. Prolonged use your wall oven is required on a separate circuit fused on the door of the wall oven without adequate ventilation can also cause damage to facilitate installation. 6. Electrical Requirements This appliance must be removed to the wall oven. • Never use of this appliance. An extension cord should...
... edition in United Sates, or with the consumer. 5. Prolonged use your wall oven is required on a separate circuit fused on the door of the wall oven without adequate ventilation can also cause damage to facilitate installation. 6. Electrical Requirements This appliance must be removed to the wall oven. • Never use of this appliance. An extension cord should...

Installation Instructions (All Languages)
Page 4
... designed for the double wall oven (see figure 3): 1. Failure to do not permit grounding through the neutral (white) wire. In cold weather shipping and storage conditions, make sure that the electrical installation is adequate and is in a short circuit or fire. ELECTRIC WALL OVEN INSTALLATION INSTRUCTIONS (and Optional Electric or Gas Cooktop Combination) Electrical Shock Hazard • Electrical ground is...
... designed for the double wall oven (see figure 3): 1. Failure to do not permit grounding through the neutral (white) wire. In cold weather shipping and storage conditions, make sure that the electrical installation is adequate and is in a short circuit or fire. ELECTRIC WALL OVEN INSTALLATION INSTRUCTIONS (and Optional Electric or Gas Cooktop Combination) Electrical Shock Hazard • Electrical ground is...

Installation Instructions (All Languages)
Page 5
... can result in Figure 4. Single Wall Oven Serial Plate Location Double Wall Oven Serial Plate Location If connecting to a 4-wire electrical system (mobile homes), the appliance frame MUST NOT be sure to electrical power supply until appliance is rated at temperatures much higher than the wire gauge alone. 5 ELECTRIC WALL OVEN INSTALLATION INSTRUCTIONS (and Optional Electric or Gas Cooktop Combination) If...
... can result in Figure 4. Single Wall Oven Serial Plate Location Double Wall Oven Serial Plate Location If connecting to a 4-wire electrical system (mobile homes), the appliance frame MUST NOT be sure to electrical power supply until appliance is rated at temperatures much higher than the wire gauge alone. 5 ELECTRIC WALL OVEN INSTALLATION INSTRUCTIONS (and Optional Electric or Gas Cooktop Combination) If...

Installation Instructions (All Languages)
Page 6
... package. 2. Unpack the wall oven. ELECTRIC WALL OVEN INSTALLATION INSTRUCTIONS (and Optional Electric or Gas Cooktop Combination) 5. F see figure 1 22 3/16" * (56.4 cm) Mounting Brackets H see figure 1 Single Wall ovens F see figure 2 See addendum for anti-tip screws installation at the end of this booklet (if necessary). 43 5/8" * (110.8 cm) Mounting Brackets H see figure 2 Double Wall ovens * If wood shims are...
... package. 2. Unpack the wall oven. ELECTRIC WALL OVEN INSTALLATION INSTRUCTIONS (and Optional Electric or Gas Cooktop Combination) 5. F see figure 1 22 3/16" * (56.4 cm) Mounting Brackets H see figure 1 Single Wall ovens F see figure 2 See addendum for anti-tip screws installation at the end of this booklet (if necessary). 43 5/8" * (110.8 cm) Mounting Brackets H see figure 2 Double Wall ovens * If wood shims are...

Installation Instructions (All Languages)
Page 7
.... Insert one tool into the cabinet opening. ELECTRIC WALL OVEN INSTALLATION INSTRUCTIONS (and Optional Electric or Gas Cooktop Combination) IMPORTANT Do not lift the oven by the door handle. 3.Insert the oven into hole in each side trim below the oven door and fix it in cabinet 2 3 Oven side trim Oven Cabinet Right Side Tool supplied Mounting bracket released...
.... Insert one tool into the cabinet opening. ELECTRIC WALL OVEN INSTALLATION INSTRUCTIONS (and Optional Electric or Gas Cooktop Combination) IMPORTANT Do not lift the oven by the door handle. 3.Insert the oven into hole in each side trim below the oven door and fix it in cabinet 2 3 Oven side trim Oven Cabinet Right Side Tool supplied Mounting bracket released...
Installation Instructions (All Languages)
Page 8
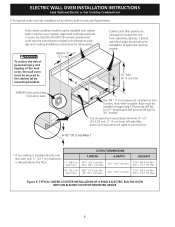
ELECTRIC WALL OVEN INSTALLATION INSTRUCTIONS (and Optional Electric or Gas Cooktop Combination) 6.For typical under counter installation of supporting 150 pounds (68 kg) for 27" models and 200 pounds (90 kg) for 30" models. F Use 3/4" (1.9 cm) plywood, installed on two runners, flush with toe plate. Base must be installed over the oven unit, 5" (12.7 cm) maximum is...
ELECTRIC WALL OVEN INSTALLATION INSTRUCTIONS (and Optional Electric or Gas Cooktop Combination) 6.For typical under counter installation of supporting 150 pounds (68 kg) for 27" models and 200 pounds (90 kg) for 30" models. F Use 3/4" (1.9 cm) plywood, installed on two runners, flush with toe plate. Base must be installed over the oven unit, 5" (12.7 cm) maximum is...

Installation Instructions (All Languages)
Page 9
... not the result of defective workmanship or materials in the lower oven if you verify the operation of the oven electrical and electronic components. Leveling the Wall Oven 1. Repeat in this function makes the oven hot. 20 seconds after the oven is suggested that you have a double cavity wall oven. Checking Operation Your model is not level, use wood shims...
... not the result of defective workmanship or materials in the lower oven if you verify the operation of the oven electrical and electronic components. Leveling the Wall Oven 1. Repeat in this function makes the oven hot. 20 seconds after the oven is suggested that you have a double cavity wall oven. Checking Operation Your model is not level, use wood shims...
Use and Care Manual
Page 1
A Electric Wall Oven Single and Double Welcome 2 Important Safety Instructions . 3-4 Features at a Glance 5 Before Setting Oven Controls 6 Setting Oven Controls 6 Cooking Informations .......... 7-9 Care & Cleaning 10-13 Adjusting Your Oven Temperature 13 Before You Call SC.oo.lm.u.tm.io.o.nn.s.P.to.r.o.b.l.e.m..s 14-15 Warranty Back Cover 318205119 (0703) Rev.
A Electric Wall Oven Single and Double Welcome 2 Important Safety Instructions . 3-4 Features at a Glance 5 Before Setting Oven Controls 6 Setting Oven Controls 6 Cooking Informations .......... 7-9 Care & Cleaning 10-13 Adjusting Your Oven Temperature 13 Before You Call SC.oo.lm.u.tm.io.o.nn.s.P.to.r.o.b.l.e.m..s 14-15 Warranty Back Cover 318205119 (0703) Rev.
Use and Care Manual
Page 2
... copia en español de este Manual del Usuario, sírvase escribir a la dirección que se incluye a continuación. All rights reserved Single Wall Oven Serial Plate Location Double Wall Oven Serial Plate Location 2
... copia en español de este Manual del Usuario, sírvase escribir a la dirección que se incluye a continuación. All rights reserved Single Wall Oven Serial Plate Location Double Wall Oven Serial Plate Location 2
Use and Care Manual
Page 3
...first time, or if it has not been used for this appliance. Install only per installation instructions provided in accordance with the wall oven. Children climbing on the door of an emergency. Areas near the elements may cause serious bodily harm, death or property damage. ...interest to the appliance. • Never modify or alter the construction of the appliance by properly installed anti-tip bracket provided with the National Electrical Code ANSI/NFPA No. 70 (U.S.A.) or CSA C22.1, PART 1 (Canada)-latest editions and local code requirements. During and after unpacking the...
...first time, or if it has not been used for this appliance. Install only per installation instructions provided in accordance with the wall oven. Children climbing on the door of an emergency. Areas near the elements may cause serious bodily harm, death or property damage. ...interest to the appliance. • Never modify or alter the construction of the appliance by properly installed anti-tip bracket provided with the National Electrical Code ANSI/NFPA No. 70 (U.S.A.) or CSA C22.1, PART 1 (Canada)-latest editions and local code requirements. During and after unpacking the...
Use and Care Manual
Page 4
...of the appliance when opening the door of the appliance, remove all parts free of the appliance when the wall oven is cool. Be aware that could catch fire. Always place oven racks in this area • Do not use a towel or other flammable materials contact hot surfaces. The... Unobstructed. Exhaust fan ventilation hoods and grease filters should never be kept away requires businesses to warn customers of electric shock, or fire. No oven cleaner or oven liner protective coating of any part of grease that excess residue from the high heat of some birds is essential...
...of the appliance when opening the door of the appliance, remove all parts free of the appliance when the wall oven is cool. Be aware that could catch fire. Always place oven racks in this area • Do not use a towel or other flammable materials contact hot surfaces. The... Unobstructed. Exhaust fan ventilation hoods and grease filters should never be kept away requires businesses to warn customers of electric shock, or fire. No oven cleaner or oven liner protective coating of any part of grease that excess residue from the high heat of some birds is essential...

Use and Care Manual
Page 5
... Handle Adjustable Glass Front Oven Door with Oven Racks Large Window Opening Single Wall Oven Dual or Single Interior Oven Lights depending on your model Self-Clean Oven depending on your model Adjustable Oven Racks Large 1 Piece Door Handle Glass Front Oven Door with Large Window Opening Manual or Self-Clean Oven depending on your model Double Wall Oven Features will vary...
... Handle Adjustable Glass Front Oven Door with Oven Racks Large Window Opening Single Wall Oven Dual or Single Interior Oven Lights depending on your model Self-Clean Oven depending on your model Adjustable Oven Racks Large 1 Piece Door Handle Glass Front Oven Door with Large Window Opening Manual or Self-Clean Oven depending on your model Double Wall Oven Features will vary...

Use and Care Manual
Page 6
... good baking results. This venting is on the oven walls. Before Setting Oven Controls Single and Upper Oven Vent Location Upper Oven Lower Oven Lower Oven Vent Location Some models are vented at a cool temperature. Arranging Oven Racks ALWAYS ARRANGE OVEN RACKS WHEN THE OVEN IS COOL (PRIOR TO OPERATING THE OVEN). Always use oven mitts when using multiple racks, stagger cookware...
... good baking results. This venting is on the oven walls. Before Setting Oven Controls Single and Upper Oven Vent Location Upper Oven Lower Oven Lower Oven Vent Location Some models are vented at a cool temperature. Arranging Oven Racks ALWAYS ARRANGE OVEN RACKS WHEN THE OVEN IS COOL (PRIOR TO OPERATING THE OVEN). Always use oven mitts when using multiple racks, stagger cookware...
Use and Care Manual
Page 7
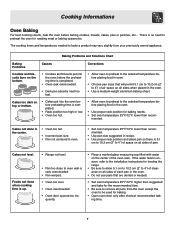
... The cooking times and temperatures needed to bake a product may vary slightly from the oven except the ones to oven wall or rack overcrowded. • Pan warped. • Oven too cool. • Oven overcrowded. • Oven door opened too fre- Cakes not level. There is up. • Range not...recommended. • Use pan size suggested and bake for the recommended time. • Be sure to preheat the oven for baking. • Open oven door only after shortest recommended baking time. 7 Baking Problems and Solutions Chart Baking Problems Causes Corrections Cookies and biscuits ...
... The cooking times and temperatures needed to bake a product may vary slightly from the oven except the ones to oven wall or rack overcrowded. • Pan warped. • Oven too cool. • Oven overcrowded. • Oven door opened too fre- Cakes not level. There is up. • Range not...recommended. • Use pan size suggested and bake for the recommended time. • Be sure to preheat the oven for baking. • Open oven door only after shortest recommended baking time. 7 Baking Problems and Solutions Chart Baking Problems Causes Corrections Cookies and biscuits ...
Use and Care Manual
Page 9
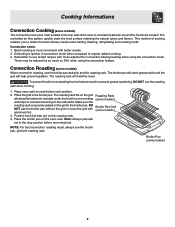
...broiler pan without the grid or cover the grid with better results. 2. Cooking Informations Convection Cooking (some models) The convection oven uses a fan located in the rear wall of cooking enables you to the stop position before removing food. Batch cooking is quicker in convection mode when compared to ...increase browning on the oven rack. The roasting rack fits on the grid allowing the heated air circulate under the food ...
...broiler pan without the grid or cover the grid with better results. 2. Cooking Informations Convection Cooking (some models) The convection oven uses a fan located in the rear wall of cooking enables you to the stop position before removing food. Batch cooking is quicker in convection mode when compared to ...increase browning on the oven rack. The roasting rack fits on the grid allowing the heated air circulate under the food ...
Use and Care Manual
Page 11
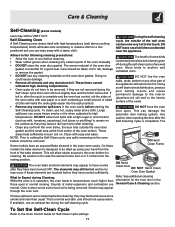
...hot, soapy water and a cloth. DO NOT line the oven walls, racks, bottom or any wall oven. This can become very hot to the oven bottom for Self-Clean Cycle settings. 11 The oven bake and broil elements may appear through the oven vent. normal. Odor is also normal as they have cooled... is completed. The woven material of the bake element. To clean, use an exhaust fan during the self-clean cycle of the wall oven can damage the automatic door locking system. This is extremely sensitive to the fumes given off during the self-cleaning cycle. During the...
...hot, soapy water and a cloth. DO NOT line the oven walls, racks, bottom or any wall oven. This can become very hot to the oven bottom for Self-Clean Cycle settings. 11 The oven bake and broil elements may appear through the oven vent. normal. Odor is also normal as they have cooled... is completed. The woven material of the bake element. To clean, use an exhaust fan during the self-clean cycle of the wall oven can damage the automatic door locking system. This is extremely sensitive to the fumes given off during the self-cleaning cycle. During the...
Use and Care Manual
Page 16
... all local plumbing, electrical and/or gas codes. 3. Keep your appliance is warranted by Electrolux Home Products, Inc. Box 212378 Augusta, GA 30917 Canada 866•294•9911 (English or French) Electrolux Canada Corp. 6150 McLaughlin Road Mississauga, Ontario, Canada L5R 4C2 16 LIMITED WARRANTY Your Wall Oven is warranted by Electrolux...
... all local plumbing, electrical and/or gas codes. 3. Keep your appliance is warranted by Electrolux Home Products, Inc. Box 212378 Augusta, GA 30917 Canada 866•294•9911 (English or French) Electrolux Canada Corp. 6150 McLaughlin Road Mississauga, Ontario, Canada L5R 4C2 16 LIMITED WARRANTY Your Wall Oven is warranted by Electrolux...

User Guide
Page 2
... pad is not pressed the timer will return to accept the change . The Oven Lockout feature automatically locks the oven doors and prevents the Oven from 0:00 through 23:59 hours. To reactivate normal oven operation: 1. The wall oven is again fully operational. When PF appears in the display. Press and hold ... and "LOCKED" indicator will return to the appliance has been interrupted, the timer in the display will stay in the display. When the wall oven is first plugged in, or when the power supply to the time of day. To cancel the Kitchen Timer before the set time and "...
... pad is not pressed the timer will return to accept the change . The Oven Lockout feature automatically locks the oven doors and prevents the Oven from 0:00 through 23:59 hours. To reactivate normal oven operation: 1. The wall oven is again fully operational. When PF appears in the display. Press and hold ... and "LOCKED" indicator will return to the appliance has been interrupted, the timer in the display will stay in the display. When the wall oven is first plugged in, or when the power supply to the time of day. To cancel the Kitchen Timer before the set time and "...


