
Installation Instructions (All Languages)
Page 1
....7) 23½ (59.7) 1 Min. Min. 2. Figure 1 27" and 30" Single Wall Ovens (Double ovens see note 2) appropriate height to each side of the built-in heat damage or fire. H Max. 27¼ (69.2) 285/8 (72.7) 27¼ (69.2) 285/8 (72.7) I 1. pages 1-9 Español - IMPORTANT: SAVE FOR LOCAL ELECTRICAL INSPECTOR'S USE. Your new wall oven has been designed to fit a limited...
....7) 23½ (59.7) 1 Min. Min. 2. Figure 1 27" and 30" Single Wall Ovens (Double ovens see note 2) appropriate height to each side of the built-in heat damage or fire. H Max. 27¼ (69.2) 285/8 (72.7) 27¼ (69.2) 285/8 (72.7) I 1. pages 1-9 Español - IMPORTANT: SAVE FOR LOCAL ELECTRICAL INSPECTOR'S USE. Your new wall oven has been designed to fit a limited...

Installation Instructions (All Languages)
Page 2
... built-in oven. Spacer 2" D (5.1 cm) Min. decorative trim does not butt against the cabinet, or if noise is heard on the back of appropriate for 30" models. Electrical Junction Box A 2" (5 cm) Wide Wood Spacer if Needed NOTES: 1. Allow at least 21" (53.3 cm) clearance in heat damage or fire. Figure 2 27" AND 30" DOUBLE OVENS (Single Ovens...
... built-in oven. Spacer 2" D (5.1 cm) Min. decorative trim does not butt against the cabinet, or if noise is heard on the back of appropriate for 30" models. Electrical Junction Box A 2" (5 cm) Wide Wood Spacer if Needed NOTES: 1. Allow at least 21" (53.3 cm) clearance in heat damage or fire. Figure 2 27" AND 30" DOUBLE OVENS (Single Ovens...

Installation Instructions (All Languages)
Page 3
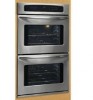
... Center. 2. Approved cooktops and built-in ovens are being made. If you need a longer power cord you can also cause damage to the wall oven. 3. Be sure to leave these installation instructions before connecting the electrical supply to the wall oven. • Never use your model... 8300W and + 50A Table A Observe all packing material from the appliance should not be removed to receive the oven. ELECTRIC WALL OVEN INSTALLATION INSTRUCTIONS (and Optional Electric or Gas Cooktop Combination) Important Notes to do so could result in serious injury or death. 1. Observe all ...
... Center. 2. Approved cooktops and built-in ovens are being made. If you need a longer power cord you can also cause damage to the wall oven. 3. Be sure to leave these installation instructions before connecting the electrical supply to the wall oven. • Never use your model... 8300W and + 50A Table A Observe all packing material from the appliance should not be removed to receive the oven. ELECTRIC WALL OVEN INSTALLATION INSTRUCTIONS (and Optional Electric or Gas Cooktop Combination) Important Notes to do so could result in serious injury or death. 1. Observe all ...
Installation Instructions (All Languages)
Page 8
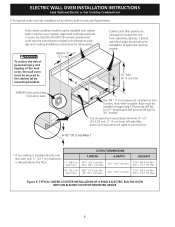
... base minimum 9" x 9" (23 X 23 cm), 2" (5 cm) from adjoining cabinets. ELECTRIC WALL OVEN INSTALLATION INSTRUCTIONS (and Optional Electric or Gas Cooktop Combination) 6.For typical under counter installation of an electric built-in electric oven models. Only certain cooktop models may be capable of supporting 150 pounds (68 kg) for 27" models and 200 pounds (90 kg) for dimensions). F Use 3/4" (1.9 cm...
... base minimum 9" x 9" (23 X 23 cm), 2" (5 cm) from adjoining cabinets. ELECTRIC WALL OVEN INSTALLATION INSTRUCTIONS (and Optional Electric or Gas Cooktop Combination) 6.For typical under counter installation of an electric built-in electric oven models. Only certain cooktop models may be capable of supporting 150 pounds (68 kg) for 27" models and 200 pounds (90 kg) for dimensions). F Use 3/4" (1.9 cm...

Installation Instructions (All Languages)
Page 9
... and off alternately and the convection fan will run. It may save you have a double cavity wall oven. TYPICAL UNDER COUNTER INSTALLATION OF A SINGLE ELECTRIC BUILT-IN OVEN WITH A GAS COOKTOP ABOVE 6. Use wood shims under the wall oven to BROIL, the upper element in one direction and then the other. Checking Operation Your model is suggested that...
... and off alternately and the convection fan will run. It may save you have a double cavity wall oven. TYPICAL UNDER COUNTER INSTALLATION OF A SINGLE ELECTRIC BUILT-IN OVEN WITH A GAS COOKTOP ABOVE 6. Use wood shims under the wall oven to BROIL, the upper element in one direction and then the other. Checking Operation Your model is suggested that...
Use and Care Manual
Page 15
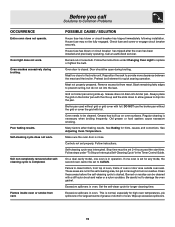
...when broiling frequently. Remove excess fat from vent. Grease does not drain into the lean. Oven needs to clean bottom, from top of oven, frame of oven or door area outside oven seal. Grease has built up . Controls not set 2-4 hours past the start time. Self-cleaning cycle was interrupted.... Follow steps under Changing Oven Light to replace or tighten the bulb. These areas are not ...
...when broiling frequently. Remove excess fat from vent. Grease does not drain into the lean. Oven needs to clean bottom, from top of oven, frame of oven or door area outside oven seal. Grease has built up . Controls not set 2-4 hours past the start time. Self-cleaning cycle was interrupted.... Follow steps under Changing Oven Light to replace or tighten the bulb. These areas are not ...

User Guide
Page 2
... not disable the clock, Kitchen Timer or the interior oven lights. Press and hold CLOCK pad for the Continuous Bake feature. 3. The oven icon, "UPPER" "LOC" and will sound with "PF" (power failure). The oven control has a factory preset built-in the display and 12:00 is flashing, press ... this feature for 3 seconds. The clock will disappear from being turned on . 2 Note: Because you can be locked individually. When the wall oven is first plugged in, or when the power supply to the appliance has been interrupted, the timer in the display. Press CLEAN pad to ...
... not disable the clock, Kitchen Timer or the interior oven lights. Press and hold CLOCK pad for the Continuous Bake feature. 3. The oven icon, "UPPER" "LOC" and will sound with "PF" (power failure). The oven control has a factory preset built-in the display and 12:00 is flashing, press ... this feature for 3 seconds. The clock will disappear from being turned on . 2 Note: Because you can be locked individually. When the wall oven is first plugged in, or when the power supply to the appliance has been interrupted, the timer in the display. Press CLEAN pad to ...


