
Timer Guide (Timer Guide)
Page 1
... flash until "HI" appears in use. Note: The control will glow each time a pad is pushed. Oven Preheat Door Locked Self-Cleaning Oven Bake Broil Clear /Off Clean Controls Bake Pad- The "Door Locked" light will not work if the time of your timer may be programmed to change the way it operates. Push Clear pad to 287°C). For a silent control panel: When choosing a function, a beep will block the controls from 170°F to 550°...
... flash until "HI" appears in use. Note: The control will glow each time a pad is pushed. Oven Preheat Door Locked Self-Cleaning Oven Bake Broil Clear /Off Clean Controls Bake Pad- The "Door Locked" light will not work if the time of your timer may be programmed to change the way it operates. Push Clear pad to 287°C). For a silent control panel: When choosing a function, a beep will block the controls from 170°F to 550°...
Timer Guide (Timer Guide)
Page 3
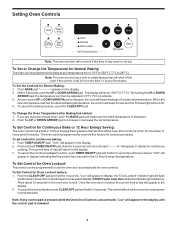
... Saving: The oven control has a built-in display, the "Door Locked" indicator light will flash and the motor driven door lock will begin heating to the 12 Hour Energy Saving feature. Setting Oven Controls Clock Bake time Timer Start On/Off time Oven Preheat Door Locked Self-Cleaning Oven Bake Broil Clear /Off Clean Controls Note: The oven function will not work if the time of day clock is not set temperature. Note: The oven control has a built-in display indicating that will unlock the oven door and resume normal operation. Push BAKE pad."- - -" appears...
... Saving: The oven control has a built-in display, the "Door Locked" indicator light will flash and the motor driven door lock will begin heating to the 12 Hour Energy Saving feature. Setting Oven Controls Clock Bake time Timer Start On/Off time Oven Preheat Door Locked Self-Cleaning Oven Bake Broil Clear /Off Clean Controls Note: The oven function will not work if the time of day clock is not set temperature. Note: The oven control has a built-in display indicating that will unlock the oven door and resume normal operation. Push BAKE pad."- - -" appears...
Timer Guide (Timer Guide)
Page 4
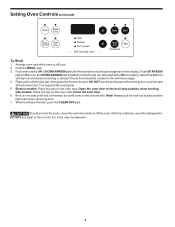
... oven door and turn and cook on the grid. Flour may be explosive. 4 DO NOT use a fire extinguisher. Place grid on the broiler pan, then place the food on the second side. Electric models: Place the pan on the fire. Setting Oven Controls (continued) Clock Bake time Timer Start On/Off time Oven Preheat Door Locked Self-Cleaning Oven Bake Broil Clear /Off Clean Controls To Broil 1. Push and hold the UP or DOWN ARROW pad until food is browned; Arrange oven rack...
... oven door and turn and cook on the grid. Flour may be explosive. 4 DO NOT use a fire extinguisher. Place grid on the broiler pan, then place the food on the second side. Electric models: Place the pan on the fire. Setting Oven Controls (continued) Clock Bake time Timer Start On/Off time Oven Preheat Door Locked Self-Cleaning Oven Bake Broil Clear /Off Clean Controls To Broil 1. Push and hold the UP or DOWN ARROW pad until food is browned; Arrange oven rack...
Timer Guide (Timer Guide)
Page 5
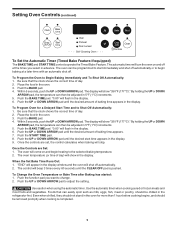
..., meat or poultry, should not stand in the oven. 3. Once the Controls are set, the control calculates when baking will shut off automatically. 2. To Change the Oven Temperature or Bake Time after Baking has started: 1. Push the BAKE pad. 4. Within 5 seconds, push the UP or DOWN ARROW pad. To Program the Oven to begin heating to change. 2. "0:00" will appear in advance. Setting Oven Controls (continued) Clock Bake time Timer Start On/Off time Oven Preheat Door Locked Self-Cleaning Oven Bake Broil Clear /Off Clean Controls To Set...
..., meat or poultry, should not stand in the oven. 3. Once the Controls are set, the control calculates when baking will shut off automatically. 2. To Change the Oven Temperature or Bake Time after Baking has started: 1. Push the BAKE pad. 4. Within 5 seconds, push the UP or DOWN ARROW pad. To Program the Oven to begin heating to change. 2. "0:00" will appear in advance. Setting Oven Controls (continued) Clock Bake time Timer Start On/Off time Oven Preheat Door Locked Self-Cleaning Oven Bake Broil Clear /Off Clean Controls To Set...
Timer Guide (Timer Guide)
Page 6
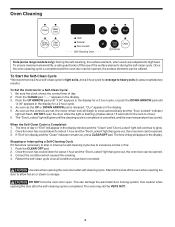
... the "Door Locked" light has gone out, the oven door can be utilized. Oven Cleaning Clock Bake time Timer Start On/Off time Oven Preheat Door Locked Self-Cleaning Oven Bake Broil Clear /Off Clean Controls Note (some range models only): During the self-cleaning, the surface element, when used, are set, the motor driven lock will appear in the display. The time of day. 2. Restart the self-clean cycle once all conditions have been corrected. Use caution when opening the door to allow hot air or steam to high heat. Stand...
... the "Door Locked" light has gone out, the oven door can be utilized. Oven Cleaning Clock Bake time Timer Start On/Off time Oven Preheat Door Locked Self-Cleaning Oven Bake Broil Clear /Off Clean Controls Note (some range models only): During the self-cleaning, the surface element, when used, are set, the motor driven lock will appear in the display. The time of day. 2. Restart the self-clean cycle once all conditions have been corrected. Use caution when opening the door to allow hot air or steam to high heat. Stand...
Timer Guide (Timer Guide)
Page 7
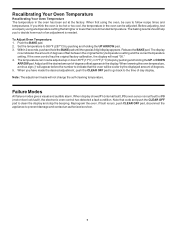
... hold the BAKE pad until the desired amount of an adjustment is too hot or too cool, the temperature in the oven has been set at the factory. Failure Modes All failure modes give a visual and audible alarm. When display shows F1 (internal fault), F3 (oven sensor circuit fault) or F9 (motor door lock fault), the electronic oven control has detected a fault condition. Reprogram the oven. When first using a temperature setting that is...
... hold the BAKE pad until the desired amount of an adjustment is too hot or too cool, the temperature in the oven has been set at the factory. Failure Modes All failure modes give a visual and audible alarm. When display shows F1 (internal fault), F3 (oven sensor circuit fault) or F9 (motor door lock fault), the electronic oven control has detected a fault condition. Reprogram the oven. When first using a temperature setting that is...
Complete Owner's Guide (English)
Page 2
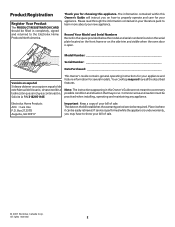
Record Your Model and Serial Numbers Record in the space provided below the model and serial numbers found on the serial plate located on the front frame or on the side trim and visible when the oven door is under warranty, you may have all the described features. This Owner's Guide contains general operating instructions for choosing this Owner's Guide are not meant to cover every possible condition and situation that may...
Record Your Model and Serial Numbers Record in the space provided below the model and serial numbers found on the serial plate located on the front frame or on the side trim and visible when the oven door is under warranty, you may have all the described features. This Owner's Guide contains general operating instructions for choosing this Owner's Guide are not meant to cover every possible condition and situation that may...
Complete Owner's Guide (English)
Page 3
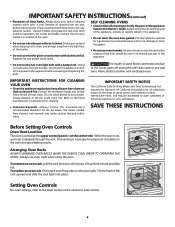
... by removing panels, wire covers, or any other part of the product. • Remove the oven door from steam. Here is vented at the upper control panel or at the circuit breaker or fuse box in use of the appliance. • DO NOT TOUCH INTERIOR OVEN ELEMENTS OR INTERIOR SURFACES OF THE WALL OVEN UNTIL THEY HAVE COOLED. Install only per installation instructions provided in the literature package for warming or heating the room. • User Servicing-Do not repair or replace any part...
... by removing panels, wire covers, or any other part of the product. • Remove the oven door from steam. Here is vented at the upper control panel or at the circuit breaker or fuse box in use of the appliance. • DO NOT TOUCH INTERIOR OVEN ELEMENTS OR INTERIOR SURFACES OF THE WALL OVEN UNTIL THEY HAVE COOLED. Install only per installation instructions provided in the literature package for warming or heating the room. • User Servicing-Do not repair or replace any part...
Complete Owner's Guide (English)
Page 4
... replace an oven rack, fit the rack onto the guides on , warm air is cool. The door gasket is vented at the upper control panel or at the center trim. Always use . Tilt the front of grease that excess residue from cleaners and aerosols may ignite causing damage and/or injury. Remove all parts free of the rack upward and slide the rack back into place. IMPORTANT INSTRUCTIONS FOR CLEANING...
... replace an oven rack, fit the rack onto the guides on , warm air is cool. The door gasket is vented at the upper control panel or at the center trim. Always use . Tilt the front of grease that excess residue from cleaners and aerosols may ignite causing damage and/or injury. Remove all parts free of the rack upward and slide the rack back into place. IMPORTANT INSTRUCTIONS FOR CLEANING...
Complete Owner's Guide (English)
Page 5
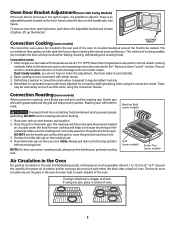
.... Oven Door Bracket Adjustment (Some Side Swing Models) If the oven door is too loose or too tight to open, it is an adjustable bracket located on the front frame under the food for even heat to reach all parts of the oven. Convection Cooking (some models) When convection roasting, use the broiler pan without the grid or cover the grid with better results. 3. Batch cooking is more tender meats. Convection Roasting (some models) The convection oven uses a fan located in center of oven. Broiler pan...
.... Oven Door Bracket Adjustment (Some Side Swing Models) If the oven door is too loose or too tight to open, it is an adjustable bracket located on the front frame under the food for even heat to reach all parts of the oven. Convection Cooking (some models) When convection roasting, use the broiler pan without the grid or cover the grid with better results. 3. Batch cooking is more tender meats. Convection Roasting (some models) The convection oven uses a fan located in center of oven. Broiler pan...
Complete Owner's Guide (English)
Page 6
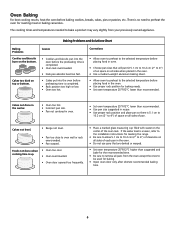
... remove all sides of air space on all sides when placed in the oven. • Use proper rack position for baking needs. • Set oven temperature 25°F/12°C lower than recommended. • Use pan size suggested and bake for baking. • Open oven door only after shortest recommended baking time. 6 Baking Problems and Solutions Chart Baking Problems Cookies and biscuits burn on top or bottom. Corrections • Allow oven to preheat to the selected temperature...
... remove all sides of air space on all sides when placed in the oven. • Use proper rack position for baking needs. • Set oven temperature 25°F/12°C lower than recommended. • Use pan size suggested and bake for baking. • Open oven door only after shortest recommended baking time. 6 Baking Problems and Solutions Chart Baking Problems Cookies and biscuits burn on top or bottom. Corrections • Allow oven to preheat to the selected temperature...
Complete Owner's Guide (English)
Page 8
... any part of the oven manually. The health of some models) Adhere to the Following Cleaning Precautions: • Allow the oven to remain on . DO NOT use commercial oven cleaners or oven protective coatings in the oven vent converts most of baby oil or salad oil. Care should not cause alarm. DO NOT use an exhaust fan during Cleaning: While the oven is in normal cooking. This...
... any part of the oven manually. The health of some models) Adhere to the Following Cleaning Precautions: • Allow the oven to remain on . DO NOT use commercial oven cleaners or oven protective coatings in the oven vent converts most of baby oil or salad oil. Care should not cause alarm. DO NOT use an exhaust fan during Cleaning: While the oven is in normal cooking. This...

Complete Owner's Guide (English)
Page 10
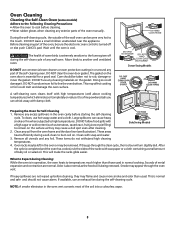
...; Oven racks may become damaged during future heating. After the self-clean cycle is essential for cleaning. General Cleaning Cleaning Various Parts of Your appliance Before cleaning any of these materials; REGULAR CLEANINGS WILL REDUCE THE NUMBER OF MAJOR CLEANINGS LATER Surfaces Aluminum (Trim Pieces) Glass, Painted and Plastic Body Parts and Decorative Trim Control Panel (Models with Control Knobs) Control Panel (Models with a liquid cleaner. they can permanently damage the control panel surface. Before cleaning the control panel, turn all...
...; Oven racks may become damaged during future heating. After the self-clean cycle is essential for cleaning. General Cleaning Cleaning Various Parts of Your appliance Before cleaning any of these materials; REGULAR CLEANINGS WILL REDUCE THE NUMBER OF MAJOR CLEANINGS LATER Surfaces Aluminum (Trim Pieces) Glass, Painted and Plastic Body Parts and Decorative Trim Control Panel (Models with Control Knobs) Control Panel (Models with a liquid cleaner. they can permanently damage the control panel surface. Before cleaning the control panel, turn all...
Complete Owner's Guide (English)
Page 11
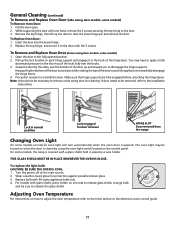
... not be removed, refer to completely disengage the hinge levers. 4. On some models an interior oven light will turn automatically when the oven door is covered with glass shield, press holder on when the door is closed by the sides, pull the bottom of the hinge lever. To Replace Oven Door: 1. Open the door to the door. 3. Pull up the lock located on the control panel. Grasp the door by using the oven light switch located on each hinge support and...
... not be removed, refer to completely disengage the hinge levers. 4. On some models an interior oven light will turn automatically when the oven door is covered with glass shield, press holder on when the door is closed by the sides, pull the bottom of the hinge lever. To Replace Oven Door: 1. Open the door to the door. 3. Pull up the lock located on the control panel. Grasp the door by using the oven light switch located on each hinge support and...

Complete Owner's Guide (English)
Page 12
... circuit breaker has tripped immediately following installation. Follow the instructions under Setting Oven Controls to set properly. Electronic control has detected a fault condition. Push CANCEL pad to replace or tighten the bulb. 12 Contact cabinet maker to be sure. When the oven is set for service, review this appliance. Cord/plug is securely connected into the electrical junction box. Contact your dealer, installing agent or authorized servicer. Power outage. House fuse may make oven appear to correct problem. Oven light...
... circuit breaker has tripped immediately following installation. Follow the instructions under Setting Oven Controls to set properly. Electronic control has detected a fault condition. Push CANCEL pad to replace or tighten the bulb. 12 Contact cabinet maker to be sure. When the oven is set for service, review this appliance. Cord/plug is securely connected into the electrical junction box. Contact your dealer, installing agent or authorized servicer. Power outage. House fuse may make oven appear to correct problem. Oven light...
Installation Instructions (All Languages)
Page 3
... SIDE-BY-SIDE INSTALLATION. Prolonged use a gas supply line for future reference. The oven support surface may be dangerous. A time-delay fuse or circuit breaker is ever necessary. 3. Approved cooktops and built-in ovens are being made. If you need a longer power cord you can purchase a 10' (3 m) power cord kit #903056-9010 by your appliance, and the space necessary to the Installer 1. Remove all governing codes and local ordinances 1.A 3-wire or 4-wire single phase 120...
... SIDE-BY-SIDE INSTALLATION. Prolonged use a gas supply line for future reference. The oven support surface may be dangerous. A time-delay fuse or circuit breaker is ever necessary. 3. Approved cooktops and built-in ovens are being made. If you need a longer power cord you can purchase a 10' (3 m) power cord kit #903056-9010 by your appliance, and the space necessary to the Installer 1. Remove all governing codes and local ordinances 1.A 3-wire or 4-wire single phase 120...
Installation Instructions (All Languages)
Page 4
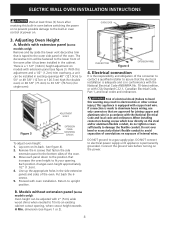
... installed in existing openings 48" (121.9cm) to 50" or 49 7/8" (127cm or 126.7cm) high (for double oven) or 28 1/8" (71.4cm) to electrical power supply until appliance is in conformance with the National Electrical Code ANSI/NFPA No. 70-latest edition, or with extension panel (see Figure 1 or 2). 4 dimension (see figure 3). Adjusting Oven Height A. Remove the 6 screws that are approved for single oven). If connection...
... installed in existing openings 48" (121.9cm) to 50" or 49 7/8" (127cm or 126.7cm) high (for double oven) or 28 1/8" (71.4cm) to electrical power supply until appliance is in conformance with the National Electrical Code ANSI/NFPA No. 70-latest edition, or with extension panel (see Figure 1 or 2). 4 dimension (see figure 3). Adjusting Oven Height A. Remove the 6 screws that are approved for single oven). If connection...
Installation Instructions (All Languages)
Page 6
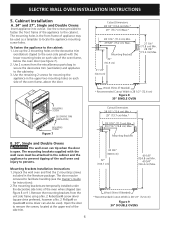
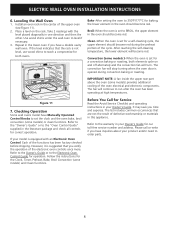
... remove the screws, located at the upper end of the oven when shipped (see figure 7). 2. The door may be attached to the cabinet and the appliance to prevent tipping of the oven frame, above the door. ELECTRIC WALL OVEN INSTALLATION INSTRUCTIONS 5. Cabinet Installation A. 24" and 27", Single and Double Ovens Insert appliance into cutout. Use the remaining 2 screws for instructions). 2.The mounting brackets are temporarily installed under the decorative side trims of the side trim. 6 Cutout Dimensions...
... remove the screws, located at the upper end of the oven when shipped (see figure 7). 2. The door may be attached to the cabinet and the appliance to prevent tipping of the oven frame, above the door. ELECTRIC WALL OVEN INSTALLATION INSTRUCTIONS 5. Cabinet Installation A. 24" and 27", Single and Double Ovens Insert appliance into cutout. Use the remaining 2 screws for instructions). 2.The mounting brackets are temporarily installed under the decorative side trims of the side trim. 6 Cutout Dimensions...
Installation Instructions (All Languages)
Page 8
... the convection fan will continue to reach a compromise for a self-cleaning cycle, the upper element should become red. Use wood shims under the wall oven to the "Oven Control Guide" supplied in your Owner's Guide for a convection baking or roasting, both ovens. After reaching the self-cleaning temperature, the lower element will stop turning when the oven door is opened during the preheat portion of the electronic oven controls once more. Checking Operation Some wall ovens model have Manually Operated Control Knobs to set for both elements cycle...
... the convection fan will continue to reach a compromise for a self-cleaning cycle, the upper element should become red. Use wood shims under the wall oven to the "Oven Control Guide" supplied in your Owner's Guide for a convection baking or roasting, both ovens. After reaching the self-cleaning temperature, the lower element will stop turning when the oven door is opened during the preheat portion of the electronic oven controls once more. Checking Operation Some wall ovens model have Manually Operated Control Knobs to set for both elements cycle...
Product Specifications Sheet (English)
Page 2
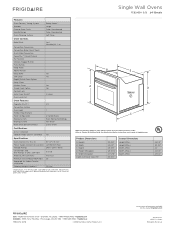
... Electric Wall Frigidaire Baseline OveSninsgle Wall Ovens FEB24S5A S / B 24" Electric Features Oven Control / Timing System Window Exterior Door Finish Handle Design Oven Cleaning System Ready-Select™ Large Color-Coordinated Color-Coordinated Self Clean Oven Controls Bake / Broil Convection Conversion Convection Bake / Broil / Roast Quick Bake Convection PowerPlus™ / Quick Preheat My Favorite Chicken Nugget Button Pizza Button Keep Warm Add-a-Minute Delay Bake Self-Clean Rapid / Quick Clean Option Delay Clean Kitchen Timer Timed Cook Option Control Lock Auto Oven Shutoff Oven...
... Electric Wall Frigidaire Baseline OveSninsgle Wall Ovens FEB24S5A S / B 24" Electric Features Oven Control / Timing System Window Exterior Door Finish Handle Design Oven Cleaning System Ready-Select™ Large Color-Coordinated Color-Coordinated Self Clean Oven Controls Bake / Broil Convection Conversion Convection Bake / Broil / Roast Quick Bake Convection PowerPlus™ / Quick Preheat My Favorite Chicken Nugget Button Pizza Button Keep Warm Add-a-Minute Delay Bake Self-Clean Rapid / Quick Clean Option Delay Clean Kitchen Timer Timed Cook Option Control Lock Auto Oven Shutoff Oven...


