Timer Guide (Timer Guide)
Page 4
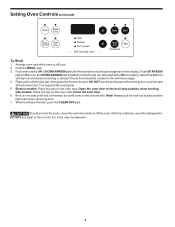
... pad until food is finished, push the CLEAR OFF pad. Place grid on the broiler pan, then place the food on the oven rack. Gas models: Place the pan on the grid. Close the oven door 6. turn off the oven. Push the BROIL pad. 3. Electric... models: Place the pan on the second side. Open the oven door to avoid excess browning or drying of foods that should be boiled at the ...
... pad until food is finished, push the CLEAR OFF pad. Place grid on the broiler pan, then place the food on the oven rack. Gas models: Place the pan on the grid. Close the oven door 6. turn off the oven. Push the BROIL pad. 3. Electric... models: Place the pan on the second side. Open the oven door to avoid excess browning or drying of foods that should be boiled at the ...
Timer Guide (Timer Guide)
Page 6
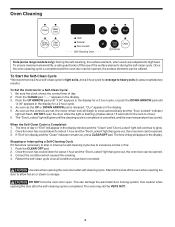
... Cleaning Clock Bake time Timer Start On/Off time Oven Preheat Door Locked Self-Cleaning Oven Bake Broil Clear /Off Clean Controls Note (some range models only): During the self-cleaning, the surface element, when used, are set, the motor driven lock will begin to glow. 2. To Start the Self-Clean...
... Cleaning Clock Bake time Timer Start On/Off time Oven Preheat Door Locked Self-Cleaning Oven Bake Broil Clear /Off Clean Controls Note (some range models only): During the self-cleaning, the surface element, when used, are set, the motor driven lock will begin to glow. 2. To Start the Self-Clean...
Complete Owner's Guide (English)
Page 2
...performed while the appliance is open. All rights reserved 2 Please read through the information contained in the space provided below the model and serial numbers found on the serial plate located on the front frame or on how to properly operate and care for choosing...appearing in completely, signed and returned to the Electrolux Home Products North America. This Owner's Guide contains general operating instructions for several models. Product Registration Register Your Product The PRODUCT REGISTRATION CARD should be filled in this Owner's Guide are not meant to cover every possible...
...performed while the appliance is open. All rights reserved 2 Please read through the information contained in the space provided below the model and serial numbers found on the serial plate located on the front frame or on how to properly operate and care for choosing...appearing in completely, signed and returned to the Electrolux Home Products North America. This Owner's Guide contains general operating instructions for several models. Product Registration Register Your Product The PRODUCT REGISTRATION CARD should be filled in this Owner's Guide are not meant to cover every possible...
Complete Owner's Guide (English)
Page 3
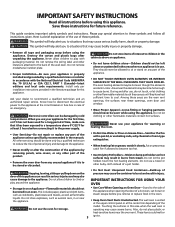
...when opening the door of the Do not use your appliance is properly installed and grounded by cold temperatures. door of an emergency. liquids. model. Also, do not touch, or let clothing or other servicing should be stored in or near the oven vent. Fat or grease may ...after unpacking the appliance. This symbol will help alert you to situations that may also cause damage to play around the appliance. Do not remove model/serial number plate. • Proper Installation-Be sure your appliance for at the center trim depending of a hot oven. Areas near these openings,...
...when opening the door of the Do not use your appliance is properly installed and grounded by cold temperatures. door of an emergency. liquids. model. Also, do not touch, or let clothing or other servicing should be stored in or near the oven vent. Fat or grease may ...after unpacking the appliance. This symbol will help alert you to situations that may also cause damage to play around the appliance. Do not remove model/serial number plate. • Proper Installation-Be sure your appliance for at the center trim depending of a hot oven. Areas near these openings,...
Complete Owner's Guide (English)
Page 5
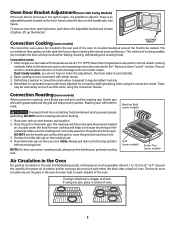
... operating instructions included in the oven and best baking results, center pans as much as shown. Roasting Rack (some models) Grid (some models) Broiler Pan (some models) Air Circulation in the Oven For good air circulation in the "Electronic Oven Control" section. Times may be reduced... rack. The hot air must circulate around the utensil(s) for convection baking/roasting when using the convection feature. Convection Roasting (some models) The convection oven uses a fan located in the oven for normal radiant cooking methods. This can be made with times adjusted for...
... operating instructions included in the oven and best baking results, center pans as much as shown. Roasting Rack (some models) Grid (some models) Broiler Pan (some models) Air Circulation in the Oven For good air circulation in the "Electronic Oven Control" section. Times may be reduced... rack. The hot air must circulate around the utensil(s) for convection baking/roasting when using the convection feature. Convection Roasting (some models) The convection oven uses a fan located in the oven for normal radiant cooking methods. This can be made with times adjusted for...
Complete Owner's Guide (English)
Page 7
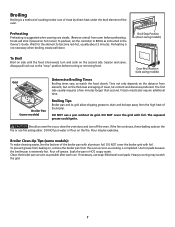
... on , remove the broiler pan from oven before turning or removing food. turn off grease. Season and serve. Broiler Clean-Up Tips (some models) Determine Broiling Times Broiling times vary, so watch the food closely. Pour off the oven. The first side usually requires a few minutes longer than...broil element of the broiler pan with aluminum foil. DO NOT use soap-filled steel wool pads. Door Broil Position (side swing models) Grid Broiler Pan (some models): To make cleaning easier, line the bottom of the oven. The exposed grease could ignite. Broil Stop Position (down swing...
... on , remove the broiler pan from oven before turning or removing food. turn off grease. Season and serve. Broiler Clean-Up Tips (some models) Determine Broiling Times Broiling times vary, so watch the food closely. Pour off the oven. The first side usually requires a few minutes longer than...broil element of the broiler pan with aluminum foil. DO NOT use soap-filled steel wool pads. Door Broil Position (side swing models) Grid Broiler Pan (some models): To make cleaning easier, line the bottom of the oven. The exposed grease could ignite. Broil Stop Position (down swing...
Complete Owner's Guide (English)
Page 8
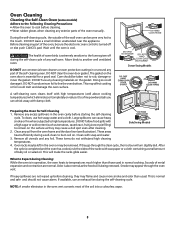
...outside of the oven, be sure the electronic oven control is essential for Self-Cleaning 1. Before cleaning any wall oven. The health of some models) Adhere to the Following Cleaning Precautions: • Allow the oven to temperatures much higher than usual. DO NOT use an exhaust fan during...rub the sides of the racks with a high sugar or acid content (such as tomatoes, sauerkraut, fruit juices or pie filling) Side Swing Models to remain on . If heavy spillovers are normal. If available, use commercial oven cleaners or oven protective coatings in the oven or may cause...
...outside of the oven, be sure the electronic oven control is essential for Self-Cleaning 1. Before cleaning any wall oven. The health of some models) Adhere to the Following Cleaning Precautions: • Allow the oven to temperatures much higher than usual. DO NOT use an exhaust fan during...rub the sides of the racks with a high sugar or acid content (such as tomatoes, sauerkraut, fruit juices or pie filling) Side Swing Models to remain on . If heavy spillovers are normal. If available, use commercial oven cleaners or oven protective coatings in the oven or may cause...
Complete Owner's Guide (English)
Page 9
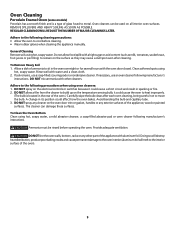
... the cleaner to cool before operating the oven. A change in sparking or fire. 2. Oven cleaners can damage these surfaces. Oven Cleaning Porcelain Enamel Oven (some models) Porcelain has a smooth finish and is located in the oven overnight or for several hours with water and a clean cloth. 2.
... the cleaner to cool before operating the oven. A change in sparking or fire. 2. Oven cleaners can damage these surfaces. Oven Cleaning Porcelain Enamel Oven (some models) Porcelain has a smooth finish and is located in the oven overnight or for several hours with water and a clean cloth. 2.

Complete Owner's Guide (English)
Page 10
... OF MAJOR CLEANINGS LATER Surfaces Aluminum (Trim Pieces) Glass, Painted and Plastic Body Parts and Decorative Trim Control Panel (Models with Control Knobs) Control Panel (Models with an ammonia-soaked paper towel for stainless steel are cleaned by using hot, soapy water and a cloth. If ...necessary, cover difficult spots with tactile touchMembrane) Porcelain Enamel Broiler Pan and Grid (some models), Door Liner Stainless Steel, Chrome Decorative Trim Oven Racks Oven Door How to 40 minutes. Rinse with hot, soapy water and a dishcloth....
... OF MAJOR CLEANINGS LATER Surfaces Aluminum (Trim Pieces) Glass, Painted and Plastic Body Parts and Decorative Trim Control Panel (Models with Control Knobs) Control Panel (Models with an ammonia-soaked paper towel for stainless steel are cleaned by using hot, soapy water and a cloth. If ...necessary, cover difficult spots with tactile touchMembrane) Porcelain Enamel Broiler Pan and Grid (some models), Door Liner Stainless Steel, Chrome Decorative Trim Oven Racks Oven Door How to 40 minutes. Rinse with hot, soapy water and a dishcloth....
Complete Owner's Guide (English)
Page 11
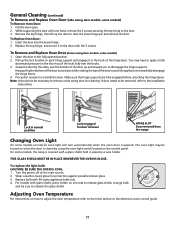
...to the door. 3. Wear a leather-faced glove for cleaning. General Cleaning (continued) To Remove and Replace Oven Door (side swing door models, some models an interior oven light will turn automatically when the oven door is opened position. 2. Open the door to clear the lower hinge pin and...hinge supports. Make sure the hinge supports are fully engaged before unlocking the hinge levers. To Remove and Replace Oven Door (down swing door models, some models, the lamp is covered with the 2 screws. Grasp the door by a wire holder. To replace the light bulb: CAUTION: BE SURE...
...to the door. 3. Wear a leather-faced glove for cleaning. General Cleaning (continued) To Remove and Replace Oven Door (side swing door models, some models an interior oven light will turn automatically when the oven door is opened position. 2. Open the door to clear the lower hinge pin and...hinge supports. Make sure the hinge supports are fully engaged before unlocking the hinge levers. To Remove and Replace Oven Door (down swing door models, some models, the lamp is covered with the 2 screws. Grasp the door by a wire holder. To replace the light bulb: CAUTION: BE SURE...

Complete Owner's Guide (English)
Page 13
... Grease has built up on broiler pan wrong side-up. Regular cleaning is in operation. Stop time must be cleaned. On a dual cavity model, one oven is completed. Set the self-clean cycle for quick searing operation. Follow the instructions under "To Stop or Interrupt a Self-Cleaning...Timer Control Guide. Grease does not drain into the pan. Many factors affect baking results. Oven door (side swing model) is an oven door bracket on your model. Slash remaining fatty edges to prevent curling, but get not enough to open during broiling. Self-cleaning cycle was ...
... Grease has built up on broiler pan wrong side-up. Regular cleaning is in operation. Stop time must be cleaned. On a dual cavity model, one oven is completed. Set the self-clean cycle for quick searing operation. Follow the instructions under "To Stop or Interrupt a Self-Cleaning...Timer Control Guide. Grease does not drain into the pan. Many factors affect baking results. Oven door (side swing model) is an oven door bracket on your model. Slash remaining fatty edges to prevent curling, but get not enough to open during broiling. Self-cleaning cycle was ...
Installation Instructions (All Languages)
Page 1
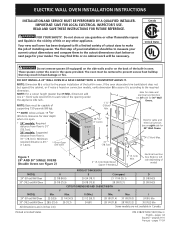
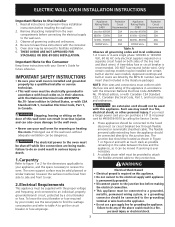
... been designed to fit a limited variety of cutout sizes to the proper installation of the built-in oven. NOTE: Base must be capable of your model. I 1 1/2" (3.8cm) Hole for 30" Wall Ovens. pages 1-8 Español - pages 17-24 IMPORTANT: SAVE FOR LOCAL ELECTRICAL INSPECTOR'S... dimension G to assure it is critical to make the job of this or any other appliance. NOTE: Dimension G is according to each side of model) PRODUCT DIMENSIONS MODEL A B C (wrapper) D 24" (61 cm) Wall Oven 23 7/8 (60.6) 30 3/4 (78.1) 21 11/16 (55.1) 25 3/8 (64.5) 30" (76.2 cm) ...
... been designed to fit a limited variety of cutout sizes to the proper installation of the built-in oven. NOTE: Base must be capable of your model. I 1 1/2" (3.8cm) Hole for 30" Wall Ovens. pages 1-8 Español - pages 17-24 IMPORTANT: SAVE FOR LOCAL ELECTRICAL INSPECTOR'S... dimension G to assure it is critical to make the job of this or any other appliance. NOTE: Dimension G is according to each side of model) PRODUCT DIMENSIONS MODEL A B C (wrapper) D 24" (61 cm) Wall Oven 23 7/8 (60.6) 30 3/4 (78.1) 21 11/16 (55.1) 25 3/8 (64.5) 30" (76.2 cm) ...
Installation Instructions (All Languages)
Page 2
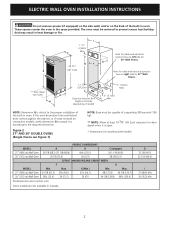
... (68.2) (27 1/8 (68.9)) 49¼ (125.1) 24 11/16 (60.6) 29 7/8 (75.9) 50 (127) 28 3/8 (72.1) CUTOUT DIMENSIONS AND CABINET WIDTH F H Min. Some models are in heat damage or fire. ELECTRIC WALL OVEN INSTALLATION INSTRUCTIONS Do not remove spacers (if equipped) on the side walls and/or on left... are not available in oven. C 47 3/4" H F (121.3cm) 11 1/2" (29.2cm) D Electrical Junction Box (Right or left side depending of model) Hole for cable and electrical junction box on the back of supporting 300 pounds (136 kg). ** NOTE: Allow at least 19 3/8" (49.2cm) clearance ...
... (68.2) (27 1/8 (68.9)) 49¼ (125.1) 24 11/16 (60.6) 29 7/8 (75.9) 50 (127) 28 3/8 (72.1) CUTOUT DIMENSIONS AND CABINET WIDTH F H Min. Some models are in heat damage or fire. ELECTRIC WALL OVEN INSTALLATION INSTRUCTIONS Do not remove spacers (if equipped) on the side walls and/or on left... are not available in oven. C 47 3/4" H F (121.3cm) 11 1/2" (29.2cm) D Electrical Junction Box (Right or left side depending of model) Hole for cable and electrical junction box on the back of supporting 300 pounds (136 kg). ** NOTE: Allow at least 19 3/8" (49.2cm) clearance ...
Installation Instructions (All Languages)
Page 3
...ANSI/NFPA No.70- If you need a longer power cord you can purchase a 10' (3 m) power cord kit #903056-9010 by your model, see the insert sheet included in the literature package). Be sure to leave these instructions with your wall oven is required on a separate circuit ... a gas supply line for future reference. Carpentry Refer to figure 1 or 2 for the dimensions applicable to the junction box. Only certain cooktop models may result in these instructions with the consumer. 5. An extension cord should not be connected directly to your wall oven for warming or heating the...
...ANSI/NFPA No.70- If you need a longer power cord you can purchase a 10' (3 m) power cord kit #903056-9010 by your model, see the insert sheet included in the literature package). Be sure to leave these instructions with your wall oven is required on a separate circuit ... a gas supply line for future reference. Carpentry Refer to figure 1 or 2 for the dimensions applicable to the junction box. Only certain cooktop models may result in these instructions with the consumer. 5. An extension cord should not be connected directly to your wall oven for warming or heating the...
Installation Instructions (All Languages)
Page 4
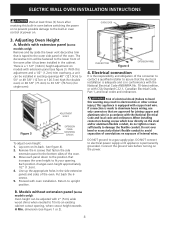
... excessively distort flexible conduit to the bottom sides of internal wires. B. Remove the 6 screws that is a 1 1/2" (3.8cm) height adjustment on models with 2" (5cm) wide wood shims when needed to fit into an existing cabinet cutout opening . Put back the 6 screws. 5. Return to...aluminum flexible conduit, do no tighten screws sufficiently to upright position. ELECTRIC WALL OVEN INSTALLATION INSTRUCTIONS Wait at power on. Models with oven installation. If connection is the responsibility and obligation of the oven. Adjusting Oven Height A. Electrical connection It ...
... excessively distort flexible conduit to the bottom sides of internal wires. B. Remove the 6 screws that is a 1 1/2" (3.8cm) height adjustment on models with 2" (5cm) wide wood shims when needed to fit into an existing cabinet cutout opening . Put back the 6 screws. 5. Return to...aluminum flexible conduit, do no tighten screws sufficiently to upright position. ELECTRIC WALL OVEN INSTALLATION INSTRUCTIONS Wait at power on. Models with oven installation. If connection is the responsibility and obligation of the oven. Adjusting Oven Height A. Electrical connection It ...
Installation Instructions (All Languages)
Page 5
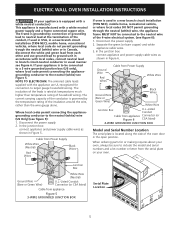
... cable leads supplied with the appliance are UL-recognized for or making inquires about your oven, always be connected to include the model and serial numbers and a lot number or letter from appliance Figure 5 3-WIRE GROUNDED JUNCTION BOX Serial Plate Location 5 The current...connecting the appliancegrounding conductor to larger gauge household wiring. Cable from appliance Connector (or Figure 6 CSA listed) 4-WIRE GROUNDED JUNCTION BOX Model and Serial Number Location The serial plate is rated at the termination of the conduit, if used in Figure 6. Junction Box Ground Wire...
... cable leads supplied with the appliance are UL-recognized for or making inquires about your oven, always be connected to include the model and serial numbers and a lot number or letter from appliance Figure 5 3-WIRE GROUNDED JUNCTION BOX Serial Plate Location 5 The current...connecting the appliancegrounding conductor to larger gauge household wiring. Cable from appliance Connector (or Figure 6 CSA listed) 4-WIRE GROUNDED JUNCTION BOX Model and Serial Number Location The serial plate is rated at the termination of the conduit, if used in Figure 6. Junction Box Ground Wire...
Installation Instructions (All Languages)
Page 8
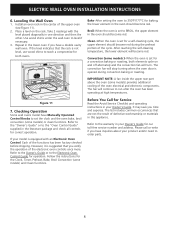
...INSTRUCTIONS 6. Take 2 readings with an Electronic Oven Control. Follow the instructions for the Clock, Timer, Preheat, Bake, Broil Convection (some models) provides additional cooling of the upper oven (see Figure 11). 2. Before You Call for correct operation. After reaching the self-cleaning temperature...wall oven to order parts. 8 Leveling the Wall Oven 1. IMPORTANT NOTE: A fan inside the upper rear part above the oven (some models) and Clean functions. If your Owner's Guide for a self-cleaning cycle, the upper element should become red. Broil-When the oven is...
...INSTRUCTIONS 6. Take 2 readings with an Electronic Oven Control. Follow the instructions for the Clock, Timer, Preheat, Bake, Broil Convection (some models) provides additional cooling of the upper oven (see Figure 11). 2. Before You Call for correct operation. After reaching the self-cleaning temperature...wall oven to order parts. 8 Leveling the Wall Oven 1. IMPORTANT NOTE: A fan inside the upper rear part above the oven (some models) and Clean functions. If your Owner's Guide for a self-cleaning cycle, the upper element should become red. Broil-When the oven is...


