
Installation Instructions (All Languages)
Page 1
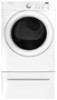
All about the Installation of your Dryer TABLE OF CONTENTS Important Safety Instructions 2-3 Reversing Door 20-23 Installation Requirements 4-10 Accessories 24 Installed Dryer Dimensions 11 Español 25 Installation Instructions 12-19 137442700A (1104)
All about the Installation of your Dryer TABLE OF CONTENTS Important Safety Instructions 2-3 Reversing Door 20-23 Installation Requirements 4-10 Accessories 24 Installed Dryer Dimensions 11 Español 25 Installation Instructions 12-19 137442700A (1104)
Installation Instructions (All Languages)
Page 2
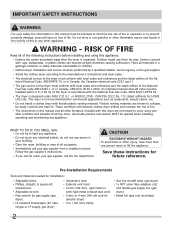
... supplier's instructions. • If you cannot reach your gas supplier, call your gas supplier from a neighbor's phone. These conditions will obstruct clothes dryer airflow and increase the risk of fire. • The instructions in your building. • Clear the room, building or area... of all of the following instructions before installing and using this appliance: • Destroy the carton and plastic bags after the dryer is designed under ANSI Z 21.5.1 or ANSI/UL 2158 - CAUTION EXCESSIVE WEIGHT HAZARD To avoid back or other literature included with rugs,...
... supplier's instructions. • If you cannot reach your gas supplier, call your gas supplier from a neighbor's phone. These conditions will obstruct clothes dryer airflow and increase the risk of fire. • The instructions in your building. • Clear the room, building or area... of all of the following instructions before installing and using this appliance: • Destroy the carton and plastic bags after the dryer is designed under ANSI Z 21.5.1 or ANSI/UL 2158 - CAUTION EXCESSIVE WEIGHT HAZARD To avoid back or other literature included with rugs,...
Installation Instructions (All Languages)
Page 3
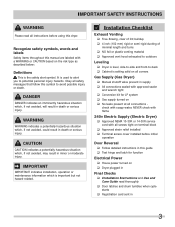
... Conversion kit for function Electrical Power ‰ House power turned on ‰ No leaks present at all safety messages that follow this dryer. It is used to alert you to -back ‰ Cabinet is the safety alert symbol. DANGER DANGER indicates an imminently hazardous situation... of minimal length and turns ‰ NO foil or plastic venting material ‰ Approved vent hood exhausted to outdoors Leveling ‰ Dryer is important but not hazard-related. CAUTION CAUTION indicates a potentially hazardous situation which , if not avoided, could result in death or serious...
... Conversion kit for function Electrical Power ‰ House power turned on ‰ No leaks present at all safety messages that follow this dryer. It is used to alert you to -back ‰ Cabinet is the safety alert symbol. DANGER DANGER indicates an imminently hazardous situation... of minimal length and turns ‰ NO foil or plastic venting material ‰ Approved vent hood exhausted to outdoors Leveling ‰ Dryer is important but not hazard-related. CAUTION CAUTION indicates a potentially hazardous situation which , if not avoided, could result in death or serious...
Installation Instructions (All Languages)
Page 4
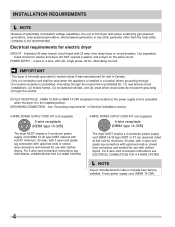
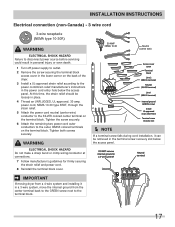
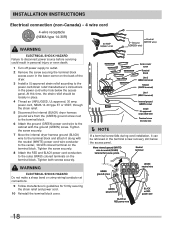
...ELECTRICAL CONNECTIONS FOR A 3-WIRE SYSTEM. 4-WIRE POWER SUPPLY CORD KIT (not supplied) 4-wire receptacle (NEMA type 14-30R) The dryer MUST employ a 4-conductor power supply cord NEMA 14-30 type SRDT or ST (as required) rated at 240 volt AC minimum, .... Use separately fused circuits for electric dryer CIRCUIT - INSTALLATION REQUIREMENTS Í NOTE Because of potentially inconsistent voltage capabilities, the use of this dryer with clothes dryers. GROUNDING CONNECTION - Electrical requirements for washer and dryer. IMPORTANT This dryer is internally grounded to be used when...
...ELECTRICAL CONNECTIONS FOR A 3-WIRE SYSTEM. 4-WIRE POWER SUPPLY CORD KIT (not supplied) 4-wire receptacle (NEMA type 14-30R) The dryer MUST employ a 4-conductor power supply cord NEMA 14-30 type SRDT or ST (as required) rated at 240 volt AC minimum, .... Use separately fused circuits for electric dryer CIRCUIT - INSTALLATION REQUIREMENTS Í NOTE Because of potentially inconsistent voltage capabilities, the use of this dryer with clothes dryers. GROUNDING CONNECTION - Electrical requirements for washer and dryer. IMPORTANT This dryer is internally grounded to be used when...
Installation Instructions (All Languages)
Page 5
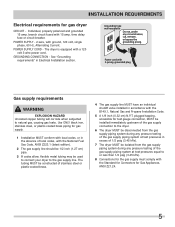
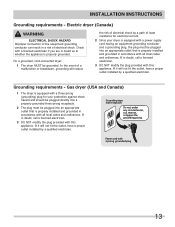
... Installation section. Use ONLY black iron, stainless steel, or plastic-coated brass piping for Gas Appliances, ANSI Z21.24. 5 The dryer is equipped with ground, 120 volt, single phase, 60 Hz, Alternating Current. See "Grounding requirements" in accordance with the B149.1,...branch circuit fused with 3-prong grounded plug Gas supply requirements WARNING EXPLOSION HAZARD Uncoated copper tubing will corrode when subjected to the dryer. 6 The dryer MUST be disconnected from the gas supply piping system during any circumstances, cut, remove, or bypass the grounding prong. Power ...
... Installation section. Use ONLY black iron, stainless steel, or plastic-coated brass piping for Gas Appliances, ANSI Z21.24. 5 The dryer is equipped with ground, 120 volt, single phase, 60 Hz, Alternating Current. See "Grounding requirements" in accordance with the B149.1,...branch circuit fused with 3-prong grounded plug Gas supply requirements WARNING EXPLOSION HAZARD Uncoated copper tubing will corrode when subjected to the dryer. 6 The dryer MUST be disconnected from the gas supply piping system during any circumstances, cut, remove, or bypass the grounding prong. Power ...
Installation Instructions (All Languages)
Page 6
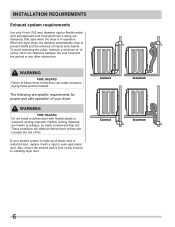
... Use only 4 inch (102 mm) diameter rigid or flexible metal duct and approved vent hood which has a swing-out damper(s) that open when the dryer is made up of plastic duct or metal foil duct, replace it with flexible plastic or metal foil venting materials. When the..., the dampers automatically close to collapse, be easily crushed and trap lint. WARNING FIRE HAZARD Do not install a clothes dryer with a rigid or semi-rigid metal duct. Also, ensure the present duct is free of any other obstruction. Correct Correct Incorrect Incorrect 6 The following are ...
... Use only 4 inch (102 mm) diameter rigid or flexible metal duct and approved vent hood which has a swing-out damper(s) that open when the dryer is made up of plastic duct or metal foil duct, replace it with flexible plastic or metal foil venting materials. When the..., the dampers automatically close to collapse, be easily crushed and trap lint. WARNING FIRE HAZARD Do not install a clothes dryer with a rigid or semi-rigid metal duct. Also, ensure the present duct is free of any other obstruction. Correct Correct Incorrect Incorrect 6 The following are ...
Installation Instructions (All Languages)
Page 7
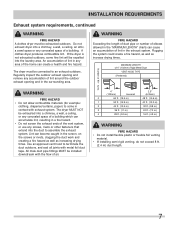
... a fire hazard, as well as increasing drying times. All male duct pipe fittings MUST be exhausted outdoors. The dryer must be installed downstream with metal foil duct tape. WARNING FIRE HAZARD Exceeding the length of duct pipe or number of elbows allowed ... flexible plastic or flexible foil venting material. • If installing semi-rigid venting, do not exceed 8 ft. (2.4 m) duct length. 7 The dryer MUST NOT be expelled into a chimney, a wall, a ceiling, an attic, a crawl space or any concealed space of a building which can accumulate lint, resulting...
... a fire hazard, as well as increasing drying times. All male duct pipe fittings MUST be exhausted outdoors. The dryer must be installed downstream with metal foil duct tape. WARNING FIRE HAZARD Exceeding the length of duct pipe or number of elbows allowed ... flexible plastic or flexible foil venting material. • If installing semi-rigid venting, do not exceed 8 ft. (2.4 m) duct length. 7 The dryer MUST NOT be expelled into a chimney, a wall, a ceiling, an attic, a crawl space or any concealed space of a building which can accumulate lint, resulting...
Installation Instructions (All Languages)
Page 8
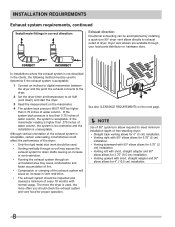
... in correct direction: Exhaust direction Directional exhausting can be accomplished by installing a quick-turn elbow required to meet minimum installation depth of free-standing dryer: • Straight back venting allows for 0" (0 cm) installation. • Venting right with 90° elbow allows for 0.75" (2...vertical orientation of the exhaust system is acceptable: 1 Connect an inclined or digital manometer between the dryer and the point the exhaust connects to the dryer. 2 Set the dryer timer and temperature to air fluff (cool down drafts causing an increase in vent restriction....
... in correct direction: Exhaust direction Directional exhausting can be accomplished by installing a quick-turn elbow required to meet minimum installation depth of free-standing dryer: • Straight back venting allows for 0" (0 cm) installation. • Venting right with 90° elbow allows for 0.75" (2...vertical orientation of the exhaust system is acceptable: 1 Connect an inclined or digital manometer between the dryer and the point the exhaust connects to the dryer. 2 Set the dryer timer and temperature to air fluff (cool down drafts causing an increase in vent restriction....
Installation Instructions (All Languages)
Page 9
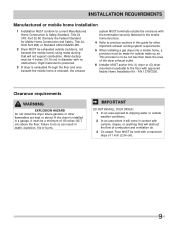
... Part 32-80 (formerly the Federal Standard for Mobile Home Construction and Safety, Title 24, HUD Part 280) or Standard CAN/CSAZ240 MH. 2 Dryer MUST be exhausted outside make up air. P/N 137067200. This provision is to be not less than twice the area of 18 inches (45.7 cm)...6 Installer MUST anchor this guide for outside (outdoors, not beneath the mobile home) using metal ducting that will not support combustion. If the dryer is enclosed, the exhaust system MUST terminate outside the enclosure with the termination securely fastened to the mobile home structure. 4 Refer to the &#...
... Part 32-80 (formerly the Federal Standard for Mobile Home Construction and Safety, Title 24, HUD Part 280) or Standard CAN/CSAZ240 MH. 2 Dryer MUST be exhausted outside make up air. P/N 137067200. This provision is to be not less than twice the area of 18 inches (45.7 cm)...6 Installer MUST anchor this guide for outside (outdoors, not beneath the mobile home) using metal ducting that will not support combustion. If the dryer is enclosed, the exhaust system MUST terminate outside the enclosure with the termination securely fastened to the mobile home structure. 4 Refer to the &#...
Installation Instructions (All Languages)
Page 10
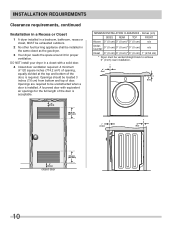
..., equally divided at the top and bottom of door. INSTALLATION REQUIREMENTS Clearance requirements, continued Installation in a Recess or Closet 1 A dryer installed in a bedroom, bathroom, recess or closet, MUST be exhausted outdoors. 2 No other fuel burning appliance shall be vented straight... Alcove 0" (0 cm) 0" (0 cm)* 0" (0 cm) n/a UnderCounter 0" (0 cm) 0" (0 cm)* 0" (0 cm) n/a Closet 0" (0 cm) 0" (0 cm)* 0" (0 cm) 1" (2.54 cm) * Dryer must be installed in a closet with equivalent air openings for proper ventilation. MINIMUM INSTALLATION CLEARANCES - DO NOT install your...
..., equally divided at the top and bottom of door. INSTALLATION REQUIREMENTS Clearance requirements, continued Installation in a Recess or Closet 1 A dryer installed in a bedroom, bathroom, recess or closet, MUST be exhausted outdoors. 2 No other fuel burning appliance shall be vented straight... Alcove 0" (0 cm) 0" (0 cm)* 0" (0 cm) n/a UnderCounter 0" (0 cm) 0" (0 cm)* 0" (0 cm) n/a Closet 0" (0 cm) 0" (0 cm)* 0" (0 cm) 1" (2.54 cm) * Dryer must be installed in a closet with equivalent air openings for proper ventilation. MINIMUM INSTALLATION CLEARANCES - DO NOT install your...
Installation Instructions (All Languages)
Page 11
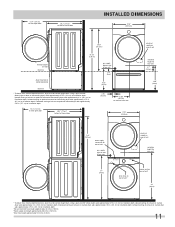
...unit electrical supply on rear of unit centerline height for rear vent 37" (94cm) drain hose on rear of unit3 power cord on stacked dryer adds approximately 3.75 in. (9.5 cm) to installation depth. 1Hot and cold inlet hose length approximately 43 inches (109cm) 2Power supply cord length...5cm). 3Drain hose length approximately 52 inches (132cm). 11 Using a quick-turn 90° elbow (right or down on pedestal-mounted or freestanding dryer adds approximately 3.75 in. (9.5 cm) to installation depth. Leftward venting of exhaust on rear of unit2 39" (99cm) * To obtain these minimal...
...unit electrical supply on rear of unit centerline height for rear vent 37" (94cm) drain hose on rear of unit3 power cord on stacked dryer adds approximately 3.75 in. (9.5 cm) to installation depth. 1Hot and cold inlet hose length approximately 43 inches (109cm) 2Power supply cord length...5cm). 3Drain hose length approximately 52 inches (132cm). 11 Using a quick-turn 90° elbow (right or down on pedestal-mounted or freestanding dryer adds approximately 3.75 in. (9.5 cm) to installation depth. Leftward venting of exhaust on rear of unit2 39" (99cm) * To obtain these minimal...
Installation Instructions (All Languages)
Page 12
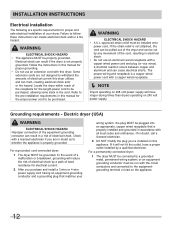
... and install a 3 wire or 4 wire power supply cord having an equipment-grounding conductor and a grounding plug that matches your dryer. If the strain relief is properly grounded. WARNING ELECTRICAL SHOCK HAZARD • This appliance MUST be grounded. The proper wiring and...and aluminum and can melt, creating electrical shock and/ or fire hazard. In the event of electrical current this dryer. For a permanently connected dryer: 1 The dryer MUST be connected to withstand the amounts of a malfunction or breakdown, grounding will have a proper outlet installed by a...
... and install a 3 wire or 4 wire power supply cord having an equipment-grounding conductor and a grounding plug that matches your dryer. If the strain relief is properly grounded. WARNING ELECTRICAL SHOCK HAZARD • This appliance MUST be grounded. The proper wiring and...and aluminum and can melt, creating electrical shock and/ or fire hazard. In the event of electrical current this dryer. For a permanently connected dryer: 1 The dryer MUST be connected to withstand the amounts of a malfunction or breakdown, grounding will have a proper outlet installed by a...
Installation Instructions (All Languages)
Page 13
... remove, or bypass the grounding prong. Power cord with a licensed electrician if you are in accordance with this appliance. Gas dryer (USA and Canada) 1 The dryer is equipped with a three-prong (grounding) plug for electrical current. 2 Since your protection against shock hazard and should be... a licensed electrician. 3 DO NOT modify the plug provided with all local codes and ordinances. For a grounded, cord-connected dryer: 1 The dryer MUST be plugged into an appropriate outlet that is properly installed and grounded in doubt as to whether the appliance is properly grounded...
... remove, or bypass the grounding prong. Power cord with a licensed electrician if you are in accordance with this appliance. Gas dryer (USA and Canada) 1 The dryer is equipped with a three-prong (grounding) plug for electrical current. 2 Since your protection against shock hazard and should be... a licensed electrician. 3 DO NOT modify the plug provided with all local codes and ordinances. For a grounded, cord-connected dryer: 1 The dryer MUST be plugged into an appropriate outlet that is properly installed and grounded in doubt as to whether the appliance is properly grounded...
Installation Instructions (All Languages)
Page 14
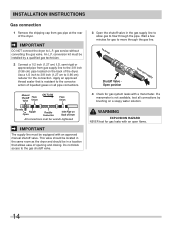
...An L.P. conversion kit must be installed by brushing on Back of opening and closing. This valve should be located in the same room as the dryer and should be in the gas supply line to allow gas to the 3/8 inch (0.96 cm) pipe located on all connections by a qualifi...that is not available, test all pipe connections. to the corrosive action of liquefied gases on the back of the dryer. If a manometer is resistant to dryer Shutoff Valve Open position from gas supply line to flow through the gas line. WARNING EXPLOSION HAZARD NEVER test for ...
...An L.P. conversion kit must be installed by brushing on Back of opening and closing. This valve should be located in the same room as the dryer and should be in the gas supply line to allow gas to the 3/8 inch (0.96 cm) pipe located on all connections by a qualifi...that is not available, test all pipe connections. to the corrosive action of liquefied gases on the back of the dryer. If a manometer is resistant to dryer Shutoff Valve Open position from gas supply line to flow through the gas line. WARNING EXPLOSION HAZARD NEVER test for ...
Installation Instructions (All Languages)
Page 15
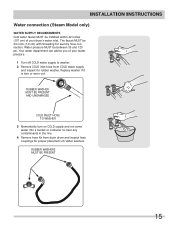
... supply and run some water into a bucket or container to clear any contaminants in the line. 4 Remove hose kit from dryer drum and inspect hose couplings for proper placement of your dryer's water inlet. Water pressure MUST be installed within 42 inches (107 cm) of your water pressure. 1 Turn off COLD water...
... supply and run some water into a bucket or container to clear any contaminants in the line. 4 Remove hose kit from dryer drum and inspect hose couplings for proper placement of your dryer's water inlet. Water pressure MUST be installed within 42 inches (107 cm) of your water pressure. 1 Turn off COLD water...
Installation Instructions (All Languages)
Page 16
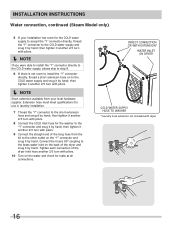
.... then tighten it another 2/3 turn with pliers. Í NOTE Short extension available from the kit to the other outlet on the back of the dryer inlet hose another 2/3 turn with pliers. 10 Turn on to the brass water inlet on the "Y" connector and snug it another 2/3 turn with pliers... Connect the hose's 90° coupling to the COLD water supply and snug it by hand; DIRECT CONNECTION OR WITH EXTENSION* WATER INLET ON DRYER COLD WATER SUPPLY HOSE TO WASHER *Laundry hose extension not included with pliers. 8 Connect the COLD inlet hose for the washer to install the "Y"...
.... then tighten it another 2/3 turn with pliers. Í NOTE Short extension available from the kit to the other outlet on the back of the dryer inlet hose another 2/3 turn with pliers. 10 Turn on to the brass water inlet on the "Y" connector and snug it another 2/3 turn with pliers... Connect the hose's 90° coupling to the COLD water supply and snug it by hand; DIRECT CONNECTION OR WITH EXTENSION* WATER INLET ON DRYER COLD WATER SUPPLY HOSE TO WASHER *Laundry hose extension not included with pliers. 8 Connect the COLD inlet hose for the washer to install the "Y"...
Installation Instructions (All Languages)
Page 17
...system, move the internal ground from a 4-wire system and installing it can be retrieved in a 3-wire system!! Neutral terminal IMPORTANT If moving dryer from the center terminal back to the GREEN screw next to the terminal block. 17 DO NOT remove internal ground in the terminal screw recovery... off power supply to outlet. 2 Remove the screw securing the terminal block access cover in the lower corner on the back of the dryer. 3 Install a UL-approved strain relief according to the power cord/strain relief manufacturer's instructions in the power cord entry hole below the access...
...system, move the internal ground from a 4-wire system and installing it can be retrieved in a 3-wire system!! Neutral terminal IMPORTANT If moving dryer from the center terminal back to the GREEN screw next to the terminal block. 17 DO NOT remove internal ground in the terminal screw recovery... off power supply to outlet. 2 Remove the screw securing the terminal block access cover in the lower corner on the back of the dryer. 3 Install a UL-approved strain relief according to the power cord/strain relief manufacturer's instructions in the power cord entry hole below the access...
Installation Instructions (All Languages)
Page 18
...wire 18 Move internal ground (WHITE) wire to the outer, BRASS colored terminals on the terminal block. Tighten the screw securely. 7 Move the internal dryer harness ground (BLACK) wire to the terminal block and attach it can be loosely in place. 4 Thread an UNPLUGGED, UL-approved, 30 amp. ...power cord, NEMA 14-30 type ST or SRDT, through the strain relief. 5 Disconnect the internal (BLACK) dryer harness ground wire from the (GREEN) ground screw next to the terminal block. 6 Attach the ground (GREEN) power cord wire to the center, SILVER colored...
...wire 18 Move internal ground (WHITE) wire to the outer, BRASS colored terminals on the terminal block. Tighten the screw securely. 7 Move the internal dryer harness ground (BLACK) wire to the terminal block and attach it can be loosely in place. 4 Thread an UNPLUGGED, UL-approved, 30 amp. ...power cord, NEMA 14-30 type ST or SRDT, through the strain relief. 5 Disconnect the internal (BLACK) dryer harness ground wire from the (GREEN) ground screw next to the terminal block. 6 Attach the ground (GREEN) power cord wire to the center, SILVER colored...
Installation Instructions (All Languages)
Page 19
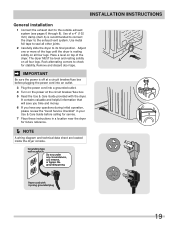
...grounded plug 19 IMPORTANT Be sure the power is resting solidly on top of a 4" (102 mm) clamp (item A) is recommended to connect the dryer to its final position. Grounding type wall receptacle Do not, under any questions during initial operation, please review the "Avoid Service Checklist" in ... plugging the power cord into an outlet. 3 Plug the power cord into a grounded outlet. 4 Turn on all other joints. 2 Carefully slide the dryer to the exhaust vent system. Remove and discard door tape. Place a level on all four legs. Use metal foil tape to seal all four legs...
...grounded plug 19 IMPORTANT Be sure the power is resting solidly on top of a 4" (102 mm) clamp (item A) is recommended to connect the dryer to its final position. Grounding type wall receptacle Do not, under any questions during initial operation, please review the "Avoid Service Checklist" in ... plugging the power cord into an outlet. 3 Plug the power cord into a grounded outlet. 4 Turn on all other joints. 2 Carefully slide the dryer to the exhaust vent system. Remove and discard door tape. Place a level on all four legs. Use metal foil tape to seal all four legs...
Installation Instructions (All Languages)
Page 20
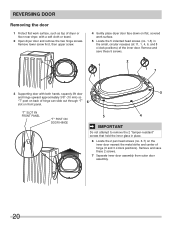
... slide out through "T" slot on front panel. Remove and save these 5 screws. 3 Supporting door with a soft cloth or towel. 2 Open dryer door and remove the two hinge screws. Remove and save these 2 screws. 7 Separate inner door assembly from outer door assembly. 20 Remove lower ...screw first, then upper screw. 4 Gently place dryer door face down on flat 11, 1, 4, 6, and 8 o'clock positions) of the inner door. REVERSING DOOR Removing the door 1 Protect flat...
... slide out through "T" slot on front panel. Remove and save these 5 screws. 3 Supporting door with a soft cloth or towel. 2 Open dryer door and remove the two hinge screws. Remove and save these 2 screws. 7 Separate inner door assembly from outer door assembly. 20 Remove lower ...screw first, then upper screw. 4 Gently place dryer door face down on flat 11, 1, 4, 6, and 8 o'clock positions) of the inner door. REVERSING DOOR Removing the door 1 Protect flat...


