Installation Instructions (All Languages)
Page 2
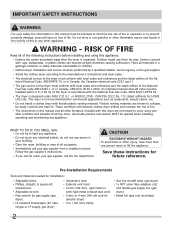
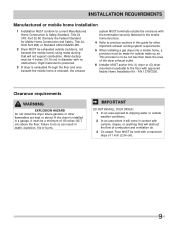
... metal exhaust duct work • 3-wire or 4-wire 240 volt cord kit (electric dryer) • 4 in. (102 mm) clamp • Gas line shutoff valve (gas dryer) • ½ NPT union flare known to light any appliance. • Do not touch any electrical switch; Place all of the following instructions before installing and using this dryer are not meant to children. • Clothes dryer installation and service must be installed within 6 ft (1.83 m) of the dryer in...
... metal exhaust duct work • 3-wire or 4-wire 240 volt cord kit (electric dryer) • 4 in. (102 mm) clamp • Gas line shutoff valve (gas dryer) • ½ NPT union flare known to light any appliance. • Do not touch any electrical switch; Place all of the following instructions before installing and using this dryer are not meant to children. • Clothes dryer installation and service must be installed within 6 ft (1.83 m) of the dryer in...
Installation Instructions (All Languages)
Page 3
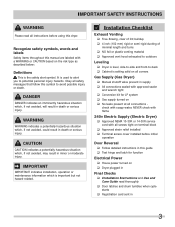
... serious injury. Recognize safety symbols, words and labels Safety items throughout this manual are labeled with approved sealer and wrench tight ‰ Conversion kit for function Electrical Power ‰ House power turned on ‰ Dryer plugged in Final Checks ‰ Installation Instructions and Use and Care Guide read all connections - IMPORTANT SAFETY INSTRUCTIONS WARNING Please read thoroughly ‰ Door latches and drum tumbles when cycle starts ‰ Registration card sent in 3
... serious injury. Recognize safety symbols, words and labels Safety items throughout this manual are labeled with approved sealer and wrench tight ‰ Conversion kit for function Electrical Power ‰ House power turned on ‰ Dryer plugged in Final Checks ‰ Installation Instructions and Use and Care Guide read all connections - IMPORTANT SAFETY INSTRUCTIONS WARNING Please read thoroughly ‰ Door latches and drum tumbles when cycle starts ‰ Registration card sent in 3
Installation Instructions (All Languages)
Page 4
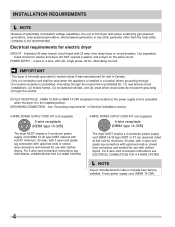
... clothes dryers. Electrical requirements for use with clothes dryers. GROUNDING CONNECTION - For 3-wire cord connection instructions see ELECTRICAL CONNECTIONS FOR A 4-WIRE SYSTEM. Í NOTE Dryers manufactured for sale in Electrical Installation section. 3-WIRE POWER SUPPLY CORD KIT (not supplied) 3-wire receptacle (NEMA type 10-30R) The dryer MUST employ a 3-conductor power supply cord NEMA 10-30 type SRDT rated at 240 volt AC minimum, 30 amp, with 4 open end spade lug connectors with upturned ends or closed loop connectors and marked for electric dryer CIRCUIT - Use...
... clothes dryers. Electrical requirements for use with clothes dryers. GROUNDING CONNECTION - For 3-wire cord connection instructions see ELECTRICAL CONNECTIONS FOR A 4-WIRE SYSTEM. Í NOTE Dryers manufactured for sale in Electrical Installation section. 3-WIRE POWER SUPPLY CORD KIT (not supplied) 3-wire receptacle (NEMA type 10-30R) The dryer MUST employ a 3-conductor power supply cord NEMA 10-30 type SRDT rated at 240 volt AC minimum, 30 amp, with 4 open end spade lug connectors with upturned ends or closed loop connectors and marked for electric dryer CIRCUIT - Use...
Installation Instructions (All Languages)
Page 5
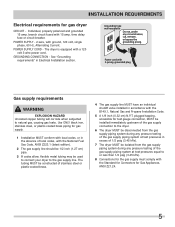
... the gas supply line. plugged tapping, accessible for Gas Appliances, ANSI Z21.24. 5 INSTALLATION REQUIREMENTS Electrical requirements for the gas supply must comply with 15 amp. branch circuit fused with the Standard for Connectors for test gauge connection, MUST be installed immediately upstream of the gas supply connection to the dryer. 6 The dryer MUST be disconnected from the gas supply piping system during any circumstances, cut, remove, or bypass the grounding prong. Use ONLY...
... the gas supply line. plugged tapping, accessible for Gas Appliances, ANSI Z21.24. 5 INSTALLATION REQUIREMENTS Electrical requirements for the gas supply must comply with 15 amp. branch circuit fused with the Standard for Connectors for test gauge connection, MUST be installed immediately upstream of the gas supply connection to the dryer. 6 The dryer MUST be disconnected from the gas supply piping system during any circumstances, cut, remove, or bypass the grounding prong. Use ONLY...
Installation Instructions (All Languages)
Page 6
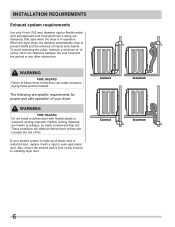
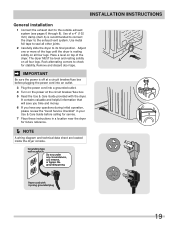
... the present duct is in operation. INSTALLATION REQUIREMENTS Exhaust system requirements Use only 4 inch (102 mm) diameter rigid or flexible metal duct and approved vent hood which has a swing-out damper(s) that open when the dryer is free of any other obstruction. WARNING FIRE HAZARD Failure to prevent drafts and the entrance of insects and rodents. These conditions will obstruct clothes dryer airfl...
... the present duct is in operation. INSTALLATION REQUIREMENTS Exhaust system requirements Use only 4 inch (102 mm) diameter rigid or flexible metal duct and approved vent hood which has a swing-out damper(s) that open when the dryer is free of any other obstruction. WARNING FIRE HAZARD Failure to prevent drafts and the entrance of insects and rodents. These conditions will obstruct clothes dryer airfl...
Installation Instructions (All Languages)
Page 7
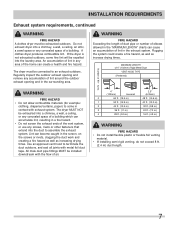
... not screen the exhaust ends of the vent system, or use any screws, rivets or other fasteners that extend into the duct to assemble the exhaust system. Regularly inspect the outdoor exhaust opening and remove any accumulation of lint around the outdoor exhaust opening and in any concealed space of lint in the surrounding area. MAXIMUM LENGTH of 4" (102mm) Rigid Metal Duct VENT HOOD TYPE (Preferred) Number of air. 4" (102mm...
... not screen the exhaust ends of the vent system, or use any screws, rivets or other fasteners that extend into the duct to assemble the exhaust system. Regularly inspect the outdoor exhaust opening and remove any accumulation of lint around the outdoor exhaust opening and in any concealed space of lint in the surrounding area. MAXIMUM LENGTH of 4" (102mm) Rigid Metal Duct VENT HOOD TYPE (Preferred) Number of air. 4" (102mm...
Installation Instructions (All Languages)
Page 8
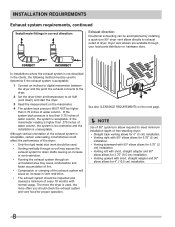
... exhaust connects to the dryer. 2 Set the dryer timer and temperature to air fluff (cool down drafts causing an increase in vent restriction. • Running the exhaust system through an uninsulated area may expose the exhaust system to down ) and start the dryer. 3 Read the measurement on the next page. Í NOTE Use of 90° quick-turn 90° dryer vent elbow directly to exhaust outlet of dryer. CORRECT INCORRECT In installations...
... exhaust connects to the dryer. 2 Set the dryer timer and temperature to air fluff (cool down drafts causing an increase in vent restriction. • Running the exhaust system through an uninsulated area may expose the exhaust system to down ) and start the dryer. 3 Read the measurement on the next page. Í NOTE Use of 90° quick-turn 90° dryer vent elbow directly to exhaust outlet of dryer. CORRECT INCORRECT In installations...
Installation Instructions (All Languages)
Page 9
... the dryer exhaust outlet. 6 Installer MUST anchor this guide for outside make up air. This provision is installed in a garage, it will obstruct the flow of 1 inch (2.54 cm). 9 If the dryer is to be 4 inches (10.16 cm) in this (1) dryer or (2) dryer mounted on pedestal to dripping water or outside (outdoors, not beneath the mobile home) using metal ducting that will come...
... the dryer exhaust outlet. 6 Installer MUST anchor this guide for outside make up air. This provision is installed in a garage, it will obstruct the flow of 1 inch (2.54 cm). 9 If the dryer is to be 4 inches (10.16 cm) in this (1) dryer or (2) dryer mounted on pedestal to dripping water or outside (outdoors, not beneath the mobile home) using metal ducting that will come...
Installation Instructions (All Languages)
Page 11
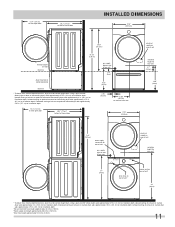
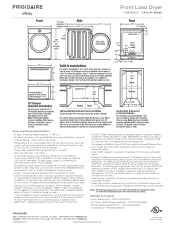
...) 71.5" (182cm) water supply connection on rear of unit1 gas supply pipe on rear of gas unit electrical supply on rear of unit centerline height for rear vent 37" (94cm) drain hose on rear of unit3 power cord on rear of unit2 39" (99cm) * To obtain these minimal depth dimensions, dryer must be vented straight back. Leftward venting of exhaust on stacked dryer adds approximately 4 in . (2 cm) to installation depth. Using a quick-turn 90°...
...) 71.5" (182cm) water supply connection on rear of unit1 gas supply pipe on rear of gas unit electrical supply on rear of unit centerline height for rear vent 37" (94cm) drain hose on rear of unit3 power cord on rear of unit2 39" (99cm) * To obtain these minimal depth dimensions, dryer must be vented straight back. Leftward venting of exhaust on stacked dryer adds approximately 4 in . (2 cm) to installation depth. Using a quick-turn 90°...
Installation Instructions (All Languages)
Page 12
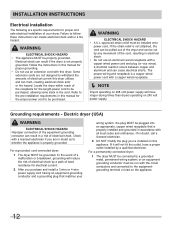
... HAZARD • A U.L.-approved strain relief must be run with a copper wired receptacle. Í NOTE Dryers operating on 208 volt power supply will have a proper outlet installed by a qualified electrician. Grounding requirements - INSTALLATION INSTRUCTIONS Electrical installation The following are specific requirements for electrical current. 2 After you 've installed on this appliance. Electric dryer (USA) WARNING ELECTRICAL SHOCK HAZARD Improper connection of the equipment grounding conductor can result...
... HAZARD • A U.L.-approved strain relief must be run with a copper wired receptacle. Í NOTE Dryers operating on 208 volt power supply will have a proper outlet installed by a qualified electrician. Grounding requirements - INSTALLATION INSTRUCTIONS Electrical installation The following are specific requirements for electrical current. 2 After you 've installed on this appliance. Electric dryer (USA) WARNING ELECTRICAL SHOCK HAZARD Improper connection of the equipment grounding conductor can result...
Installation Instructions (All Languages)
Page 13
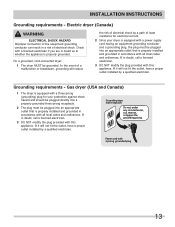
Grounding type wall receptacle Do not, under any circumstances, cut, remove, or bypass the grounding prong. Electric dryer (Canada) WARNING ELECTRICAL SHOCK HAZARD Improper connection of a malfunction or breakdown, grounding will not fit the outlet, have a proper outlet installed by a qualified electrician. Check with 3-prong grounded plug 13 For a grounded, cord-connected dryer: 1 The dryer MUST be plugged into an appropriate outlet that is equipped with a power supply cord having...
Grounding type wall receptacle Do not, under any circumstances, cut, remove, or bypass the grounding prong. Electric dryer (Canada) WARNING ELECTRICAL SHOCK HAZARD Improper connection of a malfunction or breakdown, grounding will not fit the outlet, have a proper outlet installed by a qualified electrician. Check with 3-prong grounded plug 13 For a grounded, cord-connected dryer: 1 The dryer MUST be plugged into an appropriate outlet that is equipped with a power supply cord having...
Installation Instructions (All Languages)
Page 14
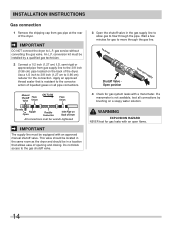
...-rigid or approved pipe from gas supply 4 Check for gas to flow through the gas line. Manual Shutoff Flare Valve Union GAS FLOW Flare Union Closed Nipple Open Flexible Connector Inlet Pipe on a soapy water solution. gas service without converting the gas valve. This valve should be located in the same room as the dryer and should be installed by brushing on Back of the dryer. Use a 1/2 inch to 3/8 inch (1.27 cm...
...-rigid or approved pipe from gas supply 4 Check for gas to flow through the gas line. Manual Shutoff Flare Valve Union GAS FLOW Flare Union Closed Nipple Open Flexible Connector Inlet Pipe on a soapy water solution. gas service without converting the gas valve. This valve should be located in the same room as the dryer and should be installed by brushing on Back of the dryer. Use a 1/2 inch to 3/8 inch (1.27 cm...
Installation Instructions (All Languages)
Page 15
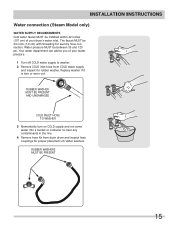
Replace washer if it is torn or worn out. INSTALLATION INSTRUCTIONS Water connection (Steam Model only) WATER SUPPLY REQUIREMENTS Cold water faucet MUST be between 30 and 120 psi. RUBBER WASHERS MUST BE PRESENT 15 Water pressure MUST be installed within 42 inches (107 cm) of your water pressure. 1 Turn off COLD water supply to clear any contaminants in the line. 4 Remove hose kit from COLD water supply and inspect for rubber washer. RUBBER...
Replace washer if it is torn or worn out. INSTALLATION INSTRUCTIONS Water connection (Steam Model only) WATER SUPPLY REQUIREMENTS Cold water faucet MUST be between 30 and 120 psi. RUBBER WASHERS MUST BE PRESENT 15 Water pressure MUST be installed within 42 inches (107 cm) of your water pressure. 1 Turn off COLD water supply to clear any contaminants in the line. 4 Remove hose kit from COLD water supply and inspect for rubber washer. RUBBER...
Installation Instructions (All Languages)
Page 16
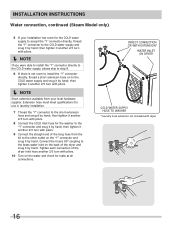
... snug it by hand. Extension hose must meet qualifications for the COLD water supply to accept the "Y" connector directly, thread the "Y" connector to the short extension hose and snug it by hand; then tighten it another 2/3 turn with pliers. 9 Connect the straight end of the dryer and snug it by hand. INSTALLATION INSTRUCTIONS Water connection, continued (Steam Model only) 5 If your local hardware...
... snug it by hand. Extension hose must meet qualifications for the COLD water supply to accept the "Y" connector directly, thread the "Y" connector to the short extension hose and snug it by hand; then tighten it another 2/3 turn with pliers. 9 Connect the straight end of the dryer and snug it by hand. INSTALLATION INSTRUCTIONS Water connection, continued (Steam Model only) 5 If your local hardware...
Installation Instructions (All Languages)
Page 17
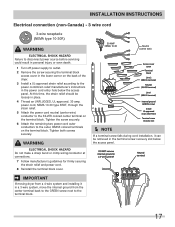
.... INSTALLATION INSTRUCTIONS Electrical connection (non-Canada) - 3 wire cord 3-wire receptacle (NEMA type 10-30R) WARNING ELECTRICAL SHOCK HAZARD Failure to disconnect power source before servicing could result in personal injury or even death. 1 Turn off power supply to outlet. 2 Remove the screw securing the terminal block access cover in the lower corner on the back of the dryer. 3 Install a UL-approved strain relief according to the terminal block. 17 Neutral terminal IMPORTANT If moving dryer...
.... INSTALLATION INSTRUCTIONS Electrical connection (non-Canada) - 3 wire cord 3-wire receptacle (NEMA type 10-30R) WARNING ELECTRICAL SHOCK HAZARD Failure to disconnect power source before servicing could result in personal injury or even death. 1 Turn off power supply to outlet. 2 Remove the screw securing the terminal block access cover in the lower corner on the back of the dryer. 3 Install a UL-approved strain relief according to the terminal block. 17 Neutral terminal IMPORTANT If moving dryer...
Installation Instructions (All Languages)
Page 19
... exhaust system (see pages 6 through 8). Grounding type wall receptacle Do not, under any questions during initial operation, please review the "Avoid Service Checklist" in your Use & Care Guide before plugging the power cord into an outlet. 3 Plug the power cord into a grounded outlet. 4 Turn on all four legs. IMPORTANT Be sure the power is recommended to connect the dryer to check A for future reference. Í NOTE A wiring diagram and technical data sheet are located inside the dryer...
... exhaust system (see pages 6 through 8). Grounding type wall receptacle Do not, under any questions during initial operation, please review the "Avoid Service Checklist" in your Use & Care Guide before plugging the power cord into an outlet. 3 Plug the power cord into a grounded outlet. 4 Turn on all four legs. IMPORTANT Be sure the power is recommended to connect the dryer to check A for future reference. Í NOTE A wiring diagram and technical data sheet are located inside the dryer...
Installation Instructions (All Languages)
Page 20
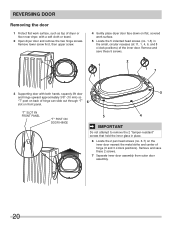
... door assembly from outer door assembly. 20 Remove and save these 5 screws. 3 Supporting door with a soft cloth or towel. 2 Open dryer door and remove the two hinge screws. "T" SLOT IN FRONT PANEL "T" POST ON DOOR HINGE IMPORTANT Do not attempt to remove the 2 "tamper-resistant" screws that hold the inner glass in place. 6 Locate the 2 pan head screws (no . 1-5) in the small, circular recesses (at work surface. 5 Locate...
... door assembly from outer door assembly. 20 Remove and save these 5 screws. 3 Supporting door with a soft cloth or towel. 2 Open dryer door and remove the two hinge screws. "T" SLOT IN FRONT PANEL "T" POST ON DOOR HINGE IMPORTANT Do not attempt to remove the 2 "tamper-resistant" screws that hold the inner glass in place. 6 Locate the 2 pan head screws (no . 1-5) in the small, circular recesses (at work surface. 5 Locate...
Installation Instructions (All Languages)
Page 24
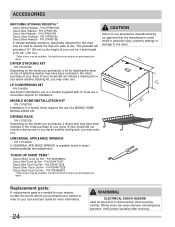
... dryer. MOBILE HOME INSTALLATION KIT P/N 137067200 Installation in a mobile home requires the use accessories manufactured by (or approved by) the manufacturer could result in the initial purchase of matching washer may order one . ACCESSORIES MATCHING STORAGE PEDESTAL* Classic White Pedestal - P/N 5304458932 *Other colors may order one . Verify proper operation after servicing. CAUTION Failure to use of your Use and Care Guide for this dryer on the model...
... dryer. MOBILE HOME INSTALLATION KIT P/N 137067200 Installation in a mobile home requires the use accessories manufactured by (or approved by) the manufacturer could result in the initial purchase of matching washer may order one . ACCESSORIES MATCHING STORAGE PEDESTAL* Classic White Pedestal - P/N 5304458932 *Other colors may order one . Verify proper operation after servicing. CAUTION Failure to use of your Use and Care Guide for this dryer on the model...
Product Specifications Sheet (English)
Page 2
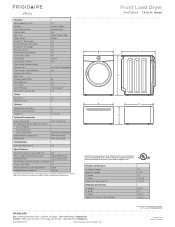
... consult local and national electric and plumbing codes. Width C - Ft. Height (Single) Height (Stacked) B - Electric Features Total Capacity (Cu. Ft.) Controls Dryer Drum Interior Interior Light Door Trim Ready Steam™ DrySense™ Technology Wrinkle Release Technology TimeWise® Technology Moisture Sensor Time Remaining Indicator Cycle Status Lights Cycle Signal Cycle Signal "On/Off " Cycle Signal Volume Control Control Lock Start / Pause / Cancel Buttons Energy Saver Option Delay Start Tumble Speed (RPM) Reversible Door Lint Screen Sound Package Adjustable Leveling...
... consult local and national electric and plumbing codes. Width C - Ft. Height (Single) Height (Stacked) B - Electric Features Total Capacity (Cu. Ft.) Controls Dryer Drum Interior Interior Light Door Trim Ready Steam™ DrySense™ Technology Wrinkle Release Technology TimeWise® Technology Moisture Sensor Time Remaining Indicator Cycle Status Lights Cycle Signal Cycle Signal "On/Off " Cycle Signal Volume Control Control Lock Start / Pause / Cancel Buttons Energy Saver Option Delay Start Tumble Speed (RPM) Reversible Door Lint Screen Sound Package Adjustable Leveling...
Product Specifications Sheet (English)
Page 3
....) - 140 Lbs. • An electrical supply with matching Frigidaire® Affinity Washer in area exposed to Product Installation Guide on web for steam setting connects to change. in . in . Do NOT install on this page for detailed instructions. Specifications subject to cold water supply with 1" maximum slope. or 4-wire cable, 240 Volt, 60 Hertz AC only electrical supply with ground required on separate circuit fused on both sides of...
....) - 140 Lbs. • An electrical supply with matching Frigidaire® Affinity Washer in area exposed to Product Installation Guide on web for steam setting connects to change. in . in . Do NOT install on this page for detailed instructions. Specifications subject to cold water supply with 1" maximum slope. or 4-wire cable, 240 Volt, 60 Hertz AC only electrical supply with ground required on separate circuit fused on both sides of...


