Use and Care Manual
Page 1
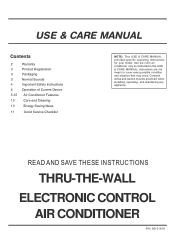
... that may occur. Common sense and caution must be practiced when installing, operating, and maintaining any appliance. READ AND SAVE THESE INSTRUCTIONS THRU-THE-WALL ELECTRONIC CONTROL AIR CONDITIONER P/N 66121618 USE & CARE MANUAL Contents 2 3 3 3 4 4 5-10 10 10 11 Warranty Product Registration Packaging Normal Sounds Important Safety Instructions Operation of Current Device Air Conditioner Features Care and Cleaning Energy Saving Ideas Avoid Service Checklist NOTE: This USE & CARE MANUAL provides specific operating instructions for your model.
... that may occur. Common sense and caution must be practiced when installing, operating, and maintaining any appliance. READ AND SAVE THESE INSTRUCTIONS THRU-THE-WALL ELECTRONIC CONTROL AIR CONDITIONER P/N 66121618 USE & CARE MANUAL Contents 2 3 3 3 4 4 5-10 10 10 11 Warranty Product Registration Packaging Normal Sounds Important Safety Instructions Operation of Current Device Air Conditioner Features Care and Cleaning Energy Saving Ideas Avoid Service Checklist NOTE: This USE & CARE MANUAL provides specific operating instructions for your model.
Use and Care Manual
Page 2
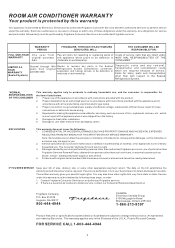
... BE RESPONSIBLE FOR: FULL ONE-YEAR WARRANTY One year from original purchase date. Pay all costs for the items listed below. 1. Proper use , and the consumer is responsible for repairing or replacing parts of Costs of God. 4. EXCLUSIONS This warranty does not cover the following these obligations under this warranty. FOR SERVICE CALL 1-800-444-4944 2 ROOM AIR CONDITIONER WARRANTY Your product is protected by this appliance...
... BE RESPONSIBLE FOR: FULL ONE-YEAR WARRANTY One year from original purchase date. Pay all costs for the items listed below. 1. Proper use , and the consumer is responsible for repairing or replacing parts of Costs of God. 4. EXCLUSIONS This warranty does not cover the following these obligations under this warranty. FOR SERVICE CALL 1-800-444-4944 2 ROOM AIR CONDITIONER WARRANTY Your product is protected by this appliance...
Use and Care Manual
Page 3
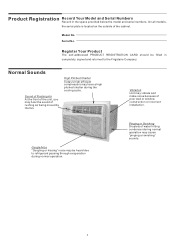
... located on the outside of water hitting condenser during normal operation may be filled in the space provided below the model and serial numbers. Normal Sounds Sound of Rushing Air At the front of the unit, you may vibrate and make noise because of rushing air being moved by the fan. Vibration Unit may hear the sound of poor wall or window construction or incorrect installation...
... located on the outside of water hitting condenser during normal operation may be filled in the space provided below the model and serial numbers. Normal Sounds Sound of Rushing Air At the front of the unit, you may vibrate and make noise because of rushing air being moved by the fan. Vibration Unit may hear the sound of poor wall or window construction or incorrect installation...
Use and Care Manual
Page 4
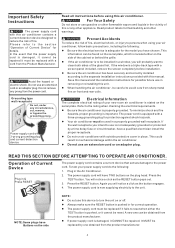
... circuit breaker, have TWO buttons on the side of the cabinet or behind the grille. ? WARNING Avoid fire hazard or electric shock. Do not remove any circumstances, cut, remove, or bypass the grounding prong. If the air conditioner is a triple-track type with a cord from the product manufacturer. ? If the window is to turn the unit on or off. ? Do not use this device to be installed...
... circuit breaker, have TWO buttons on the side of the cabinet or behind the grille. ? WARNING Avoid fire hazard or electric shock. Do not remove any circumstances, cut, remove, or bypass the grounding prong. If the air conditioner is a triple-track type with a cord from the product manufacturer. ? If the window is to turn the unit on or off. ? Do not use this device to be installed...
Use and Care Manual
Page 5
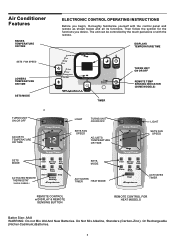
...TIME 4 Temp/Timer LIGHT TURNS UNIT ON OR OFF SETS FAN SPEED ADJUSTS TEMPERATURE OR TIME Temp/Timer LIGHT SETS FAN SPEED Fan Slower Fan Slower Fan Faster Fan Faster Temp/Timer SETS MODE ACTIVATES REMOTE THERMOSTAT (some models) Cool Energy Fan Saver Only Sleep Auto Timer Temp Start Stop Remote Sensing SETS MODE ACTIVATES TIMER HEAT MODE Temp/Timer Cool Energy Fan Saver Only Sleep Auto Timer Temp Heat ACTIVATES TIMER REMOTE CONTROL w/DISPLAY & REMOTE SENSING BUTTON REMOTE CONTROL FOR HEAT MODELS Batter Size: AAA WARRING: Do not Mix Old And New Batteries...
...TIME 4 Temp/Timer LIGHT TURNS UNIT ON OR OFF SETS FAN SPEED ADJUSTS TEMPERATURE OR TIME Temp/Timer LIGHT SETS FAN SPEED Fan Slower Fan Slower Fan Faster Fan Faster Temp/Timer SETS MODE ACTIVATES REMOTE THERMOSTAT (some models) Cool Energy Fan Saver Only Sleep Auto Timer Temp Start Stop Remote Sensing SETS MODE ACTIVATES TIMER HEAT MODE Temp/Timer Cool Energy Fan Saver Only Sleep Auto Timer Temp Heat ACTIVATES TIMER REMOTE CONTROL w/DISPLAY & REMOTE SENSING BUTTON REMOTE CONTROL FOR HEAT MODELS Batter Size: AAA WARRING: Do not Mix Old And New Batteries...
Use and Care Manual
Page 6
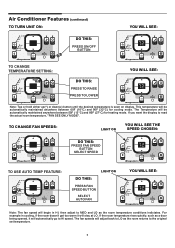
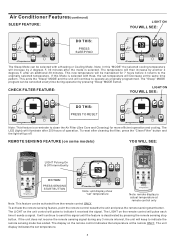
...°C) for cooling mode. Air Conditioner Features (continued) TO TURN UNIT ON: YOU WILL SEE: Auto Temp Hi Med Lo Heat Fan Speed Cool Energy Saver Fan Only Mode Temp/Timer Temp/Timer Timer Sleep Check Filter Remote Sensing DO THIS: PRESS ON/OFF BUTTON Auto Temp Hi Med Lo Heat Fan Speed Cool Energy Saver Fan Only Mode Temp/Timer Temp/Timer Timer Sleep Check Filter Remote Sensing TO CHANGE TEMPERATURE SETTING: YOU WILL SEE: Auto Temp Hi Med Lo Heat Fan Speed Cool Energy Saver Fan Only Mode Temp/Timer Temp/Timer Timer Sleep Check Filter Remote Sensing DO THIS...
...°C) for cooling mode. Air Conditioner Features (continued) TO TURN UNIT ON: YOU WILL SEE: Auto Temp Hi Med Lo Heat Fan Speed Cool Energy Saver Fan Only Mode Temp/Timer Temp/Timer Timer Sleep Check Filter Remote Sensing DO THIS: PRESS ON/OFF BUTTON Auto Temp Hi Med Lo Heat Fan Speed Cool Energy Saver Fan Only Mode Temp/Timer Temp/Timer Timer Sleep Check Filter Remote Sensing TO CHANGE TEMPERATURE SETTING: YOU WILL SEE: Auto Temp Hi Med Lo Heat Fan Speed Cool Energy Saver Fan Only Mode Temp/Timer Temp/Timer Timer Sleep Check Filter Remote Sensing DO THIS...
Use and Care Manual
Page 7
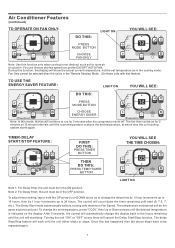
... you prefer,EXCEPT AUTO FAN. Air Conditioner Features (continued) TO OPERATE ON FAN ONLY: Auto Temp Hi Med Lo Heat Fan Speed Cool Energy Saver Fan Only Mode Temp/Timer Temp/Timer Timer Sleep Check Filter Remote Sensing DO THIS: LIGHT ON PRESS MODE BUTTON CHOOSE FAN ONLY YOU WILL SEE: Auto Temp Hi Med Lo Heat Fan Speed Cool Energy Saver Fan Only Mode Temp/Timer Temp/Timer Timer Sleep Check Filter Remote Sensing Note: Use this function only when cooling is in the 'Remote Sensing' Mode. (On those units with maximum Fan Speed. To adjust timer setting, tap or hold...
... you prefer,EXCEPT AUTO FAN. Air Conditioner Features (continued) TO OPERATE ON FAN ONLY: Auto Temp Hi Med Lo Heat Fan Speed Cool Energy Saver Fan Only Mode Temp/Timer Temp/Timer Timer Sleep Check Filter Remote Sensing DO THIS: LIGHT ON PRESS MODE BUTTON CHOOSE FAN ONLY YOU WILL SEE: Auto Temp Hi Med Lo Heat Fan Speed Cool Energy Saver Fan Only Mode Temp/Timer Temp/Timer Timer Sleep Check Filter Remote Sensing Note: Use this function only when cooling is in the 'Remote Sensing' Mode. (On those units with maximum Fan Speed. To adjust timer setting, tap or hold...
Use and Care Manual
Page 8
... cooling. Temp/Timer Cool Energy Fan Saver Only Sleep Auto Timer Temp Start Stop Remote Sensing Note: remote display is selected with a Heating or Cooling Mode. The temperature will continue to operate as originally programmed. To reset after the mode is deactivated by pressing "Sleep" MODE button. The LIGHT on the remote control will continue to send this "MODE" the selected cooling temperature will increase by another 2 degrees F, after 250 hours of operation. It will then increase by 2 degrees F, 30 minutes after cleaning the filter...
... cooling. Temp/Timer Cool Energy Fan Saver Only Sleep Auto Timer Temp Start Stop Remote Sensing Note: remote display is selected with a Heating or Cooling Mode. The temperature will continue to operate as originally programmed. To reset after the mode is deactivated by pressing "Sleep" MODE button. The LIGHT on the remote control will continue to send this "MODE" the selected cooling temperature will increase by another 2 degrees F, after 250 hours of operation. It will then increase by 2 degrees F, 30 minutes after cleaning the filter...

Use and Care Manual
Page 9
... the operating procedure, here are more features in the "Heat" Mode, the fan will automatically be used with any set temperature is needed. The control is turned off and on quickly. TO TURN UNIT OFF: YOU WILL SEE: Auto Temp Hi Med Lo Heat Fan Speed Cool Energy Saver Fan Only Mode Temp/Timer Temp/Timer Timer Sleep Check Filter Remote Sensing DO THIS: PRESS ON/OFF BUTTOT Auto Temp Hi Med Lo Heat Fan Speed Cool Energy Saver Fan Only Mode Temp/Timer Temp/Timer Timer Sleep Check Filter Remote Sensing FAULT CODES Auto Temp Hi Med Lo Heat Fan S peed...
... the operating procedure, here are more features in the "Heat" Mode, the fan will automatically be used with any set temperature is needed. The control is turned off and on quickly. TO TURN UNIT OFF: YOU WILL SEE: Auto Temp Hi Med Lo Heat Fan Speed Cool Energy Saver Fan Only Mode Temp/Timer Temp/Timer Timer Sleep Check Filter Remote Sensing DO THIS: PRESS ON/OFF BUTTOT Auto Temp Hi Med Lo Heat Fan Speed Cool Energy Saver Fan Only Mode Temp/Timer Temp/Timer Timer Sleep Check Filter Remote Sensing FAULT CODES Auto Temp Hi Med Lo Heat Fan S peed...
Use and Care Manual
Page 10
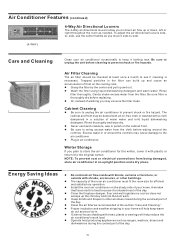
... oil-free cloth or washed with a cloth dampened in a solution of frost on the cooling coils. ? Be sure filter is necessary. Be sure to wring excess water from the cloth before cleaning to prevent shock or fire hazards. Excess water in an upright position and a dry place. Do not block air flow inside with trees, plants or awnings will help reduce the air conditioner's work . ? Install...
... oil-free cloth or washed with a cloth dampened in a solution of frost on the cooling coils. ? Be sure filter is necessary. Be sure to wring excess water from the cloth before cleaning to prevent shock or fire hazards. Excess water in an upright position and a dry place. Do not block air flow inside with trees, plants or awnings will help reduce the air conditioner's work . ? Install...
Use and Care Manual
Page 11
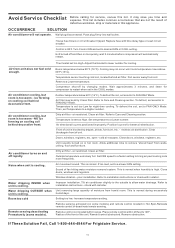
... setting. It may be dirty. Temperature sensor touching cold coil, located behind air filter. Outdoor temperature below 60°F (16°C). To defrost the coil, set to installation instructions or check with time delay type or reset circuit breaker. Temperature is blocked by changing modes. Dirty air filter - Water dripping OUTSIDE when unit is cooling. Remote sensing activated (on in this list. Avoid Service Checklist Before calling for service, review this appliance. Reset to remove "stored heat" from humid room. To defrost the coil, set...
... setting. It may be dirty. Temperature sensor touching cold coil, located behind air filter. Outdoor temperature below 60°F (16°C). To defrost the coil, set to installation instructions or check with time delay type or reset circuit breaker. Temperature is blocked by changing modes. Dirty air filter - Water dripping OUTSIDE when unit is cooling. Remote sensing activated (on in this list. Avoid Service Checklist Before calling for service, review this appliance. Reset to remove "stored heat" from humid room. To defrost the coil, set...
Installation Instructions
Page 1
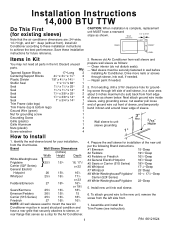
... kit. Remove old Air Conditioner from the left side of sleeve as follows: - Drive more nails or screws through left side front. 7. Save these installation instructions to mount the new Air Conditioner must be in wall before installing Air Conditioner. Qty. Clean interior (do not disturb seals). - Identify the wall-sleeve brand for grounding screw 1 Grounding Screw 1 Grille (plastic) 1 Grille Aluminum 1 Nuts (plastic) 4 Screw w/washer 4 2. Install new unit into wall, if needed . 3. Next attach ground wire inside sleeve, using...
... kit. Remove old Air Conditioner from the left side of sleeve as follows: - Drive more nails or screws through left side front. 7. Save these installation instructions to mount the new Air Conditioner must be in wall before installing Air Conditioner. Qty. Clean interior (do not disturb seals). - Identify the wall-sleeve brand for grounding screw 1 Grounding Screw 1 Grille (plastic) 1 Grille Aluminum 1 Nuts (plastic) 4 Screw w/washer 4 2. Install new unit into wall, if needed . 3. Next attach ground wire inside sleeve, using...
Installation Instructions
Page 4
...wire to the left side of the wall sleeve as shown opposite. Before sliding all-the-way back, remove 2nd screw from the screw. 11. Slide the unit completely to the rear to the vertical section of the rear grille as shown in center of side wall with the tapered end facing the back of these instructions...Top View ←7→ " 6 7 2 3 5 2. Seal & Frame the unit as shown below into two pieces. 17". 2 1" 3/4" Tapered Spacer Block Cut Here 4" Protection Paper Backing 4. The use of the sleeve. Cut (2) 17" Tapered Spacer Blocks as described on left and right sides...
...wire to the left side of the wall sleeve as shown opposite. Before sliding all-the-way back, remove 2nd screw from the screw. 11. Slide the unit completely to the rear to the vertical section of the rear grille as shown in center of side wall with the tapered end facing the back of these instructions...Top View ←7→ " 6 7 2 3 5 2. Seal & Frame the unit as shown below into two pieces. 17". 2 1" 3/4" Tapered Spacer Block Cut Here 4" Protection Paper Backing 4. The use of the sleeve. Cut (2) 17" Tapered Spacer Blocks as described on left and right sides...

Installation Instructions
Page 5
... into sleeve. 9. Slide the unit completely to the rear to the vertical section of these instructions. 5 Cut the 1 ½" x 3/8" x 25" long seal to 14" long and attach it to ensure a good seal, making sure the ground wire does not become tangled. 13. Seal & Frame the unit as described on each side wall. Attach (2) 4 ½" x 3 ½" x 1 ½" centering/support blocks...
... into sleeve. 9. Slide the unit completely to the rear to the vertical section of these instructions. 5 Cut the 1 ½" x 3/8" x 25" long seal to 14" long and attach it to ensure a good seal, making sure the ground wire does not become tangled. 13. Seal & Frame the unit as described on each side wall. Attach (2) 4 ½" x 3 ½" x 1 ½" centering/support blocks...

Installation Instructions
Page 6
... Paper Backing 3. Remove the backing paper and press into sleeve. 8. Make sure that the toothed washer is recommended. 60° Top View ←7→ " 5 6 2 4 2. The use of the sleeve. 6. Screw and attach the other end of the ground wire to the vertical section of the rear grille as described on the unit. 4. Attach (2) 1 ½" x 3/8" x 14" seals to ensure...
... Paper Backing 3. Remove the backing paper and press into sleeve. 8. Make sure that the toothed washer is recommended. 60° Top View ←7→ " 5 6 2 4 2. The use of the sleeve. 6. Screw and attach the other end of the ground wire to the vertical section of the rear grille as described on the unit. 4. Attach (2) 1 ½" x 3/8" x 14" seals to ensure...

Installation Instructions
Page 7
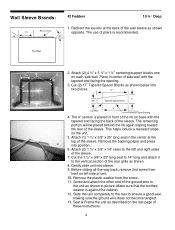
... and attach the other end of the ground wire to the left side of the sleeve. 6. Attach (2) 1 ½" x 3/8" x 14" seals to the unit as described on left and right sides of unit. 9. Before sliding all-the-way back, remove 2nd screw from the back of these instructions. 7 The use of the sleeve. Wall Sleeve Brands: #5 Sears or Carrier 51S Series 18...
... and attach the other end of the ground wire to the left side of the sleeve. 6. Attach (2) 1 ½" x 3/8" x 14" seals to the unit as described on left and right sides of unit. 9. Before sliding all-the-way back, remove 2nd screw from the back of these instructions. 7 The use of the sleeve. Wall Sleeve Brands: #5 Sears or Carrier 51S Series 18...

Installation Instructions
Page 8
... use of the rear grille as shown. Before sliding all-the-way back, remove 2nd screw from the screw. 10. Remove the backing paper and press into sleeve. 8. Remove the plastic washer from front on left and right sides of these instructions. 8 Install to the left side of the sleeve as shown. 7. Attach (2) 1 ½" x 3/8" x 14" seals to the floor of unit...
... use of the rear grille as shown. Before sliding all-the-way back, remove 2nd screw from the screw. 10. Remove the backing paper and press into sleeve. 8. Remove the plastic washer from front on left and right sides of these instructions. 8 Install to the left side of the sleeve as shown. 7. Attach (2) 1 ½" x 3/8" x 14" seals to the floor of unit...

Installation Instructions
Page 9
... the unit completely to the rear to the rear grill 7" from the screw. 16. The use of the rear grille. 9. Cut the 1 ½" x 1 ½" x 25" long seal to 14" long and attach it vertically to ensure a good seal, making sure all -the-way back, remove 1st screw from the sleeve is sufficient once the trim frame is recommended. Wall Sleeve...
... the unit completely to the rear to the rear grill 7" from the screw. 16. The use of the rear grille. 9. Cut the 1 ½" x 1 ½" x 25" long seal to 14" long and attach it vertically to ensure a good seal, making sure all -the-way back, remove 1st screw from the sleeve is sufficient once the trim frame is recommended. Wall Sleeve...
Installation Instructions
Page 10
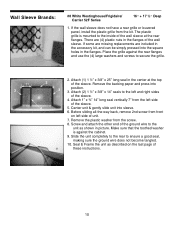
... is mounted to secure the grille. ←7→ " 2 3 4 2. Seal & Frame the unit as shown in the center at the rear flanges. Remove the backing paper and press into sleeve. 6. The plastic grille is against the rear flanges and use the (4) large washers and screws to the inside of the wall sleeve at the top of the sleeve. 5. If some are missing replacements are...
... is mounted to secure the grille. ←7→ " 2 3 4 2. Seal & Frame the unit as shown in the center at the rear flanges. Remove the backing paper and press into sleeve. 6. The plastic grille is against the rear flanges and use the (4) large washers and screws to the inside of the wall sleeve at the top of the sleeve. 5. If some are missing replacements are...
Installation Instructions
Page 11
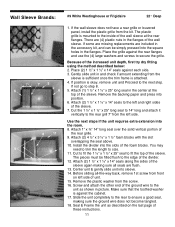
... a rear grille or louvered panel, install the plastic grille from the screw. 16. Cut to fit the 1 ½" x 1 ½" x 25" seal to the edge of the sleeve. 7. You may need to trim the length to step 8. 5. Wall Sleeve Brands: #9 White Westinghouse or Frigidaire 22" Deep ←7→ " 7 5 6 6 8 11 9 12 1. Remove the plastic washer from the kit. If not go to size. 11...
... a rear grille or louvered panel, install the plastic grille from the screw. 16. Cut to fit the 1 ½" x 1 ½" x 25" seal to the edge of the sleeve. 7. You may need to trim the length to step 8. 5. Wall Sleeve Brands: #9 White Westinghouse or Frigidaire 22" Deep ←7→ " 7 5 6 6 8 11 9 12 1. Remove the plastic washer from the kit. If not go to size. 11...


