Frigidaire FAH14ER2T Support Question
Frigidaire FAH14ER2T Support Question
Find answers below for this question about Frigidaire FAH14ER2T - 14,000-BTU Through-the-Wall Air Conditioner.Need a Frigidaire FAH14ER2T manual? We have 2 online manuals for this item!
Question posted by maxyako on August 23rd, 2014
Can You Purchase A New Remote For This Unit
can you purchase a new remote for this unit
Current Answers
Answer #1: Posted by OnlineOutreachSpecialist on August 26th, 2014 10:21 AM
OnlineOutreachSpecialist

Member since:
March 30th, 2011 Points: 2,848,320

Member since:
March 30th, 2011 Points: 2,848,320
Hello maxyako, that’s a great question!
I see that your post is listed under Frigidaire air conditioner, FAH14ER2T. I show that a replacement remote for your air conditioner (part number 5304459455) may be purchase directly from the manufacturer. Hope this information proves helpful! – Chris
Online Outreach Specialist
Related Frigidaire FAH14ER2T Manual Pages
Use and Care Manual - Page 2
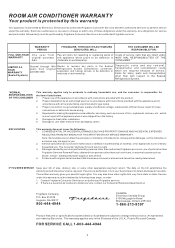
...purchase date. Service under this warranty must be defective in NOR- This warranty applies only in the 50 states of loose
connections or defects in house wiring. 4. FOR SERVICE CALL 1-800-444-4944
2 ROOM AIR CONDITIONER... Refrigeration System (compressor, condenser, evaporator and tubing) proves to unit after installation. 6.
WARRANTY PERIOD
FRIGIDAIRE, THROUGH ITS AUTHORIZED SERVICERS,...
Use and Care Manual - Page 3
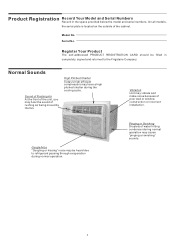
..., the serial plate is located on the outside of rushing air being moved by the fan.
Pinging or Swishing Droplets of poor wall or window construction or incorrect installation. Model No. Serial No... space provided below the model and serial numbers. Normal Sounds
Sound of Rushing Air At the front of the unit, you may vibrate and make noise because of water hitting condenser during the cooling...
Use and Care Manual - Page 4
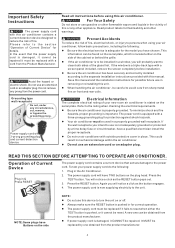
...Air Conditioner. 2.
Plug in mechanical damage within the air conditioner.
?
A new one obtained from the product manufacturer.
4 WARNING Avoid fire hazard or electric shock. Read product labels for the model you intend to turn the unit... completely before using your air conditioner, follow basic precautions, including the following : 1. If the wall receptacle you have Buttons ...
Use and Care Manual - Page 5
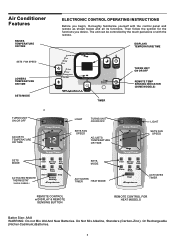
... not Mix Old And New Batteries. Air Conditioner Features
RAISES TEMPERATURE OR TIME
SETS FAN SPEED
LOWERS TEMPERATURE OR TIME
SETS MODE
ELECTRONIC CONTROL OPERATING INSTRUCTIONS
Before you desire.
Or Rechargeable (Nichel-Cadmium) Batteries.
5 The unit can be controlled by the touch pad alone or with the control panel and remote as shown below and...
Use and Care Manual - Page 6
...
Fan Speed
Cool Energy Saver
Fan Only
Mode
Temp/Timer
Temp/Timer Timer
Sleep
Check Filter
Remote Sensing
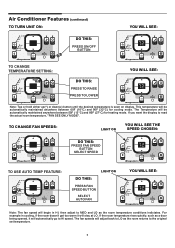
Note: The fan speed will automatically go to the original set temperature.
6 If ...Air Conditioner Features (continued)
TO TURN UNIT ON:
YOU WILL SEE:
Auto Temp Hi Med Lo
Heat
Fan Speed
Cool Energy Saver
Fan Only
Mode
Temp/Timer
Temp/Timer Timer
Sleep
Check Filter
Remote...
Use and Care Manual - Page 7
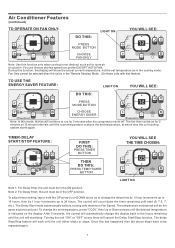
...desired, such as previously set temperature, press "COOL" then Up or Down arrows until the unit will be repeated again.
7 The delay Start/Stop feature will continue to the hours remaining ...
Mode
Temp/Timer
Temp/Timer Timer
Sleep
Check Filter
Remote Sensing
Note: In this mode, the fan will work until start /stop. Air Conditioner Features
(continued)
TO OPERATE ON FAN ONLY:
Auto...
Use and Care Manual - Page 8
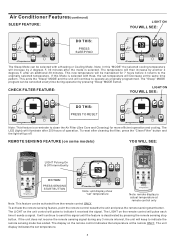
... to send this "MODE" the selected cooling temperature will increase by pressing the remote sensing stop
button. The temperature will then increase by another 2 degrees F, after the mode is deactivated by 2 degrees F, 30 minutes after an additional 30 minutes. Air Conditioner Features(continued)
SLEEP FEATURE:
LIGHT ON
YOU WILL SEE:
Auto Temp Hi...
Use and Care Manual - Page 9

...Air Conditioner Features
(continued)
HEATING FEATURE (on some models):
YOU WILL SEE:
Auto Temp Hi Med Lo
Heat
Fan Speed
Cool Energy Saver
Fan Only
Mode
Temp/Timer
Temp/Timer Timer
Sleep
Check Filter
Remote...ilte r
R emote S ens ing
If the display reads "ES", a sensor has failed. TO TURN UNIT OFF:
YOU WILL SEE:
Auto Temp Hi Med Lo
Heat
Fan Speed
Cool Energy Saver
Fan Only
Mode
...
Use and Care Manual - Page 10
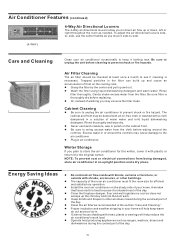
...part of frost on the cooling coils. ? Close the fireplace damper, floor and wall registers so cool air does not escape up and cause an accumulation of the day.
10 External house shading... is best because it looking new. Be sure to unplug the unit before replacing. ? Do not block air flow inside with trees, plants or awnings will help reduce the air conditioner's work .
?
Use and Care Manual - Page 11
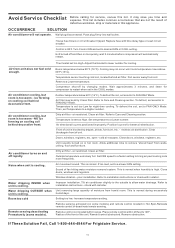
...Water dripping OUTSIDE when unit is normal. OCCURRENCE
SOLUTION
Air conditioner will automatically restart.
Temperature is high. NO ice forming on cooling coil behind air filter.
Air conditioner turns on some models). Dirty air filter -
Air conditioner cooling, but room is cooling. Dirty air filter -
air restricted.
Remote sensing deactivating Prematurely (some...
Installation Instructions - Page 1
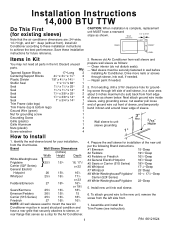
Installation Instructions 14,000 BTU TTW
Do This First (for future reference. Install Air Conditioner according to these installation instructions for existing sleeve)
Note that the air conditioner dimensions are: 24"wide, 141⁄2"high, and 22" deep (without front). Save these installation instructions to Install
1.
Remove old Air Conditioner from the left side of wall sleeve, in...
Installation Instructions - Page 3

...against the cabinet.
10. Cut the 1 ½" x 3/8" x 25" long seal to 14" long and attach
it to
the unit as shown.
5. Attach (2) 4 ½" x 3 ½" x 1 ½" centering/...washer is recommended.
60°
Top View
←7→ " 3 4
5
2
2. Seal & Frame the unit as shown opposite. Wall Sleeve Brands:
#1 Emerson
15"Deep
7"
60°
Rear Louvers
1. Attach (1) 1 ½" x 3/8" x ...
Installation Instructions - Page 4
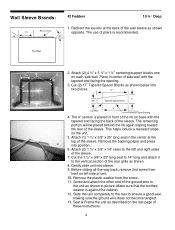
.... This helps induce a rearward slope on base with the
tapered end facing the opening.
3. Attach (2) 1 ½" x 3/8" x 14" seals to the left side of the rib on the unit.
5. Remove the plastic washer from
front on each side wall. Attach (2) 4 ½" x 3 ½" x 1 ½" centering/support blocks one on left and right sides of these...
Installation Instructions - Page 5

...-way back, remove 2nd screw from the screw.
11. Wall Sleeve Brands:
#3 Fedders or Friedrich
16 ¾" Deep
7"
60°
Rear Louvers
1. Attach (2) 1 ½" x 3/8" x 14" seals to the left side of pliers is against the cabinet.
12. Gently slide unit into position.
6. The use of unit.
10. Attach (2) 4 ½" x 3 ½" x 1 ½" centering/support blocks...
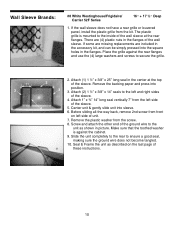
Installation Instructions - Page 6

... left side of the sleeve. Wall Sleeve Brands:
#4 General Electra/Hotpoint
16 7/8" Deep
7"
60°
Rear Louvers
1. Center unit & gently slide unit into sleeve. 8. Seal & Frame the unit as shown with the tapered end ½" from the screw. 10. Remove the plastic washer from the back of unit. 9. Attach (2) 1 ½" x 3/8" x 14" seals to ensure a good seal...
Installation Instructions - Page 7

... from front
on the unit.
3. Seal & Frame the unit as shown in the center at the back of the wall sleeve as shown with the tapered end ½" from the screw.
10. Wall Sleeve Brands:
#5 Sears...press into sleeve.
8. Attach (2) 1 ½" x 3/8" x 14" seals to the floor of the
sleeve. Cut the 1 ½" x 3/8" x 25" long seal to 14" long and attach it
to ensure a good seal,
making sure...
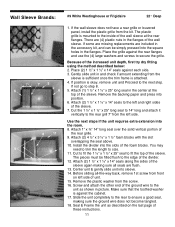
Installation Instructions - Page 8

...189;" x 3/8" x 25" long seal to 14" long and attach it to ensure a good seal, making sure the ground wire does not become tangled. 12. Wall Sleeve Brands:
#6 Whirlpool
17 1/8" Deep
7"...
60°
Rear Louvers
1. Attach (1) 1 ½" x 3/8" x 25" long seal in picture. Center unit & gently slide unit into position.
5. The use of the wall...
Installation Instructions - Page 9

.... Redirect the louvers at the
top of the sleeve. 6. Gently slide unit in and check if amount extending from the left side. 7. Cut the 1 ½" x 1 ½" x 25" long seal to 14" long and attach it vertically to the edge of the wall sleeve as shown opposite. The pieces must be fitted flush to...
Installation Instructions - Page 10
... the rear flanges. Place the grille against the cabinet.
9. Attach 1" x ¾" 14" long seal vertically 7" from the kit. Before sliding all-the-way back, remove 2nd screw from the screw.
8. Seal & Frame the unit as shown in the flanges. If the wall sleeve does not have a rear grille or louvered panel, install the...
Installation Instructions - Page 11
... grille. 9. Gently slide unit in picture. Attach 1" x ¾" 14" long seal over the solid vertical portion of the increased unit depth, first try dry fitting using the method described below: 2.
Screw and attach the other end of the ground wire to the
unit as described on left side of the sleeve. 7. Wall Sleeve Brands:
#9 White...
Similar Questions


Where Does Water Drain For In The Wall Air Conditioner
(Posted by IvanVkeb 9 years ago)

How Do You Tell If Vent Is Open Or Closed On In The Wall Air Conditioner
(Posted by fmarschris7 10 years ago)

The Temp Can Not Be Changed. On The Ac Or By Remote Unit
(Posted by jmilc 11 years ago)
Drain Water From A 1991 Sears 5000 Btu Window Air Conditioner
water is holding in the unit. I took the casing off and could not find any way for the unit to drain...
water is holding in the unit. I took the casing off and could not find any way for the unit to drain...
(Posted by williambrewer2 12 years ago)