Use and Care Manual
Page 1
... that may occur. READ AND SAVE THESE INSTRUCTIONS THRU-THE-WALL ELECTRONIC CONTROL AIR CONDITIONER P/N 66129901149 Common sense and caution must be practiced when installing, operating, and maintaining any appliance. USE & CARE MANUAL Contents 2 3 3 3 4 4 5-10 10 10 11 Warranty Product Registration Packaging Normal Sounds Important Safety Instructions Operation of Current Device Air Conditioner Features Care and Cleaning Energy Saving Ideas Avoid Service Checklist NOTE: This USE & CARE MANUAL provides specific operating instructions for your model.
... that may occur. READ AND SAVE THESE INSTRUCTIONS THRU-THE-WALL ELECTRONIC CONTROL AIR CONDITIONER P/N 66129901149 Common sense and caution must be practiced when installing, operating, and maintaining any appliance. USE & CARE MANUAL Contents 2 3 3 3 4 4 5-10 10 10 11 Warranty Product Registration Packaging Normal Sounds Important Safety Instructions Operation of Current Device Air Conditioner Features Care and Cleaning Energy Saving Ideas Avoid Service Checklist NOTE: This USE & CARE MANUAL provides specific operating instructions for your model.
Use and Care Manual
Page 2
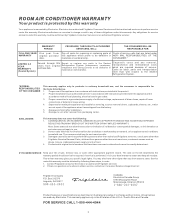
... RESPONSIBLE FOR: FULL ONE-YEAR O n e y e a r f r o m WARRANTY original purchase date. IF YOU NEED SERVICE Keep your best interest to be readily determined. Service under this warranty. Any obligations for such service calls. 3. ROOM AIR CONDITIONER WARRANTY Your product is protected by this warranty Your appliance is warranted by Frigidaire Consumer Services or an authorized Frigidaire servicer. Diagnostic costs and any parts in the Sealed Refrigeration System (compressor, condenser, evaporator and tubing) proves...
... RESPONSIBLE FOR: FULL ONE-YEAR O n e y e a r f r o m WARRANTY original purchase date. IF YOU NEED SERVICE Keep your best interest to be readily determined. Service under this warranty. Any obligations for such service calls. 3. ROOM AIR CONDITIONER WARRANTY Your product is protected by this warranty Your appliance is warranted by Frigidaire Consumer Services or an authorized Frigidaire servicer. Diagnostic costs and any parts in the Sealed Refrigeration System (compressor, condenser, evaporator and tubing) proves...
Use and Care Manual
Page 3
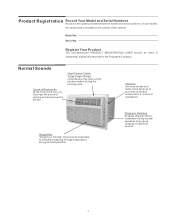
... model and serial numbers. Vibration Unit may have a high pitched chatter during the cooling cycle. On all models, the serial plate is located on the outside of poor wall or window construction or incorrect installation. Product Registration Record Your Model and Serial Numbers Record in completely, signed and returned to refrigerant passing through evaporation during normal operation. High Pitched Chatter Today's high efficient compressors may vibrate and make noise...
... model and serial numbers. Vibration Unit may have a high pitched chatter during the cooling cycle. On all models, the serial plate is located on the outside of poor wall or window construction or incorrect installation. Product Registration Record Your Model and Serial Numbers Record in completely, signed and returned to refrigerant passing through evaporation during normal operation. High Pitched Chatter Today's high efficient compressors may vibrate and make noise...
Use and Care Manual
Page 4
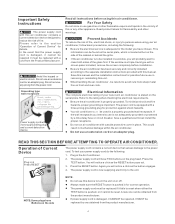
... possible future use this air conditioner. If the window is stated on the serial plate. When handling the air conditioner , be replaced with a screen panel included, remove the screen completely before using your power supply cord do the following : Be sure the electrical service is damaged, it cannot be repaired it must be replaced if it cannot be installed in a properly grounded wall receptacle. Be sure the air conditioner is important...
... possible future use this air conditioner. If the window is stated on the serial plate. When handling the air conditioner , be replaced with a screen panel included, remove the screen completely before using your power supply cord do the following : Be sure the electrical service is damaged, it cannot be repaired it must be replaced if it cannot be installed in a properly grounded wall receptacle. Be sure the air conditioner is important...
Use and Care Manual
Page 5
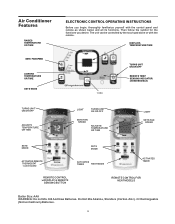
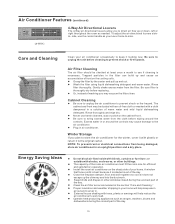
... or with the control panel and remote as shown below and all its functions. DISPLAYS TEMPERATURE/TIME 7,0(5 TURNS UNIT ON OR OFF REMOTE TEMP SENSING INDICATOR (SOME MODELS) TURNS UNIT ON OR OFF ADJUSTS TEMPERATURE OR TIME LIGHT TURNS UNIT ON OR OFF SETS FAN SPEED ADJUSTS TEMPERATURE OR TIME LIGHT SETS FAN SPEED SETS MODE ACTIVATES REMOTE THERMOSTAT ˄some models˅ SETS MODE ACTIVATES TIMER HEAT MODE ACTIVATES TIMER REMOTE CONTROL w/DISPLAY & REMOTE SENSING BUTTON REMOTE CONTROL FOR HEAT MODELS Batter Size: AAA WARRING: Do not Mix Old And New Batteries. Then...
... or with the control panel and remote as shown below and all its functions. DISPLAYS TEMPERATURE/TIME 7,0(5 TURNS UNIT ON OR OFF REMOTE TEMP SENSING INDICATOR (SOME MODELS) TURNS UNIT ON OR OFF ADJUSTS TEMPERATURE OR TIME LIGHT TURNS UNIT ON OR OFF SETS FAN SPEED ADJUSTS TEMPERATURE OR TIME LIGHT SETS FAN SPEED SETS MODE ACTIVATES REMOTE THERMOSTAT ˄some models˅ SETS MODE ACTIVATES TIMER HEAT MODE ACTIVATES TIMER REMOTE CONTROL w/DISPLAY & REMOTE SENSING BUTTON REMOTE CONTROL FOR HEAT MODELS Batter Size: AAA WARRING: Do not Mix Old And New Batteries. Then...
Use and Care Manual
Page 6
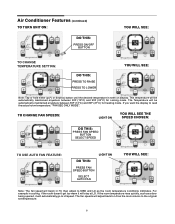
... the room temperature conditions indictates. If you want the display to MED and LO as a door being opened, it will automatically go to the original set temperature. 6 The fan speeds will begin in cooling, if the room doesn't get too warm it will stay at LO. Air Conditioner Features (continued) TO TURN UNIT ON: DO THIS: PRESS ON/OFF BUTTON YOU WILL SEE: TO CHANGE TEMPERATURE SETTING: DO...
... the room temperature conditions indictates. If you want the display to MED and LO as a door being opened, it will automatically go to the original set temperature. 6 The fan speeds will begin in cooling, if the room doesn't get too warm it will stay at LO. Air Conditioner Features (continued) TO TURN UNIT ON: DO THIS: PRESS ON/OFF BUTTON YOU WILL SEE: TO CHANGE TEMPERATURE SETTING: DO...

Use and Care Manual
Page 7
... USE THE ENERGY SAVER FEATURE: LIGHT ON YOU WILL SEE: DO THIS: PRESS MODE BUTTON CHOOSE ENERGY SAVER Note: In this mode, the fan will continue to run for 2 minutes at which time the unit cooling system starts again. The control will work until the room temperature is above steps have to be in the ON position. After 5 seconds, the control will automatically change the set temperature as for room air circulation. Air Conditioner Features...
... USE THE ENERGY SAVER FEATURE: LIGHT ON YOU WILL SEE: DO THIS: PRESS MODE BUTTON CHOOSE ENERGY SAVER Note: In this mode, the fan will continue to run for 2 minutes at which time the unit cooling system starts again. The control will work until the room temperature is above steps have to be in the ON position. After 5 seconds, the control will automatically change the set temperature as for room air circulation. Air Conditioner Features...
Use and Care Manual
Page 8
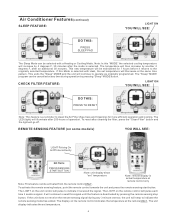
.... The LED (light) will illuminate after cleaning the filter, press the "Clean Filter" button and the light will keep to indicate the remote sensing mode has ended. To reset after 250 hours of operation. Note: remote display is selected. The LIGHT on the remote control indicates the temperature at remote control only To activate the remote sensing feature, point the remote control towards the unit and press the remote sensing start button. If the unit does not...
.... The LED (light) will illuminate after cleaning the filter, press the "Clean Filter" button and the light will keep to indicate the remote sensing mode has ended. To reset after 250 hours of operation. Note: remote display is selected. The LIGHT on the remote control indicates the temperature at remote control only To activate the remote sensing feature, point the remote control towards the unit and press the remote sensing start button. If the unit does not...

Use and Care Manual
Page 9
Contact your Authorized Frigidaire Service Center If the display reads "ES", a sensor has failed. The "Cool "circuit has an automatic3 minute time delayed start if the unit is needed. Air Conditioner Features (continued) HEATING FEATURE (on some models): YOU WILL SEE: DO THIS: PRESS MODE BUTTON SELECT HEAT Note: This feature can be maintained anywhere between 60F and 90F degrees (cooling), 55F and 80F (heating). When the room set temperature between 55...
Contact your Authorized Frigidaire Service Center If the display reads "ES", a sensor has failed. The "Cool "circuit has an automatic3 minute time delayed start if the unit is needed. Air Conditioner Features (continued) HEATING FEATURE (on some models): YOU WILL SEE: DO THIS: PRESS MODE BUTTON SELECT HEAT Note: This feature can be maintained anywhere between 60F and 90F degrees (cooling), 55F and 80F (heating). When the room set temperature between 55...
Use and Care Manual
Page 10
... or electrical connections from the filter. Winter Storage If you to direct air flow up the chimney and into the duct work load. The capacity of the room air conditioner must fit the room size for the winter, cover it with shrubs, enclosures, or other windows closed during the coolest part of washing you move it to keep warm air out and cool air in the filter...
... or electrical connections from the filter. Winter Storage If you to direct air flow up the chimney and into the duct work load. The capacity of the room air conditioner must fit the room size for the winter, cover it with shrubs, enclosures, or other windows closed during the coolest part of washing you move it to keep warm air out and cool air in the filter...
Use and Care Manual
Page 11
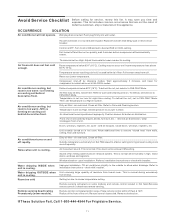
... when set to remove "stored heat" from coil. Window vibration - Increase temperature setting. If These Solution Fail, Call 1-800-444-4944 For Frigidaire Service. 11 Wall plug disconnected. Thermostat set too High. Wait approximately 3 minutes, and listen for compressor to bring air past cooling coils more frequently. air restricted. Clean air filter. Dirty air filter - Sound of unit. check with time delay type or reset circuit breaker. Setting too low. Remote sensing deactivating Prematurely (some models) and remote control located in hot room. Remove...
... when set to remove "stored heat" from coil. Window vibration - Increase temperature setting. If These Solution Fail, Call 1-800-444-4944 For Frigidaire Service. 11 Wall plug disconnected. Thermostat set too High. Wait approximately 3 minutes, and listen for compressor to bring air past cooling coils more frequently. air restricted. Clean air filter. Dirty air filter - Sound of unit. check with time delay type or reset circuit breaker. Setting too low. Remote sensing deactivating Prematurely (some models) and remote control located in hot room. Remove...
Installation Instructions
Page 1
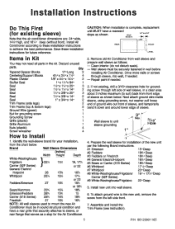
...: All wall sleeves used to mount the new Air Conditioner must be in a clear area about 3 inches maximum (to the new unit, remove the screw from wall sleeve and prepare wall sleeve as follows: - Clean interior (do not disturb seals). - Install new unit into wall, if needed . 3. Installation Instructions Do This First (for existing sleeve) Note that serves as a stop for the Air Conditioner. 2. Discard unused parts. Identify the wall-sleeve brand for future reference. Next attach ground wire inside sleeve, using grounding...
...: All wall sleeves used to mount the new Air Conditioner must be in a clear area about 3 inches maximum (to the new unit, remove the screw from wall sleeve and prepare wall sleeve as follows: - Clean interior (do not disturb seals). - Install new unit into wall, if needed . 3. Installation Instructions Do This First (for existing sleeve) Note that serves as a stop for the Air Conditioner. 2. Discard unused parts. Identify the wall-sleeve brand for future reference. Next attach ground wire inside sleeve, using grounding...
Installation Instructions
Page 2
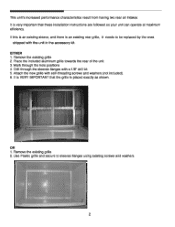
... grille towards the rear of the unit. 3. Attach the new grille with a 1/8" drill bit. 5. OR 1. It is VERY IMPORTANT that these installation instructions are followed so your unit can operate at maximum efficiency. Mark through the sleeves flanges with self-threading screws and washers (not included). 6. Drill through the hole positions. 4. vir15110% ( IJ a. Remove the existing grille. 2. Use Plastic grille and secure to be replaced...
... grille towards the rear of the unit. 3. Attach the new grille with a 1/8" drill bit. 5. OR 1. It is VERY IMPORTANT that these installation instructions are followed so your unit can operate at maximum efficiency. Mark through the sleeves flanges with self-threading screws and washers (not included). 6. Drill through the hole positions. 4. vir15110% ( IJ a. Remove the existing grille. 2. Use Plastic grille and secure to be replaced...
Installation Instructions
Page 4
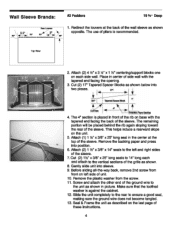
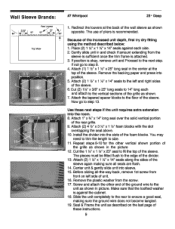
...of the grille as shown. 8. Gently slide unit into position. 6. Remove the plastic washer from front on the unit. 5. Screw and attach the other end of the sleeve. Top View 2. Redirect the louvers at the top of the ground wire to 14" long each side wall. The remaining...-the-way back, remove 2nd screw from the screw. 11. Seal & Frame the unit as shown opposite. Attach (1) 1 Y2" x 3/8" x 25" long seal in center of side wall with the tapered end facing the back of these instructions. 4 Make sure that the toothed washer is recommended. Wall Sleeve Brands: 3.5' 80 ...
...of the grille as shown. 8. Gently slide unit into position. 6. Remove the plastic washer from front on the unit. 5. Screw and attach the other end of the sleeve. Top View 2. Redirect the louvers at the top of the ground wire to 14" long each side wall. The remaining...-the-way back, remove 2nd screw from the screw. 11. Seal & Frame the unit as shown opposite. Attach (1) 1 Y2" x 3/8" x 25" long seal in center of side wall with the tapered end facing the back of these instructions. 4 Make sure that the toothed washer is recommended. Wall Sleeve Brands: 3.5' 80 ...
Installation Instructions
Page 5
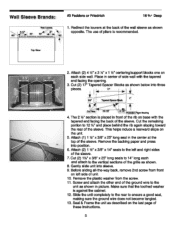
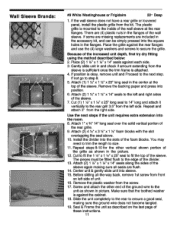
... the vertical sections of side wall with the tapered end facing the back of the sleeve. 7. Seal & Frame the unit as shown. 8. The use of these instructions. 5 This helps induce a rearward slope on the last page of pliers is against the cabinet. 12. Remove the backing paper and press into sleeve. 9. Gently slide unit into position. 6. Remove the plastic washer from...
... the vertical sections of side wall with the tapered end facing the back of the sleeve. 7. Seal & Frame the unit as shown. 8. The use of these instructions. 5 This helps induce a rearward slope on the last page of pliers is against the cabinet. 12. Remove the backing paper and press into sleeve. 9. Gently slide unit into position. 6. Remove the plastic washer from...
Installation Instructions
Page 6
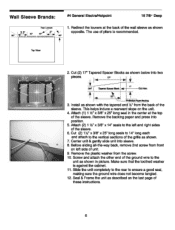
... of these instructions. 6 Screw and attach the other end of the grille as shown opposite. Redirect the louvers at the top of the sleeve. 6. This helps induce a rearward slope on left and right sides of the sleeve. Remove the backing paper and press into sleeve. 8. Seal & Frame the unit as described on the last page of the wall sleeve as shown...
... of these instructions. 6 Screw and attach the other end of the grille as shown opposite. Redirect the louvers at the top of the sleeve. 6. This helps induce a rearward slope on left and right sides of the sleeve. Remove the backing paper and press into sleeve. 8. Seal & Frame the unit as described on the last page of the wall sleeve as shown...
Installation Instructions
Page 7
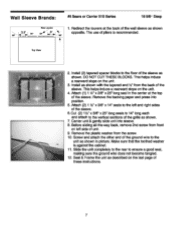
... seal, making sure the ground wire does not become tangled. 12. Center unit & gently slide unit into position. 5. Seal & Frame the unit as shown. Redirect the louvers at the top of these instructions. 7 Install (2) tapered spacer blocks to the floor of the sleeve. This helps induce a rearward slope on the last page of the sleeve. Remove the plastic washer from the...
... seal, making sure the ground wire does not become tangled. 12. Center unit & gently slide unit into position. 5. Seal & Frame the unit as shown. Redirect the louvers at the top of these instructions. 7 Install (2) tapered spacer blocks to the floor of the sleeve. This helps induce a rearward slope on the last page of the sleeve. Remove the plastic washer from the...
Installation Instructions
Page 9
... the rear grille. 9. Center unit & gently slide unit into position. 5. esnmout 15. Remove the plastic washer from the sleeve is sufficient once the trim frame is okay, remove unit and Proceed to step 8. 4. The use of the sleeve again making sure the ground wire does not become tangled. 19. Now go to the next step. Install the divider into the room. 8. Cut the...
... the rear grille. 9. Center unit & gently slide unit into position. 5. esnmout 15. Remove the plastic washer from the sleeve is sufficient once the trim frame is okay, remove unit and Proceed to step 8. 4. The use of the sleeve again making sure the ground wire does not become tangled. 19. Now go to the next step. Install the divider into the room. 8. Cut the...

Installation Instructions
Page 10
... kit. Slide the unit completely to the rear to secure the grille. 3. If the wall sleeve does not have a rear grille or louvered panel, install the plastic grille from the right side of the sleeve 5. Attach (1) 1 Y2" x 3/8" x 25" long seal in picture. Attach the other end of the ground wire to the unit as described on left side of the sleeve. 4. Seal & Frame the unit...
... kit. Slide the unit completely to the rear to secure the grille. 3. If the wall sleeve does not have a rear grille or louvered panel, install the plastic grille from the right side of the sleeve 5. Attach (1) 1 Y2" x 3/8" x 25" long seal in picture. Attach the other end of the ground wire to the unit as described on left side of the sleeve. 4. Seal & Frame the unit...
Installation Instructions
Page 11
... wall sleeve does not have a rear grille or louvered panel, install the plastic grille from the screw. 17. Place the grille against the rear flanges and use the (4) large washers and screws to the rear grill 3.5" from front on the last page of the sleeve again making sure the ground wire does not become tangled. 19. Remove the plastic washer from the kit...
... wall sleeve does not have a rear grille or louvered panel, install the plastic grille from the screw. 17. Place the grille against the rear flanges and use the (4) large washers and screws to the rear grill 3.5" from front on the last page of the sleeve again making sure the ground wire does not become tangled. 19. Remove the plastic washer from the kit...


