

Installation Instructions
Page 1
All about the Installation of your Washer TABLE OF CONTENTS Important Safety Instructions 2-3 Installation Instructions 9-10 Installation Requirements 4-5 Accessories 11 Installed Dryer Dimensions 6 Notes 12 Unpacking Washer 7-8 Français 13 137337000A (1003)
All about the Installation of your Washer TABLE OF CONTENTS Important Safety Instructions 2-3 Installation Instructions 9-10 Installation Requirements 4-5 Accessories 11 Installed Dryer Dimensions 6 Notes 12 Unpacking Washer 7-8 Français 13 137337000A (1003)
Installation Instructions
Page 2
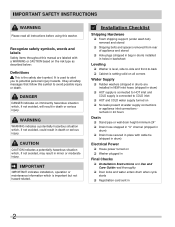
...Hole plugs (shipped in bag in drum) installed in holes in backsheet Leveling ‰ Washer is level, side-to-side and front-to-back ‰ Cabinet is setting solid on all corners Water Supply ‰ Rubber washers (shipped in drum) are labeled with cable tie (shipped in drum) Electrical Power &#...137; Drain hose snapped in "U" channel (shipped in drum) ‰ Drain hose secured in place with a WARNING or CAUTION based on ‰ Washer plugged in Final Checks ‰ Installation Instructions and Use and Care Guide read all safety messages that follow this manual are installed in NEW inlet...
...Hole plugs (shipped in bag in drum) installed in holes in backsheet Leveling ‰ Washer is level, side-to-side and front-to-back ‰ Cabinet is setting solid on all corners Water Supply ‰ Rubber washers (shipped in drum) are labeled with cable tie (shipped in drum) Electrical Power &#...137; Drain hose snapped in "U" channel (shipped in drum) ‰ Drain hose secured in place with a WARNING or CAUTION based on ‰ Washer plugged in Final Checks ‰ Installation Instructions and Use and Care Guide read all safety messages that follow this manual are installed in NEW inlet...
Installation Instructions
Page 3
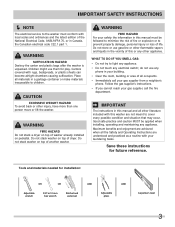
...10 mm box wrench Ratchet and socket set Adjustable pliers Carpenter's level 3 Tools and materials needed for future reference. Do not stack washer on top of washer already installed on pedestal. WHAT TO DO IF YOU SMELL GAS: • Do not try to light any appliance. • ...64257;re department. CAUTION EXCESSIVE WEIGHT HAZARD To avoid back or other appliance. WARNING SUFFOCATION HAZARD Destroy the carton and plastic bags after the washer is unpacked. Follow the gas supplier's instructions. • If you cannot reach your building. • Clear the room, building or area...
...10 mm box wrench Ratchet and socket set Adjustable pliers Carpenter's level 3 Tools and materials needed for future reference. Do not stack washer on top of washer already installed on pedestal. WHAT TO DO IF YOU SMELL GAS: • Do not try to light any appliance. • ...64257;re department. CAUTION EXCESSIVE WEIGHT HAZARD To avoid back or other appliance. WARNING SUFFOCATION HAZARD Destroy the carton and plastic bags after the washer is unpacked. Follow the gas supplier's instructions. • If you cannot reach your building. • Clear the room, building or area...
Installation Instructions
Page 4
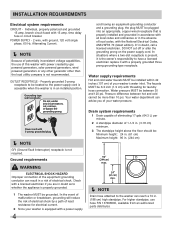
...licensed electrician replace it with a properly grounded three prong grounding type receptacle. Ground requirements WARNING ELECTRICAL SHOCK HAZARD Improper connection of this washer with ground, 120 volt single phase, 60 Hz, Alternating Current. Í NOTE Because of potentially inconsistent voltage capabilities, the use ... conductor and a grounding plug, the plug MUST be plugged into an appropriate, copper wired receptacle that is properly grounded. 1 The washer MUST be installed within 42 inches (107 cm) of local codes, with 3-prong grounded plug Í NOTE GFI (Ground Fault ...
...licensed electrician replace it with a properly grounded three prong grounding type receptacle. Ground requirements WARNING ELECTRICAL SHOCK HAZARD Improper connection of this washer with ground, 120 volt single phase, 60 Hz, Alternating Current. Í NOTE Because of potentially inconsistent voltage capabilities, the use ... conductor and a grounding plug, the plug MUST be plugged into an appropriate, copper wired receptacle that is properly grounded. 1 The washer MUST be installed within 42 inches (107 cm) of local codes, with 3-prong grounded plug Í NOTE GFI (Ground Fault ...
Installation Instructions
Page 5
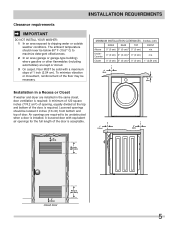
Inches (cm) SIDES REAR TOP FRONT Alcove 0" (0 cm) 0" (0 cm)* 0" (0 cm) n/a UnderCounter 0" (0 cm) 0" (0 cm)* 0" (0 cm) n/a Closet 0" (0 cm) 0" (0 cm)* 0" (0 cm) 1" (2.54 cm) 0" (0cm) 0" (0cm) Installation in the same closet, door ventilation is...be solid with equivalent air openings for the full length of door. in . (387.1cm²) 5 INSTALLATION REQUIREMENTS Clearance requirements IMPORTANT DO NOT INSTALL YOUR WASHER: 1 In an area exposed to maximize detergent effectiveness. 2 In an area (garage or garage-type building) where gasoline or other flammables (including ...
Inches (cm) SIDES REAR TOP FRONT Alcove 0" (0 cm) 0" (0 cm)* 0" (0 cm) n/a UnderCounter 0" (0 cm) 0" (0 cm)* 0" (0 cm) n/a Closet 0" (0 cm) 0" (0 cm)* 0" (0 cm) 1" (2.54 cm) 0" (0cm) 0" (0cm) Installation in the same closet, door ventilation is...be solid with equivalent air openings for the full length of door. in . (387.1cm²) 5 INSTALLATION REQUIREMENTS Clearance requirements IMPORTANT DO NOT INSTALL YOUR WASHER: 1 In an area exposed to maximize detergent effectiveness. 2 In an area (garage or garage-type building) where gasoline or other flammables (including ...
Installation Instructions
Page 6
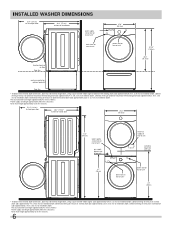
...approximately 60 inches (152.5cm). 3Drain hose length approximately 52 inches (132cm). 51.4" (131cm) to clear open door 30.3" (77cm)* to front of closed door 27.0" (68.5cm) 71.5" (182cm) water supply connection on rear of unit1 gas supply pipe on rear of gas unit electrical supply on rear... door 30.3" (77cm)* to front of closed door water supply connection on rear of unit1 drain hose on rear of unit3 27.0" (68.5cm) power cord on rear of unit2 freestand washer on floor floor line 51.25" (130cm) 36.0" (91.5cm) washer mounted on freestanding dryer) adds approximately...
...approximately 60 inches (152.5cm). 3Drain hose length approximately 52 inches (132cm). 51.4" (131cm) to clear open door 30.3" (77cm)* to front of closed door 27.0" (68.5cm) 71.5" (182cm) water supply connection on rear of unit1 gas supply pipe on rear of gas unit electrical supply on rear... door 30.3" (77cm)* to front of closed door water supply connection on rear of unit1 drain hose on rear of unit3 27.0" (68.5cm) power cord on rear of unit2 freestand washer on floor floor line 51.25" (130cm) 36.0" (91.5cm) washer mounted on freestanding dryer) adds approximately...
Installation Instructions
Page 7
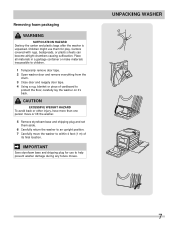
...with rugs, bedspreads, or plastic sheets can become airtight chambers causing suffocation. UNPACKING WASHER 7 Removing foam packaging WARNING SUFFOCATION HAZARD Destroy the carton and plastic bags after the washer is unpacked. CAUTION EXCESSIVE WEIGHT HAZARD To avoid back or other injury, have ... plug and set them for use them aside. 6 Carefully return the washer to an upright position. 7 Carefully move the washer to within 4 feet (1 m) of cardboard to children. 1 Temporarily remove door tape. 2 Open washer door and remove everything from the drum. 3 Close door and reapply ...
...with rugs, bedspreads, or plastic sheets can become airtight chambers causing suffocation. UNPACKING WASHER 7 Removing foam packaging WARNING SUFFOCATION HAZARD Destroy the carton and plastic bags after the washer is unpacked. CAUTION EXCESSIVE WEIGHT HAZARD To avoid back or other injury, have ... plug and set them for use them aside. 6 Carefully return the washer to an upright position. 7 Carefully move the washer to within 4 feet (1 m) of cardboard to children. 1 Temporarily remove door tape. 2 Open washer door and remove everything from the drum. 3 Close door and reapply ...
Installation Instructions
Page 8
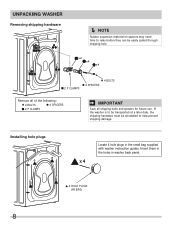
Insert them in the holes in the small bag supplied with washer instruction guides. Installing hole plugs Locate 4 hole plugs in washer back panel. If the washer is to be transported at a later date, the shipping hardware must be reinstalled to relax before they can be easily pulled ... x 4 x 4 2 P CLAMPS 4 BOLTS 4 SPACERS Remove all of the following: 4 BOLTS 4 SPACERS 2 P CLAMPS IMPORTANT Save all shipping bolts and spacers for future use. UNPACKING WASHER Removing shipping hardware Í NOTE Rubber expansion material on spacers may need time to help prevent shipping damage.
Insert them in the holes in the small bag supplied with washer instruction guides. Installing hole plugs Locate 4 hole plugs in washer back panel. If the washer is to be transported at a later date, the shipping hardware must be reinstalled to relax before they can be easily pulled ... x 4 x 4 2 P CLAMPS 4 BOLTS 4 SPACERS Remove all of the following: 4 BOLTS 4 SPACERS 2 P CLAMPS IMPORTANT Save all shipping bolts and spacers for future use. UNPACKING WASHER Removing shipping hardware Í NOTE Rubber expansion material on spacers may need time to help prevent shipping damage.
Installation Instructions
Page 9
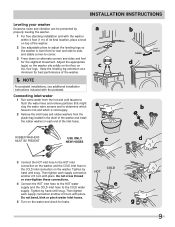
... cold supply. 2 Remove the inlet hoses and rubber washers from the hot and cold faucets to flush the water lines and remove particles that might a clog the water valve screens and to determine which faucet is hot and which is level front-to-rear and side-to-side, and stable corner...-to the COLD water supply. Connecting inlet water 1 Run some water from the plastic bag located in the drum of the washer and install the rubber washers in each end of the washer. Í NOTE For pedestal installations...
... cold supply. 2 Remove the inlet hoses and rubber washers from the hot and cold faucets to flush the water lines and remove particles that might a clog the water valve screens and to determine which faucet is hot and which is level front-to-rear and side-to-side, and stable corner...-to the COLD water supply. Connecting inlet water 1 Run some water from the plastic bag located in the drum of the washer and install the rubber washers in each end of the washer. Í NOTE For pedestal installations...
Installation Instructions
Page 10
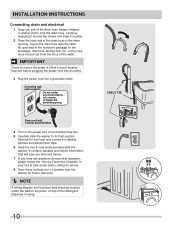
... Connecting drain and electrical 1 Snap one end of the detergent dispenser housing. 10 CABLE TIE Secure the drain hose with the washer. Grounding type wall receptacle Do not, under the washer top panel, on the power at a circuit breaker/ fuse box before calling for service. 8 Place these instructions in a location ..., cut, remove, or bypass the grounding prong. IMPORTANT Check to ensure the power is off at a circuit breaker/fuse box. 5 Carefully slide the washer to the standpipe, inlet hose, laundry tub, etc. so the hose does not pull out from the force of the drain hose in...
... Connecting drain and electrical 1 Snap one end of the detergent dispenser housing. 10 CABLE TIE Secure the drain hose with the washer. Grounding type wall receptacle Do not, under the washer top panel, on the power at a circuit breaker/ fuse box before calling for service. 8 Place these instructions in a location ..., cut, remove, or bypass the grounding prong. IMPORTANT Check to ensure the power is off at a circuit breaker/fuse box. 5 Carefully slide the washer to the standpipe, inlet hose, laundry tub, etc. so the hose does not pull out from the force of the drain hose in...
Installation Instructions
Page 11
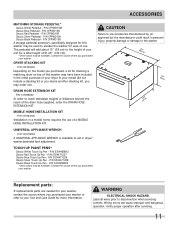
... KIT P/N 134700400 Depending on the model you purchased your Use and Care Guide for stacking a matching dryer on top of this washer may be available. MOBILE HOME INSTALLATION KIT P/N 137067200 Installation in a mobile home requires the use accessories manufactured by (or approved by... order the DRAIN HOSE EXTENSION KIT. Wiring errors can cause improper and dangerous operation. Contact the source where you purchased your washer. CAUTION Failure to your washer or refer to use of use. Verify proper operation after servicing. 11 P/N CFPWD15W Classic Blue Pedestal - P/N CFPWD15B A...
... KIT P/N 134700400 Depending on the model you purchased your Use and Care Guide for stacking a matching dryer on top of this washer may be available. MOBILE HOME INSTALLATION KIT P/N 137067200 Installation in a mobile home requires the use accessories manufactured by (or approved by... order the DRAIN HOSE EXTENSION KIT. Wiring errors can cause improper and dangerous operation. Contact the source where you purchased your washer. CAUTION Failure to your washer or refer to use of use. Verify proper operation after servicing. 11 P/N CFPWD15W Classic Blue Pedestal - P/N CFPWD15B A...


