

Installation Instructions
Page 1
All about the Installation of your Washer TABLE OF CONTENTS Important Safety Instructions 2-3 Installation Instructions 9-10 Installation Requirements 4-5 Accessories 11 Installed Dryer Dimensions 6 Notes 12 Unpacking Washer 7-8 Français 13 137337000A (1003)
All about the Installation of your Washer TABLE OF CONTENTS Important Safety Instructions 2-3 Installation Instructions 9-10 Installation Requirements 4-5 Accessories 11 Installed Dryer Dimensions 6 Notes 12 Unpacking Washer 7-8 Français 13 137337000A (1003)
Installation Instructions
Page 2
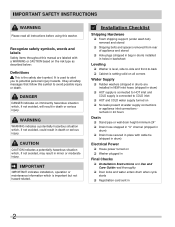
... Water Supply ‰ Rubber washers (shipped in drum) are labeled with cable tie (shipped in drum) Electrical Power ‰ House power turned on ‰ Washer plugged in Final Checks ‰ Installation Instructions and Use and Care Guide read all safety messages that follow this washer. Installation Checklist Shipping Hardware ‰ Foam shipping support (under wash tub) removed and stored ‰ Shipping bolts and spacers removed from rear of appliance and stored ‰ Hole plugs (shipped in bag in drum) installed in holes in backsheet Leveling ‰ Washer...
... Water Supply ‰ Rubber washers (shipped in drum) are labeled with cable tie (shipped in drum) Electrical Power ‰ House power turned on ‰ Washer plugged in Final Checks ‰ Installation Instructions and Use and Care Guide read all safety messages that follow this washer. Installation Checklist Shipping Hardware ‰ Foam shipping support (under wash tub) removed and stored ‰ Shipping bolts and spacers removed from rear of appliance and stored ‰ Hole plugs (shipped in bag in drum) installed in holes in backsheet Leveling ‰ Washer...
Installation Instructions
Page 3
... electrical code C22.1 part 1. Do not stack washer on top of this or any other appliance. do not use any phone in this manual must conform with local codes and ordinances and the latest edition of the National Electrical Code, ANSI/NFPA 70, or in the vicinity of another washer. IMPORTANT SAFETY INSTRUCTIONS Í NOTE The electrical service to the washer must be applied when installing, operating...
... electrical code C22.1 part 1. Do not stack washer on top of this or any other appliance. do not use any phone in this manual must conform with local codes and ordinances and the latest edition of the National Electrical Code, ANSI/NFPA 70, or in the vicinity of another washer. IMPORTANT SAFETY INSTRUCTIONS Í NOTE The electrical service to the washer must be applied when installing, operating...
Installation Instructions
Page 4
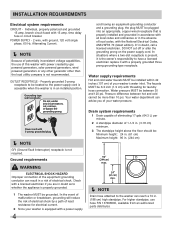
... replace it with a licensed electrician if you of 1-1/4 in . (188 cm) high standpipe. Pressure difference between 30 and 120 psi. Drain system requirements 1 Drain capable of eliminating 17 gals (64.3 L) per minute. 2 A standpipe diameter of your washer's water inlet. time delay fuse or circuit breaker. Ground requirements WARNING ELECTRICAL SHOCK HAZARD Improper connection of electrical shock by gas powered generators, solar powered generators, wind powered...
... replace it with a licensed electrician if you of 1-1/4 in . (188 cm) high standpipe. Pressure difference between 30 and 120 psi. Drain system requirements 1 Drain capable of eliminating 17 gals (64.3 L) per minute. 2 A standpipe diameter of your washer's water inlet. time delay fuse or circuit breaker. Ground requirements WARNING ELECTRICAL SHOCK HAZARD Improper connection of electrical shock by gas powered generators, solar powered generators, wind powered...
Installation Instructions
Page 5
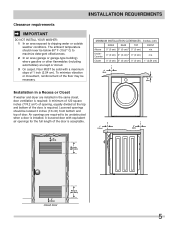
... square inches (774.2 cm²) of opening, equally divided at the top and bottom of the door is installed. in . (387.1cm²) 3" (7.6cm) closet door 60 sq. INSTALLATION REQUIREMENTS Clearance requirements IMPORTANT DO NOT INSTALL YOUR WASHER: 1 In an area exposed to maximize detergent effectiveness. 2 In an area (garage or garage-type building) where gasoline or other fl...
... square inches (774.2 cm²) of opening, equally divided at the top and bottom of the door is installed. in . (387.1cm²) 3" (7.6cm) closet door 60 sq. INSTALLATION REQUIREMENTS Clearance requirements IMPORTANT DO NOT INSTALL YOUR WASHER: 1 In an area exposed to maximize detergent effectiveness. 2 In an area (garage or garage-type building) where gasoline or other fl...
Installation Instructions
Page 6
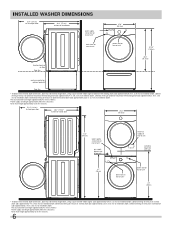
... venting of exhaust on pedestal-mounted or freestanding dryer adds approximately 4 in . (10.2 cm) to installation depth. Downward venting of exhaust on pedestal-mounted dryer adds approximately 2.25 in . (9.5 cm) to installation depth. INSTALLED WASHER DIMENSIONS 51.4" (131cm) to clear open door 30.3" (77cm)* to front of closed door water supply connection on rear of unit1 drain hose on rear of unit3 27.0" (68.5cm) power cord on rear of unit2...
... venting of exhaust on pedestal-mounted or freestanding dryer adds approximately 4 in . (10.2 cm) to installation depth. Downward venting of exhaust on pedestal-mounted dryer adds approximately 2.25 in . (9.5 cm) to installation depth. INSTALLED WASHER DIMENSIONS 51.4" (131cm) to clear open door 30.3" (77cm)* to front of closed door water supply connection on rear of unit1 drain hose on rear of unit3 27.0" (68.5cm) power cord on rear of unit2...
Installation Instructions
Page 7
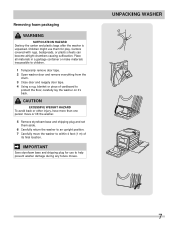
.... 1 Temporarily remove door tape. 2 Open washer door and remove everything from the drum. 3 Close door and reapply door tape. 4 Using a rug, blanket or piece of its final location. UNPACKING WASHER 7 CAUTION EXCESSIVE WEIGHT HAZARD To avoid back or other injury, have more than one person move or lift the washer. 5 Remove styrofoam base and shipping plug and set them for use them aside. 6 Carefully return the washer to an...
.... 1 Temporarily remove door tape. 2 Open washer door and remove everything from the drum. 3 Close door and reapply door tape. 4 Using a rug, blanket or piece of its final location. UNPACKING WASHER 7 CAUTION EXCESSIVE WEIGHT HAZARD To avoid back or other injury, have more than one person move or lift the washer. 5 Remove styrofoam base and shipping plug and set them for use them aside. 6 Carefully return the washer to an...
Installation Instructions
Page 8
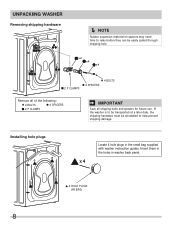
... washer instruction guides. x 4 4 HOLE PLUGS (IN BAG) 8 UNPACKING WASHER Removing shipping hardware Í NOTE Rubber expansion material on spacers may need time to relax before they can be reinstalled to be transported at a later date, the shipping hardware must be easily pulled through shipping hole. x 2 x 4 x 4 2 P CLAMPS 4 BOLTS 4 SPACERS Remove all of the following: 4 BOLTS 4 SPACERS 2 P CLAMPS IMPORTANT Save all shipping bolts and spacers for future use. Installing hole plugs Locate 4 hole plugs...
... washer instruction guides. x 4 4 HOLE PLUGS (IN BAG) 8 UNPACKING WASHER Removing shipping hardware Í NOTE Rubber expansion material on spacers may need time to relax before they can be reinstalled to be transported at a later date, the shipping hardware must be easily pulled through shipping hole. x 2 x 4 x 4 2 P CLAMPS 4 BOLTS 4 SPACERS Remove all of the following: 4 BOLTS 4 SPACERS 2 P CLAMPS IMPORTANT Save all shipping bolts and spacers for future use. Installing hole plugs Locate 4 hole plugs...
Installation Instructions
Page 9
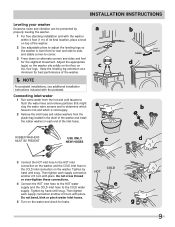
... water and check for leaks. Connecting inlet water 1 Run some water from the plastic bag located in the drum of the washer and install the rubber washers in each supply connection HOT COLD another 2/3 turn with pliers. INSTALLATION INSTRUCTIONS Leveling your washer Excessive noise and vibration can be prevented by a properly leveling the washer. 1 For free standing installation and with the washer within 4 feet (1 m) of its final location, place a level on top of the washer. 2 Use adjustable pliers to adjust the leveling...
... water and check for leaks. Connecting inlet water 1 Run some water from the plastic bag located in the drum of the washer and install the rubber washers in each supply connection HOT COLD another 2/3 turn with pliers. INSTALLATION INSTRUCTIONS Leveling your washer Excessive noise and vibration can be prevented by a properly leveling the washer. 1 For free standing installation and with the washer within 4 feet (1 m) of its final location, place a level on top of the washer. 2 Use adjustable pliers to adjust the leveling...
Installation Instructions
Page 10
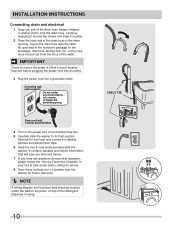
..., inlet hose, laundry tub, etc. Remove and discard door tape. 6 Read the Use & Care Guide provided with 3-prong grounded plug 4 Turn on top of the drain hose hanger (shipped in your Use & Care Guide before plugging the power cord into an outlet. 3 Plug the power cord into a grounded outlet. Recheck for level and rock corners for future reference. Í NOTE A wiring diagram and technical data sheet are located under any questions during initial operation, please review the "Service Prevention Checklist" in washer drum) onto...
..., inlet hose, laundry tub, etc. Remove and discard door tape. 6 Read the Use & Care Guide provided with 3-prong grounded plug 4 Turn on top of the drain hose hanger (shipped in your Use & Care Guide before plugging the power cord into an outlet. 3 Plug the power cord into a grounded outlet. Recheck for level and rock corners for future reference. Í NOTE A wiring diagram and technical data sheet are located under any questions during initial operation, please review the "Service Prevention Checklist" in washer drum) onto...
Installation Instructions
Page 11
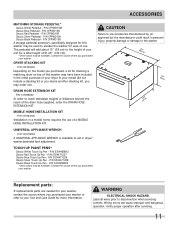
... have been included in dryer/ washer/pedestal feet adjustment. P/N 5304471227 Classic Blue Touch Up Pen - ACCESSORIES MATCHING STORAGE PEDESTAL* Classic White Pedestal - DRAIN HOSE EXTENSION KIT P/N 137098000 In order to elevate the washer for more information. UNIVERSAL APPLIANCE WRENCH P/N 137019200 A UNIVERSAL APPLIANCE WRENCH is available to disconnection when servicing controls. Verify proper operation after servicing. 11 WARNING ELECTRICAL SHOCK HAZARD Label all wires prior to aid...
... have been included in dryer/ washer/pedestal feet adjustment. P/N 5304471227 Classic Blue Touch Up Pen - ACCESSORIES MATCHING STORAGE PEDESTAL* Classic White Pedestal - DRAIN HOSE EXTENSION KIT P/N 137098000 In order to elevate the washer for more information. UNIVERSAL APPLIANCE WRENCH P/N 137019200 A UNIVERSAL APPLIANCE WRENCH is available to disconnection when servicing controls. Verify proper operation after servicing. 11 WARNING ELECTRICAL SHOCK HAZARD Label all wires prior to aid...


