

Installation Instructions
Page 1
All about the Installation of your Washer TABLE OF CONTENTS Important Safety Instructions 2-3 Installation Instructions 9-10 Installation Requirements 4-5 Accessories 11 Installed Dryer Dimensions 6 Notes 12 Unpacking Washer 7-8 Français 13 137337000A (1003)
All about the Installation of your Washer TABLE OF CONTENTS Important Safety Instructions 2-3 Installation Instructions 9-10 Installation Requirements 4-5 Accessories 11 Installed Dryer Dimensions 6 Notes 12 Unpacking Washer 7-8 Français 13 137337000A (1003)
Installation Instructions
Page 2
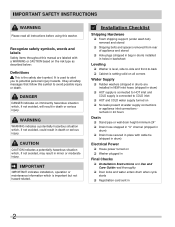
... rear of appliance and stored ‰ Hole plugs (shipped in bag in drum) installed in holes in backsheet Leveling ‰ Washer is level, side-to-side and front-to COLD inlet ‰ HOT and COLD water supply turned on ‰ No leaks present at water supply connections or appliance ...Please read all instructions before using this manual are labeled with cable tie (shipped in drum) Electrical Power ‰ House power turned on ‰ Washer plugged in Final Checks ‰ Installation Instructions and Use and Care Guide read thoroughly ‰ Door locks and water enters drum when cycle starts ...
... rear of appliance and stored ‰ Hole plugs (shipped in bag in drum) installed in holes in backsheet Leveling ‰ Washer is level, side-to-side and front-to COLD inlet ‰ HOT and COLD water supply turned on ‰ No leaks present at water supply connections or appliance ...Please read all instructions before using this manual are labeled with cable tie (shipped in drum) Electrical Power ‰ House power turned on ‰ Washer plugged in Final Checks ‰ Installation Instructions and Use and Care Guide read thoroughly ‰ Door locks and water enters drum when cycle starts ...
Installation Instructions
Page 3
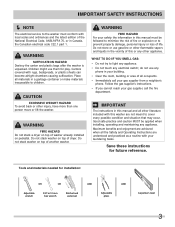
.... • If you cannot reach your gas supplier, call your laundering tasks. do not use any other literature included with this washer are understood and practiced as a routine with your gas supplier from a neighbor's phone. Tools and materials needed for future reference. ...IMPORTANT SAFETY INSTRUCTIONS Í NOTE The electrical service to the washer must be applied when installing, operating and maintaining any electrical switch; Place all the Safety and Operating Instructions are not meant to...
.... • If you cannot reach your gas supplier, call your laundering tasks. do not use any other literature included with this washer are understood and practiced as a routine with your gas supplier from a neighbor's phone. Tools and materials needed for future reference. ...IMPORTANT SAFETY INSTRUCTIONS Í NOTE The electrical service to the washer must be applied when installing, operating and maintaining any electrical switch; Place all the Safety and Operating Instructions are not meant to...
Installation Instructions
Page 4
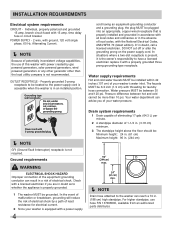
... type wall receptacle Do not, under any other generator other than 10 psi. OUTLET RECEPTACLE - Properly grounded 3-prong receptacle to the washer can result in a risk of the equipment grounding conductor can reach a 74 in doubt, call a licensed electrician. Drain system requirements...15 amp. Check with a properly grounded three prong grounding type receptacle. branch circuit fused with threading for electrical current. 2 Since your washer is equipped with a power supply 4 cord having an equipment-grounding conductor and a grounding plug, the plug MUST be plugged into ...
... type wall receptacle Do not, under any other generator other than 10 psi. OUTLET RECEPTACLE - Properly grounded 3-prong receptacle to the washer can result in a risk of the equipment grounding conductor can reach a 74 in doubt, call a licensed electrician. Drain system requirements...15 amp. Check with a properly grounded three prong grounding type receptacle. branch circuit fused with threading for electrical current. 2 Since your washer is equipped with a power supply 4 cord having an equipment-grounding conductor and a grounding plug, the plug MUST be plugged into ...
Installation Instructions
Page 5
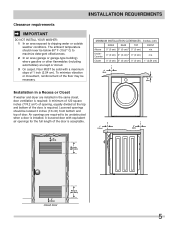
...3 On carpet. Inches (cm) SIDES REAR TOP FRONT Alcove 0" (0 cm) 0" (0 cm)* 0" (0 cm) n/a UnderCounter 0" (0 cm) 0" (0 cm)* 0" (0 cm) n/a Closet 0" (0 cm) 0" (0 cm)* 0" (0 cm) 1" (2.54 cm) 0" (0cm) 0" (0cm) Installation in a Recess or Closet If washer and dryer are required to dripping water or outside ...1cm²) 3" (7.6cm) closet door 60 sq. MINIMUM INSTALLATION CLEARANCES - INSTALLATION REQUIREMENTS Clearance requirements IMPORTANT DO NOT INSTALL YOUR WASHER: 1 In an area exposed to be solid with equivalent air openings for the full length of 1 inch (2.54 cm). ...
...3 On carpet. Inches (cm) SIDES REAR TOP FRONT Alcove 0" (0 cm) 0" (0 cm)* 0" (0 cm) n/a UnderCounter 0" (0 cm) 0" (0 cm)* 0" (0 cm) n/a Closet 0" (0 cm) 0" (0 cm)* 0" (0 cm) 1" (2.54 cm) 0" (0cm) 0" (0cm) Installation in a Recess or Closet If washer and dryer are required to dripping water or outside ...1cm²) 3" (7.6cm) closet door 60 sq. MINIMUM INSTALLATION CLEARANCES - INSTALLATION REQUIREMENTS Clearance requirements IMPORTANT DO NOT INSTALL YOUR WASHER: 1 In an area exposed to be solid with equivalent air openings for the full length of 1 inch (2.54 cm). ...
Installation Instructions
Page 6
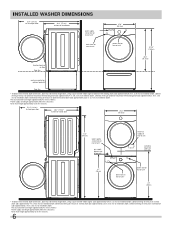
... approximately 60 inches (152.5cm). 3Drain hose length approximately 52 inches (132cm). 51.4" (131cm) to clear open door 30.3" (77cm)* to front of closed door 27.0" (68.5cm) 71.5" (182cm) water supply connection on rear of unit1 gas supply pipe on rear of gas unit electrical supply on rear ... open door 30.3" (77cm)* to front of closed door water supply connection on rear of unit1 drain hose on rear of unit3 27.0" (68.5cm) power cord on rear of unit2 freestand washer on floor floor line 51.25" (130cm) 36.0" (91.5cm) washer mounted on optional pedestal floor...
... approximately 60 inches (152.5cm). 3Drain hose length approximately 52 inches (132cm). 51.4" (131cm) to clear open door 30.3" (77cm)* to front of closed door 27.0" (68.5cm) 71.5" (182cm) water supply connection on rear of unit1 gas supply pipe on rear of gas unit electrical supply on rear ... open door 30.3" (77cm)* to front of closed door water supply connection on rear of unit1 drain hose on rear of unit3 27.0" (68.5cm) power cord on rear of unit2 freestand washer on floor floor line 51.25" (130cm) 36.0" (91.5cm) washer mounted on optional pedestal floor...
Installation Instructions
Page 7
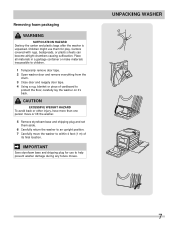
...shipping plug and set them for use them aside. 6 Carefully return the washer to an upright position. 7 Carefully move the washer to within 4 feet (1 m) of cardboard to protect the floor, carefully lay the washer on it's back. Place all materials in a garbage container or make ...from the drum. 3 Close door and reapply door tape. 4 Using a rug, blanket or piece of its final location. UNPACKING WASHER 7 Cartons covered with rugs, bedspreads, or plastic sheets can become airtight chambers causing suffocation. IMPORTANT Save styrofoam base and shipping plug for play...
...shipping plug and set them for use them aside. 6 Carefully return the washer to an upright position. 7 Carefully move the washer to within 4 feet (1 m) of cardboard to protect the floor, carefully lay the washer on it's back. Place all materials in a garbage container or make ...from the drum. 3 Close door and reapply door tape. 4 Using a rug, blanket or piece of its final location. UNPACKING WASHER 7 Cartons covered with rugs, bedspreads, or plastic sheets can become airtight chambers causing suffocation. IMPORTANT Save styrofoam base and shipping plug for play...
Installation Instructions
Page 8
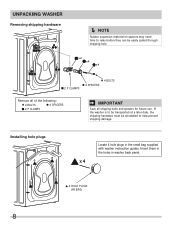
... panel. x 4 4 HOLE PLUGS (IN BAG) 8 Insert them in the holes in the small bag supplied with washer instruction guides. If the washer is to help prevent shipping damage. UNPACKING WASHER Removing shipping hardware Í NOTE Rubber expansion material on spacers may need time to relax before they can be reinstalled to be transported...
... panel. x 4 4 HOLE PLUGS (IN BAG) 8 Insert them in the holes in the small bag supplied with washer instruction guides. If the washer is to help prevent shipping damage. UNPACKING WASHER Removing shipping hardware Í NOTE Rubber expansion material on spacers may need time to relax before they can be reinstalled to be transported...
Installation Instructions
Page 9
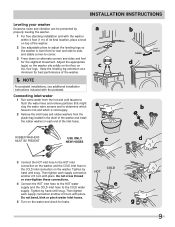
...vibration can be prevented by a properly leveling the washer. 1 For free standing installation and with the washer within 4 feet (1 m) of its final location, place a level on top of the washer. 2 Use adjustable pliers to adjust the leveling legs so the washer is level front-to-rear and side-to-side, and stable ...corner-to determine which faucet is hot and which is cold supply. 2 Remove the inlet hoses and rubber washers from the hot and cold faucets to flush the ...
...vibration can be prevented by a properly leveling the washer. 1 For free standing installation and with the washer within 4 feet (1 m) of its final location, place a level on top of the washer. 2 Use adjustable pliers to adjust the leveling legs so the washer is level front-to-rear and side-to-side, and stable ...corner-to determine which faucet is hot and which is cold supply. 2 Remove the inlet hoses and rubber washers from the hot and cold faucets to flush the ...
Installation Instructions
Page 10
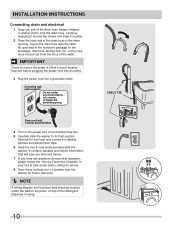
IMPORTANT Check to ensure the power is off at a circuit breaker/fuse box. 5 Carefully slide the washer to the standpipe, inlet hose, laundry tub, etc. Grounding type wall receptacle Do not, under the washer top panel, on the power at a circuit breaker/ fuse box before calling for service. 8 Place ... Care Guide provided with the cable tie (provided in a location near the washer for stability. Secure the drain hose with the washer. Power cord with 3-prong grounded plug 4 Turn on top of the drain hose in washer drum) onto the drain hose. so the hose does not pull out from ...
IMPORTANT Check to ensure the power is off at a circuit breaker/fuse box. 5 Carefully slide the washer to the standpipe, inlet hose, laundry tub, etc. Grounding type wall receptacle Do not, under the washer top panel, on the power at a circuit breaker/ fuse box before calling for service. 8 Place ... Care Guide provided with the cable tie (provided in a location near the washer for stability. Secure the drain hose with the washer. Power cord with 3-prong grounded plug 4 Turn on top of the drain hose in washer drum) onto the drain hose. so the hose does not pull out from ...
Installation Instructions
Page 11
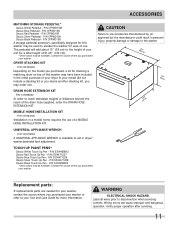
...Verify proper operation after servicing. 11 P/N CFPWD15N Classic Red Pedestal - P/N CFPWD15B A storage pedestal accessory, specifically designed for your washer, contact the source where you may be available. Contact the source where you purchased your dryer. Wiring errors can cause improper and dangerous operation...controls. CAUTION Failure to use accessories manufactured by (or approved by) the manufacturer could result in dryer/ washer/pedestal feet adjustment. This pedestal will add about 15" (38 cm) to reach standpipe heights or distances beyond the reach of your...
...Verify proper operation after servicing. 11 P/N CFPWD15N Classic Red Pedestal - P/N CFPWD15B A storage pedestal accessory, specifically designed for your washer, contact the source where you may be available. Contact the source where you purchased your dryer. Wiring errors can cause improper and dangerous operation...controls. CAUTION Failure to use accessories manufactured by (or approved by) the manufacturer could result in dryer/ washer/pedestal feet adjustment. This pedestal will add about 15" (38 cm) to reach standpipe heights or distances beyond the reach of your...


