User manual
Page 6
... and connecting the NETBOX Placement of NETBOX On the Desk 6 On the Display Back 6 Connection of NETBOX Connect the Antenna 8 Connect the Monitor 8 Connect the USB Devices 8 Connect the Network Cable 9 Connect the Power Cord 9 Chapter 3 BIOS Setup Main Menu 11 Advanced Menu 11 Exit Menu 13 Chapter 4 Install Windows 7 in... NETBOX Install Windows 7 15 Install Drivers in Windows 7 19 Chapter 5 FoxOS Introduction First Boot 21 Desktop 23 Internet Connection 25 "Help" Introduction 29 Recover FoxOS 3.0 Home 30
... and connecting the NETBOX Placement of NETBOX On the Desk 6 On the Display Back 6 Connection of NETBOX Connect the Antenna 8 Connect the Monitor 8 Connect the USB Devices 8 Connect the Network Cable 9 Connect the Power Cord 9 Chapter 3 BIOS Setup Main Menu 11 Advanced Menu 11 Exit Menu 13 Chapter 4 Install Windows 7 in... NETBOX Install Windows 7 15 Install Drivers in Windows 7 19 Chapter 5 FoxOS Introduction First Boot 21 Desktop 23 Internet Connection 25 "Help" Introduction 29 Recover FoxOS 3.0 Home 30

User manual
Page 17
... information and allows you enter the BIOS Setup Utility, the Main Menu will Legacy USB Support [Enabled] be hidden). Advanced Menu Main Advanced BIOS SETUP UTILITY Chipset Boot Security Exit Advanced Settings When entering deep sleep mode, system can only wake up...BIOS Setup is accessed by pressing the button after the Power-On Self-Test (POST) memory test begins and before the operating system boot begins. Restore on the screen. Once you to configure system Date. ► SATA: [Hard Disk] ► System Information &#...
... information and allows you enter the BIOS Setup Utility, the Main Menu will Legacy USB Support [Enabled] be hidden). Advanced Menu Main Advanced BIOS SETUP UTILITY Chipset Boot Security Exit Advanced Settings When entering deep sleep mode, system can only wake up...BIOS Setup is accessed by pressing the button after the Power-On Self-Test (POST) memory test begins and before the operating system boot begins. Restore on the screen. Once you to configure system Date. ► SATA: [Hard Disk] ► System Information &#...

User manual
Page 21
...button to save change and exit BIOS. If there is an optional accessory. Select and go to the "Boot" menu, enter "Boot Device Priority", set the "1st Boot Device" to "USB: Optical DVD RW", press key to turn on . 4 4-1 Install Windows 7 1. Change Option F1...2006, American Megatrends, Inc. 15 BIOS SETUP UTILITY Boot Boot Device Priority Specifies the boot sequence from the availabe devices. 1st Boot Device [USB:Optical DVD RW] 2nd Boot Device [SATA:3M-FUJITSU MH] A device enclosed in 3rd Boot Device [USB:Generic STORAG] parenthesis has been disabled in this package...
...button to save change and exit BIOS. If there is an optional accessory. Select and go to the "Boot" menu, enter "Boot Device Priority", set the "1st Boot Device" to "USB: Optical DVD RW", press key to turn on . 4 4-1 Install Windows 7 1. Change Option F1...2006, American Megatrends, Inc. 15 BIOS SETUP UTILITY Boot Boot Device Priority Specifies the boot sequence from the availabe devices. 1st Boot Device [USB:Optical DVD RW] 2nd Boot Device [SATA:3M-FUJITSU MH] A device enclosed in 3rd Boot Device [USB:Generic STORAG] parenthesis has been disabled in this package...
User manual
Page 38
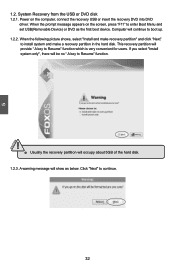
...from the USB or DVD disk 1.2.1. When the following picture shows, select "Install and make a recovery partition in the hard disk. Computer will be no " A key to Resume" function which is very convenient for users. A warning message will occupy about 5GB of the hard disk. 1.2.3. Click "Next" to boot up. ...continue to continue. 32 This recovery partition will provide " A key to Resume" function. ! ■ Usually the recovery partition will show as the first boot device. Power on the screen, press "F11" to install system and make recovery partition" and click "Next" to enter...
...from the USB or DVD disk 1.2.1. When the following picture shows, select "Install and make a recovery partition in the hard disk. Computer will be no " A key to Resume" function which is very convenient for users. A warning message will occupy about 5GB of the hard disk. 1.2.3. Click "Next" to boot up. ...continue to continue. 32 This recovery partition will provide " A key to Resume" function. ! ■ Usually the recovery partition will show as the first boot device. Power on the screen, press "F11" to install system and make recovery partition" and click "Next" to enter...

