User manual
Page 3
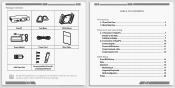
... an extension cable to Display 7 2-2 Connection of NanoPC 10 Connect display...10 Connect USB devices 11 Connect network cable 11 Connect power cord 12 BIOS Setup Enter BIOS Setup...14 Main...15 Advanced...16 Miscellaneous...17 Integrated Peripherals 18 SATA Configuration 19 Power...20 Package Contents NanoPC Seat Base VESA Mount Power...
... an extension cable to Display 7 2-2 Connection of NanoPC 10 Connect display...10 Connect USB devices 11 Connect network cable 11 Connect power cord 12 BIOS Setup Enter BIOS Setup...14 Main...15 Advanced...16 Miscellaneous...17 Integrated Peripherals 18 SATA Configuration 19 Power...20 Package Contents NanoPC Seat Base VESA Mount Power...
User manual
Page 10
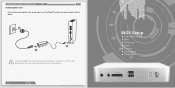
CAUTION PLACEMENT AND CONNECTING Connect power cord Connect the power adapter to the power input port of the NanoPC, and then press the power button to start it. 2 3 1 The power adapter is dissipating heat during normal use, please do not cover it and keep it away from your body to prevent injury from heat exposure. 12 BIOS Setup ■ Enter BIOS Setup ■ Main ■ Advanced ■ Power ■ Security ■ BootOptions ■ Save & Exit
CAUTION PLACEMENT AND CONNECTING Connect power cord Connect the power adapter to the power input port of the NanoPC, and then press the power button to start it. 2 3 1 The power adapter is dissipating heat during normal use, please do not cover it and keep it away from your body to prevent injury from heat exposure. 12 BIOS Setup ■ Enter BIOS Setup ■ Main ■ Advanced ■ Power ■ Security ■ BootOptions ■ Save & Exit
User manual
Page 11
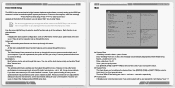
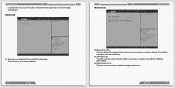
... boot menu." Press to input the value. It means, if your current access level. Main Advanced Power Security BootOptions Save & Exit System BIOS Project Version Build Date EC Version B34F1D29 09/10/2012 12.F1.01 Set the Date. Date-date from 1 to select a field. ...". Use [ENTER], [TAB] or [SHIFT-TAB] to configure the desired time. Copyright (C) 2011 American Megatrends, Inc. If 15 BIOS SETUP Enter BIOS Setup The BIOS is the communication bridge between Date elements. If you set up through this message is Administrator) F10: Save & Exit ESC: Exit Version...
... boot menu." Press to input the value. It means, if your current access level. Main Advanced Power Security BootOptions Save & Exit System BIOS Project Version Build Date EC Version B34F1D29 09/10/2012 12.F1.01 Set the Date. Date-date from 1 to select a field. ...". Use [ENTER], [TAB] or [SHIFT-TAB] to configure the desired time. Copyright (C) 2011 American Megatrends, Inc. If 15 BIOS SETUP Enter BIOS Setup The BIOS is the communication bridge between Date elements. If you set up through this message is Administrator) F10: Save & Exit ESC: Exit Version...
User manual
Page 12
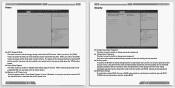
... Num-Lock Intel IGD Configuration IGFX-Boot Type [off] [CRT+HDMI] Select the keyboard NumLock state High Precision Event Timer Configuration High Precision Timer [Enabled] BIOS SETUP → ←: Select Screen ↑ ↓: Select Item Enter: Select +/-: Change Opt F7: Load User-defined Defaults F8: Save as User-defined F9: Optimized...
... Num-Lock Intel IGD Configuration IGFX-Boot Type [off] [CRT+HDMI] Select the keyboard NumLock state High Precision Event Timer Configuration High Precision Timer [Enabled] BIOS SETUP → ←: Select Screen ↑ ↓: Select Item Enter: Select +/-: Change Opt F7: Load User-defined Defaults F8: Save as User-defined F9: Optimized...

User manual
Page 13
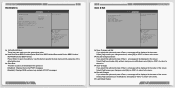
... Save as This item is used to set to support IDE mode. [AHCI] - This configures the SATA ports to enabled. 18 SATA Configuration BIOS SETUP Aptio Setup Utility - The Advanced Host Controller Interface (AHCI) specification describes the register level interface for a Host Controller for USB devices on legacy...Controller. ► Configure SATA as User-defined F9: Optimized Defaults (When Access Level is Administrator) F10: Save & Exit ESC: Exit Version 2.14.1219. BIOS SETUP Integrated Peripherals Aptio Setup Utility - Copyright (C) 2011 American Megatrends, Inc.
... Save as This item is used to set to support IDE mode. [AHCI] - This configures the SATA ports to enabled. 18 SATA Configuration BIOS SETUP Aptio Setup Utility - The Advanced Host Controller Interface (AHCI) specification describes the register level interface for a Host Controller for USB devices on legacy...Controller. ► Configure SATA as User-defined F9: Optimized Defaults (When Access Level is Administrator) F10: Save & Exit ESC: Exit Version 2.14.1219. BIOS SETUP Integrated Peripherals Aptio Setup Utility - Copyright (C) 2011 American Megatrends, Inc.
User manual
Page 14
...User Password Security option Installed Not Installed [Setup] Valid Keys: (1)a-z (A-Z) (2)0~9 (3)11 special keys:-=[];,./ (4)key pad:0-9 support and 5 special keys BIOS Write Protect [Enabled] → ←: Select Screen ↑ ↓: Select Item Enter: Select +/-: Change Opt F7: Load User-defined ...When Access Level is used to set the energy saving mode of the computer before it entering STR will be required to update BIOS. 21 Copyright (C) 2011 American Megatrends, Inc. Copyright (C) 2011 American Megatrends, Inc. ► Change Supervisor Password This item ...
...User Password Security option Installed Not Installed [Setup] Valid Keys: (1)a-z (A-Z) (2)0~9 (3)11 special keys:-=[];,./ (4)key pad:0-9 support and 5 special keys BIOS Write Protect [Enabled] → ←: Select Screen ↑ ↓: Select Item Enter: Select +/-: Change Opt F7: Load User-defined ...When Access Level is used to set the energy saving mode of the computer before it entering STR will be required to update BIOS. 21 Copyright (C) 2011 American Megatrends, Inc. Copyright (C) 2011 American Megatrends, Inc. ► Change Supervisor Password This item ...
User manual
Page 15
BIOS SETUP BootOptions Aptio Setup Utility - Main Advanced Power Security BootOptions Save & Exit Save Changes and Exit Discard Changes and Exit Save Changes Discard Changes Load ... the normal POST messages. [Enabled] : Displays OEM customer logo instead of the screen. Use this option and press , a message will be displayed in the screen. BIOS SETUP → ←: Select Screen ↑ ↓: Select Item Enter: Select +/-: Change Opt F7: Load User-defined Defaults F8: Save as User-defined F9: Optimized...
BIOS SETUP BootOptions Aptio Setup Utility - Main Advanced Power Security BootOptions Save & Exit Save Changes and Exit Discard Changes and Exit Save Changes Discard Changes Load ... the normal POST messages. [Enabled] : Displays OEM customer logo instead of the screen. Use this option and press , a message will be displayed in the screen. BIOS SETUP → ←: Select Screen ↑ ↓: Select Item Enter: Select +/-: Change Opt F7: Load User-defined Defaults F8: Save as User-defined F9: Optimized...
User manual
Page 16
BIOS SETUP Optimal defaults are the best settings of system components. Select [Yes] to save the changes done so far as User ... and press Enter, it will be displayed in the screen. Select and press , it will be displayed in the screen. By this default, BIOS have set cannot be set the optimal performance parameters of system to work. ► Save as user defaults, select [No] or to return...then press to the menu. 24 Install OS ■ Install Windows 7 ■ Install Drivers Always load the Optimal defaults after updating the BIOS or after clearing the CMOS values.
BIOS SETUP Optimal defaults are the best settings of system components. Select [Yes] to save the changes done so far as User ... and press Enter, it will be displayed in the screen. Select and press , it will be displayed in the screen. By this default, BIOS have set cannot be set the optimal performance parameters of system to work. ► Save as user defaults, select [No] or to return...then press to the menu. 24 Install OS ■ Install Windows 7 ■ Install Drivers Always load the Optimal defaults after updating the BIOS or after clearing the CMOS values.
User manual
Page 17
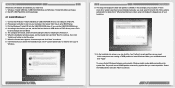
... button to select the installation type. So you will then ask you need select them and click "Drive options (advanced)" to save changes and exit BIOS. 5. Windows 7 Install USB Disk / USB DVD-ROM drive and Windows 7 Install CD (Other purchase) 2. When the license terms appear, choose ...accept and click "Next" to enter BIOS Setup. 3. NanoPC USB Flash Disk (In this example) of your modifications and click "Apply". When the installation windows popup, set the first boot ...
... button to select the installation type. So you will then ask you need select them and click "Drive options (advanced)" to save changes and exit BIOS. 5. Windows 7 Install USB Disk / USB DVD-ROM drive and Windows 7 Install CD (Other purchase) 2. When the license terms appear, choose ...accept and click "Next" to enter BIOS Setup. 3. NanoPC USB Flash Disk (In this example) of your modifications and click "Apply". When the installation windows popup, set the first boot ...

User manual
Page 20
... Operating Systems: ■ Windows 7 (32-bit) Please set the BIOS setting "BIOS Write Protect" or "Super BIOS Protect" to the physical motherboard for details. 32 UTILITY 1-2 Local Update - You can back up your system BIOS. Update BIOS This page helps you may need them to ensure if you know your... system BIOS information. After click "Update BIOS", An alert message will guide you to load a local BIOS file to Save 1-3 Local Update - UTILITY Fox WINFLASH ...
... Operating Systems: ■ Windows 7 (32-bit) Please set the BIOS setting "BIOS Write Protect" or "Super BIOS Protect" to the physical motherboard for details. 32 UTILITY 1-2 Local Update - You can back up your system BIOS. Update BIOS This page helps you may need them to ensure if you know your... system BIOS information. After click "Update BIOS", An alert message will guide you to load a local BIOS file to Save 1-3 Local Update - UTILITY Fox WINFLASH ...

