
English manual.
Page 5
... quickly damage your system. CAUTION ! tors. ■ If there is a PCI Express x16 graphics card installed in your computer : ■ It is recommended to come in order to avoid damage to the motherboard and CPU due to the internal connectors on the motherboard, make sure the power supply AC input voltage setting has been configured to the local standard. ■ To prevent damage to the...
... quickly damage your system. CAUTION ! tors. ■ If there is a PCI Express x16 graphics card installed in your computer : ■ It is recommended to come in order to avoid damage to the motherboard and CPU due to the internal connectors on the motherboard, make sure the power supply AC input voltage setting has been configured to the local standard. ■ To prevent damage to the...
English manual.
Page 6
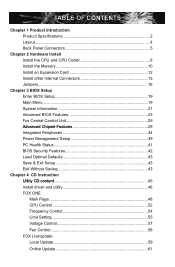
... 1 Product Introduction Product Specifications 2 Layout...4 Back Panel Connectors 5 Chapter 2 Hardware Install Install the CPU and CPU Cooler 8 Install the Memory 10 Install an Expansion Card 12 Install other Internal Connectors 13 Jumpers 16 Chapter 3 BIOS Setup Enter BIOS Setup 19 Main Menu 19 System Information 21 Advanced BIOS Features 23 Fox Central Control Unit 25 ......A.d.v.a.n.ce.d..C.h.ip.s.e.t.F.e.a.tu.r.e.s 29 Integrated Peripherals 34 Power Management Setup 39 PC Health Status 41 BIOS Security Features 42 Load Optimal Defaults 43 Save & Exit...
... 1 Product Introduction Product Specifications 2 Layout...4 Back Panel Connectors 5 Chapter 2 Hardware Install Install the CPU and CPU Cooler 8 Install the Memory 10 Install an Expansion Card 12 Install other Internal Connectors 13 Jumpers 16 Chapter 3 BIOS Setup Enter BIOS Setup 19 Main Menu 19 System Information 21 Advanced BIOS Features 23 Fox Central Control Unit 25 ......A.d.v.a.n.ce.d..C.h.ip.s.e.t.F.e.a.tu.r.e.s 29 Integrated Peripherals 34 Power Management Setup 39 PC Health Status 41 BIOS Security Features 42 Load Optimal Defaults 43 Save & Exit...

English manual.
Page 9
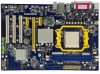
1 1-1 Product Specifications CPU Support AMD socket AM2+ PhenomTM� s��e�r�ie�s��p�r�o�c�e�s�s�o��rs S�up�p�o�rt�A�M�D��so�c�k�et�A�M�2�s�e�ri�e�s �pr�o�ce�s�s�o�rs Ath� lonTM 64X2 Dual-Core (
1 1-1 Product Specifications CPU Support AMD socket AM2+ PhenomTM� s��e�r�ie�s��p�r�o�c�e�s�s�o��rs S�up�p�o�rt�A�M�D��so�c�k�et�A�M�2�s�e�ri�e�s �pr�o�ce�s�s�o�rs Ath� lonTM 64X2 Dual-Core (
English manual.
Page 14
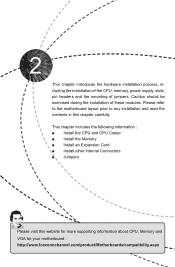
... website for more supporting information about CPU, Memory and VGA for your motherboard : http://www.foxconnchannel.com/product/Motherboards/compatibility.aspx This chapter includes the following information : ■ Install the CPU and CPU Cooler ■ Install the Memory ■ Install an Expansion Card ■ Install other Internal Connectors ■ Jumpers Please visit this chapter carefully. This chapter introduces the hardware installation process, including the installation of the CPU, memory, power supply, slots, pin headers and the mounting...
... website for more supporting information about CPU, Memory and VGA for your motherboard : http://www.foxconnchannel.com/product/Motherboards/compatibility.aspx This chapter includes the following information : ■ Install the CPU and CPU Cooler ■ Install the Memory ■ Install an Expansion Card ■ Install other Internal Connectors ■ Jumpers Please visit this chapter carefully. This chapter introduces the hardware installation process, including the installation of the CPU, memory, power supply, slots, pin headers and the mounting...
English manual.
Page 19
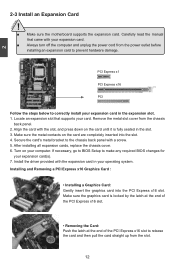
... slot. 12 If necessary, go to BIOS Setup to correctly install your expansion card. ■ Always turn off the computer and unplug the power cord from the chassis back panel. 2. PCI Express x1 PCI Express x16 PCI Follow the steps below to make any required BIOS changes for your operating system. After installing all expansion cards, replace the chassis cover. 6. Installing and Removing a PCI Express x16 Graphics Card : • Installing a Graphics Card: Gently insert the graphics card into the slot. 4. Locate an expansion slot...
... slot. 12 If necessary, go to BIOS Setup to correctly install your expansion card. ■ Always turn off the computer and unplug the power cord from the chassis back panel. 2. PCI Express x1 PCI Express x16 PCI Follow the steps below to make any required BIOS changes for your operating system. After installing all expansion cards, replace the chassis cover. 6. Installing and Removing a PCI Express x16 Graphics Card : • Installing a Graphics Card: Gently insert the graphics card into the slot. 4. Locate an expansion slot...
English manual.
Page 21
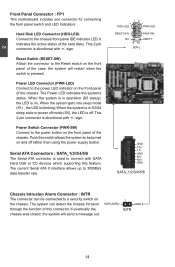
... panel IDE indicator LED. 2 Front Panel Connector : FP1 This motherboard includes one connector for connecting the front panel switch and LED Indicators. Power LED Connector (PWR-LED) Connect to connect with +/- The Power LED indicates the system's status. This 2-pin connector is blinking; Serial ATA Connectors : SATA_1/2/3/4/5/6 The Serial ATA connector is directional with SATA Hard Disk or CD devices which supporting this feature. The system can be turned on 1 the chassis. This 2-pin connector is used to the power LED indicator on the front panel of this switch...
... panel IDE indicator LED. 2 Front Panel Connector : FP1 This motherboard includes one connector for connecting the front panel switch and LED Indicators. Power LED Connector (PWR-LED) Connect to connect with +/- The Power LED indicates the system's status. This 2-pin connector is blinking; Serial ATA Connectors : SATA_1/2/3/4/5/6 The Serial ATA connector is directional with SATA Hard Disk or CD devices which supporting this feature. The system can be turned on 1 the chassis. This 2-pin connector is used to the power LED indicator on the front panel of this switch...
English manual.
Page 22
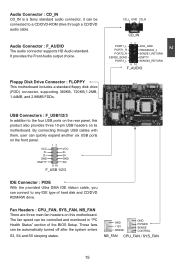
... the provided Ultra DMA IDE ribbon cable, you can connect to a CD/DVD-ROM drive through USB cables with them, user can be connected to any IDE type of the BIOS Setup. Fan Headers : CPU_FAN, SYS_FAN, NB_FAN There are three main fan headers on its motherboard. These fans can be controlled and monitored in "PC Health Status" section of hard disk and CD/DVD ROM/RW drive. Audio Connector : F_AUDIO The audio connector supports HD Audio standard. Floppy Disk Drive Connector : FLOPPY This motherboard includes a standard floppy disk drive (FDD) connector, supporting 360KB, 720KB,1.2MB...
... the provided Ultra DMA IDE ribbon cable, you can connect to a CD/DVD-ROM drive through USB cables with them, user can be connected to any IDE type of the BIOS Setup. Fan Headers : CPU_FAN, SYS_FAN, NB_FAN There are three main fan headers on its motherboard. These fans can be controlled and monitored in "PC Health Status" section of hard disk and CD/DVD ROM/RW drive. Audio Connector : F_AUDIO The audio connector supports HD Audio standard. Floppy Disk Drive Connector : FLOPPY This motherboard includes a standard floppy disk drive (FDD) connector, supporting 360KB, 720KB,1.2MB...
English manual.
Page 23
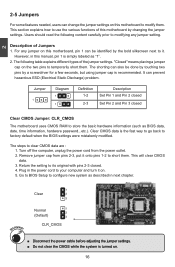
... short them . For any jumper setting. The shorting can be done by touching two pins by the bold silkscreen next to clear CMOS data are : 1. Turn off the computer, unplug the power cord from pins 2-3, put it . Plug in next chapter. 1 Clear 2 3 WARNING! Jumper 1 Diagram 1 1 Definition 1-2 2-3 Description Set Pin 1 and Pin 2 closed Set Pin 2 and Pin 3 closed . 4. This will clear CMOS data. 3. Clear CMOS data is simply labeled as BIOS data, date, time information, hardware password...
... short them . For any jumper setting. The shorting can be done by touching two pins by the bold silkscreen next to clear CMOS data are : 1. Turn off the computer, unplug the power cord from pins 2-3, put it . Plug in next chapter. 1 Clear 2 3 WARNING! Jumper 1 Diagram 1 1 Definition 1-2 2-3 Description Set Pin 1 and Pin 2 closed Set Pin 2 and Pin 3 closed . 4. This will clear CMOS data. 3. Clear CMOS data is simply labeled as BIOS data, date, time information, hardware password...
English manual.
Page 27
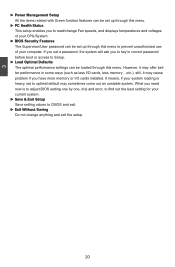
..., trial and error, to find out the best setting for your current system. ► Save & Exit Setup Save setting values to CMOS and exit. ► Exit Without Saving Do not change Fan speeds, and displays temperatures and voltages of your CPU/System. ► BIOS Security Features The Supervisor/User password can be set a password, the system will ask you to key in some ways (such as less I /O cards installed. However...
..., trial and error, to find out the best setting for your current system. ► Save & Exit Setup Save setting values to CMOS and exit. ► Exit Without Saving Do not change Fan speeds, and displays temperatures and voltages of your CPU/System. ► BIOS Security Features The Supervisor/User password can be set a password, the system will ask you to key in some ways (such as less I /O cards installed. However...
English manual.
Page 29
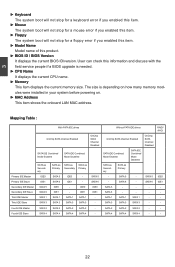
... service people if a BIOS upgrade is depending on how many memory modules were installed in your system before powering on. ► MAC Address This item shows the onboard LAN MAC address. Without PATA IDE drives OnChip SATA Channel Enabled SATA IDE Combined Mode Enabled SATA as Secondary SATA 5 SATA 6 SATA 1 SATA 3 SATA as Primary Secondary Primary SATA 5 SATA 6 IDE0 IDE1 SATA 1 SATA 3 IDE0 IDE1 SATA 1 SATA 3 IDE0 IDE1 SATA 1 SATA 3 OnChip SATA Channel Disabled SATA 5 SATA 6 IDE0 IDE1 - Fourth IDE Slave SATA 4 SATA 4 SATA 4 SATA 4 - RAID/ AHCI IDE0 IDE1 - SATA 2 SATA...
... service people if a BIOS upgrade is depending on how many memory modules were installed in your system before powering on. ► MAC Address This item shows the onboard LAN MAC address. Without PATA IDE drives OnChip SATA Channel Enabled SATA IDE Combined Mode Enabled SATA as Secondary SATA 5 SATA 6 SATA 1 SATA 3 SATA as Primary Secondary Primary SATA 5 SATA 6 IDE0 IDE1 SATA 1 SATA 3 IDE0 IDE1 SATA 1 SATA 3 IDE0 IDE1 SATA 1 SATA 3 OnChip SATA Channel Disabled SATA 5 SATA 6 IDE0 IDE1 - Fourth IDE Slave SATA 4 SATA 4 SATA 4 SATA 4 - RAID/ AHCI IDE0 IDE1 - SATA 2 SATA...
English manual.
Page 32
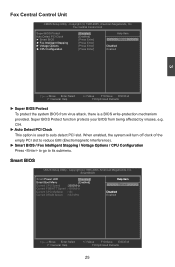
... Current CPU Multiplier : 13x D� � isab� led Current DRAM Speed : 533 MHz Enabled Move Enter:Select +/-/:Value F10:Save ESC:Exit F1:General Help F9:Optimized Defaults 25 Smart BIOS CMOS Setup Utility - Copyright (C) 1985-2005, American Megatrends, Inc. Smart BIOS Smart P�o�we�r �LE�D D��is used to its submenu. When enabled, the system will turn off clock of the empty PCI slot...
... Current CPU Multiplier : 13x D� � isab� led Current DRAM Speed : 533 MHz Enabled Move Enter:Select +/-/:Value F10:Save ESC:Exit F1:General Help F9:Optimized Defaults 25 Smart BIOS CMOS Setup Utility - Copyright (C) 1985-2005, American Megatrends, Inc. Smart BIOS Smart P�o�we�r �LE�D D��is used to its submenu. When enabled, the system will turn off clock of the empty PCI slot...

English manual.
Page 33
...; CPU Clock Adjust This option is used to adjust the CPU clock. ► PCIE Clock Adjust This option is used to get into your motherboard to enter smart boot menu. It may enhance the graphics card speed. 26 If [Disabled] is selected, then pressing [Esc] has no function. Enter Setup or Skip No CPU Fan Continue blinking On (1/2sec.), Off (1/2sec.) Reboot & Fan OK ► Smart Boot Menu When PC starts, it displays POST state by different long-short blinking intervals. 3 ► Smart Power LED (Optional) Smart Power LED...
...; CPU Clock Adjust This option is used to adjust the CPU clock. ► PCIE Clock Adjust This option is used to get into your motherboard to enter smart boot menu. It may enhance the graphics card speed. 26 If [Disabled] is selected, then pressing [Esc] has no function. Enter Setup or Skip No CPU Fan Continue blinking On (1/2sec.), Off (1/2sec.) Reboot & Fan OK ► Smart Boot Menu When PC starts, it displays POST state by different long-short blinking intervals. 3 ► Smart Power LED (Optional) Smart Power LED...

English manual.
Page 41
..., Inc. By installing a boot ROM in the network board, you set up a diskless workstation on the network to be booted remotely. ► HD Audio Controller This item is used to enable or disable the onboard LAN boot optional ROM. Integrated Peripherals ►���I�D�E���C�o�n��fi�g�u�r�a�t�io�n� [Press Enter] Help Item U�...
..., Inc. By installing a boot ROM in the network board, you set up a diskless workstation on the network to be booted remotely. ► HD Audio Controller This item is used to enable or disable the onboard LAN boot optional ROM. Integrated Peripherals ►���I�D�E���C�o�n��fi�g�u�r�a�t�io�n� [Press Enter] Help Item U�...

English manual.
Page 42
... for a Host Controller for old Windows system. ► SATA IDE Combined Mode [Disabled] : Disable SATA ports 5, 6. [Enabled] : SATA ports 5, 6 are displayed as IDE Channel 0 Master/Slave and IDE Channel 1 Master/Slave in "System Information" menu. 35 This configures the SATA ports to get its specification. IDE Configuration CMOS Setup Utility - Options : [Native IDE]; [RAID]; [AHCI]; [Legacy IDE]. [Native IDE] - Four drives are used to support native IDE mode. [RAID] - The specification includes a description of your SATA drives must also support AHCI. [AHCI] -
... for a Host Controller for old Windows system. ► SATA IDE Combined Mode [Disabled] : Disable SATA ports 5, 6. [Enabled] : SATA ports 5, 6 are displayed as IDE Channel 0 Master/Slave and IDE Channel 1 Master/Slave in "System Information" menu. 35 This configures the SATA ports to get its specification. IDE Configuration CMOS Setup Utility - Options : [Native IDE]; [RAID]; [AHCI]; [Legacy IDE]. [Native IDE] - Four drives are used to support native IDE mode. [RAID] - The specification includes a description of your SATA drives must also support AHCI. [AHCI] -

English manual.
Page 48
... is used to enable or disable case open warning function. ► CPU/System Temperature The CPU/System temperature are automatically detected and displayed by the system. ► CPU Fan/System Fan Speed The CPU fan/System fan speed are automatically detected and displayed by the system. ► CPU Core/DRAM Voltage/+ 3.3V/+12.0V/+1.1V The current voltages are automatically detected and displayed by the system. ► CPU Smart Fan Function / System Smart Fan Function This option is used to enable or disable smart fan...
... is used to enable or disable case open warning function. ► CPU/System Temperature The CPU/System temperature are automatically detected and displayed by the system. ► CPU Fan/System Fan Speed The CPU fan/System fan speed are automatically detected and displayed by the system. ► CPU Core/DRAM Voltage/+ 3.3V/+12.0V/+1.1V The current voltages are automatically detected and displayed by the system. ► CPU Smart Fan Function / System Smart Fan Function This option is used to enable or disable smart fan...

English manual.
Page 52
Some auto features help user to improve (or overclock) your PC screen to guide you how to install all the drivers have been installed. FOX ONE B. Microsoft DirectX 9.0 F. Create RAID Driver Floppy I. You can simply put it into your CD/DVD-ROM drive, and the main menu will be displayed on your system without going to change your computer after all the drivers for your system. AMD RAID Driver 2. Software Utilities Use these options to install. 1. Adobe Acrobat...
Some auto features help user to improve (or overclock) your PC screen to guide you how to install all the drivers have been installed. FOX ONE B. Microsoft DirectX 9.0 F. Create RAID Driver Floppy I. You can simply put it into your CD/DVD-ROM drive, and the main menu will be displayed on your system without going to change your computer after all the drivers for your system. AMD RAID Driver 2. Software Utilities Use these options to install. 1. Adobe Acrobat...

English manual.
Page 77
... use . 4. Use Administrative Tools in Control Panel to set RAID enabled in your current Windows XP system. 4. Several SATA hard disks. 3. Several SATA hard disks. 4. Creating a Non-Bootable Array - A motherboard driver CD. 70 5 Creating a Bootable Array - Installing a new Windows XP (or Vista) in BIOS. 2. Follow 5-1 to Install a new Windows Operating System. Follow 5-3 to build a new RAID array in BIOS. 3. Follow 5-4 to create a RAID driver diskette. 2. A floppy drive. 2. A DVD-ROM drive. 3. A RAID driver diskette. 5. Follow 5-3 to install AMD RAID driver...
... use . 4. Use Administrative Tools in Control Panel to set RAID enabled in your current Windows XP system. 4. Several SATA hard disks. 3. Several SATA hard disks. 4. Creating a Non-Bootable Array - A motherboard driver CD. 70 5 Creating a Bootable Array - Installing a new Windows XP (or Vista) in BIOS. 2. Follow 5-1 to Install a new Windows Operating System. Follow 5-3 to build a new RAID array in BIOS. 3. Follow 5-4 to create a RAID driver diskette. 2. A floppy drive. 2. A DVD-ROM drive. 3. A RAID driver diskette. 5. Follow 5-3 to install AMD RAID driver...

English manual.
Page 84
... IDE controller Both: Enable both IDE controllers. Move Enter:Select +/-/:Value F10:Save ESC:Exit F1:General Help F9:Optimized Defaults 5-3 Select a RAID Array for hard drive or DVD connection. 4. Enable RAID function and individual SATA port for Use When BIOS is restarted, it will display a message asking you to press [Ctrl-F] key to save the setting then PC will reboot itself. CMOS Setup Utility - Select the "Integrated Peripherals" from the "Main menu", then select the "IDE Configuration" menu...
... IDE controller Both: Enable both IDE controllers. Move Enter:Select +/-/:Value F10:Save ESC:Exit F1:General Help F9:Optimized Defaults 5-3 Select a RAID Array for hard drive or DVD connection. 4. Enable RAID function and individual SATA port for Use When BIOS is restarted, it will display a message asking you to press [Ctrl-F] key to save the setting then PC will reboot itself. CMOS Setup Utility - Select the "Integrated Peripherals" from the "Main menu", then select the "IDE Configuration" menu...

English manual.
Page 98
... will load support for the following picture appears, press to specify additional mass storage devices for which you do not want to continue the specific driver installation. 5 5. Windows Setup Setup could not determine the type of one or more mass storage devices installed in your system, the following mass storage device(s): * To specify additional SCSI adapters, CD-ROM drivers, or special disk controllers for use with Windows, including those for use with Windows, press ENTER.
... will load support for the following picture appears, press to specify additional mass storage devices for which you do not want to continue the specific driver installation. 5 5. Windows Setup Setup could not determine the type of one or more mass storage devices installed in your system, the following mass storage device(s): * To specify additional SCSI adapters, CD-ROM drivers, or special disk controllers for use with Windows, including those for use with Windows, press ENTER.

English manual.
Page 101
...;y�p�e� [RAID] controller. Though we highly recommend you using different brand of the motherboard. SATA IDE Combined Mode [Enabled] Primary: Enable only Combined Mode Option [SATA as a mirrored RAID1 array, they are : Hitachi HDT725025VLA3, (250.05GB) connected to "IDE Configuration" menu. Copyright (C) 1985-2005, American Megatrends, Inc. 5 5-5 Setting Up a Non-Bootable RAID Array This section assumes the following setup : ■ Boot Disk with the same brand, size and model number. Reboot your...
...;y�p�e� [RAID] controller. Though we highly recommend you using different brand of the motherboard. SATA IDE Combined Mode [Enabled] Primary: Enable only Combined Mode Option [SATA as a mirrored RAID1 array, they are : Hitachi HDT725025VLA3, (250.05GB) connected to "IDE Configuration" menu. Copyright (C) 1985-2005, American Megatrends, Inc. 5 5-5 Setting Up a Non-Bootable RAID Array This section assumes the following setup : ■ Boot Disk with the same brand, size and model number. Reboot your...


