English manual
Page 1
A74MX Series Motherboard User's Manual
A74MX Series Motherboard User's Manual
English manual
Page 2
... use of this symbol indicates that can help prevent potential negative consequences for A74MX Series motherboard. For more information about recycling of these changes. All images are for specific features. WARNING! CAUTION Statement: This manual is disposed of Foxconn, Inc. Version: User's Manual V1.0 for the environment and human health, which could otherwise be caused...
... use of this symbol indicates that can help prevent potential negative consequences for A74MX Series motherboard. For more information about recycling of these changes. All images are for specific features. WARNING! CAUTION Statement: This manual is disposed of Foxconn, Inc. Version: User's Manual V1.0 for the environment and human health, which could otherwise be caused...

English manual
Page 19
2 CAUTION 2-3 Install an Expansion Card ! ■ Make sure the motherboard supports the expansion card. Secure the card's metal bracket to make any required BIOS changes for your expansion card(s). 7. Install the driver provided with your ... slot. 12 Make sure the graphics card is fully seated in the slot. 3. Align the card with a screw. 5. Turn on your card. Carefully read the manual that supports your computer. After installing all expansion cards, replace the chassis cover. 6.
2 CAUTION 2-3 Install an Expansion Card ! ■ Make sure the motherboard supports the expansion card. Secure the card's metal bracket to make any required BIOS changes for your expansion card(s). 7. Install the driver provided with your ... slot. 12 Make sure the graphics card is fully seated in the slot. 3. Align the card with a screw. 5. Turn on your card. Carefully read the manual that supports your computer. After installing all expansion cards, replace the chassis cover. 6.
English manual
Page 24
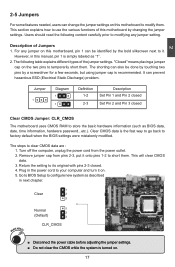
...;t�in�g��t�h�e��ju�m��p��e�r�s�e��tt�in this motherboard, pin 1 can be done by touching two pins by a screwdriver for a few seconds, but using jumper cap is the fast ... will clear CMOS data. 3. Go to BIOS Setup to configure new system as described in the power cord to modifying any jumper on this manual, pin 1 is simply labeled as BIOS data, date, time information, hardware password...etc.). Users should read the following table explains different types ...
...;t�in�g��t�h�e��ju�m��p��e�r�s�e��tt�in this motherboard, pin 1 can be done by touching two pins by a screwdriver for a few seconds, but using jumper cap is the fast ... will clear CMOS data. 3. Go to BIOS Setup to configure new system as described in the power cord to modifying any jumper on this manual, pin 1 is simply labeled as BIOS data, date, time information, hardware password...etc.). Users should read the following table explains different types ...
English manual
Page 39
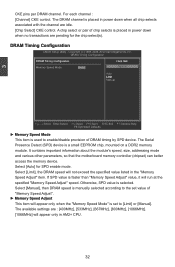
...�io�n H�elp�I�te�m Memory Speed Mode A�ut�o]]� Options Auto� Limit Manual Move Enter:Select +/-/:Value F10:Save ESC:Exit F1:General Help F9:Optimized Defaults ► Memory Speed Mode This item is placed...+ CPU. 32 It contains important information about the module's speed, size, addressing mode and various other parameters, so that the motherboard memory controller (chipset) can better access the memory device. Select [Limit], the DRAM speed will appear only when the "Memory ...
...�io�n H�elp�I�te�m Memory Speed Mode A�ut�o]]� Options Auto� Limit Manual Move Enter:Select +/-/:Value F10:Save ESC:Exit F1:General Help F9:Optimized Defaults ► Memory Speed Mode This item is placed...+ CPU. 32 It contains important information about the module's speed, size, addressing mode and various other parameters, so that the motherboard memory controller (chipset) can better access the memory device. Select [Limit], the DRAM speed will appear only when the "Memory ...


