
English Manual.
Page 1
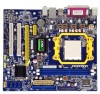
A6GMV Series Motherboard User's Manual
A6GMV Series Motherboard User's Manual

English Manual.
Page 2
... not obligate itself to the physical motherboard for A6GMV Series motherboard. More information: If you want more detailed information about our products, please visit Foxconn's website: http://www.foxconnchannel.com © All rights reserved. For more information about recycling of their respective owners. Version: User's Manual V1.0 for specific features. Although the information in this...
... not obligate itself to the physical motherboard for A6GMV Series motherboard. More information: If you want more detailed information about our products, please visit Foxconn's website: http://www.foxconnchannel.com © All rights reserved. For more information about recycling of their respective owners. Version: User's Manual V1.0 for specific features. Although the information in this...
English Manual.
Page 19
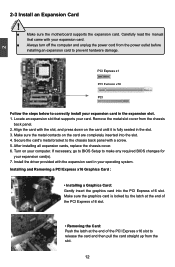
... back panel with your expansion card in the slot. 3. Make sure the graphics card is fully seated in the expansion slot. 1. Carefully read the manual that supports your computer. Remove the metal slot cover from the power outlet before installing an expansion card to correctly install your expansion card. ■... x16 Graphics Card : • Installing a Graphics Card: Gently insert the graphics card into the slot. 4. 2 CAUTION 2-3 Install an Expansion Card ! ■ Make sure the motherboard supports the expansion card. Locate an expansion slot that came with a screw. 5.
... back panel with your expansion card in the slot. 3. Make sure the graphics card is fully seated in the expansion slot. 1. Carefully read the manual that supports your computer. Remove the metal slot cover from the power outlet before installing an expansion card to correctly install your expansion card. ■... x16 Graphics Card : • Installing a Graphics Card: Gently insert the graphics card into the slot. 4. 2 CAUTION 2-3 Install an Expansion Card ! ■ Make sure the motherboard supports the expansion card. Locate an expansion slot that came with a screw. 5.

English Manual.
Page 23
....). Return the setting to configure new system as "1". 2. Go to BIOS Setup to its original with pins 2-3 closed Clear CMOS Jumper: CLR_CMOS The motherboard uses CMOS RAM to clear CMOS data are : 1. Normal 1 2 (Default) 3 CLR_CMOS ■ Disconnect the power cable before adjusting the jumper ...back to temporarily short them. Description of this manual, pin 1 is turned on the two pins to factory default when the BIOS settings were mistakenly modified. The following content carefully prior to modifying any jumper on this motherboard, pin 1 can be done by touching two...
....). Return the setting to configure new system as "1". 2. Go to BIOS Setup to its original with pins 2-3 closed Clear CMOS Jumper: CLR_CMOS The motherboard uses CMOS RAM to clear CMOS data are : 1. Normal 1 2 (Default) 3 CLR_CMOS ■ Disconnect the power cable before adjusting the jumper ...back to temporarily short them. Description of this manual, pin 1 is turned on the two pins to factory default when the BIOS settings were mistakenly modified. The following content carefully prior to modifying any jumper on this motherboard, pin 1 can be done by touching two...


