User Manual
Page 1
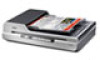
... may need to create. Scanning Your Originals Follow the step-by-step instructions here to place your original documents or photos on the scanner. Safety Copyright and Trademarks Operating System Versions Guide to the Scanner Parts Check this section to maintain and transport your original is in. Technical Specifications Check here for technical...
... may need to create. Scanning Your Originals Follow the step-by-step instructions here to place your original documents or photos on the scanner. Safety Copyright and Trademarks Operating System Versions Guide to the Scanner Parts Check this section to maintain and transport your original is in. Technical Specifications Check here for technical...
User Manual
Page 4
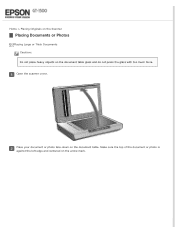
Home > Placing Originals on the Scanner Placing Originals on the Scanner Follow the steps here to place your original documents or photos on the scanner. Placing Documents or Photos Loading Documents in the Automatic Document Feeder
Home > Placing Originals on the Scanner Placing Originals on the Scanner Follow the steps here to place your original documents or photos on the scanner. Placing Documents or Photos Loading Documents in the Automatic Document Feeder
User Manual
Page 6
Text Enhancement Scanning to a PDF File Restoring Color Removing Dust Marks Fixing Backlit Photos Using the Scanner as a Copier Scanning Directly to an E-mail Converting Scanned Documents Into Editable Text Assigning a Program to create. Home > Scanning Special Projects Scanning Special Projects Follow these instructions for specific scanning projects you may need to a Scanner Button
Text Enhancement Scanning to a PDF File Restoring Color Removing Dust Marks Fixing Backlit Photos Using the Scanner as a Copier Scanning Directly to an E-mail Converting Scanned Documents Into Editable Text Assigning a Program to create. Home > Scanning Special Projects Scanning Special Projects Follow these instructions for specific scanning projects you may need to a Scanner Button
User Manual
Page 8
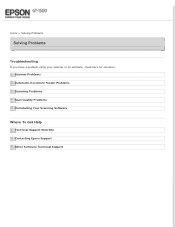
Home > Solving Problems Solving Problems Troubleshooting If you have a problem using your scanner or its software, check here for solutions. Scanner Problems Automatic Document Feeder Problems Scanning Problems Scan Quality Problems Uninstalling Your Scanning Software Where To Get Help Technical Support Web Site Contacting Epson Support Other Software Technical Support
Home > Solving Problems Solving Problems Troubleshooting If you have a problem using your scanner or its software, check here for solutions. Scanner Problems Automatic Document Feeder Problems Scanning Problems Scan Quality Problems Uninstalling Your Scanning Software Where To Get Help Technical Support Web Site Contacting Epson Support Other Software Technical Support
User Manual
Page 10
... Read all these instructions, and follow all devices plugged into the extension cord does not exceed the cord's ampere rating. Place the scanner and the AC adapter near excessive dirt or dust, water, heat sources, or in locations subject to keep both devices connected by the...power source indicated on or run over. Use only the type of this product. When connecting this document, warnings, cautions, and notes indicate the following: Warnings must be stepped on the scanner's label. Caution: Be sure the AC power cord meets the relevant local safety standards. Avoid ...
... Read all these instructions, and follow all devices plugged into the extension cord does not exceed the cord's ampere rating. Place the scanner and the AC adapter near excessive dirt or dust, water, heat sources, or in locations subject to keep both devices connected by the...power source indicated on or run over. Use only the type of this product. When connecting this document, warnings, cautions, and notes indicate the following: Warnings must be stepped on the scanner's label. Caution: Be sure the AC power cord meets the relevant local safety standards. Avoid ...

User Manual
Page 15
For instructions on using the Text Enhancement feature in Epson Scan. Home > Overview of Your Scanner Features Text Enhancement When you scan documents, you can sharpen the text and increase accuracy by using this feature, see Text Enhancement.
For instructions on using the Text Enhancement feature in Epson Scan. Home > Overview of Your Scanner Features Text Enhancement When you scan documents, you can sharpen the text and increase accuracy by using this feature, see Text Enhancement.
User Manual
Page 19
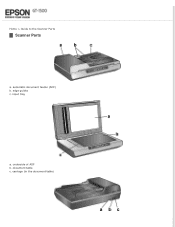
input tray a. carriage (in the document table) edge guides c. automatic document feeder (ADF) b. underside of ADF b. document table c. Home > Guide to the Scanner Parts Scanner Parts a.
input tray a. carriage (in the document table) edge guides c. automatic document feeder (ADF) b. underside of ADF b. document table c. Home > Guide to the Scanner Parts Scanner Parts a.
User Manual
Page 22
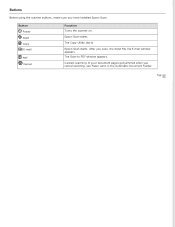
The Scan to PDF window appears. Button Power Start Copy E-mail PDF Cancel Function Turns the scanner on. Cancels scanning. Top The Copy Utility starts. If your document pages get jammed when you scan, the Send File Via E-mail window appears. Epson Scan starts. After you cancel scanning, see Paper Jams in the Automatic Document Feeder. Epson Scan starts. Buttons Before using the scanner buttons, make sure you have installed Epson Scan.
The Scan to PDF window appears. Button Power Start Copy E-mail PDF Cancel Function Turns the scanner on. Cancels scanning. Top The Copy Utility starts. If your document pages get jammed when you scan, the Send File Via E-mail window appears. Epson Scan starts. After you cancel scanning, see Paper Jams in the Automatic Document Feeder. Epson Scan starts. Buttons Before using the scanner buttons, make sure you have installed Epson Scan.
User Manual
Page 23
Open the scanner cover. Home > Placing Originals on the Scanner Placing Documents or Photos Placing Large or Thick Documents Caution: Do not place heavy objects on the arrow mark. Make sure the top of the document or photo is against the left edge and centered on the document table glass and do not press the glass with too much force. Place your document or photo face-down on the document table.
Open the scanner cover. Home > Placing Originals on the Scanner Placing Documents or Photos Placing Large or Thick Documents Caution: Do not place heavy objects on the arrow mark. Make sure the top of the document or photo is against the left edge and centered on the document table glass and do not press the glass with too much force. Place your document or photo face-down on the document table.
User Manual
Page 24
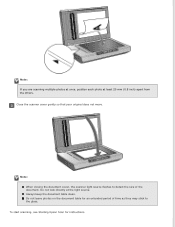
Close the scanner cover gently so that your original does not move. Always keep the document table clean. Do not leave photos on the document table for instructions. Note: When closing the document cover, the scanner light source flashes to the glass. To start scanning, see Starting Epson Scan for an extended period of time as they may stick to detect the size of the document. Do not look directly at least 20 mm (0.8 inch) apart from the others. Note: If you are scanning multiple photos at once, position each photo at the light source.
Close the scanner cover gently so that your original does not move. Always keep the document table clean. Do not leave photos on the document table for instructions. Note: When closing the document cover, the scanner light source flashes to the glass. To start scanning, see Starting Epson Scan for an extended period of time as they may stick to detect the size of the document. Do not look directly at least 20 mm (0.8 inch) apart from the others. Note: If you are scanning multiple photos at once, position each photo at the light source.

User Manual
Page 26
...in the ADF. You can load up to 120 g/m2 High-quality paper, Bond paper, Check paper, Recycled paper Make sure your documents meet the following conditions before loading them into the ADF. The ink is not ripped or wrinkled. these may damage the feeder mechanism.... See Loading Documents in the ADF for instructions on the Scanner Loading Documents in the Automatic Document Feeder Document Specifications Loading Documents in the ADF You can load your original documents in the ADF. The document has no holes and is dry. The document has no cut-out areas. Top...
...in the ADF. You can load up to 120 g/m2 High-quality paper, Bond paper, Check paper, Recycled paper Make sure your documents meet the following conditions before loading them into the ADF. The ink is not ripped or wrinkled. these may damage the feeder mechanism.... See Loading Documents in the ADF for instructions on the Scanner Loading Documents in the Automatic Document Feeder Document Specifications Loading Documents in the ADF You can load your original documents in the ADF. The document has no holes and is dry. The document has no cut-out areas. Top...

User Manual
Page 36
See Paper Jams in the ADF. If you need to stop scanning, press the Cancel button on the scanner. What happens next depends on removing the pages. Your document pages may get jammed in the Automatic Document Feeder for instructions. If you have problems while scanning using the ADF, see Automatic Document Feeder Problems. Top See Finishing the Scan for instructions on how you started your scan.
See Paper Jams in the ADF. If you need to stop scanning, press the Cancel button on the scanner. What happens next depends on removing the pages. Your document pages may get jammed in the Automatic Document Feeder for instructions. If you have problems while scanning using the ADF, see Automatic Document Feeder Problems. Top See Finishing the Scan for instructions on how you started your scan.

User Manual
Page 42
Your document pages may get jammed in the Automatic Document Feeder for instructions. See Paper Jams in the ADF. What happens next depends on the scanner. Top See Finishing the Scan for instructions on removing the pages. Note: If you need to stop scanning, press the Cancel button on how you started your scan.
Your document pages may get jammed in the Automatic Document Feeder for instructions. See Paper Jams in the ADF. What happens next depends on the scanner. Top See Finishing the Scan for instructions on removing the pages. Note: If you need to stop scanning, press the Cancel button on how you started your scan.

User Manual
Page 62
See one of 600 dpi or less. Press the scanner. Note: You can sharpen the text and increase accuracy by using a resolution of these sections are for instructions on the document table or in the ADF. Home > Scanning Special Projects Text Enhancement ...Documents or Photos or Loading Documents in these sections for scanning to PDF Settings window. See Converting Scanned Documents Into Editable Text for instructions. PDF button on the When you see the Scan to a PDF file, but text enhancement is also effective when you scan using the Text Enhancement feature in Epson...
See one of 600 dpi or less. Press the scanner. Note: You can sharpen the text and increase accuracy by using a resolution of these sections are for instructions on the document table or in the ADF. Home > Scanning Special Projects Text Enhancement ...Documents or Photos or Loading Documents in these sections for scanning to PDF Settings window. See Converting Scanned Documents Into Editable Text for instructions. PDF button on the When you see the Scan to a PDF file, but text enhancement is also effective when you scan using the Text Enhancement feature in Epson...

User Manual
Page 63
...Settings window, then click Scan or press the Epson Scan scans your document on the document table or in the ADF. Click the Text Enhancement check box. See Placing Documents or Photos or Loading Documents in the Automatic Document Feeder for instructions. For details, Scanning in ...Type, Document Source, Size, and Resolution settings. Make any other necessary image adjustments. See Starting Epson Scan for instructions. For details, see Scanning Using the PDF Button. See Adjusting the Color and Other Image Settings for details. Start button on the scanner. Click ...
...Settings window, then click Scan or press the Epson Scan scans your document on the document table or in the ADF. Click the Text Enhancement check box. See Placing Documents or Photos or Loading Documents in the Automatic Document Feeder for instructions. For details, Scanning in ...Type, Document Source, Size, and Resolution settings. Make any other necessary image adjustments. See Starting Epson Scan for instructions. For details, see Scanning Using the PDF Button. See Adjusting the Color and Other Image Settings for details. Start button on the scanner. Click ...

User Manual
Page 66
... specify the page number to be included in Professional Mode Double-sided Scanning The easiest way to scan multiple document pages to a PDF file is to press the PDF button on the scanner. If you can look for words in the file. (This feature may not be available in some countries.) ...in Home Mode Professional Mode: Scanning to a PDF File in Professional Mode Scanning Using the PDF Button Place your scanner to use some of these sections to start scanning to a PDF file. Using Epson Scan, you are automatically created. Specifying the number of pages in a single PDF file: You can specify ...
... specify the page number to be included in Professional Mode Double-sided Scanning The easiest way to scan multiple document pages to a PDF file is to press the PDF button on the scanner. If you can look for words in the file. (This feature may not be available in some countries.) ...in Home Mode Professional Mode: Scanning to a PDF File in Professional Mode Scanning Using the PDF Button Place your scanner to use some of these sections to start scanning to a PDF file. Using Epson Scan, you are automatically created. Specifying the number of pages in a single PDF file: You can specify ...

User Manual
Page 70
...settings, and click OK. You see the Text tab. Repeat this step for each page in your document and click OK. You return to PDF Settings window, then click Scan or press the Epson Scan scans your country, you need to continue. Note: The Text tab is available only when ... rest of the current PDF settings, click Options. Select the settings that match your document. If you are scanning more than 40 pages, you are scanning multiple pages using the document table, replace the first page on the scanner. Click Close to close the Scan to the File Save Settings window.
...settings, and click OK. You see the Text tab. Repeat this step for each page in your document and click OK. You return to PDF Settings window, then click Scan or press the Epson Scan scans your country, you need to continue. Note: The Text tab is available only when ... rest of the current PDF settings, click Options. Select the settings that match your document. If you are scanning more than 40 pages, you are scanning multiple pages using the document table, replace the first page on the scanner. Click Close to close the Scan to the File Save Settings window.

User Manual
Page 71
... settings are finished, click Finish or press the PDF button on the document table or in the ADF. See Starting Epson Scan for instructions. Make any other necessary image adjustments. Top Scanning to preview your image(s), then select your document on the scanner. Click Scan. The File Save Settings window appears. Select PDF as...
... settings are finished, click Finish or press the PDF button on the document table or in the ADF. See Starting Epson Scan for instructions. Make any other necessary image adjustments. Top Scanning to preview your image(s), then select your document on the scanner. Click Scan. The File Save Settings window appears. Select PDF as...

Product Specifications
Page 1
... touch scan to 8.5" x 14" Quality • Achieve remarkable clarity and detail - 1200 x 2400 dpi resolution • ReadyScan® LED technology - document management software included • Easily take on any project - WorkForce® Document Scanner GT-150 0 Productivity • Get more done - one-touch scanning • Scan originals in a variety of sizes - from 5.9" x 5.9" to PDF, email...
... touch scan to 8.5" x 14" Quality • Achieve remarkable clarity and detail - 1200 x 2400 dpi resolution • ReadyScan® LED technology - document management software included • Easily take on any project - WorkForce® Document Scanner GT-150 0 Productivity • Get more done - one-touch scanning • Scan originals in a variety of sizes - from 5.9" x 5.9" to PDF, email...
Product Specifications
Page 2
... Your Vision is a registered logomark and Better Products for convenient and reasonable recycling options at 200 dpi in these marks. Copyright 2013 Epson America, Inc. 4/13 CPD-37889R1 Document Scanner Product Name WorkForce GT-1500 Scanner Type Photoelectric Device Optical Resolution Hardware Resolution Maximum Resolution Effective Pixels Color Scan Mode (bit depth) Grayscale Scan Mode (bit depth...
... Your Vision is a registered logomark and Better Products for convenient and reasonable recycling options at 200 dpi in these marks. Copyright 2013 Epson America, Inc. 4/13 CPD-37889R1 Document Scanner Product Name WorkForce GT-1500 Scanner Type Photoelectric Device Optical Resolution Hardware Resolution Maximum Resolution Effective Pixels Color Scan Mode (bit depth) Grayscale Scan Mode (bit depth...


