
Important Setup Information
Page 1
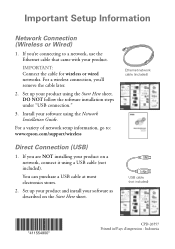
Set up your product and install your software as described on a network, connect it using a USB cable (not included). Install your product. Set up your product on the Start Here sheet. If you're connecting to : www.epson.com/support/wireless Direct Connection (USB) 1. ...IMPORTANT: Connect the cable for wireless or wired networks. For a wireless connection, you are NOT installing your product using the Network Installation Guide. DO NOT follow the software installation steps under "USB connection." 3....
Set up your product and install your software as described on a network, connect it using a USB cable (not included). Install your product. Set up your product on the Start Here sheet. If you're connecting to : www.epson.com/support/wireless Direct Connection (USB) 1. ...IMPORTANT: Connect the cable for wireless or wired networks. For a wireless connection, you are NOT installing your product using the Network Installation Guide. DO NOT follow the software installation steps under "USB connection." 3....
Network Installation Guide
Page 4
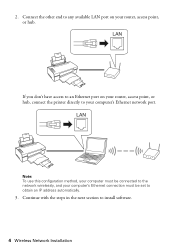
Note: To use this configuration method, your computer must be connected to your computer's Ethernet network port. Connect the other end to any available LAN port on your router, access point, or hub, connect the printer directly to the network wirelessly, and your router, access point, or hub. Continue with the steps in the next section to obtain an IP address automatically. 3. 2. If you don't have access to an Ethernet port on your computer's Ethernet connection must be set to install software. 4 Wireless Network Installation
Note: To use this configuration method, your computer must be connected to your computer's Ethernet network port. Connect the other end to any available LAN port on your router, access point, or hub, connect the printer directly to the network wirelessly, and your router, access point, or hub. Continue with the steps in the next section to obtain an IP address automatically. 3. 2. If you don't have access to an Ethernet port on your computer's Ethernet connection must be set to install software. 4 Wireless Network Installation
Network Installation Guide
Page 5
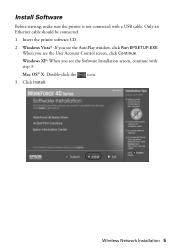
Mac OS® X: Double-click the icon. 3. Insert the printer software CD. 2. Windows Vista®: If you see the User Account Control screen, click Continue. Only an Ethernet cable should be connected. 1. Windows XP: When you see the AutoPlay window, click Run EPSETUP.EXE. Install Software Before starting, make sure the printer is not connected with step 3. When you see the Software Installation screen, continue with a USB cable. Wireless Network Installation 5 Click Install.
Mac OS® X: Double-click the icon. 3. Insert the printer software CD. 2. Windows Vista®: If you see the User Account Control screen, click Continue. Only an Ethernet cable should be connected. 1. Windows XP: When you see the AutoPlay window, click Run EPSETUP.EXE. Install Software Before starting, make sure the printer is not connected with step 3. When you see the Software Installation screen, continue with a USB cable. Wireless Network Installation 5 Click Install.
Network Installation Guide
Page 6
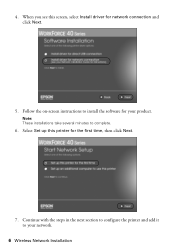
Follow the on-screen instructions to install the software for network connection and click Next. 5. Note: These installations take several minutes to your product. 4. Continue with the steps in the next section to configure the printer and add it to complete. 6. When you see this printer for the first time, then click Next. 7. Select Set up this screen, select Install driver for your network. 6 Wireless Network Installation
Follow the on-screen instructions to install the software for network connection and click Next. 5. Note: These installations take several minutes to your product. 4. Continue with the steps in the next section to configure the printer and add it to complete. 6. When you see this printer for the first time, then click Next. 7. Select Set up this screen, select Install driver for your network. 6 Wireless Network Installation
Network Installation Guide
Page 9
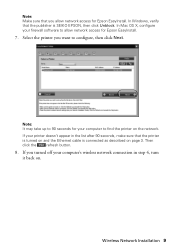
...90 seconds, make sure that the printer is turned on and the Ethernet cable is SEIKO EPSON, then click Unblock. Note: It may take up to 90 seconds for Epson EasyInstall. Then click the refresh button. 8. Wireless Network Installation 9 In Windows, verify that ...the publisher is connected as described on page 3. Note: Make sure that you allow network access for Epson EasyInstall. 7. In Mac OS X, configure your firewall software to configure, ...
...90 seconds, make sure that the printer is turned on and the Ethernet cable is SEIKO EPSON, then click Unblock. Note: It may take up to 90 seconds for Epson EasyInstall. Then click the refresh button. 8. Wireless Network Installation 9 In Windows, verify that ...the publisher is connected as described on page 3. Note: Make sure that you allow network access for Epson EasyInstall. 7. In Mac OS X, configure your firewall software to configure, ...
Network Installation Guide
Page 15
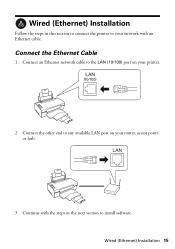
Wired (Ethernet) Installation Follow the steps in the next section to install software. Continue with an Ethernet cable. Connect the other end to the LAN (10/100) port on your network with the steps in this section to connect the printer to your router, access point, or hub. 3. Connect an Ethernet network cable to any available LAN port on your printer. 2. Wired (Ethernet) Installation 15 Connect the Ethernet Cable 1.
Wired (Ethernet) Installation Follow the steps in the next section to install software. Continue with an Ethernet cable. Connect the other end to the LAN (10/100) port on your network with the steps in this section to connect the printer to your router, access point, or hub. 3. Connect an Ethernet network cable to any available LAN port on your printer. 2. Wired (Ethernet) Installation 15 Connect the Ethernet Cable 1.
Network Installation Guide
Page 16
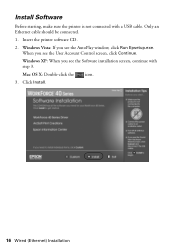
Click Install. 16 Wired (Ethernet) Installation Windows Vista: If you see the User Account Control screen, click Continue. Install Software Before starting, make sure the printer is not connected with step 3. Mac OS X: Double-click the icon. 3. Insert the printer software CD. 2. Windows XP: When you see the AutoPlay window, click Run Epsetup.exe. Only an Ethernet cable should be connected. 1. When you see the Software installation screen, continue with a USB cable.
Click Install. 16 Wired (Ethernet) Installation Windows Vista: If you see the User Account Control screen, click Continue. Install Software Before starting, make sure the printer is not connected with step 3. Mac OS X: Double-click the icon. 3. Insert the printer software CD. 2. Windows XP: When you see the AutoPlay window, click Run Epsetup.exe. Only an Ethernet cable should be connected. 1. When you see the Software installation screen, continue with a USB cable.

Network Installation Guide
Page 17
Note: These installations take several minutes to your product. 4. Select Set up this screen, select Install driver for network connection and click Next. 5. Wired (Ethernet) Installation 17 Follow the instructions on the screen to install the software for the first time, then click Next. 7. Continue with the steps in the next section to configure the printer and add it to complete. 6. When you see this printer for your network.
Note: These installations take several minutes to your product. 4. Select Set up this screen, select Install driver for network connection and click Next. 5. Wired (Ethernet) Installation 17 Follow the instructions on the screen to install the software for the first time, then click Next. 7. Continue with the steps in the next section to configure the printer and add it to complete. 6. When you see this printer for your network.
Network Installation Guide
Page 19
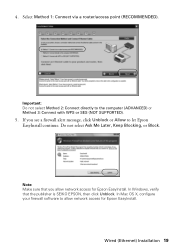
...that you see a firewall alert message, click Unblock or Allow to let Epson EasyInstall continue. Do not select Ask Me Later, Keep Blocking, or Block. In Mac OS X, configure your firewall software to the computer (ADVANCED) or Method 3: Connect with WPS or SES (...NOT SUPPORTED). 5. 4. Select Method 1: Connect via a router/access point (RECOMMENDED). Important: Do not select Method 2: Connect directly to allow network access for Epson EasyInstall. Wired (Ethernet) Installation 19
...that you see a firewall alert message, click Unblock or Allow to let Epson EasyInstall continue. Do not select Ask Me Later, Keep Blocking, or Block. In Mac OS X, configure your firewall software to the computer (ADVANCED) or Method 3: Connect with WPS or SES (...NOT SUPPORTED). 5. 4. Select Method 1: Connect via a router/access point (RECOMMENDED). Important: Do not select Method 2: Connect directly to allow network access for Epson EasyInstall. Wired (Ethernet) Installation 19
Network Installation Guide
Page 23
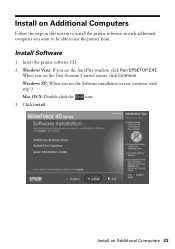
Install Software 1. Insert the printer software CD. 2. Install on each additional computer you see the User Account Control screen, click Continue. Windows Vista: If you see the Software installation screen, continue with step 3. Click Install. Windows XP: When you see the AutoPlay window, click Run EPSETUP.EXE. Mac OS X: Double-click the icon. 3. When you want to be able to install the printer software on Additional Computers 23 Install on Additional Computers Follow the steps in this section to use the printer from.
Install Software 1. Insert the printer software CD. 2. Install on each additional computer you see the User Account Control screen, click Continue. Windows Vista: If you see the Software installation screen, continue with step 3. Click Install. Windows XP: When you see the AutoPlay window, click Run EPSETUP.EXE. Mac OS X: Double-click the icon. 3. When you want to be able to install the printer software on Additional Computers 23 Install on Additional Computers Follow the steps in this section to use the printer from.
Network Installation Guide
Page 24
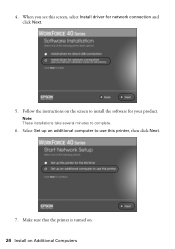
Follow the instructions on Additional Computers Select Set up an additional computer to install the software for network connection and click Next. 5. Make sure that the printer is turned on. 24 Install on the screen to use this screen, select Install driver for your product. 4. Note: These installations take several minutes to complete. 6. When you see this printer, then click Next. 7.
Follow the instructions on Additional Computers Select Set up an additional computer to install the software for network connection and click Next. 5. Make sure that the printer is turned on. 24 Install on the screen to use this screen, select Install driver for your product. 4. Note: These installations take several minutes to complete. 6. When you see this printer, then click Next. 7.
Network Installation Guide
Page 25
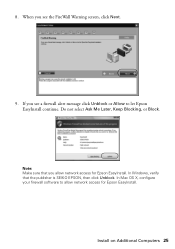
Note: Make sure that the publisher is SEIKO EPSON, then click Unblock. In Mac OS X, configure your firewall software to let Epson EasyInstall continue. Install on Additional Computers 25 When you see the FireWall Warning screen, click Next. 9. In Windows, verify that you allow network access for Epson EasyInstall. If you see a firewall alert message click Unblock or Allow to allow network access for Epson EasyInstall. 8. Do not select Ask Me Later, Keep Blocking, or Block.
Note: Make sure that the publisher is SEIKO EPSON, then click Unblock. In Mac OS X, configure your firewall software to let Epson EasyInstall continue. Install on Additional Computers 25 When you see the FireWall Warning screen, click Next. 9. In Windows, verify that you allow network access for Epson EasyInstall. If you see a firewall alert message click Unblock or Allow to allow network access for Epson EasyInstall. 8. Do not select Ask Me Later, Keep Blocking, or Block.

Network Installation Guide
Page 27
Follow the on -screen Epson Information Center for the printer in the Printer Name text box (optional) ■ Select Set as default to finish installing software and print a test page. When installation is complete, you see this screen: 2. Click Next and follow the on-screen instructions to make the printer your operating system: ■ "Windows" below ■ "Mac...
Follow the on -screen Epson Information Center for the printer in the Printer Name text box (optional) ■ Select Set as default to finish installing software and print a test page. When installation is complete, you see this screen: 2. Click Next and follow the on-screen instructions to make the printer your operating system: ■ "Windows" below ■ "Mac...

Network Installation Guide
Page 29
4. See your Quick Guide or on -screen instructions to print. Follow the on -screen Epson Information Center for details. When installation is complete, you're ready to finish installing software and print a test page. Click Next. 5. Finish the Installation 29
4. See your Quick Guide or on -screen instructions to print. Follow the on -screen Epson Information Center for details. When installation is complete, you're ready to finish installing software and print a test page. Click Next. 5. Finish the Installation 29
Network Installation Guide
Page 30
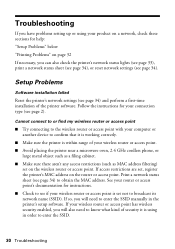
... the SSID. 30 Troubleshooting If your wireless router or access point is set , register the printer's MAC address on the wireless router or access point. Setup Problems Software installation failed Reset the printer's network settings (see page 34). Cannot connect to or find my wireless router or access...such as MAC address filtering) set on the router or access point. Troubleshooting If you have problems setting up or using in the printer's setup software. Print a network status sheet (see page 2). Follow the instructions for your connection type (see page 34) to know what kind...
... the SSID. 30 Troubleshooting If your wireless router or access point is set , register the printer's MAC address on the wireless router or access point. Setup Problems Software installation failed Reset the printer's network settings (see page 34). Cannot connect to or find my wireless router or access...such as MAC address filtering) set on the router or access point. Troubleshooting If you have problems setting up or using in the printer's setup software. Print a network status sheet (see page 2). Follow the instructions for your connection type (see page 34) to know what kind...
Network Installation Guide
Page 32
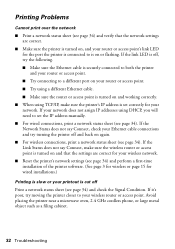
... on and that the network settings are correct for your wireless network. ■ Reset the printer's network settings (see page 34) and perform a first-time installation of the printer software. (See page 3 for wireless or page 15 for wired installations.) Printing is slow or your printout is set the IP address manually. ■ For wired...
... on and that the network settings are correct for your wireless network. ■ Reset the printer's network settings (see page 34) and perform a first-time installation of the printer software. (See page 3 for wireless or page 15 for wired installations.) Printing is slow or your printout is set the IP address manually. ■ For wired...

Quick Guide
Page 8
Make sure EPSON WorkForce 40 Series is selected, then click the Preferences or Properties button. (If you 've installed your printer software and connected the printer to your WorkForce 40 Series software (see a Setup, Printer, or Options button, click it. Open the File menu and select Print. Open a document or photo in Windows 1. For detailed instructions on printing, see a window ...
Make sure EPSON WorkForce 40 Series is selected, then click the Preferences or Properties button. (If you 've installed your printer software and connected the printer to your WorkForce 40 Series software (see a Setup, Printer, or Options button, click it. Open the File menu and select Print. Open a document or photo in Windows 1. For detailed instructions on printing, see a window ...
Quick Guide
Page 33
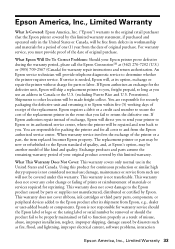
... improper installation, neglect, improper shipping, damage caused by disasters such as fire, flood, and lightning, improper electrical current, software problems, interaction Epson America, Inc., Limited Warranty 33 When warranty service involves the exchange of the replacement printer in the event that the Epson printer covered...call the Epson ConnectionSM at Epson's option, may be new or refurbished to and from such use in the United States and Canada. This warranty does not cover ribbons, ink cartridges or third party parts, components, or peripheral devices added to Epson within five...
... improper installation, neglect, improper shipping, damage caused by disasters such as fire, flood, and lightning, improper electrical current, software problems, interaction Epson America, Inc., Limited Warranty 33 When warranty service involves the exchange of the replacement printer in the event that the Epson printer covered...call the Epson ConnectionSM at Epson's option, may be new or refurbished to and from such use in the United States and Canada. This warranty does not cover ribbons, ink cartridges or third party parts, components, or peripheral devices added to Epson within five...
Start Here
Page 5
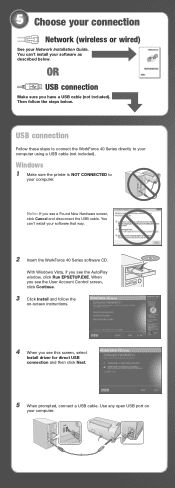
USB connection Follow these steps to connect the WorkForce 40 Series directly to your software as described below . Note: If you have a USB cable (not included). You can 't install your computer. You can 't install your computer using a USB cable (not included). OR USB connection Make...Account Control screen, click Continue. 3 Click Install and follow the steps below . Then follow the on your Network Installation Guide. Windows 1 Make sure the printer is NOT CONNECTED to your software that way. 2 Insert the WorkForce 40 Series software CD. With Windows Vista, if you see ...
USB connection Follow these steps to connect the WorkForce 40 Series directly to your software as described below . Note: If you have a USB cable (not included). You can 't install your computer. You can 't install your computer using a USB cable (not included). OR USB connection Make...Account Control screen, click Continue. 3 Click Install and follow the steps below . Then follow the on your Network Installation Guide. Windows 1 Make sure the printer is NOT CONNECTED to your software that way. 2 Insert the WorkForce 40 Series software CD. With Windows Vista, if you see ...
Start Here
Page 6
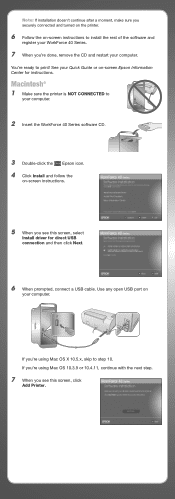
...7 When you see this screen, click Add Printer. Macintosh® 1 Make sure the printer is NOT CONNECTED to your computer. If you're using Mac OS X 10.5.x, skip to print! You're ready to step 10. Note: If installation doesn't continue after a moment, make sure ...on the printer. 6 Follow the on-screen instructions to install the rest of the software and register your WorkForce 40 Series. 7 When you're done, remove the CD and restart your computer. 2 Insert the WorkForce 40 Series software CD. 3 Double-click the Epson icon. 4 Click Install and follow the on -screen Epson Information ...
...7 When you see this screen, click Add Printer. Macintosh® 1 Make sure the printer is NOT CONNECTED to your computer. If you're using Mac OS X 10.5.x, skip to print! You're ready to step 10. Note: If installation doesn't continue after a moment, make sure ...on the printer. 6 Follow the on-screen instructions to install the rest of the software and register your WorkForce 40 Series. 7 When you're done, remove the CD and restart your computer. 2 Insert the WorkForce 40 Series software CD. 3 Double-click the Epson icon. 4 Click Install and follow the on -screen Epson Information ...


