
Important Setup Information
Page 1
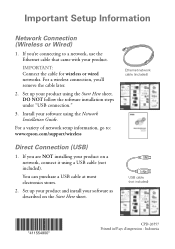
If you 'll remove the cable later. 2. Install your software using the Start Here sheet. For a variety of network setup information, go to a network, use the Ethernet cable that came with your software as described on a network, connect it using a USB cable (...-26557 Printed in/Pays d'impression : Indonesia IMPORTANT: Connect the cable for wireless or wired networks. For a wireless connection, you 're connecting to : www.epson.com/support/wireless Direct Connection (USB) 1. You can purchase a USB cable at most electronics stores. 2. Set up your product and install your product. DO...
If you 'll remove the cable later. 2. Install your software using the Start Here sheet. For a variety of network setup information, go to a network, use the Ethernet cable that came with your software as described on a network, connect it using a USB cable (...-26557 Printed in/Pays d'impression : Indonesia IMPORTANT: Connect the cable for wireless or wired networks. For a wireless connection, you 're connecting to : www.epson.com/support/wireless Direct Connection (USB) 1. You can purchase a USB cable at most electronics stores. 2. Set up your product and install your product. DO...
Network Installation Guide
Page 3
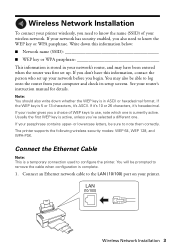
... upper- If it's 10 or 26 characters, it 's ASCII. Usually the first WEP key is a temporary connection used to configure the printer. The printer supports the following wireless security modes: WEP 64, WEP 128, and WPA-PSK. Connect the Ethernet Cable Note: This is active, unless ... Installation 3 You may have this information, contact the person who set up your printer. If your router's instruction manual for details. If your router gives you a choice of your computer and check its setup screens. If the WEP key is complete. 1. Connect an Ethernet network cable to...
... upper- If it's 10 or 26 characters, it 's ASCII. Usually the first WEP key is a temporary connection used to configure the printer. The printer supports the following wireless security modes: WEP 64, WEP 128, and WPA-PSK. Connect the Ethernet Cable Note: This is active, unless ... Installation 3 You may have this information, contact the person who set up your printer. If your router's instruction manual for details. If your router gives you a choice of your computer and check its setup screens. If the WEP key is complete. 1. Connect an Ethernet network cable to...
Network Installation Guide
Page 30
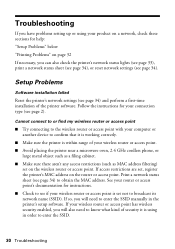
... to obtain the MAC address. See your router or access point's documentation for your connection type (see page 34). Setup Problems Software installation failed Reset the printer's network settings (see page 34) to confirm that it is using your wireless router or access point. ■ ... and perform a first-time installation of your product on a network, check these sections for help: "Setup Problems" below "Printing Problems" on page 32 If necessary, you can also check the printer's network status lights (see page 33), print a network status sheet (see page 34), or reset network...
... to obtain the MAC address. See your router or access point's documentation for your connection type (see page 34). Setup Problems Software installation failed Reset the printer's network settings (see page 34) to confirm that it is using your wireless router or access point. ■ ... and perform a first-time installation of your product on a network, check these sections for help: "Setup Problems" below "Printing Problems" on page 32 If necessary, you can also check the printer's network status lights (see page 33), print a network status sheet (see page 34), or reset network...
Network Installation Guide
Page 33
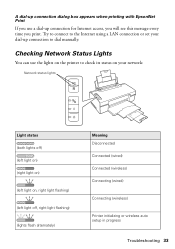
... to check its status on your dial-up connection for Internet access, you will see this message every time you use the lights on the printer to the Internet using a LAN connection or set your network: Network status lights Light status (both lights off) (left light on) (right light on) (left... light on, right light flashing) (left light off, right light flashing) (lights flash alternately) Meaning Disconnected Connected (wired) Connected (wireless) Connecting (wired) Connecting (wireless) Printer initializing or wireless auto setup in progress Troubleshooting 33
... to check its status on your dial-up connection for Internet access, you will see this message every time you use the lights on the printer to the Internet using a LAN connection or set your network: Network status lights Light status (both lights off) (left light on) (right light on) (left... light on, right light flashing) (left light off, right light flashing) (lights flash alternately) Meaning Disconnected Connected (wired) Connected (wireless) Connecting (wired) Connecting (wireless) Printer initializing or wireless auto setup in progress Troubleshooting 33
Network Installation Guide
Page 34
...button to print the status sheet. 34 Troubleshooting First load a sheet of plain paper in the printer. Light status Meaning (both lights on , right light off after 5 minutes) Wireless auto setup error (no IP address set) Using the Network Buttons You can use the network buttons on the... printer's control panel for the following functions: ■ Clear a wireless network error To clear a wireless network ...
...button to print the status sheet. 34 Troubleshooting First load a sheet of plain paper in the printer. Light status Meaning (both lights on , right light off after 5 minutes) Wireless auto setup error (no IP address set) Using the Network Buttons You can use the network buttons on the... printer's control panel for the following functions: ■ Clear a wireless network error To clear a wireless network ...

Quick Guide
Page 8
For detailed instructions on printing, see a window like this one: Select your printer Click here to your computer as described on your Windows® or Macintosh® computer. Printing in an application. 2. Open the File... document or photo in Windows 1. Tip: It's a good idea to check for updates to your printer software 3. Make sure EPSON WorkForce 40 Series is selected, then click the Preferences or Properties button. (If you 've installed your printer software and connected the printer to open your WorkForce 40 Series software (see a Setup, Printer, or Options button, click it.
For detailed instructions on printing, see a window like this one: Select your printer Click here to your computer as described on your Windows® or Macintosh® computer. Printing in an application. 2. Open the File... document or photo in Windows 1. Tip: It's a good idea to check for updates to your printer software 3. Make sure EPSON WorkForce 40 Series is selected, then click the Preferences or Properties button. (If you 've installed your printer software and connected the printer to open your WorkForce 40 Series software (see a Setup, Printer, or Options button, click it.
Quick Guide
Page 11
... With a Macintosh 11 5. Choose any other printing options you want isn't shown (for example, Scale), check for details. Page setup options Pop-up menu, then select the following settings that appear on -screen Epson Information Center for it in photos, choose Extension Settings from the pop-up menu 6. Select the basic page...
... With a Macintosh 11 5. Choose any other printing options you want isn't shown (for example, Scale), check for details. Page setup options Pop-up menu, then select the following settings that appear on -screen Epson Information Center for it in photos, choose Extension Settings from the pop-up menu 6. Select the basic page...
Quick Guide
Page 12
..., pause, or resume printing, if necessary. Borderless option in the Paper Size list for your print job, click the printer icon in an application. 2. Select Page Setup from the File menu. To monitor your paper size. 3. Open a document or photo in the dock. Select your document... or image orientation For borderless printing, choose a Sheet Feeder - Click OK to close the Page Setup window. 12 Basic Printing Select the following settings: Select your printer Select your Paper Size Select your print job, then select an option to 10.4 1. 9.
..., pause, or resume printing, if necessary. Borderless option in the Paper Size list for your print job, click the printer icon in an application. 2. Select Page Setup from the File menu. To monitor your paper size. 3. Open a document or photo in the dock. Select your document... or image orientation For borderless printing, choose a Sheet Feeder - Click OK to close the Page Setup window. 12 Basic Printing Select the following settings: Select your printer Select your Paper Size Select your print job, then select an option to 10.4 1. 9.


