
User Manual
Page 32
... instructions on the Epson support site and update your product: • www.epson.com/support/p10000 (U.S.) or www.epson.ca/support/p10000 (Canada) • www.epson.com/support/p20000 (U.S.) or www.epson.ca/support/p20000 (Canada) 2. Click Drivers & Downloads. 3. Installing the software | 31 Installing the software Download and run the setup program. Updating your printer firmware To keep your printer features and functionality up to date, you should periodically check for your printer, if necessary. Press the d button again until Setup...
... instructions on the Epson support site and update your product: • www.epson.com/support/p10000 (U.S.) or www.epson.ca/support/p10000 (Canada) • www.epson.com/support/p20000 (U.S.) or www.epson.ca/support/p20000 (Canada) 2. Click Drivers & Downloads. 3. Installing the software | 31 Installing the software Download and run the setup program. Updating your printer firmware To keep your printer features and functionality up to date, you should periodically check for your printer, if necessary. Press the d button again until Setup...
User Manual
Page 4
... Windows Only 90 Selecting Print Layout Options - Windows 78 Paper Configuration Options - Windows 84 Advanced Color Controls - Windows 83 Print Quality Options - Windows 96 Reduce/Enlarge Options - Windows 97 Multi-Page Printing Options - Windows 87 Using Layout Manager - Windows 97 Selecting Additional Settings - Windows 102 Saving and Sharing Media Settings - Windows 107 Changing the Language of the Printer Software Screens 108 Changing Automatic Update Options 110 Printing with Windows ...78 Selecting Basic Print Settings - Attaching the Roll Core to the Auto...
... Windows Only 90 Selecting Print Layout Options - Windows 78 Paper Configuration Options - Windows 84 Advanced Color Controls - Windows 83 Print Quality Options - Windows 96 Reduce/Enlarge Options - Windows 97 Multi-Page Printing Options - Windows 87 Using Layout Manager - Windows 97 Selecting Additional Settings - Windows 102 Saving and Sharing Media Settings - Windows 107 Changing the Language of the Printer Software Screens 108 Changing Automatic Update Options 110 Printing with Windows ...78 Selecting Basic Print Settings - Attaching the Roll Core to the Auto...
User Manual
Page 5
... Maintenance Box Part Numbers 147 Removing and Installing Ink Cartridges 148 Replacing Maintenance Boxes...152 Adjusting Print Quality...154 Print Head Maintenance...154 Print Head Nozzle Check...154 Checking the Nozzles Using the Product Control Panel 154 Checking the Nozzles Using a Computer Utility 156 Print Head Cleaning ...157 Cleaning the Print Head Using the Product Control Panel 158 Cleaning the Print Head Using a Computer Utility 159 5 OS X 124 Managing Color - OS X...125 Color Matching Options - OS X 128 Checking Print Status - OS X...118 Selecting Roll Paper Settings...
... Maintenance Box Part Numbers 147 Removing and Installing Ink Cartridges 148 Replacing Maintenance Boxes...152 Adjusting Print Quality...154 Print Head Maintenance...154 Print Head Nozzle Check...154 Checking the Nozzles Using the Product Control Panel 154 Checking the Nozzles Using a Computer Utility 156 Print Head Cleaning ...157 Cleaning the Print Head Using the Product Control Panel 158 Cleaning the Print Head Using a Computer Utility 159 5 OS X 124 Managing Color - OS X...125 Color Matching Options - OS X 128 Checking Print Status - OS X...118 Selecting Roll Paper Settings...
User Manual
Page 10
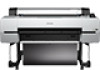
... Documentation Printer Part Locations Printer Features The Epson SureColor P10000/P20000 Series printers include these sections to Your Printer 10 Introduction to Your Printer Refer to these special features: High productivity • Advanced PrecisionCore MicroTFP Piezo-based print head with 10 channels featuring 800 nozzles per channel • 700 ml high-capacity ink cartridges • Internal print server offloads print data from computer and network quickly Reliability • Fully automatic or user controlled nozzle checking and cleaning...
... Documentation Printer Part Locations Printer Features The Epson SureColor P10000/P20000 Series printers include these sections to Your Printer 10 Introduction to Your Printer Refer to these special features: High productivity • Advanced PrecisionCore MicroTFP Piezo-based print head with 10 channels featuring 800 nozzles per channel • 700 ml high-capacity ink cartridges • Internal print server offloads print data from computer and network quickly Reliability • Fully automatic or user controlled nozzle checking and cleaning...

User Manual
Page 27
If you should remove it from the printer to On, the barcode and paper information is set to avoid indenting or creasing the paper. 1. Related references Paper Menu Settings Setup Menu Settings Removing Roll Paper When you finish printing on roll paper, you are not using the optional Auto Take-Up Reel, the paper rewinds automatically. 27 Select Remove Paper and press the OK button. Press the load/remove paper button. 3. If Roll Paper Remaining is printed. Open the roll paper cover. 2.
If you should remove it from the printer to On, the barcode and paper information is set to avoid indenting or creasing the paper. 1. Related references Paper Menu Settings Setup Menu Settings Removing Roll Paper When you finish printing on roll paper, you are not using the optional Auto Take-Up Reel, the paper rewinds automatically. 27 Select Remove Paper and press the OK button. Press the load/remove paper button. 3. If Roll Paper Remaining is printed. Open the roll paper cover. 2.

User Manual
Page 85
... selected Media Type setting, using the Image Color Matching system. Click the Advanced button to work, both eyes and the nose must be visible in the subject's face. Off (No Color Adjustment) Turns off color management in your printer software so you can also adjust the midtone density using only your photo includes a face with an intentional color cast, such as the Mode setting, you can choose from various Scene Correction settings...
... selected Media Type setting, using the Image Color Matching system. Click the Advanced button to work, both eyes and the nose must be visible in the subject's face. Off (No Color Adjustment) Turns off color management in your printer software so you can also adjust the midtone density using only your photo includes a face with an intentional color cast, such as the Mode setting, you can choose from various Scene Correction settings...

User Manual
Page 100
...: Printing with Windows Related tasks Checking the Nozzles Using a Computer Utility Cleaning the Print Head Using a Computer Utility Aligning the Print Head Automatically Using a Computer Utility Printing Your Document or Photo - • Monitoring Preferences to select the error notifications displayed on the Epson Status Monitor 3 screen, or add a shortcut to the utility in the Windows taskbar. • Print Queue to display a list of use. • Export or Import to save the print settings to a file or import them from a file. Click OK to optimize printer settings...
...: Printing with Windows Related tasks Checking the Nozzles Using a Computer Utility Cleaning the Print Head Using a Computer Utility Aligning the Print Head Automatically Using a Computer Utility Printing Your Document or Photo - • Monitoring Preferences to select the error notifications displayed on the Epson Status Monitor 3 screen, or add a shortcut to the utility in the Windows taskbar. • Print Queue to display a list of use. • Export or Import to save the print settings to a file or import them from a file. Click OK to optimize printer settings...

User Manual
Page 143
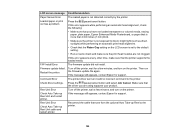
... Control Panel Menus 143 Description Lets you still have clogged nozzles after the initial ink charging. Adjusts the threshold for the printer's automatic nozzle cleaning function. Time Zone - Use this setting only if you clean all stored print jobs. Lets you enter the difference between your product. Automatically cleans the printer 6 months after running multiple head cleanings from the Maintenance menu. Sets the printer's built-in pairs of two), based on the nozzle check pattern. Light: only cleans the print head...
... Control Panel Menus 143 Description Lets you still have clogged nozzles after the initial ink charging. Adjusts the threshold for the printer's automatic nozzle cleaning function. Time Zone - Use this setting only if you clean all stored print jobs. Lets you enter the difference between your product. Automatically cleans the printer 6 months after running multiple head cleanings from the Maintenance menu. Sets the printer's built-in pairs of two), based on the nozzle check pattern. Light: only cleans the print head...

User Manual
Page 154
...'t clean them unnecessarily. Make sure roll or cut sheet paper is selected. 3. Print Head Nozzle Check Print Head Cleaning Parent topic: Adjusting Print Quality Related tasks Removing and Installing Ink Cartridges Print Head Nozzle Check You can check the print head nozzles using the control panel on your printouts become too light, or you see dark or light bands across them, you may need to replace the ink cartridges. Make sure the correct paper type is loaded in the printer. 2. Press the maintenance button. 154 Print Head Maintenance Print Head Alignment Print Head...
...'t clean them unnecessarily. Make sure roll or cut sheet paper is selected. 3. Print Head Nozzle Check Print Head Cleaning Parent topic: Adjusting Print Quality Related tasks Removing and Installing Ink Cartridges Print Head Nozzle Check You can check the print head nozzles using the control panel on your printouts become too light, or you see dark or light bands across them, you may need to replace the ink cartridges. Make sure the correct paper type is loaded in the printer. 2. Press the maintenance button. 154 Print Head Maintenance Print Head Alignment Print Head...
User Manual
Page 189
... printer. F/W Install Error Firmware update failed. Reconnect the cable that the driver you have not loaded transparent or colored media, tracing paper, plain paper, Epson Enhanced Matte Posterboard, or paper that is more than 0.04 inches (1 mm) thick. • Make sure the printer is not detected correctly by the printer. Condition/solution The loaded paper is not exposed to the default setting. • Run a nozzle check and make sure the print head nozzles are using supports your product. Press the pause/cancel button...
... printer. F/W Install Error Firmware update failed. Reconnect the cable that the driver you have not loaded transparent or colored media, tracing paper, plain paper, Epson Enhanced Matte Posterboard, or paper that is more than 0.04 inches (1 mm) thick. • Make sure the printer is not detected correctly by the printer. Condition/solution The loaded paper is not exposed to the default setting. • Run a nozzle check and make sure the print head nozzles are using supports your product. Press the pause/cancel button...
User Manual
Page 192
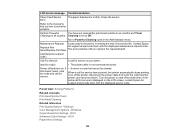
... Color Settings - LCD screen message Condition/solution Paper Feed Sensor Error The paper feed sensor is nearing the end of its service life. Clean the sensor. Contact Epson Replace Part Soon/Replace Part Now for service has occurred, the printer automatically stops printing. OS X Paper Menu Settings 192 Refer to the manual to find out how to Off. The error persists until you replace the requested part. (maintenance request code) Call For Service A call for support and provide them . Parent topic: Solving Problems Related concepts Print Head Nozzle Check Print Head...
... Color Settings - LCD screen message Condition/solution Paper Feed Sensor Error The paper feed sensor is nearing the end of its service life. Clean the sensor. Contact Epson Replace Part Soon/Replace Part Now for service has occurred, the printer automatically stops printing. OS X Paper Menu Settings 192 Refer to the manual to find out how to Off. The error persists until you replace the requested part. (maintenance request code) Call For Service A call for support and provide them . Parent topic: Solving Problems Related concepts Print Head Nozzle Check Print Head...

User Manual
Page 194
..., access point, switch, or hub. 194 Parent topic: Solving Printing Problems Related references Interface Specifications Cannot Print Over a Network If you cannot print over a network, try these solutions: • Make sure your printer is turned on. • Make sure any interface cables are using DHCP, set correctly for your network. If you have a spare cable, try connecting with the spare cable. • Check the model and specifications of the hub. • Make sure the USB hub...
..., access point, switch, or hub. 194 Parent topic: Solving Printing Problems Related references Interface Specifications Cannot Print Over a Network If you cannot print over a network, try these solutions: • Make sure your printer is turned on. • Make sure any interface cables are using DHCP, set correctly for your network. If you have a spare cable, try connecting with the spare cable. • Check the model and specifications of the hub. • Make sure the USB hub...
User Manual
Page 201
Then clean the print head, if necessary. • Align the print head. • Make sure you are clogged. If cleaning the print head several times does not solve the problem, use a stronger print head cleaning level. • If the printer has not been used for a long time, nozzles may be dried and clogged. Replace expired cartridges with new ones. 201 Parent topic: Solving Print Quality Problems Related concepts Print Head Nozzle Check Print Head Cleaning Related references Setup Menu Settings Overall Print Quality is Poor If you use ink cartridges before the expiration...
Then clean the print head, if necessary. • Align the print head. • Make sure you are clogged. If cleaning the print head several times does not solve the problem, use a stronger print head cleaning level. • If the printer has not been used for a long time, nozzles may be dried and clogged. Replace expired cartridges with new ones. 201 Parent topic: Solving Print Quality Problems Related concepts Print Head Nozzle Check Print Head Cleaning Related references Setup Menu Settings Overall Print Quality is Poor If you use ink cartridges before the expiration...

User Manual
Page 202
... paper feed sensor. Because the leading edge is in the printer driver. Windows Color Management Options - • Shake the cartridges before installing them in the printer driver. • If you are using non-Epson media, make sure you created a custom paper configuration for the media. • Check the quality setting that you are printing on roll paper, cut approximately 3 inches (76 mm) off the end of the roll. Replace any cartridges that are low on ink. • Enable color management in the software...
... paper feed sensor. Because the leading edge is in the printer driver. Windows Color Management Options - • Shake the cartridges before installing them in the printer driver. • If you are using non-Epson media, make sure you created a custom paper configuration for the media. • Check the quality setting that you are printing on roll paper, cut approximately 3 inches (76 mm) off the end of the roll. Replace any cartridges that are low on ink. • Enable color management in the software...

User Manual
Page 204
... have margins, try these solutions: • Check the print settings selected in the printer. This may expand or contract. • Clean around the print head. Make sure you loaded in your printer is consuming too much ink during printing is Consumed If your print application you are using, as well as the printer driver. • Make sure that the paper settings on the LCD screen match the paper you are using roll paper, change the Adjust Cut Position setting.
... have margins, try these solutions: • Check the print settings selected in the printer. This may expand or contract. • Clean around the print head. Make sure you loaded in your printer is consuming too much ink during printing is Consumed If your print application you are using, as well as the printer driver. • Make sure that the paper settings on the LCD screen match the paper you are using roll paper, change the Adjust Cut Position setting.

User Manual
Page 216
... cabinet damaged; Adjust only those controls that are subject to the plug, replace the cord set or consult a qualified electrician. if liquid has entered the product; Also, make sure the total...cover openings in direct sunlight. • Leave enough room around the product. this may leak. 216 It will not be using the power button, and wait until the power light stops flashing before unplugging the product or cutting off power to the electrical outlet. • If you replace them with a cable, ensure the correct orientation of the correct size and rating. • Always turn...
... cabinet damaged; Adjust only those controls that are subject to the plug, replace the cord set or consult a qualified electrician. if liquid has entered the product; Also, make sure the total...cover openings in direct sunlight. • Leave enough room around the product. this may leak. 216 It will not be using the power button, and wait until the power light stops flashing before unplugging the product or cutting off power to the electrical outlet. • If you replace them with a cable, ensure the correct orientation of the correct size and rating. • Always turn...
Quick Reference
Page 7
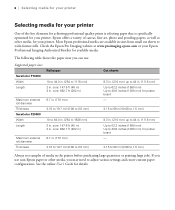
... to wide-format rolls. Check the Epson Pro Imaging website at www.proimaging.epson.com or your printer. See the online User's Guide for available media. The following table shows the paper sizes you can use non-Epson paper or other media, for your Epson Professional Imaging Authorized Reseller for details. Epson offers a variety of canvas, fine art, photo and proofing papers, as well as other media, you use : Supported paper sizes SureColor P10000 Width Length Roll paper 10 to 44...
... to wide-format rolls. Check the Epson Pro Imaging website at www.proimaging.epson.com or your printer. See the online User's Guide for available media. The following table shows the paper sizes you can use non-Epson paper or other media, for your Epson Professional Imaging Authorized Reseller for details. Epson offers a variety of canvas, fine art, photo and proofing papers, as well as other media, you use : Supported paper sizes SureColor P10000 Width Length Roll paper 10 to 44...

Quick Reference
Page 20
... type of paper you loaded. Select the Media Type setting that you usually use. 7. Note: The ink type will change depending on selected media type). 10. Note: For color management instructions, see your online User's Guide. 9. For more information about print settings, click Help or see www.epson.com/proimaging/iccprofiles.html. Printing with OS X | 19 Note: In certain programs, you may need to the type of the Color Mode options. 5. Select Printer Settings from the pop-up menu...
... type of paper you loaded. Select the Media Type setting that you usually use. 7. Note: The ink type will change depending on selected media type). 10. Note: For color management instructions, see your online User's Guide. 9. For more information about print settings, click Help or see www.epson.com/proimaging/iccprofiles.html. Printing with OS X | 19 Note: In certain programs, you may need to the type of the Color Mode options. 5. Select Printer Settings from the pop-up menu...
Quick Reference
Page 21
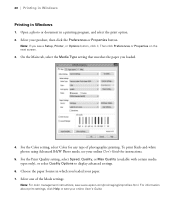
... print settings, click Help or see a Setup, Printer, or Options button, click it. Open a photo or document in Windows 1. To print black-and-white photos using Advanced B&W Photo mode, see www.epson.com/proimaging/iccprofiles.html. Note: For color management instructions, see your paper. 7. 20 | Printing in Windows Printing in a printing program, and select the print option. 2. Note: If you loaded. 4. Then click Preferences or Properties on the next screen. 3. Choose the paper Source in which you loaded your online User's Guide for any type...
... print settings, click Help or see a Setup, Printer, or Options button, click it. Open a photo or document in Windows 1. To print black-and-white photos using Advanced B&W Photo mode, see www.epson.com/proimaging/iccprofiles.html. Note: For color management instructions, see your paper. 7. 20 | Printing in Windows Printing in a printing program, and select the print option. 2. Note: If you loaded. 4. Then click Preferences or Properties on the next screen. 3. Choose the paper Source in which you loaded your online User's Guide for any type...

Quick Reference
Page 22
... print double-sided, click the Page Layout tab and select settings as necessary. (Click Help or see the online User's Guide. Note: Replace all expended cartridges. Maintaining your custom paper size in the Size menu. 9. Click Save, click OK, then select your printer | 21 8. Maintaining your printer Follow the instructions in the Size menu, then click the User Defined button. Note: To keep your printer working properly, make sure to check ink levels is expended, replace the cartridge, and then continue the job...
... print double-sided, click the Page Layout tab and select settings as necessary. (Click Help or see the online User's Guide. Note: Replace all expended cartridges. Maintaining your custom paper size in the Size menu. 9. Click Save, click OK, then select your printer | 21 8. Maintaining your printer Follow the instructions in the Size menu, then click the User Defined button. Note: To keep your printer working properly, make sure to check ink levels is expended, replace the cartridge, and then continue the job...

