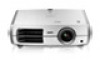
User's Guide
Page 3
Contents Introduction Projector Parts Remote Control Optional Accessories Registration and Warranty Using This Manual Setting Up the Projector Choosing a Location Installing the Projector Connecting the Cables Connecting Video and Computer Equipment Making Other Connections Installing Batteries in the Remote ... Image Source Positioning the Image Making Basic Adjustments Focusing and Zooming Choosing the Aspect Ratio Choosing the Color Mode Advanced Color Adjustments Adjusting the Gamma Setting Adjusting RGBCMY Locking the Projector 6 7 9 10 10 11 12 12 16 18 18 20 21 21 21 22 23 24 26 26 27 28 ...
Contents Introduction Projector Parts Remote Control Optional Accessories Registration and Warranty Using This Manual Setting Up the Projector Choosing a Location Installing the Projector Connecting the Cables Connecting Video and Computer Equipment Making Other Connections Installing Batteries in the Remote ... Image Source Positioning the Image Making Basic Adjustments Focusing and Zooming Choosing the Aspect Ratio Choosing the Color Mode Advanced Color Adjustments Adjusting the Gamma Setting Adjusting RGBCMY Locking the Projector 6 7 9 10 10 11 12 12 16 18 18 20 21 21 21 22 23 24 26 26 27 28 ...
User's Guide
Page 4
... Display 35 Adjusting the Picture Quality 35 Input Brightness Settings 35 Sharpness and Picture Quality Settings 37 Color Settings 40 Adjustments for Computer Images 42 Selecting Memory Settings and Resetting the Projector 43 Selecting Memory Settings 43 Creating Memory Settings 44 Renaming Memory Settings 44 Deleting Saved Memory Settings 45 Resetting the Projector 45 Customizing Projector Features 46...
... Display 35 Adjusting the Picture Quality 35 Input Brightness Settings 35 Sharpness and Picture Quality Settings 37 Color Settings 40 Adjustments for Computer Images 42 Selecting Memory Settings and Resetting the Projector 43 Selecting Memory Settings 43 Creating Memory Settings 44 Renaming Memory Settings 44 Deleting Saved Memory Settings 45 Resetting the Projector 45 Customizing Projector Features 46...
User's Guide
Page 9
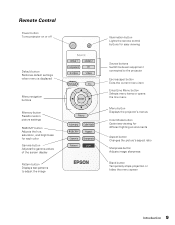
Remote Control Power button Turns projector on or off Default button Restores default settings when menu is displayed Menu navigation buttons Memory button Recalls custom picture settings RGBCMY button Adjusts the hue, saturation, and brightness for each color Gamma button Adjusts the gamma values of the screen display Pattern button Displays test ...
Remote Control Power button Turns projector on or off Default button Restores default settings when menu is displayed Menu navigation buttons Memory button Recalls custom picture settings RGBCMY button Adjusts the hue, saturation, and brightness for each color Gamma button Adjusts the gamma values of the screen display Pattern button Displays test ...
User's Guide
Page 12
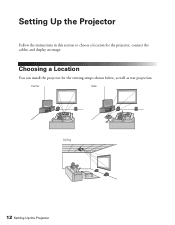
Center Side Ceiling 12 Setting Up the Projector Setting Up the Projector Follow the instructions in this section to choose a location for the viewing setups shown below, as well as rear projection. Choosing a Location You can install the projector for the projector, connect the cables, and display an image.
Center Side Ceiling 12 Setting Up the Projector Setting Up the Projector Follow the instructions in this section to choose a location for the viewing setups shown below, as well as rear projection. Choosing a Location You can install the projector for the projector, connect the cables, and display an image.
User's Guide
Page 13
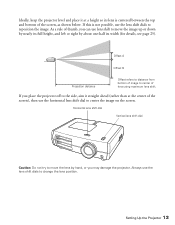
Offset A Offset B Projection distance Offset refers to distance from bottom of image to center the image on the screen. Setting Up the Projector 13 As a rule of thumb, you can use the lens shift dials to change the lens position. Horizontal lens shift dial Vertical ...
Offset A Offset B Projection distance Offset refers to distance from bottom of image to center the image on the screen. Setting Up the Projector 13 As a rule of thumb, you can use the lens shift dials to change the lens position. Horizontal lens shift dial Vertical ...
User's Guide
Page 14
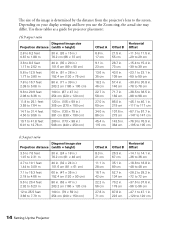
The size of the image is determined by the distance from the projector's lens to 120 cm 14 Setting Up the Projector Use these tables as a guide for projector placement: 16:9 aspect ratio Diagonal image size Projection distance (width × height) 2.8 to 6.2 feet 0.87 ....2 in. -72 to 72 cm -37.6 to 37.6 in. -96 to 96 cm -47.1 to 47.1 in. -120 to the screen. Depending on your display settings and how you use the Zoom ring, the actual size may differ.
The size of the image is determined by the distance from the projector's lens to 120 cm 14 Setting Up the Projector Use these tables as a guide for projector placement: 16:9 aspect ratio Diagonal image size Projection distance (width × height) 2.8 to 6.2 feet 0.87 ....2 in. -72 to 72 cm -37.6 to 37.6 in. -96 to 96 cm -47.1 to 47.1 in. -120 to the screen. Depending on your display settings and how you use the Zoom ring, the actual size may differ.
User's Guide
Page 15
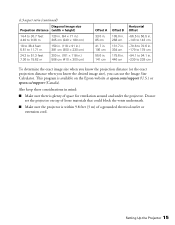
Do not set the projector on the Epson website at epson.com/support (U.S.) or epson.ca/support (Canada). Also keep these considerations in . -239 to 239 cm To determine the exact image size when you know the projection distance (or .... -179 to 179 cm -94.1 to 94.1 in mind: ■ Make sure there is within 9.8 feet (3 m) of space for ventilation around and under the projector. Setting Up the Projector 15
Do not set the projector on the Epson website at epson.com/support (U.S.) or epson.ca/support (Canada). Also keep these considerations in . -239 to 239 cm To determine the exact image size when you know the projection distance (or .... -179 to 179 cm -94.1 to 94.1 in mind: ■ Make sure there is within 9.8 feet (3 m) of space for ventilation around and under the projector. Setting Up the Projector 15

User's Guide
Page 16
...may fall, causing serious injury and serious damage to lower a projection screen or operate a motorized anamorphic lens (see page 48). 16 Setting Up the Projector WARNING: When installing or adjusting the ceiling mount, do not use adhesives to prevent the screws from loosening and do not... the projector. Follow these steps: 1. Press the Menu button when done. In addition, the projector's Trigger out port can rotate the Epson logo plate 180 degrees when suspending the projector from a ceiling, you will need the optional projector mount designed for ordering information. If you...
...may fall, causing serious injury and serious damage to lower a projection screen or operate a motorized anamorphic lens (see page 48). 16 Setting Up the Projector WARNING: When installing or adjusting the ceiling mount, do not use adhesives to prevent the screws from loosening and do not... the projector. Follow these steps: 1. Press the Menu button when done. In addition, the projector's Trigger out port can rotate the Epson logo plate 180 degrees when suspending the projector from a ceiling, you will need the optional projector mount designed for ordering information. If you...

User's Guide
Page 17
The following illustrations show the dimensions of the projector: Center of lens 5.4 in. 36 mm 0.5 in. 2.3 mm 0.2 in. 4.5 mm 17.7 in. 450 mm 11.8 in. 300 mm 5.2 in. 131 mm 3.0 in. 75 mm 1.8 in. 45 mm 5.9 in. 150 mm 2.2 in. 56 mm 5.8 in. 2.8 in. 148.3 mm 72 mm 5.3 in. 134.7 mm 6.3 in. 160 mm 15.3 in. 389.7 mm M4 × 9 mm Setting Up the Projector 17
The following illustrations show the dimensions of the projector: Center of lens 5.4 in. 36 mm 0.5 in. 2.3 mm 0.2 in. 4.5 mm 17.7 in. 450 mm 11.8 in. 300 mm 5.2 in. 131 mm 3.0 in. 75 mm 1.8 in. 45 mm 5.9 in. 150 mm 2.2 in. 56 mm 5.8 in. 2.8 in. 148.3 mm 72 mm 5.3 in. 134.7 mm 6.3 in. 160 mm 15.3 in. 389.7 mm M4 × 9 mm Setting Up the Projector 17
User's Guide
Page 18
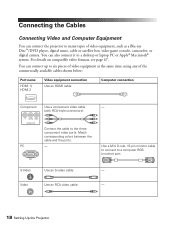
... digital camera. You can also connect it to a desktop or laptop PC or Apple® Macintosh® system. Video Use an RCA video cable: - 18 Setting Up the Projector Connecting the Cables Connecting Video and Computer Equipment You can connect the projector to many types of the commercially available cables shown...
... digital camera. You can also connect it to a desktop or laptop PC or Apple® Macintosh® system. Video Use an RCA video cable: - 18 Setting Up the Projector Connecting the Cables Connecting Video and Computer Equipment You can connect the projector to many types of the commercially available cables shown...
User's Guide
Page 19
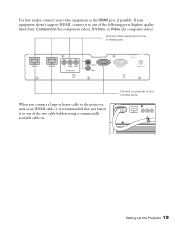
Connect a computer to one of these ports When you connect a large or heavy cable to the projector, such as an HDMI cable, it is recommended that you fasten it to one of the following ports (highest quality listed first): Component (for component video), S-Video, or Video (for composite video). If your video equipment to the HDMI port, if possible. Connect video equipment to one of these ports Setting Up the Projector 19 For best results, connect your equipment doesn't support HDMI, connect it to one of the two cable holders using a commercially available cable tie.
Connect a computer to one of these ports When you connect a large or heavy cable to the projector, such as an HDMI cable, it is recommended that you fasten it to one of the following ports (highest quality listed first): Component (for component video), S-Video, or Video (for composite video). If your video equipment to the HDMI port, if possible. Connect video equipment to one of these ports Setting Up the Projector 19 For best results, connect your equipment doesn't support HDMI, connect it to one of the two cable holders using a commercially available cable tie.
User's Guide
Page 20
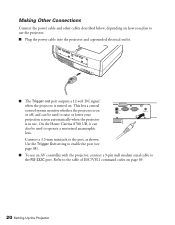
On the Home Cinema 8700 UB, it can be used to raise or lower your projection screen automatically when the projector is in use. Connect a 3.5-mm mini jack to... to the table of ESC/VP21 command codes on or off, and can also be used to the port, as shown. Use the Trigger Out setting to enable the port (see page 48). ■ To use an AV controller with the projector, connect a 9-pin null modem serial cable to the ... the projector and a grounded electrical outlet. ■ The Trigger out port outputs a 12-volt DC signal when the projector is on page 69. 20 Setting Up the Projector
On the Home Cinema 8700 UB, it can be used to raise or lower your projection screen automatically when the projector is in use. Connect a 3.5-mm mini jack to... to the table of ESC/VP21 command codes on or off, and can also be used to the port, as shown. Use the Trigger Out setting to enable the port (see page 48). ■ To use an AV controller with the projector, connect a 9-pin null modem serial cable to the ... the projector and a grounded electrical outlet. ■ The Trigger out port outputs a 12-volt DC signal when the projector is on page 69. 20 Setting Up the Projector
User's Guide
Page 21
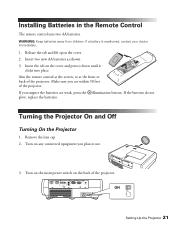
... lens cap. 2. Release the tab and lift open the cover. 2. WARNING: Keep batteries away from children. If a battery is swallowed, contact your doctor immediately. 1. ON Setting Up the Projector 21 Turn on the main power switch on the back of the projector. Insert the tab on any connected equipment you are...
... lens cap. 2. Release the tab and lift open the cover. 2. WARNING: Keep batteries away from children. If a battery is swallowed, contact your doctor immediately. 1. ON Setting Up the Projector 21 Turn on the main power switch on the back of the projector. Insert the tab on any connected equipment you are...
User's Guide
Page 22
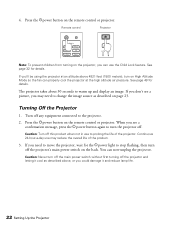
... Ppower light to prolong the life of the product. 3. If you need to turn off the projector and letting it and reduce lamp life. 22 Setting Up the Projector 4. If you don't see a confirmation message, press the Ppower button again to change the image source as described above 4921 feet (1500...
... Ppower light to prolong the life of the product. 3. If you need to turn off the projector and letting it and reduce lamp life. 22 Setting Up the Projector 4. If you don't see a confirmation message, press the Ppower button again to change the image source as described above 4921 feet (1500...

User's Guide
Page 23
... remote control that corresponds to the port to the projector (such as a Blu-ray Disc/DVD player, cable or satellite box, or video game console). Setting Up the Projector 23 Selecting the Image Source The source buttons on the remote control. Note: If an image does not appear, see a list of...
... remote control that corresponds to the port to the projector (such as a Blu-ray Disc/DVD player, cable or satellite box, or video game console). Setting Up the Projector 23 Selecting the Image Source The source buttons on the remote control. Note: If an image does not appear, see a list of...

User's Guide
Page 24
... difficult to move the lens by pressing the Pattern button on the screen, use the lens shift dials to adjust its position. Adjustable feet 24 Setting Up the Projector Caution: Do not try to turn off the test pattern. Positioning the Image If the image is not centered on the remote...
... difficult to move the lens by pressing the Pattern button on the screen, use the lens shift dials to adjust its position. Adjustable feet 24 Setting Up the Projector Caution: Do not try to turn off the test pattern. Positioning the Image If the image is not centered on the remote...

User's Guide
Page 25
The amount by the full amount. For example, the image cannot be moved to the right Setting Up the Projector 25 When the image has been shifted vertically by the full amount, it has been shifted horizontally by which you can be ...
The amount by the full amount. For example, the image cannot be moved to the right Setting Up the Projector 25 When the image has been shifted vertically by the full amount, it has been shifted horizontally by which you can be ...
User's Guide
Page 27
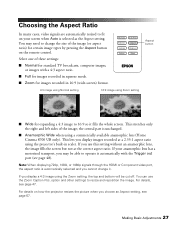
... able to operate it automatically with a 4:3 aspect ratio. ■ Full for images recorded in 16:9 (wide-screen) format. 4:3 image using Normal setting 16:9 image using a commercially available anamorphic lens (Home Cinema 8700 UB only). For details on how the projector resizes the picture when you cannot change the size of the image; Note...
... able to operate it automatically with a 4:3 aspect ratio. ■ Full for images recorded in 16:9 (wide-screen) format. 4:3 image using Normal setting 16:9 image using a commercially available anamorphic lens (Home Cinema 8700 UB only). For details on how the projector resizes the picture when you cannot change the size of the image; Note...
User's Guide
Page 28
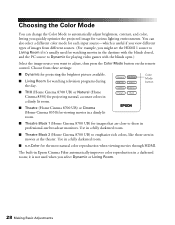
...Home Cinema 8700 UB) or Natural (Home Cinema 8350) for projecting natural, accurate colors in a dimly lit room. ■ Theatre (Home Cinema 8700 UB) or Cinema (Home Cinema 8350...) for viewing movies in a fully darkened room. ■ x.v.Color for various lighting environments. Use in a dimly lit room. ■ Theatre Black 1 (Home Cinema...Home Cinema 8700 UB) to adjust, then press the Color Mode button on the remote control. Choose from different sources. (For example, you might set...types of images from these settings: ■ Dynamic for...
...Home Cinema 8700 UB) or Natural (Home Cinema 8350) for projecting natural, accurate colors in a dimly lit room. ■ Theatre (Home Cinema 8700 UB) or Cinema (Home Cinema 8350...) for viewing movies in a fully darkened room. ■ x.v.Color for various lighting environments. Use in a dimly lit room. ■ Theatre Black 1 (Home Cinema...Home Cinema 8700 UB) to adjust, then press the Color Mode button on the remote control. Choose from different sources. (For example, you might set...types of images from these settings: ■ Dynamic for...

User's Guide
Page 29
Making Basic Adjustments 29 You can press the Default button to restore the factory settings. If you don't like the settings you have selected on a particular menu screen, you can adjust the gamma and individual RGBCMY color tones using the RGBCMY and Gamma buttons on the... control. (Not available when x.v.Color is selected as the Color Mode.) RGBCMY Gamma Note: You can fine-tune these and other color and image quality settings using the projector's menu system (see page 43). Advanced Color Adjustments To further customize the color and image quality, you can also save combinations of...
Making Basic Adjustments 29 You can press the Default button to restore the factory settings. If you don't like the settings you have selected on a particular menu screen, you can adjust the gamma and individual RGBCMY color tones using the RGBCMY and Gamma buttons on the... control. (Not available when x.v.Color is selected as the Color Mode.) RGBCMY Gamma Note: You can fine-tune these and other color and image quality settings using the projector's menu system (see page 43). Advanced Color Adjustments To further customize the color and image quality, you can also save combinations of...


