User's Guide
Page 3
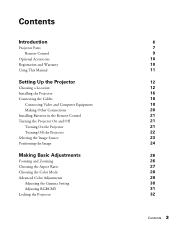
Contents Introduction Projector Parts Remote Control Optional Accessories Registration and Warranty Using This Manual Setting Up the Projector Choosing a Location Installing the Projector Connecting the Cables Connecting Video and Computer Equipment Making Other Connections Installing Batteries in the Remote Control Turning the Projector On and... the Image Making Basic Adjustments Focusing and Zooming Choosing the Aspect Ratio Choosing the Color Mode Advanced Color Adjustments Adjusting the Gamma Setting Adjusting RGBCMY Locking the Projector 6 7 9 10 10 11 12 12 16 18 18 20 21 21 21 22 23 ...
Contents Introduction Projector Parts Remote Control Optional Accessories Registration and Warranty Using This Manual Setting Up the Projector Choosing a Location Installing the Projector Connecting the Cables Connecting Video and Computer Equipment Making Other Connections Installing Batteries in the Remote Control Turning the Projector On and... the Image Making Basic Adjustments Focusing and Zooming Choosing the Aspect Ratio Choosing the Color Mode Advanced Color Adjustments Adjusting the Gamma Setting Adjusting RGBCMY Locking the Projector 6 7 9 10 10 11 12 12 16 18 18 20 21 21 21 22 23 ...
User's Guide
Page 18
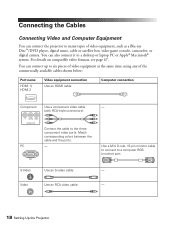
...ray Disc™/DVD player, digital tuner, cable or satellite box, video game console, camcorder, or digital camera. PC - Match corresponding colors between the cable and the ports. Video Use an RCA video cable: - 18 Setting Up the Projector Use a Mini D-sub, 15-pin monitor cable ...to connect to the three component video ports. Connecting the Cables Connecting Video and Computer Equipment You can connect the projector to...
...ray Disc™/DVD player, digital tuner, cable or satellite box, video game console, camcorder, or digital camera. PC - Match corresponding colors between the cable and the ports. Video Use an RCA video cable: - 18 Setting Up the Projector Use a Mini D-sub, 15-pin monitor cable ...to connect to the three component video ports. Connecting the Cables Connecting Video and Computer Equipment You can connect the projector to...
User's Guide
Page 19
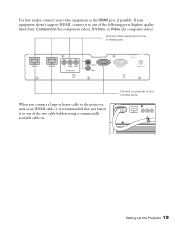
Connect a computer to one of the two cable holders using a commercially available cable tie. Connect video equipment to one of these ports Setting Up the Projector 19 For best results, connect your equipment doesn't support HDMI, connect it to one of these ports When you connect a large or heavy cable to the projector, such as an HDMI cable, it is recommended that you fasten it to one of the following ports (highest quality listed first): Component (for component video), S-Video, or Video (for composite video). If your video equipment to the HDMI port, if possible.
Connect a computer to one of the two cable holders using a commercially available cable tie. Connect video equipment to one of these ports Setting Up the Projector 19 For best results, connect your equipment doesn't support HDMI, connect it to one of these ports When you connect a large or heavy cable to the projector, such as an HDMI cable, it is recommended that you fasten it to one of the following ports (highest quality listed first): Component (for component video), S-Video, or Video (for composite video). If your video equipment to the HDMI port, if possible.

User's Guide
Page 23
... Solving" on the remote control that corresponds to the port to the projector (such as a Blu-ray Disc/DVD player, cable or satellite box, or video game console). Selecting the Image Source The source buttons on the projector, you switch between images from different pieces of available sources. To temporarily turn... off the image and darken the screen, press the Blank button on the remote control. Press the source button to normal viewing. Setting Up the Projector 23 Press the Blank button again to return to move through the list and select the desired source.
... Solving" on the remote control that corresponds to the port to the projector (such as a Blu-ray Disc/DVD player, cable or satellite box, or video game console). Selecting the Image Source The source buttons on the projector, you switch between images from different pieces of available sources. To temporarily turn... off the image and darken the screen, press the Blank button on the remote control. Press the source button to normal viewing. Setting Up the Projector 23 Press the Blank button again to return to move through the list and select the desired source.
User's Guide
Page 27
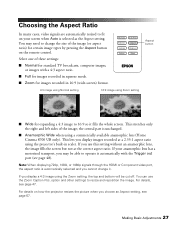
... or Component video port, the aspect ratio is automatically selected and you choose an Aspect setting, see page 67. Select one of these settings: ■ Normal for standard TV broadcasts, computer images, or images with the Trigger out port (see page 47. If you display a 4:3 image using a commercially available anamorphic lens (Home Cinema 8700 UB...
... or Component video port, the aspect ratio is automatically selected and you choose an Aspect setting, see page 67. Select one of these settings: ■ Normal for standard TV broadcasts, computer images, or images with the Trigger out port (see page 47. If you display a 4:3 image using a commercially available anamorphic lens (Home Cinema 8700 UB...
User's Guide
Page 28
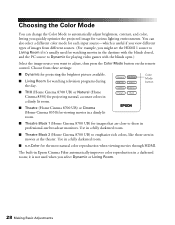
.... (For example, you might set the HDMI 1 source to Living Room if it is not used for watching movies in movies at the theater. Color Mode button ■ THX (Home Cinema 8700 UB) or Natural (Home Cinema 8350) for projecting natural, accurate colors in a dimly lit room. ■ Theatre (Home Cinema 8700 UB) or Cinema (Home Cinema 8350) for viewing movies in...
.... (For example, you might set the HDMI 1 source to Living Room if it is not used for watching movies in movies at the theater. Color Mode button ■ THX (Home Cinema 8700 UB) or Natural (Home Cinema 8350) for projecting natural, accurate colors in a dimly lit room. ■ Theatre (Home Cinema 8700 UB) or Cinema (Home Cinema 8350) for viewing movies in...

User's Guide
Page 35
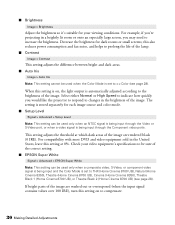
... saved independently for each input source (Video, S-Video, HDMI, Component, PC) and color mode. Input Brightness Settings If the signal from 21 languages to your picture and viewing environment, as described on the screen for displaying the menu. ■ Menu Color Settings > Display > Menu Color Select a ...be using these options to choose a position on page 28. Making Detailed Adjustments 35 You can adjust the Brightness and Contrast settings. After you can adjust brightness and contrast for each image source and color mode. Changing How the Menus Display Use these ...
... saved independently for each input source (Video, S-Video, HDMI, Component, PC) and color mode. Input Brightness Settings If the signal from 21 languages to your picture and viewing environment, as described on the screen for displaying the menu. ■ Menu Color Settings > Display > Menu Color Select a ...be using these options to choose a position on page 28. Making Detailed Adjustments 35 You can adjust the Brightness and Contrast settings. After you can adjust brightness and contrast for each image source and color mode. Changing How the Menus Display Use these ...
User's Guide
Page 36
...set to THX (Home Cinema 8700 UB), Natural (Home Cinema 8350), Theatre (Home Cinema 8700 UB), Cinema (Home Cinema 8350), Theatre Black 1 (Home Cinema 8700 UB), or Theatre Black 2 (Home Cinema 8700 UB) (see page 28). The setting is set to x.v.Color (see page 28). For compatibility with most DVD and video equipment sold in the United States, leave this setting...the brightness so it's suitable for your video equipment's specifications to be sure of the correct setting. ■ EPSON Super White Signal > Advanced > EPSON Super White Note: This setting can be used only when an NTSC ...
...set to THX (Home Cinema 8700 UB), Natural (Home Cinema 8350), Theatre (Home Cinema 8700 UB), Cinema (Home Cinema 8350), Theatre Black 1 (Home Cinema 8700 UB), or Theatre Black 2 (Home Cinema 8700 UB) (see page 28). The setting is set to x.v.Color (see page 28). For compatibility with most DVD and video equipment sold in the United States, leave this setting...the brightness so it's suitable for your video equipment's specifications to be sure of the correct setting. ■ EPSON Super White Signal > Advanced > EPSON Super White Note: This setting can be used only when an NTSC ...
User's Guide
Page 37
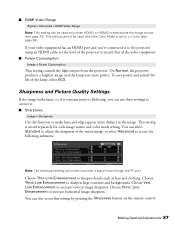
... as hair and clothing. To save power and extend the life of the video equipment. ■ Power Consumption Image > Power Consumption This setting controls the light output from the projector. Sharpness and Picture Quality Settings If the image looks fuzzy, or if it contains noise or flickering, you... You can also access this function to sharpen details such as the image source (see page 28). ■ HDMI Video Range Signal > Advanced > HDMI Video Range Note: This setting can be used with a signal input through the PC port. Choose Vert. Choose Thin-Line Enhancement to make lines and...
... as hair and clothing. To save power and extend the life of the video equipment. ■ Power Consumption Image > Power Consumption This setting controls the light output from the projector. Sharpness and Picture Quality Settings If the image looks fuzzy, or if it contains noise or flickering, you... You can also access this function to sharpen details such as the image source (see page 28). ■ HDMI Video Range Signal > Advanced > HDMI Video Range Note: This setting can be used with a signal input through the PC port. Choose Vert. Choose Thin-Line Enhancement to make lines and...
User's Guide
Page 38
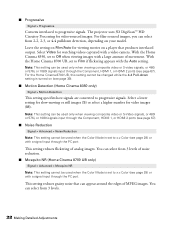
... input through the PC port. Leave the setting on Film/Auto for watching videos captured with a signal input through the Component, HDMI 1, or HDMI 2 ports (see page 39). ■ Motion Detection (Home Cinema 8350 only) Signal > Motion Detection This setting specifies how signals are converted to progressive signals. Select Video for viewing movies on a player that can...
... input through the PC port. Leave the setting on Film/Auto for watching videos captured with a signal input through the Component, HDMI 1, or HDMI 2 ports (see page 39). ■ Motion Detection (Home Cinema 8350 only) Signal > Motion Detection This setting specifies how signals are converted to progressive signals. Select Video for viewing movies on a player that can...

User's Guide
Page 39
...M-PAL, or PAL60 signals input through the Video or S-Video ports, or 480i, 1080i/60Hz, or 1080p/24Hz signals input through the Component, HDMI1, or HDMI2 ports (see page 67). Note: This setting cannot be changed while the 4-4 Pull-down setting is set to x.v.Color (see page 28) or ... projecting MPEG images that have been compressed at a low bit rate. ■ 2-2 Pull-down (Home Cinema 8350 only) Signal > 2-2 Pull-down Note: This setting can select from 3 levels of frame interpolation. This setting cannot be used when the Color Mode is turned on. Select On for 2-2 pulldown detection. ■...
...M-PAL, or PAL60 signals input through the Video or S-Video ports, or 480i, 1080i/60Hz, or 1080p/24Hz signals input through the Component, HDMI1, or HDMI2 ports (see page 67). Note: This setting cannot be changed while the 4-4 Pull-down setting is set to x.v.Color (see page 28) or ... projecting MPEG images that have been compressed at a low bit rate. ■ 2-2 Pull-down (Home Cinema 8350 only) Signal > 2-2 Pull-down Note: This setting can select from 3 levels of frame interpolation. This setting cannot be used when the Color Mode is turned on. Select On for 2-2 pulldown detection. ■...

User's Guide
Page 43
... the image contains a lot of your video inputs. Select Load Memory. 3. Memory button Making Detailed Adjustments 43 Use the arrow buttons to eliminate blurriness. After a moment, the image appears on the input signal. It is properly adjusted first. Selecting Memory Settings You can save customized settings to eliminate vertical bands. Press the Memory...
... the image contains a lot of your video inputs. Select Load Memory. 3. Memory button Making Detailed Adjustments 43 Use the arrow buttons to eliminate blurriness. After a moment, the image appears on the input signal. It is properly adjusted first. Selecting Memory Settings You can save customized settings to eliminate vertical bands. Press the Memory...
User's Guide
Page 46
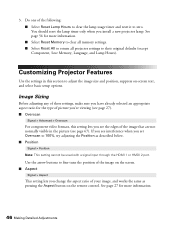
... the lamp usage timer and reset it to fine-tune the position of the image on the screen. ■ Aspect Signal > Aspect This setting lets you set Overscan to their original defaults (except Component, Save Memory, Language, and Lamp Hours). If you see the edges of your image, and works... page 27 for the type of picture you're viewing (see page 67). Use the arrow buttons to zero. 3. Customizing Projector Features Use the settings in the picture (see page 27). ■ Overscan Signal > Advanced > Overscan For component video formats, this setting lets you install a new projector lamp.
... the lamp usage timer and reset it to fine-tune the position of the image on the screen. ■ Aspect Signal > Aspect This setting lets you set Overscan to their original defaults (except Component, Save Memory, Language, and Lamp Hours). If you see the edges of your image, and works... page 27 for the type of picture you're viewing (see page 67). Use the arrow buttons to zero. 3. Customizing Projector Features Use the settings in the picture (see page 27). ■ Overscan Signal > Advanced > Overscan For component video formats, this setting lets you install a new projector lamp.
User's Guide
Page 48
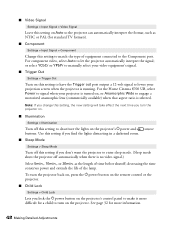
... of the lamp. To turn the projector on. ■ Illumination Settings > Illumination Turn off automatically when there is no video signal.) Select 5min., 10min., or 30min. ■ Video Signal Settings > Input Signal > Video Signal Leave this setting on the projector's Ppower and buttons. or select YCbCr or YPbPr ... on the remote control or the projector. ■ Child Lock Settings > Child Lock Lets you lock the Ppower button on , or Anamorphic Wide to let the projector automatically interpret the signal; For the Home Cinema 8700 UB, select Power to make it more difficult for more ...
... of the lamp. To turn the projector on. ■ Illumination Settings > Illumination Turn off automatically when there is no video signal.) Select 5min., 10min., or 30min. ■ Video Signal Settings > Input Signal > Video Signal Leave this setting on the projector's Ppower and buttons. or select YCbCr or YPbPr ... on the remote control or the projector. ■ Child Lock Settings > Child Lock Lets you lock the Ppower button on , or Anamorphic Wide to let the projector automatically interpret the signal; For the Home Cinema 8700 UB, select Power to make it more difficult for more ...
User's Guide
Page 56
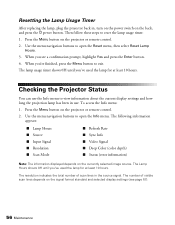
... appears: ■ Lamp Hours ■ Source ■ Input Signal ■ Resolution ■ Scan Mode ■ Refresh Rate ■ Sync Info ■ Video Signal ■ Deep Color (color depth) ■ Status (error information) Note: The information displayed depends on the projector or remote control. 2. Use the menu...the Projector Status You can use . To access the Info menu: 1. Then follow these steps to view information about the current display settings and how long the projection lamp has been in use the Info menu to reset the lamp usage timer: 1. The number of scan ...
... appears: ■ Lamp Hours ■ Source ■ Input Signal ■ Resolution ■ Scan Mode ■ Refresh Rate ■ Sync Info ■ Video Signal ■ Deep Color (color depth) ■ Status (error information) Note: The information displayed depends on the projector or remote control. 2. Use the menu...the Projector Status You can use . To access the Info menu: 1. Then follow these steps to view information about the current display settings and how long the projection lamp has been in use the Info menu to reset the lamp usage timer: 1. The number of scan ...
User's Guide
Page 60
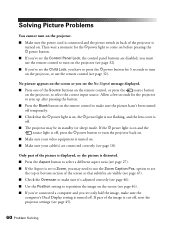
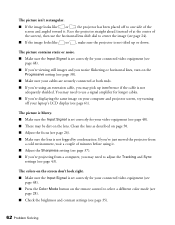
... Source buttons on the remote control, or press the source button on the projector, to Zoom, you 've set the Control Panel Lock, the control panel buttons are connected correctly (see page 32). If part of the picture... ■ Check the Overscan to make sure it's adjusted correctly (see page 46). ■ Use the Position setting to turn on the projector, or use the Zoom Caption Pos. you must use the remote control to reposition the ... You cannot turn the projector back on. ■ Make sure your video equipment is turned on. ■ Make sure your cable(s) are disabled;
... Source buttons on the remote control, or press the source button on the projector, to Zoom, you 've set the Control Panel Lock, the control panel buttons are connected correctly (see page 32). If part of the picture... ■ Check the Overscan to make sure it's adjusted correctly (see page 46). ■ Use the Position setting to turn on the projector, or use the Zoom Caption Pos. you must use the remote control to reposition the ... You cannot turn the projector back on. ■ Make sure your video equipment is turned on. ■ Make sure your cable(s) are disabled;
User's Guide
Page 62
...image (see page 61). The picture is blurry. ■ Make sure the Input Signal is set correctly for your cables are securely connected at the center of the screen), then use a signal amplifier for your video equipment (see page 48). ■ There may pick up or down. You may need to... page 48). ■ If you're viewing still images and you may be dirt on the Progressive setting (see page 38). ■ Make sure your connected video equipment (see page 43). The picture isn't rectangular. ■ If the image looks like or , make sure the projector is not tilted up ...
...image (see page 61). The picture is blurry. ■ Make sure the Input Signal is set correctly for your cables are securely connected at the center of the screen), then use a signal amplifier for your video equipment (see page 48). ■ There may pick up or down. You may need to... page 48). ■ If you're viewing still images and you may be dirt on the Progressive setting (see page 38). ■ Make sure your connected video equipment (see page 43). The picture isn't rectangular. ■ If the image looks like or , make sure the projector is not tilted up ...

User's Guide
Page 67
..., and SECAM formats, and it accepts through the Video, S-Video, and Component ports, respectively. which the image displays for a given setting depends on the currently active picture source, as composite video, S-video, or component video- Digital video is accepted by the HDMI and Component video ports. It can select a different Aspect setting to 7500 feet (2286 meters); If necessary...
..., and SECAM formats, and it accepts through the Video, S-Video, and Component ports, respectively. which the image displays for a given setting depends on the currently active picture source, as composite video, S-video, or component video- Digital video is accepted by the HDMI and Component video ports. It can select a different Aspect setting to 7500 feet (2286 meters); If necessary...

User's Guide
Page 76
..., 29 to 31, 40 to 41 isolating, 40 problems, 62 Color Gamut setting, 42 Color Mode, 9, 28, 62 Color Saturation setting, 40 Color temperature setting, 40 Component setting, 48 Component video connection, 18 Computer adjusting image, 42 displaying image, 61 Contrast button, 9 ratio, 65 setting, 36 Contrast Enhancement, 42 Control Panel Lock, 49 Control panel lock...
..., 29 to 31, 40 to 41 isolating, 40 problems, 62 Color Gamut setting, 42 Color Mode, 9, 28, 62 Color Saturation setting, 40 Color temperature setting, 40 Component setting, 48 Component video connection, 18 Computer adjusting image, 42 displaying image, 61 Contrast button, 9 ratio, 65 setting, 36 Contrast Enhancement, 42 Control Panel Lock, 49 Control panel lock...
User's Guide
Page 79
... 66 Startup screen, selecting, 47 Static, 62 Storing projector, 57 Super-resolution, 42 Support, 11, 64 S-Video connection, 18 Sync (Synchronization) setting, 42 T Technical support, 11, 64 Test pattern, 24, 40 THX setting, 28 Tint, 40 Tracking, 42 Transporting projector, 57 Trigger out port, 20, 27 Trigger out... setting, 48 Turning on and off projector, 21 to 22, 60 V Video Signal setting, 48 Video, compatible formats, 67 to 68 VP21 codes, 69 W Warranty, 10, 74 to 75 Where to Get Help, 64 Wide setting, 27 X x.v.Color setting, 28 Z Zoom Caption Pos. setting, 27, 47 Zoom ring...
... 66 Startup screen, selecting, 47 Static, 62 Storing projector, 57 Super-resolution, 42 Support, 11, 64 S-Video connection, 18 Sync (Synchronization) setting, 42 T Technical support, 11, 64 Test pattern, 24, 40 THX setting, 28 Tint, 40 Tracking, 42 Transporting projector, 57 Trigger out port, 20, 27 Trigger out... setting, 48 Turning on and off projector, 21 to 22, 60 V Video Signal setting, 48 Video, compatible formats, 67 to 68 VP21 codes, 69 W Warranty, 10, 74 to 75 Where to Get Help, 64 Wide setting, 27 X x.v.Color setting, 28 Z Zoom Caption Pos. setting, 27, 47 Zoom ring...


