
User Manual
Page 3
... to a Computer for VGA Video 29 Connecting to a Computer for HDMI Video 29 Connecting to Go for Additional Information 12 Projector Part Locations ...12 Projector Parts - Contents PowerLite Home Cinema 5025UB User's Guide 7 Introduction to Your Projector ...8 Projector Features...8 Product Box Contents...9 Additional Components ...10 Optional Equipment and Replacement Parts 10 Warranty and Registration Information 11 Notations Used...
... to a Computer for VGA Video 29 Connecting to a Computer for HDMI Video 29 Connecting to Go for Additional Information 12 Projector Part Locations ...12 Projector Parts - Contents PowerLite Home Cinema 5025UB User's Guide 7 Introduction to Your Projector ...8 Projector Features...8 Product Box Contents...9 Additional Components ...10 Optional Equipment and Replacement Parts 10 Warranty and Registration Information 11 Notations Used...

User Manual
Page 4
... Charging the 3D Glasses...38 3D Viewing Range...39 Selecting the Language for the Projector Menus 40 Adjusting the Image Height ...41 Adjusting the Image Position Using Lens Shift 42 Image Shape...44 Correcting Image Shape with the Keystone Buttons ... the Color Mode...55 Available Color Modes...55 Turning On Auto Iris...56 Using Picture in Picture ...57 Available Picture in Picture Options 58 Adjusting Projector Features ...59 Shutting Off the Picture Temporarily 59...
... Charging the 3D Glasses...38 3D Viewing Range...39 Selecting the Language for the Projector Menus 40 Adjusting the Image Height ...41 Adjusting the Image Position Using Lens Shift 42 Image Shape...44 Correcting Image Shape with the Keystone Buttons ... the Color Mode...55 Available Color Modes...55 Turning On Auto Iris...56 Using Picture in Picture ...57 Available Picture in Picture Options 58 Adjusting Projector Features ...59 Shutting Off the Picture Temporarily 59...
User Manual
Page 5
... Replacing the Lamp ...89 Resetting the Lamp Timer...94 Replacing the Remote Control Batteries 95 Transporting the Projector...97 Solving Problems ...98 Projection Problem Tips ...98 Projector Light Status ...99 Solving Image Problems ...102 Solutions When No Image Appears 102 Solutions When "No ... Cable ...61 Saving Settings to Memory and Using Saved Settings 61 Adjusting the Menu Settings ...63 Using the Projector's Menus...63 Image Quality Settings - Settings Menu 71 Projector Setup Settings - Info Menu 79 Projector Reset Options - Image Menu 64 Input Signal Settings - Memory Menu 78...
... Replacing the Lamp ...89 Resetting the Lamp Timer...94 Replacing the Remote Control Batteries 95 Transporting the Projector...97 Solving Problems ...98 Projection Problem Tips ...98 Projector Light Status ...99 Solving Image Problems ...102 Solutions When No Image Appears 102 Solutions When "No ... Cable ...61 Saving Settings to Memory and Using Saved Settings 61 Adjusting the Menu Settings ...63 Using the Projector's Menus...63 Image Quality Settings - Settings Menu 71 Projector Setup Settings - Info Menu 79 Projector Reset Options - Image Menu 64 Input Signal Settings - Memory Menu 78...
User Manual
Page 6
... Incorrect 106 Solutions When a 3D Image Does Not Display Correctly 107 Solving Projector or Remote Control Operation Problems 108 Solutions to Projector Power or Shut-Off Problems 108 Solutions to Problems with the Remote Control...to Get Help...110 Technical Specifications ...112 General Projector Specifications ...112 Projector Lamp Specifications...113 Remote Control Specifications ...114 Projector Dimension Specifications 114 Projector Electrical Specifications ...114 Projector Environmental Specifications 115 Projector Safety and Approvals Specifications 115 Supported Video Display ...
... Incorrect 106 Solutions When a 3D Image Does Not Display Correctly 107 Solving Projector or Remote Control Operation Problems 108 Solutions to Projector Power or Shut-Off Problems 108 Solutions to Problems with the Remote Control...to Get Help...110 Technical Specifications ...112 General Projector Specifications ...112 Projector Lamp Specifications...113 Remote Control Specifications ...114 Projector Dimension Specifications 114 Projector Electrical Specifications ...114 Projector Environmental Specifications 115 Projector Safety and Approvals Specifications 115 Supported Video Display ...
User Manual
Page 8
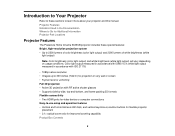
... measured in the Documentation Where to Go for Additional Information Projector Part Locations Projector Features The PowerLite Home Cinema 5025UB projector includes these sections to learn more about your projector and this manual. Projector Features Notations Used in accordance with RF active shutter glasses ...lens shift dials, and vertical keystone correction buttons for flexible projector placement • 2.1× optical zoom ratio for improved zooming capability Product Box Contents 8 Introduction to Your Projector Refer to these special features: Bright, high-resolution projection...
... measured in the Documentation Where to Go for Additional Information Projector Part Locations Projector Features The PowerLite Home Cinema 5025UB projector includes these sections to learn more about your projector and this manual. Projector Features Notations Used in accordance with RF active shutter glasses ...lens shift dials, and vertical keystone correction buttons for flexible projector placement • 2.1× optical zoom ratio for improved zooming capability Product Box Contents 8 Introduction to Your Projector Refer to these special features: Bright, high-resolution projection...
User Manual
Page 9
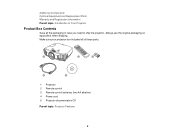
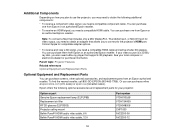
Additional Components Optional Equipment and Replacement Parts Warranty and Registration Information Parent topic: Introduction to Your Projector Product Box Contents Save all of these parts: 1 Projector 2 Remote control 3 Remote control batteries (two AA alkaline) 4 Power cord 5 Projector documentation CD Parent topic: Projector Features 9 Make sure your projector box included all the packaging in case you need to ship the projector. Always use the original packaging (or equivalent) when shipping.
Additional Components Optional Equipment and Replacement Parts Warranty and Registration Information Parent topic: Introduction to Your Projector Product Box Contents Save all of these parts: 1 Projector 2 Remote control 3 Remote control batteries (two AA alkaline) 4 Power cord 5 Projector documentation CD Parent topic: Projector Features 9 Make sure your projector box included all the packaging in case you need to ship the projector. Always use the original packaging (or equivalent) when shipping.
User Manual
Page 10
... To receive and view a 3D signal, you to connect to the projector's HDMI port. See your projector: Option or part Genuine Epson replacement lamp (ELPLP69) Replacement air filter RF 3D glasses (ELPGS03) Projector ceiling mount Belkin PureAV HDMI audio video cable, 6 ft Belkin PureAV HDMI...Bluray disc, you can purchase online at epsonstore.com (U.S. Parent topic: Projector Features Related references Optional Equipment and Replacement Parts Optional Equipment and Replacement Parts You can purchase them from an Epson authorized reseller. Or you also need a Blu-ray player that allows ...
... To receive and view a 3D signal, you to connect to the projector's HDMI port. See your projector: Option or part Genuine Epson replacement lamp (ELPLP69) Replacement air filter RF 3D glasses (ELPGS03) Projector ceiling mount Belkin PureAV HDMI audio video cable, 6 ft Belkin PureAV HDMI...Bluray disc, you can purchase online at epsonstore.com (U.S. Parent topic: Projector Features Related references Optional Equipment and Replacement Parts Optional Equipment and Replacement Parts You can purchase them from an Epson authorized reseller. Or you also need a Blu-ray player that allows ...

User Manual
Page 11
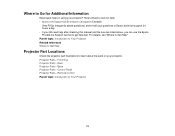
... above, 1-year and 2-year extended service plans are available. In addition, Epson offers free Extra Care Home Service. In the unlikely event of an equipment failure, you project with your projector. Register your product online using the projector CD or at this site: epson.com/webreg Registering also lets you a replacement unit anywhere in these...
... above, 1-year and 2-year extended service plans are available. In addition, Epson offers free Extra Care Home Service. In the unlikely event of an equipment failure, you project with your projector. Register your product online using the projector CD or at this site: epson.com/webreg Registering also lets you a replacement unit anywhere in these...
User Manual
Page 12
...Projector 12 Rear Projector Parts - Parent topic: Introduction to Your Projector Related references Where to Get Help Projector Part Locations Check the projector part illustrations to learn about the parts on using your projector? Control Panel Projector Parts - Where to Go for help: • epson.com/support (U.S) or epson... and the sources listed above, you can use the Epson PrivateLine Support service to get help on your projector. Remote Control Parent topic: Introduction to Get Help". Projector Parts - Base Projector Parts - Here's where to look for Additional Information ...
...Projector 12 Rear Projector Parts - Parent topic: Introduction to Your Projector Related references Where to Get Help Projector Part Locations Check the projector part illustrations to learn about the parts on using your projector? Control Panel Projector Parts - Where to Go for help: • epson.com/support (U.S) or epson... and the sources listed above, you can use the Epson PrivateLine Support service to get help on your projector. Remote Control Parent topic: Introduction to Get Help". Projector Parts - Base Projector Parts - Here's where to look for Additional Information ...

User Manual
Page 13
Projector Parts - Front/Top 1 Lamp cover 2 Horizontal and vertical lens shift dials 3 Exhaust vent 4 Remote receiver 5 Lens shutter 6 Lens 7 Air intake/air filter cover 8 Front adjustable foot 9 Control panel and lights 10 Focus ring 11 Zoom ring Parent topic: Projector Part Locations 13
Projector Parts - Front/Top 1 Lamp cover 2 Horizontal and vertical lens shift dials 3 Exhaust vent 4 Remote receiver 5 Lens shutter 6 Lens 7 Air intake/air filter cover 8 Front adjustable foot 9 Control panel and lights 10 Focus ring 11 Zoom ring Parent topic: Projector Part Locations 13

User Manual
Page 14
Rear 1 Cable clip holes 2 HDMI1 port 3 HDMI2 port 4 Component ports 5 Video port 6 PC port (VGA) 7 RS-232C port 8 Trigger out port 9 Service port 10 Remote receiver 11 AC input port Parent topic: Projector Part Locations Related tasks Installing a Security Cable Attaching and Removing the Cable Clips 14 Projector Parts -
Rear 1 Cable clip holes 2 HDMI1 port 3 HDMI2 port 4 Component ports 5 Video port 6 PC port (VGA) 7 RS-232C port 8 Trigger out port 9 Service port 10 Remote receiver 11 AC input port Parent topic: Projector Part Locations Related tasks Installing a Security Cable Attaching and Removing the Cable Clips 14 Projector Parts -
User Manual
Page 15
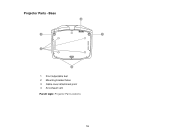
Base 1 Front adjustable feet 2 Mounting bracket holes 3 Cable cover attachment point 4 Air exhaust vent Parent topic: Projector Part Locations 15 Projector Parts -
Base 1 Front adjustable feet 2 Mounting bracket holes 3 Cable cover attachment point 4 Air exhaust vent Parent topic: Projector Part Locations 15 Projector Parts -
User Manual
Page 17
6 Vertical keystone adjustment buttons (adjust screen shape) and arrow buttons 7 Arrow buttons 8 Esc button (cancels/exits functions) 9 Enter button (selects options) 10 Source button (cycles through the list of sources) 11 Power button/light Parent topic: Projector Part Locations Related references Projector Light Status 17
6 Vertical keystone adjustment buttons (adjust screen shape) and arrow buttons 7 Arrow buttons 8 Esc button (cancels/exits functions) 9 Enter button (selects options) 10 Source button (cycles through the list of sources) 11 Power button/light Parent topic: Projector Part Locations Related references Projector Light Status 17
User Manual
Page 18
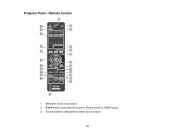
Projector Parts - Remote Control 1 On button (turns on projector) 2 P-in-P button (controls the Picture-in-Picture mode for HDMI inputs) 3 Source buttons (select specific video input sources) 18
Projector Parts - Remote Control 1 On button (turns on projector) 2 P-in-P button (controls the Picture-in-Picture mode for HDMI inputs) 3 Source buttons (select specific video input sources) 18
User Manual
Page 19
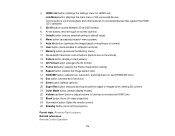
... (cycles between 2D and 3D modes) 6 Arrow buttons (move though on-screen options) 7 Default button (returns selected setting to default value) 8 Menu button (accesses projector menu system) 9 Auto Iris button (optimizes the image based on brightness of content) 10 User button (customizable for different functions) 11 Memory button (accesses the... connected via HDMI Link) 23 Blank button (turns off video projection) 24 Illumination button (lights the remote control) 25 Standby button (turns off the projector) Parent topic: Projector Part Locations Related references Remote Control Operation 19
... (cycles between 2D and 3D modes) 6 Arrow buttons (move though on-screen options) 7 Default button (returns selected setting to default value) 8 Menu button (accesses projector menu system) 9 Auto Iris button (optimizes the image based on brightness of content) 10 User button (customizable for different functions) 11 Memory button (accesses the... connected via HDMI Link) 23 Blank button (turns off video projection) 24 Illumination button (lights the remote control) 25 Standby button (turns off the projector) Parent topic: Projector Part Locations Related references Remote Control Operation 19

User Manual
Page 20
Projector Memory Options - Memory Menu 20
Projector Memory Options - Memory Menu 20
User Manual
Page 21
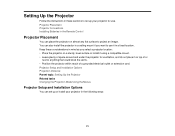
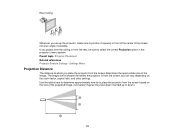
... in the following ways: 21 Projector Setup and Installation Options Projection Distance Parent topic: Setting Up the Projector Related tasks Changing the Projection Mode Using the Menus Projector Setup and Installation Options You can set up or install your projector for ventilation, and do not place...to project an image. Keep these sections to set up your projector in the Remote Control Projector Placement You can also install the projector in a ceiling mount if you select a projector location: • Place the projector on a sturdy, level surface or install it on almost ...
... in the following ways: 21 Projector Setup and Installation Options Projection Distance Parent topic: Setting Up the Projector Related tasks Changing the Projection Mode Using the Menus Projector Setup and Installation Options You can set up or install your projector for ventilation, and do not place...to project an image. Keep these sections to set up your projector in the Remote Control Projector Placement You can also install the projector in a ceiling mount if you select a projector location: • Place the projector on a sturdy, level surface or install it on almost ...
User Manual
Page 23
... on the size of the projected image. (Conversion figures may have been rounded up the projector, make sure to position it squarely in the projector's menu system. Parent topic: Projector Placement Related references Projector Feature Settings - Use the tables here to determine approximately how far to select the correct ...Projection option in front of the center of the screen, not at an angle, if possible. Rear Ceiling Wherever you place the projector from the screen determines the approximate size of the image. If you project from the ceiling or from the rear, be sure to...
... on the size of the projected image. (Conversion figures may have been rounded up the projector, make sure to position it squarely in the projector's menu system. Parent topic: Projector Placement Related references Projector Feature Settings - Use the tables here to determine approximately how far to select the correct ...Projection option in front of the center of the screen, not at an angle, if possible. Rear Ceiling Wherever you place the projector from the screen determines the approximate size of the image. If you project from the ceiling or from the rear, be sure to...

User Manual
Page 25
... 40.6 inches (103 cm) 128.7 inches (327 cm) (540 to 1148 cm) Parent topic: Projector Placement Projector Connections You can connect the projector to a variety of computer (Windows or Mac) that allows you to connect to the projector. Note: To connect a smartphone or tablet, you may need to display presentations, movies, or other... sources to obtain an adapter that has a standard video output (15-pin VGA monitor) port, or HDMI port. This allows you will use the projector at altitudes above 4921 feet (1500 m), turn on High Altitude Mode to External Speakers Parent topic: Setting Up the...
... 40.6 inches (103 cm) 128.7 inches (327 cm) (540 to 1148 cm) Parent topic: Projector Placement Projector Connections You can connect the projector to a variety of computer (Windows or Mac) that allows you to connect to the projector. Note: To connect a smartphone or tablet, you may need to display presentations, movies, or other... sources to obtain an adapter that has a standard video output (15-pin VGA monitor) port, or HDMI port. This allows you will use the projector at altitudes above 4921 feet (1500 m), turn on High Altitude Mode to External Speakers Parent topic: Setting Up the...

User Manual
Page 26
... instructions in response time to game commands, set your image to appear when you connected a game console, it to control certain features of the projector's HDMI ports. Connect the other end to one of the linked device by pressing the HDMI Link button on the remote control and setting HDMI...of 480p, 720p, or higher. See your game console documentation for your game console's output format to On. 26 Connect the HDMI cable to the projector. You can connect it may take a few seconds for instructions. Note: When an audio/video source that meets the HDMI CEC standard is connected ...
... instructions in response time to game commands, set your image to appear when you connected a game console, it to control certain features of the projector's HDMI ports. Connect the other end to one of the linked device by pressing the HDMI Link button on the remote control and setting HDMI...of 480p, 720p, or higher. See your game console documentation for your game console's output format to On. 26 Connect the HDMI cable to the projector. You can connect it may take a few seconds for instructions. Note: When an audio/video source that meets the HDMI CEC standard is connected ...


