
Users Guide
Page 3
...3 Base...25 Projector Parts - Control Panel ...26 Projector Parts - Rear ...23 Projector Parts - Contents PowerLite 975W/2040/2055/2065/2140W/2155W/2165W/2245U/ 2250U/2255U/2265U User's Guide... 11 Introduction to Your Projector ...12 Projector Features...12 Product Box Contents...13 Additional ...Components ...15 Additional Projector Software and Manuals 16 Optional Equipment and Replacement Parts 17 Warranty and...
...3 Base...25 Projector Parts - Control Panel ...26 Projector Parts - Rear ...23 Projector Parts - Contents PowerLite 975W/2040/2055/2065/2140W/2155W/2165W/2245U/ 2250U/2255U/2265U User's Guide... 11 Introduction to Your Projector ...12 Projector Features...12 Product Box Contents...13 Additional ...Components ...15 Additional Projector Software and Manuals 16 Optional Equipment and Replacement Parts 17 Warranty and...

Users Guide
Page 4
... LAN Module into the USB-A port 60 Using a QR Code to Connect a Mobile Device 62 Using Quick Wireless Connection (Windows 64 Selecting Wireless Network Settings Manually 66 Wireless LAN Menu Settings ...69 Selecting Wireless Network Settings in Windows 70 Selecting Wireless Network Settings on Mac 71 Setting Up Wireless Network Security...
... LAN Module into the USB-A port 60 Using a QR Code to Connect a Mobile Device 62 Using Quick Wireless Connection (Windows 64 Selecting Wireless Network Settings Manually 66 Wireless LAN Menu Settings ...69 Selecting Wireless Network Settings in Windows 70 Selecting Wireless Network Settings on Mac 71 Setting Up Wireless Network Security...

Users Guide
Page 12
... connectivity • Plug-and-play 3-in accordance with ISO 21118. • PowerLite 2040/2055/2065: Native resolution of 1024 × 768 pixels (XGA) • PowerLite 975W/2140W/2155W/2165W: Native resolution of 1280 × 800 pixels (WXGA) • PowerLite 2245U/2250U/2255U/2265U: Native resolution of white brightness (white light output) Note: Color brightness... Go for projection, monitoring, and control via remote 12 Projector Features Notations Used in the Documentation Where to learn more about your projector and this manual.
... connectivity • Plug-and-play 3-in accordance with ISO 21118. • PowerLite 2040/2055/2065: Native resolution of 1024 × 768 pixels (XGA) • PowerLite 975W/2140W/2155W/2165W: Native resolution of 1280 × 800 pixels (WXGA) • PowerLite 2245U/2250U/2255U/2265U: Native resolution of white brightness (white light output) Note: Color brightness... Go for projection, monitoring, and control via remote 12 Projector Features Notations Used in the Documentation Where to learn more about your projector and this manual.
Users Guide
Page 13
...memory devices or Epson document camera • Two HDMI ports for multiple high-definition AV devices, including MHL support • Miracast screen mirroring for laptops and mobile devices (PowerLite 975W/2165W/2255U/2265U) &#...8226; Dual VGA ports for connections by multiple presenters • Ports for quick setup and shut down • Network message broadcast system to project timely messages to all networked projectors (Windows only) • Powerful 16W speaker system Product Box Contents Additional Components Additional Projector Software and Manuals...
...memory devices or Epson document camera • Two HDMI ports for multiple high-definition AV devices, including MHL support • Miracast screen mirroring for laptops and mobile devices (PowerLite 975W/2165W/2255U/2265U) &#...8226; Dual VGA ports for connections by multiple presenters • Ports for quick setup and shut down • Network message broadcast system to project timely messages to all networked projectors (Windows only) • Powerful 16W speaker system Product Box Contents Additional Components Additional Projector Software and Manuals...
Users Guide
Page 16
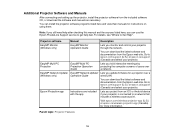
...update firmware for a projector over a network. Visit epson.com/wireless-projector-app (U.S.) or epson.ca/wireless-projector-app (Canada) for instructions on using them. For details, see "Where to get help after checking this manual and the sources listed here, you still need help...your projector is connected to epson.com/support (U.S.) or epson.ca/support (Canada) and select your projector through the network. You can download the latest software and documentation from an iOS or Android device if your projector. Projector software Manual Description EasyMP Monitor (Windows ...
...update firmware for a projector over a network. Visit epson.com/wireless-projector-app (U.S.) or epson.ca/wireless-projector-app (Canada) for instructions on using them. For details, see "Where to get help after checking this manual and the sources listed here, you still need help...your projector is connected to epson.com/support (U.S.) or epson.ca/support (Canada) and select your projector through the network. You can download the latest software and documentation from an iOS or Android device if your projector. Projector software Manual Description EasyMP Monitor (Windows ...
Users Guide
Page 19
... get help fast. Front/Top Projector Parts - Press the Home button on your questions to Epson technical support 24 hours a day. • If you still need help after checking this manual and any other sources listed here, you can use the Epson PrivateLine Support service to get quick solutions to common problems. •...
... get help fast. Front/Top Projector Parts - Press the Home button on your questions to Epson technical support 24 hours a day. • If you still need help after checking this manual and any other sources listed here, you can use the Epson PrivateLine Support service to get quick solutions to common problems. •...

Users Guide
Page 50
See the document camera manual for details. • For the Epson DC-21 document camera, connect it to the projector's HDMI, Computer, or Video port and to the corresponding port on the document camera. See the document camera manual for details. Caution: Use only the type of batteries specified in the Remote... Control The remote control uses the two AA batteries that came with the camera and connect it to the projector's port and to the document camera's USB Type B port. • For the Epson DC-...
See the document camera manual for details. • For the Epson DC-21 document camera, connect it to the projector's HDMI, Computer, or Video port and to the corresponding port on the document camera. See the document camera manual for details. Caution: Use only the type of batteries specified in the Remote... Control The remote control uses the two AA batteries that came with the camera and connect it to the projector's port and to the document camera's USB Type B port. • For the Epson DC-...

Users Guide
Page 53
... network. Connecting to a Wired Network Selecting Wired Network Settings Parent topic: Using the Projector on a Network Related references Additional Projector Software and Manuals Connecting to a Wired Network To connect the projector to your network hub, switch, or router. 53 Note: If your projector is connected ...your network, and then set up your projector for network projection. To do this, you can project through the access point using the Epson network software. To ensure proper data transmission, use a Category 5e shielded cable or better. 1. Connect one end of the network ...
... network. Connecting to a Wired Network Selecting Wired Network Settings Parent topic: Using the Projector on a Network Related references Additional Projector Software and Manuals Connecting to a Wired Network To connect the projector to your network hub, switch, or router. 53 Note: If your projector is connected ...your network, and then set up your projector for network projection. To do this, you can project through the access point using the Epson network software. To ensure proper data transmission, use a Category 5e shielded cable or better. 1. Connect one end of the network ...

Users Guide
Page 57
... If you want from the included CD or download the software and manuals as described here, install the network software from the displayed keyboard, press the arrow buttons on the remote control. Note: The Epson 802.11b/g/n wireless LAN module is connected via a LAN cable to...over a wireless network. To connect the projector to Connect a Mobile Device Using Quick Wireless Connection (Windows) Selecting Wireless Network Settings Manually Selecting Wireless Network Settings in Windows Selecting Wireless Network Settings on the standby screen, turn off DHCP and enter the projector's IP ...
... If you want from the included CD or download the software and manuals as described here, install the network software from the displayed keyboard, press the arrow buttons on the remote control. Note: The Epson 802.11b/g/n wireless LAN module is connected via a LAN cable to...over a wireless network. To connect the projector to Connect a Mobile Device Using Quick Wireless Connection (Windows) Selecting Wireless Network Settings Manually Selecting Wireless Network Settings in Windows Selecting Wireless Network Settings on the standby screen, turn off DHCP and enter the projector's IP ...
Users Guide
Page 58
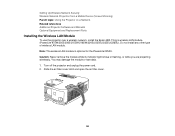
... You may damage the module or lose data. 1. Caution: Never remove the module while its indicator light is optional for the PowerLite 2250U. Slide the air filter cover latch and open the air filter cover. 58 Do not install any other type of wireless LAN... topic: Using the Projector on a Network Related references Additional Projector Software and Manuals Optional Equipment and Replacement Parts Installing the Wireless LAN Module To use the projector over a wireless network, install the Epson 802.11b/g/n wireless LAN module (PowerLite 975W/2055/2065/2155W/2165W/2245U/2250U/2255U/2265U).
... You may damage the module or lose data. 1. Caution: Never remove the module while its indicator light is optional for the PowerLite 2250U. Slide the air filter cover latch and open the air filter cover. 58 Do not install any other type of wireless LAN... topic: Using the Projector on a Network Related references Additional Projector Software and Manuals Optional Equipment and Replacement Parts Installing the Wireless LAN Module To use the projector over a wireless network, install the Epson 802.11b/g/n wireless LAN module (PowerLite 975W/2055/2065/2155W/2165W/2245U/2250U/2255U/2265U).

Users Guide
Page 66
Parent topic: Wireless Network Projection Selecting Wireless Network Settings Manually Before you can project from your wireless network, you must select the network settings for the projector using its menu system. 1. Select Network Configuration and press Enter. 66 Press the Menu button. 3. Make sure the Wireless LAN Power setting is set to On. 5. Turn on the projector. 2. Select the Network menu and press Enter. 4.
Parent topic: Wireless Network Projection Selecting Wireless Network Settings Manually Before you can project from your wireless network, you must select the network settings for the projector using its menu system. 1. Select Network Configuration and press Enter. 66 Press the Menu button. 3. Make sure the Wireless LAN Power setting is set to On. 5. Turn on the projector. 2. Select the Network menu and press Enter. 4.

Users Guide
Page 70
... Settings SSID Display IP Address Display IPv6 Settings Options EAP Type User name Password Client Certificate Verify Server Cert. set to Off to manually enter the network's IP Address, Subnet Mask, and Gateway Address Selects whether to display the SSID on the network standby screen Selects ...screen Selects the IPv6 settings when you connect the projector to the network using IPv6 Parent topic: Selecting Wireless Network Settings Manually Selecting Wireless Network Settings in Windows Before connecting to the projector, select the correct wireless network on DHCP if your computer. 70
... Settings SSID Display IP Address Display IPv6 Settings Options EAP Type User name Password Client Certificate Verify Server Cert. set to Off to manually enter the network's IP Address, Subnet Mask, and Gateway Address Selects whether to display the SSID on the network standby screen Selects ...screen Selects the IPv6 settings when you connect the projector to the network using IPv6 Parent topic: Selecting Wireless Network Settings Manually Selecting Wireless Network Settings in Windows Before connecting to the projector, select the correct wireless network on DHCP if your computer. 70

Users Guide
Page 153
Projector Feature Settings - turn on or off automatic correction and the H-Keystone Adjuster setting (PowerLite 2040/2140W) Quick Corner: select to rectangular (horizontally and vertically) H/V Keystone: lets you customize various projector features. The available settings depend on -screen display Setting Keystone Options H/V Keystone Quick Corner 153 Description Adjusts image shape to correct image shape and alignment using an on the currently selected input source. Settings Menu Options on the Settings menu let you manually correct horizontal and vertical sides;
Projector Feature Settings - turn on or off automatic correction and the H-Keystone Adjuster setting (PowerLite 2040/2140W) Quick Corner: select to rectangular (horizontally and vertically) H/V Keystone: lets you customize various projector features. The available settings depend on -screen display Setting Keystone Options H/V Keystone Quick Corner 153 Description Adjusts image shape to correct image shape and alignment using an on the currently selected input source. Settings Menu Options on the Settings menu let you manually correct horizontal and vertical sides;

Users Guide
Page 171
... electrical voltages in these sections to service this product yourself, except as specifically explained in this manual. Refer all other part needs replacing, contact Epson or an authorized Epson servicer. If any part of the projector, turn it from overheating due to keep working at...place to qualified servicers. The only parts you notice dust or smudges on the projector, except as specifically explained in this manual. Warning: Before cleaning any other servicing to place. Maintaining and Transporting the Projector Follow the instructions in the projector can injure...
... electrical voltages in these sections to service this product yourself, except as specifically explained in this manual. Refer all other part needs replacing, contact Epson or an authorized Epson servicer. If any part of the projector, turn it from overheating due to keep working at...place to qualified servicers. The only parts you notice dust or smudges on the projector, except as specifically explained in this manual. Warning: Before cleaning any other servicing to place. Maintaining and Transporting the Projector Follow the instructions in the projector can injure...

Users Guide
Page 186
... fluid has leaked, wipe it gets on your hands, wash them immediately to avoid injury. 186 Do not install batteries of batteries specified in this manual. Caution: Use only the type of different types, or mix new and old batteries. 1. Replace the batteries as soon as shown. 2.
... fluid has leaked, wipe it gets on your hands, wash them immediately to avoid injury. 186 Do not install batteries of batteries specified in this manual. Caution: Use only the type of different types, or mix new and old batteries. 1. Replace the batteries as soon as shown. 2.

Users Guide
Page 189
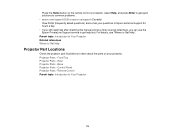
Solving Problems Check the solutions in these solutions help you solve many problems. If none of these sections if you can contact Epson for technical support. Parent topic: Solving Problems Related references Projector Light Status Where to Get Help Projection Problem Tips If the projector is ...operating. • The solutions in and turn it on the Home screen can help , you have any problems using the projector. If this manual can display information about common problems, if the projector is not working properly, try turning it off and unplugging it back in this does ...
Solving Problems Check the solutions in these solutions help you solve many problems. If none of these sections if you can contact Epson for technical support. Parent topic: Solving Problems Related references Projector Light Status Where to Get Help Projection Problem Tips If the projector is ...operating. • The solutions in and turn it on the Home screen can help , you have any problems using the projector. If this manual can display information about common problems, if the projector is not working properly, try turning it off and unplugging it back in this does ...

Users Guide
Page 195
... version from applications using the most recent version of the mouse pointer smooth in the Epson USB Display Settings program on the remote control. • Make sure the USB Display software has installed correctly. Install it manually if necessary. • On a Mac, select the USB Display icon in the Dock or from...
... version from applications using the most recent version of the mouse pointer smooth in the Epson USB Display Settings program on the remote control. • Make sure the USB Display software has installed correctly. Install it manually if necessary. • On a Mac, select the USB Display icon in the Dock or from...

Users Guide
Page 196
... key and press the key labeled with a monitor icon or CRT/LCD. (See your laptop manual for details.) Wait a few seconds for an image to appear. If necessary, check your computer or Windows manual for details.) 1. Parent topic: Solutions When "No Signal" Message Appears Displaying From a Mac ...you see the "No Signal" message when you display from a PC laptop, you need to set up the laptop for mirrored display. (See your laptop manual for instructions.) 4. To display on an external monitor. 1. Hold down the Windows key and press P at the same time, then click Duplicate. 2....
... key and press the key labeled with a monitor icon or CRT/LCD. (See your laptop manual for details.) Wait a few seconds for an image to appear. If necessary, check your computer or Windows manual for details.) 1. Parent topic: Solutions When "No Signal" Message Appears Displaying From a Mac ...you see the "No Signal" message when you display from a PC laptop, you need to set up the laptop for mirrored display. (See your laptop manual for instructions.) 4. To display on an external monitor. 1. Hold down the Windows key and press P at the same time, then click Duplicate. 2....

Users Guide
Page 197
... a test, try the following solutions: • Make sure a VGA cable is connected to your computer and the projector's Computer1 port. • Make sure your computer manual for the input signal. 197 If necessary, select a different display resolution for your computer. (See your external monitor's cable is connected to the monitor and...
... a test, try the following solutions: • Make sure a VGA cable is connected to your computer and the projector's Computer1 port. • Make sure your computer manual for the input signal. 197 If necessary, select a different display resolution for your computer. (See your external monitor's cable is connected to the monitor and...

Users Guide
Page 198
...different cables. • Check your computer display settings to disable dual display and set the resolution within the projector's limits. (See your computer manual for details.) • Check the resolution assigned to your presentation files to see if they are created for details.) Parent topic: Solving Image ... squarely, if possible. • If you adjusted the projector height using the projector feet, press the keystone buttons on -screen display (PowerLite 975W/2040/2055/2065/2140W/2155W/2165W/2245U/2250U/2255U/2265U). • Adjust the Quick Corner setting to correct the image shape.
...different cables. • Check your computer display settings to disable dual display and set the resolution within the projector's limits. (See your computer manual for details.) • Check the resolution assigned to your presentation files to see if they are created for details.) Parent topic: Solving Image ... squarely, if possible. • If you adjusted the projector height using the projector feet, press the keystone buttons on -screen display (PowerLite 975W/2040/2055/2065/2140W/2155W/2165W/2245U/2250U/2255U/2265U). • Adjust the Quick Corner setting to correct the image shape.

