User Manual
Page 4
... Projector on a Network ...37 Wireless Network Projection ...37 Installing the Wireless LAN Module 38 Using Quick Wireless Connection (Windows Only 40 Selecting Wireless Network Settings Manually 41 Wireless LAN Menu Settings ...44 Selecting Wireless Network Settings in Windows 45 Selecting Wireless Network Settings in Mac OS X 45 Setting Up Wireless Network...
... Projector on a Network ...37 Wireless Network Projection ...37 Installing the Wireless LAN Module 38 Using Quick Wireless Connection (Windows Only 40 Selecting Wireless Network Settings Manually 41 Wireless LAN Menu Settings ...44 Selecting Wireless Network Settings in Windows 45 Selecting Wireless Network Settings in Mac OS X 45 Setting Up Wireless Network...
User Manual
Page 9
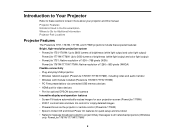
... • Wireless LAN module included (PowerLite 1761W/1771W/1776W) • PC Free presentations via connected USB memory devices • HDMI port for video devices • Port for optional EPSON document camera Innovative display and operation features • Screen Fit feature automatically resizes images for your projector and this manual. Projector Features Notations Used in...
... • Wireless LAN module included (PowerLite 1761W/1771W/1776W) • PC Free presentations via connected USB memory devices • HDMI port for video devices • Port for optional EPSON document camera Innovative display and operation features • Screen Fit feature automatically resizes images for your projector and this manual. Projector Features Notations Used in...

User Manual
Page 15
Remote Control Parent topic: Introduction to get help after checking this manual and the sources listed above, you can use the EPSON PrivateLine Support service to Your Projector 15 Projector Parts - • If you still need help fast. For details, see "Where to learn about the parts on your projector. Parent topic: Introduction to Your Projector Related references Where to Get Help Projector Part Locations Check the projector part illustrations to Get Help". Control Panel Projector Parts - Base Projector Parts - Front/Top Projector Parts - Rear Projector Parts -
Remote Control Parent topic: Introduction to get help after checking this manual and the sources listed above, you can use the EPSON PrivateLine Support service to Your Projector 15 Projector Parts - • If you still need help fast. For details, see "Where to learn about the parts on your projector. Parent topic: Introduction to Your Projector Related references Where to Get Help Projector Part Locations Check the projector part illustrations to Get Help". Control Panel Projector Parts - Base Projector Parts - Front/Top Projector Parts - Rear Projector Parts -
User Manual
Page 34
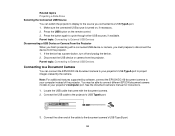
... button, turn off and unplug the device. 2. You may be able to connect different EPSON document camera models to your projector's USB TypeA port to project images viewed by software, connect the EPSON DC-06 document camera to your computer instead of the cable to the document camera's USB... Type B port. 34 Press the button again to cycle through other end of the projector. See the document camera's manual for instructions. 1. Connect the other ...
... button, turn off and unplug the device. 2. You may be able to connect different EPSON document camera models to your projector's USB TypeA port to project images viewed by software, connect the EPSON DC-06 document camera to your computer instead of the cable to the document camera's USB... Type B port. 34 Press the button again to cycle through other end of the projector. See the document camera's manual for instructions. 1. Connect the other ...

User Manual
Page 35
Open the battery cover as shown. 35 Insert the batteries with the projector. Do not install batteries of batteries specified in the Remote Control The remote control uses the two AA batteries that came with the + and - Parent topic: Projector Connections Installing Batteries in this manual. ends facing as shown. 2. Caution: Use only the type of different types, or mix new and old batteries. 1.
Open the battery cover as shown. 35 Insert the batteries with the projector. Do not install batteries of batteries specified in the Remote Control The remote control uses the two AA batteries that came with the + and - Parent topic: Projector Connections Installing Batteries in this manual. ends facing as shown. 2. Caution: Use only the type of different types, or mix new and old batteries. 1.
User Manual
Page 37
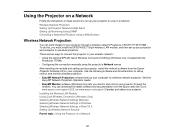
... in these sections to set up the projector, install the network software from the Epson web site. included with the PowerLite 1776W) • Configuring the connection manually using the projector's Network menus After installing the module and setting up your projector for...to www.epson.com/support (U.S.) or www.epson.ca/support (Canada) and select your projector. Use the following software and documentation to set up, control, and monitor wireless projection: • EasyMP Network Projection software sets up your projector through a wireless network PowerLite 1761W/1771W/...
... in these sections to set up the projector, install the network software from the Epson web site. included with the PowerLite 1776W) • Configuring the connection manually using the projector's Network menus After installing the module and setting up your projector for...to www.epson.com/support (U.S.) or www.epson.ca/support (Canada) and select your projector. Use the following software and documentation to set up, control, and monitor wireless projection: • EasyMP Network Projection software sets up your projector through a wireless network PowerLite 1761W/1771W/...
User Manual
Page 41
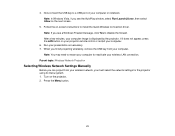
... Menu button. 41 If it does not appear, press the LAN button on the next screen. 5. Parent topic: Wireless Network Projection Selecting Wireless Network Settings Manually Before you can project from your wireless network, you finish projecting wirelessly, remove the USB key from your computer. Note: In Windows Vista, if you...
... Menu button. 41 If it does not appear, press the LAN button on the next screen. 5. Parent topic: Wireless Network Projection Selecting Wireless Network Settings Manually Before you can project from your wireless network, you finish projecting wirelessly, remove the USB key from your computer. Note: In Windows Vista, if you...

User Manual
Page 45
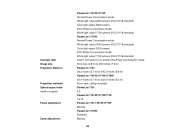
... the SSID on the network standby screen Selects whether to display the IP address on the network standby screen Parent topic: Selecting Wireless Network Settings Manually Selecting Wireless Network Settings in Mac OS X. 1. Click Connect. Parent topic: Wireless Network Projection Selecting Wireless Network Settings in Mac OS X Before connecting to the...
... the SSID on the network standby screen Selects whether to display the IP address on the network standby screen Parent topic: Selecting Wireless Network Settings Manually Selecting Wireless Network Settings in Mac OS X. 1. Click Connect. Parent topic: Wireless Network Projection Selecting Wireless Network Settings in Mac OS X Before connecting to the...

User Manual
Page 75
... presentations onto a green chalkboard (adjusts the colors accordingly) Whiteboard Best for presentations onto a whiteboard (adjusts the colors accordingly) Customized Best for customizing a color mode using manual Color Adjustment settings in the Image menu DICOM SIM Best for medical diagnosis.
... presentations onto a green chalkboard (adjusts the colors accordingly) Whiteboard Best for presentations onto a whiteboard (adjusts the colors accordingly) Customized Best for customizing a color mode using manual Color Adjustment settings in the Image menu DICOM SIM Best for medical diagnosis.
User Manual
Page 106
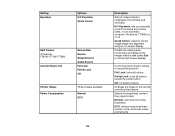
...PowerLite 1761W/1771W/1776W) Control Panel Lock Pointer Shape Power Consumption Options H/V Keystone Quick Corner Screen Size Source Swap Screens Audio Source Full Lock Partial Lock Off Three shapes available Normal ECO Description Adjusts image shape to rectangular (horizontally and vertically) H/V Keystone: lets you manually... correct horizontal and vertical sides, or turn automatic correction (PowerLite 1776W) on or off Quick Corner: select to correct image shape and alignment using...
...PowerLite 1761W/1771W/1776W) Control Panel Lock Pointer Shape Power Consumption Options H/V Keystone Quick Corner Screen Size Source Swap Screens Audio Source Full Lock Partial Lock Off Three shapes available Normal ECO Description Adjusts image shape to rectangular (horizontally and vertically) H/V Keystone: lets you manually... correct horizontal and vertical sides, or turn automatic correction (PowerLite 1776W) on or off Quick Corner: select to correct image shape and alignment using...
User Manual
Page 117
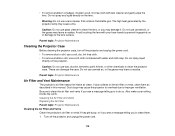
...projector can injure you severely. The only parts you notice dust or smudges on the projector, except as specifically explained in this manual. Dangerous electrical voltages in these sections to maintain your projector and transport it off and unplug the power cord. Never open ...to service this product yourself, except as specifically explained in this manual. Warning: Before cleaning any other servicing to keep working at its best. Refer all other part needs replacing, contact Epson or an authorized EPSON servicer. If any part of the projector, turn it from overheating...
...projector can injure you severely. The only parts you notice dust or smudges on the projector, except as specifically explained in this manual. Dangerous electrical voltages in these sections to maintain your projector and transport it off and unplug the power cord. Never open ...to service this product yourself, except as specifically explained in this manual. Warning: Before cleaning any other servicing to keep working at its best. Refer all other part needs replacing, contact Epson or an authorized EPSON servicer. If any part of the projector, turn it from overheating...
User Manual
Page 118
... you to clean the projector case. Warning: Do not use wax, alcohol, benzene, paint thinner, or other chemicals to clean them as described in this manual. • To remove stubborn smudges, moisten a soft, lint-free cloth with lens cleaner and gently wipe the lens.
... you to clean the projector case. Warning: Do not use wax, alcohol, benzene, paint thinner, or other chemicals to clean them as described in this manual. • To remove stubborn smudges, moisten a soft, lint-free cloth with lens cleaner and gently wipe the lens.
User Manual
Page 126
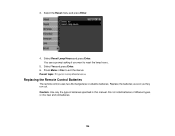
Select Reset Lamp Hours and press Enter. Press Menu or Esc to reset the lamp hours. 5. You see a prompt asking if you want to exit the menus. Do not install batteries of batteries specified in this manual. 3. Caution: Use only the type of different types, or mix new and old batteries. 126 Select the Reset menu and press Enter. 4. Replace the batteries as soon as they run out. Select Yes and press Enter. 6. Parent topic: Projector Lamp Maintenance Replacing the Remote Control Batteries The remote control uses two AA manganese or alkaline batteries.
Select Reset Lamp Hours and press Enter. Press Menu or Esc to reset the lamp hours. 5. You see a prompt asking if you want to exit the menus. Do not install batteries of batteries specified in this manual. 3. Caution: Use only the type of different types, or mix new and old batteries. 126 Select the Reset menu and press Enter. 4. Replace the batteries as soon as they run out. Select Yes and press Enter. 6. Parent topic: Projector Lamp Maintenance Replacing the Remote Control Batteries The remote control uses two AA manganese or alkaline batteries.

User Manual
Page 129
... When Network Alert E-Mails are Not Received Where to Get Help Projection Problem Tips If the projector is operating. • The solutions in this manual can contact Epson for a solution in the table here. 129 Parent topic: Solving Problems Projector Light Status The lights on . Solving Problems Check the solutions in and...
... When Network Alert E-Mails are Not Received Where to Get Help Projection Problem Tips If the projector is operating. • The solutions in this manual can contact Epson for a solution in the table here. 129 Parent topic: Solving Problems Projector Light Status The lights on . Solving Problems Check the solutions in and...

User Manual
Page 134
Displaying From a PC Laptop Displaying From a Mac Laptop Parent topic: Solving Image or Sound Problems 134 Install it manually if necessary. • Make sure the USB Type B setting in the Dock or from the Applications folder. • With Windows Media Center, reduce the screen... • If the mouse cursor flickers, select Make the movement of the mouse pointer smooth in the EPSON USB Display Settings program on your computer. • Turn off the Transfer layered window setting in the EPSON USB Display Settings program on your video sources. • If you are projecting from the projector...
Displaying From a PC Laptop Displaying From a Mac Laptop Parent topic: Solving Image or Sound Problems 134 Install it manually if necessary. • Make sure the USB Type B setting in the Dock or from the Applications folder. • With Windows Media Center, reduce the screen... • If the mouse cursor flickers, select Make the movement of the mouse pointer smooth in the EPSON USB Display Settings program on your computer. • Turn off the Transfer layered window setting in the EPSON USB Display Settings program on your video sources. • If you are projecting from the projector...

User Manual
Page 135
... laptop's monitor and the projector, try the following solutions: • Make sure the correct input signal is enabled. (See your computer or Windows manual for details.) 1. Hold down the laptop's Fn key and press the key labelled with a monitor icon or CRT/LCD. (See your laptop... select a different display resolution for your computer. (See your video card settings and set the multiple display option to Clone. If necessary, check your computer manual for an image to appear. 2. Displaying From a PC Laptop If you see the "No Signal" message when you display from a PC laptop, you need...
... laptop's monitor and the projector, try the following solutions: • Make sure the correct input signal is enabled. (See your computer or Windows manual for details.) 1. Hold down the laptop's Fn key and press the key labelled with a monitor icon or CRT/LCD. (See your laptop... select a different display resolution for your computer. (See your video card settings and set the multiple display option to Clone. If necessary, check your computer manual for an image to appear. 2. Displaying From a PC Laptop If you see the "No Signal" message when you display from a PC laptop, you need...

User Manual
Page 136
...resolution than you zoomed into or out of the image using the on automatic keystone adjustments using the projector's menus (PowerLite 1776W). • Press the Screen Fit button (PowerLite 1776W) and adjust the image shape using the E-Zoom buttons, press the Esc button twice to return to a ...full display. • Check your computer display settings to disable dual display and set the resolution within the projector's limits. (See your computer manual for details.) ...
...resolution than you zoomed into or out of the image using the on automatic keystone adjustments using the projector's menus (PowerLite 1776W). • Press the Screen Fit button (PowerLite 1776W) and adjust the image shape using the E-Zoom buttons, press the Esc button twice to return to a ...full display. • Check your computer display settings to disable dual display and set the resolution within the projector's limits. (See your computer manual for details.) ...
User Manual
Page 138
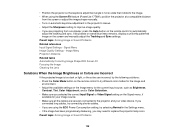
.... • Adjust the Sharpness setting to improve image quality. • If you are projecting from the screen or adjust the image shape manually. • Turn on automatic keystone adjustment in the Settings menu. • If the image has been progressively darkening, you selected the correct... Menu Image Quality Settings - If you connected long cables, try connecting shorter cables. • If you are using the Screen Fit feature (PowerLite 1776W), position the projector at a compatible distance from a computer, press the Auto button on the Signal menu, if available for the current ...
.... • Adjust the Sharpness setting to improve image quality. • If you are projecting from the screen or adjust the image shape manually. • Turn on automatic keystone adjustment in the Settings menu. • If the image has been progressively darkening, you selected the correct... Menu Image Quality Settings - If you connected long cables, try connecting shorter cables. • If you are using the Screen Fit feature (PowerLite 1776W), position the projector at a compatible distance from a computer, press the Auto button on the Signal menu, if available for the current ...
User Manual
Page 144
...: White light output 1700 lumens (ISO 21118 standard) 2000:1 with Auto Iris on and Normal Power Consumption mode 30 inches (0.8 m) to 300 inches (7.6 m) PowerLite 1751: 28.3 inches (0.7 m) to 345.3 inches (8.8 m) PowerLite 1761W/1771W/1776W: 26.4 inches (0.7 m) to 322.0 inches (8.2 m) Front, rear, ceiling-mounted PowerLite 1751: 4:3 PowerLite 1761W/1771W/1776: 16:10 PowerLite 1751/1761W/1771W: Manual PowerLite 1776W: Powered Manual 144
...: White light output 1700 lumens (ISO 21118 standard) 2000:1 with Auto Iris on and Normal Power Consumption mode 30 inches (0.8 m) to 300 inches (7.6 m) PowerLite 1751: 28.3 inches (0.7 m) to 345.3 inches (8.8 m) PowerLite 1761W/1771W/1776W: 26.4 inches (0.7 m) to 322.0 inches (8.2 m) Front, rear, ceiling-mounted PowerLite 1751: 4:3 PowerLite 1761W/1771W/1776: 16:10 PowerLite 1751/1761W/1771W: Manual PowerLite 1776W: Powered Manual 144
User Manual
Page 145
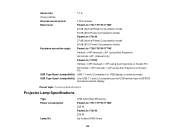
... PowerLite 1761W: 37 dB (Normal Power Consumption mode) 30 dB (ECO Power Consumption mode) Keystone correction angle PowerLite 1750/1761W/1771W: Vertical: ± 45º (manual); ±30° (using Auto Keystone) Horizontal: ±30° (manual only) PowerLite 1776W: Vertical: ± 45º (manual... compliant port for USB device input or EPSON document camera display Parent topic: Technical Specifications Projector Lamp Specifications Type Power consumption Lamp life UHE (Ultra High Efficiency) PowerLite 1751/1771W/1776W: 230 W PowerLite 1761W: 205 W Up to about 4000 hours...
... PowerLite 1761W: 37 dB (Normal Power Consumption mode) 30 dB (ECO Power Consumption mode) Keystone correction angle PowerLite 1750/1761W/1771W: Vertical: ± 45º (manual); ±30° (using Auto Keystone) Horizontal: ±30° (manual only) PowerLite 1776W: Vertical: ± 45º (manual... compliant port for USB device input or EPSON document camera display Parent topic: Technical Specifications Projector Lamp Specifications Type Power consumption Lamp life UHE (Ultra High Efficiency) PowerLite 1751/1771W/1776W: 230 W PowerLite 1761W: 205 W Up to about 4000 hours...

