
Warranty Statement
Page 1
... its option, repair or replace on Epson's tested media list. (Epson's list of media tested for use the Epson products, whether resulting from Epson (e.g. EPSON AMERICA, INC. What This Warranty Does Not Cover: This warranty does not cover: 1) Restoration of the product outside the United States or Canada. 3) Damage caused by this warranty. Some jurisdictions do under the "Tested Media" section.) 5) Any color change or fading of prints, or...
... its option, repair or replace on Epson's tested media list. (Epson's list of media tested for use the Epson products, whether resulting from Epson (e.g. EPSON AMERICA, INC. What This Warranty Does Not Cover: This warranty does not cover: 1) Restoration of the product outside the United States or Canada. 3) Damage caused by this warranty. Some jurisdictions do under the "Tested Media" section.) 5) Any color change or fading of prints, or...
Users Guide
Page 9
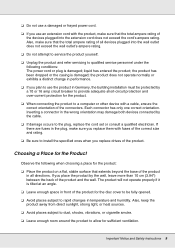
... or frayed power cord. ❏ If you use the product in Germany, the building installation must be fully opened. ❏ Avoid places subject to the plug, replace the cord set or consult a qualified electrician. liquid has entered the product; Each connector has only one correct orientation. Inserting a connector in the wrong orientation may damage both devices connected by the cable. ❏ If...
... or frayed power cord. ❏ If you use the product in Germany, the building installation must be fully opened. ❏ Avoid places subject to the plug, replace the cord set or consult a qualified electrician. liquid has entered the product; Each connector has only one correct orientation. Inserting a connector in the wrong orientation may damage both devices connected by the cable. ❏ If...
Users Guide
Page 77
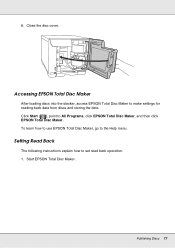
Click Start ( ), point to the Help menu. To learn how to use EPSON Total Disc Maker, go to All Programs, click EPSON Total Disc Maker, and then click EPSON Total Disc Maker. Publishing Discs 77 8. Close the disc cover. Setting Read Back The following instructions explain how to make settings for reading back data from discs and storing the data. Accessing EPSON Total Disc Maker After loading discs into the stacker, access EPSON Total Disc Maker to set read back operation. 1. Start EPSON Total Disc Maker.
Click Start ( ), point to the Help menu. To learn how to use EPSON Total Disc Maker, go to All Programs, click EPSON Total Disc Maker, and then click EPSON Total Disc Maker. Publishing Discs 77 8. Close the disc cover. Setting Read Back The following instructions explain how to make settings for reading back data from discs and storing the data. Accessing EPSON Total Disc Maker After loading discs into the stacker, access EPSON Total Disc Maker to set read back operation. 1. Start EPSON Total Disc Maker.

Users Guide
Page 84
... resumed automatically if you take out the published/read discs from the stacker. ❏ Be sure to stacker 3 is not always the same as the output stacker in stacker 3 reach the height limit. Also, the number of discs output to stacker 2. For Batch mode, the output stacker switches to the printer driver Help. ❏ If the ink smears, adjust the color...
... resumed automatically if you take out the published/read discs from the stacker. ❏ Be sure to stacker 3 is not always the same as the output stacker in stacker 3 reach the height limit. Also, the number of discs output to stacker 2. For Batch mode, the output stacker switches to the printer driver Help. ❏ If the ink smears, adjust the color...

Users Guide
Page 95
... identify the problem by using the nozzle check utility. Using the Nozzle Check Utility Follow the steps below . See "Accessing the Printer Driver" on -screen instructions. If there are two sample nozzle check patterns. You can check the print head nozzles from your computer by checking the print head nozzles. Follow the on page 22. 4. Maintaining Your Product 95 Access the printer driver. Make sure that no print quality problems, such as gaps or missing segments in stacker 1. 2. Below are no lights are indicating errors and...
... identify the problem by using the nozzle check utility. Using the Nozzle Check Utility Follow the steps below . See "Accessing the Printer Driver" on -screen instructions. If there are two sample nozzle check patterns. You can check the print head nozzles from your computer by checking the print head nozzles. Follow the on page 22. 4. Maintaining Your Product 95 Access the printer driver. Make sure that no print quality problems, such as gaps or missing segments in stacker 1. 2. Below are no lights are indicating errors and...

Users Guide
Page 96
... or missing. ❏ Use the nozzle check utility first to confirm that dots are missing, you may be able to solve these problems by using the head cleaning utility in reduction of the printed lines is opened. ❏ Print head cleaning consumes ink. Excess print head cleaning will result in the printer driver or from the product by cleaning the print head, which ensures that the nozzles are delivering ink properly. When ink has reached its replacement time, you cannot clean the print head.
... or missing. ❏ Use the nozzle check utility first to confirm that dots are missing, you may be able to solve these problems by using the head cleaning utility in reduction of the printed lines is opened. ❏ Print head cleaning consumes ink. Excess print head cleaning will result in the printer driver or from the product by cleaning the print head, which ensures that the nozzles are delivering ink properly. When ink has reached its replacement time, you cannot clean the print head.
Users Guide
Page 98
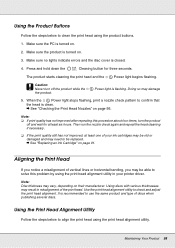
... using the print head alignment utility. Using the Print Head Alignment Utility Follow the steps below to check and adjust the print head alignment. Maintaining Your Product 98 Make sure the PC is flashing. c Caution: Never turn the product off the product while the the product. Aligning the Print Head If you notice a misalignment of your printer driver. Note: Disc thickness may result in your ink cartridges may be replaced. & See "Replacing an Ink Cartridge" on page 95. Make sure no lights indicate errors...
... using the print head alignment utility. Using the Print Head Alignment Utility Follow the steps below to check and adjust the print head alignment. Maintaining Your Product 98 Make sure the PC is flashing. c Caution: Never turn the product off the product while the the product. Aligning the Print Head If you notice a misalignment of your printer driver. Note: Disc thickness may result in your ink cartridges may be replaced. & See "Replacing an Ink Cartridge" on page 95. Make sure no lights indicate errors...

Users Guide
Page 121
... head cleaning utility to clear any clogged ink nozzles. & See "Cleaning the Print Head" on page 96. ❏ Use ink cartridges within six months after opening the packages. ❏ Use genuine Epson ink cartridges. ❏ Check the H Ink light. Horizontal Banding ❏ Make sure the printable side of discs from the same data may not be the same. Vertical Misalignment ❏ Run the print head alignment utility. & See "Aligning the Print Head" on page 98. ❏ Make sure the label type selected in the printer driver...
... head cleaning utility to clear any clogged ink nozzles. & See "Cleaning the Print Head" on page 96. ❏ Use ink cartridges within six months after opening the packages. ❏ Use genuine Epson ink cartridges. ❏ Check the H Ink light. Horizontal Banding ❏ Make sure the printable side of discs from the same data may not be the same. Vertical Misalignment ❏ Run the print head alignment utility. & See "Aligning the Print Head" on page 98. ❏ Make sure the label type selected in the printer driver...

Users Guide
Page 123
.... Troubleshooting 123 Check the Main window. Printout Has a Slight Slant ❏ Run nozzle check, print head cleaning, and print head alignment utilities. See the printer driver online Help for details. ❏ Uninstall the printer driver, then reinstall it . & See "Uninstalling Software" on page 138. ❏ Make sure the printer driver settings are appropriate for the label size you are within the printable area of the disc, making the print location appear shifted from the ink receptor layer. Printed Side is...
.... Troubleshooting 123 Check the Main window. Printout Has a Slight Slant ❏ Run nozzle check, print head cleaning, and print head alignment utilities. See the printer driver online Help for details. ❏ Uninstall the printer driver, then reinstall it . & See "Uninstalling Software" on page 138. ❏ Make sure the printer driver settings are appropriate for the label size you are within the printable area of the disc, making the print location appear shifted from the ink receptor layer. Printed Side is...

Users Guide
Page 125
... free space? The USB cable used to the administrator group). The software cannot be installed if the HDD does not have enough memory. Turn off the product and computer. When installing the software, log on as a user with administrator privileges (belonging to print a large image, your computer. ❏ Uninstall the printer driver, then reinstall it immediately. Contact your image or printing the image at a smaller size. Only the Power Light is correctly installed. Make...
... free space? The USB cable used to the administrator group). The software cannot be installed if the HDD does not have enough memory. Turn off the product and computer. When installing the software, log on as a user with administrator privileges (belonging to print a large image, your computer. ❏ Uninstall the printer driver, then reinstall it immediately. Contact your image or printing the image at a smaller size. Only the Power Light is correctly installed. Make...
Users Guide
Page 128
... software applications you normally use with access to help you much more quickly if you give them the following information: ❏ Product serial number (The serial number label is not operating properly and you cannot solve the problem using the troubleshooting information in the United States and Canada Contacts for information, support, and services are: Discproducer Technical Support: 562-276-1360 Location: Epson America Inc. If customer support...
... software applications you normally use with access to help you much more quickly if you give them the following information: ❏ Product serial number (The serial number label is not operating properly and you cannot solve the problem using the troubleshooting information in the United States and Canada Contacts for information, support, and services are: Discproducer Technical Support: 562-276-1360 Location: Epson America Inc. If customer support...
Users Guide for Mac
Page 3
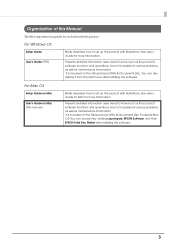
... then EPSON Total Disc Maker after installing the software. For Windows OS Setup Guide User's Guide (PDF) Briefly describes how to troubleshoot various problems, as well as the product/ software functions and operations, how to set up this product with this product. Organization of this Manual The following instruction guides are included with illustrations. See User's Guide for Mac for more information. Presents detailed information users need to know such as maintenance...
... then EPSON Total Disc Maker after installing the software. For Windows OS Setup Guide User's Guide (PDF) Briefly describes how to troubleshoot various problems, as well as the product/ software functions and operations, how to set up this product with this product. Organization of this Manual The following instruction guides are included with illustrations. See User's Guide for Mac for more information. Presents detailed information users need to know such as maintenance...
Users Guide for Mac
Page 4
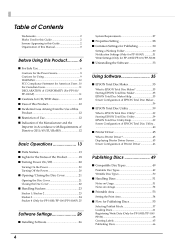
... ■ Parts Names 13 ■ Lights for the Status of the Product 18 ■ Turning Power On/Off 20 Turning On the Power 20 Turning Off the Power 20 ■ Opening/Closing the Disc Cover 21 Opening the Disc Cover 21 Closing the Disc Cover 22 ■ Handling Stackers 23 Stacker 1/Stacker 2 23 Stacker 3 24 Stacker 4 (Only for PP-100II/PP-100/PP-100AP). 25 Software Settings 26 ■ Installing Software 26...
... ■ Parts Names 13 ■ Lights for the Status of the Product 18 ■ Turning Power On/Off 20 Turning On the Power 20 Turning Off the Power 20 ■ Opening/Closing the Disc Cover 21 Opening the Disc Cover 21 Closing the Disc Cover 22 ■ Handling Stackers 23 Stacker 1/Stacker 2 23 Stacker 3 24 Stacker 4 (Only for PP-100II/PP-100/PP-100AP). 25 Software Settings 26 ■ Installing Software 26...
Users Guide for Mac
Page 5
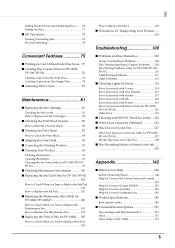
...; Printing on User Defined Label Size Discs... 75 ■ Creating Disc Copies (Only for PP-100II/ PP-100/PP-50 76 Creating Copies Directly from Discs 76 Creating Copies from Disc Image Files 78 ■ Adjusting Print Colors 79 Maintenance 81 ■ Replacing the Ink Cartridge 81 Checking the Ink Levels 81 How to Replace the Ink Cartridges 82 ■ Checking the Print Head Nozzles 85 How to Perform a Nozzle Check 85 ■ Cleaning the Print Head 87 How to Clean the Print Head...
...; Printing on User Defined Label Size Discs... 75 ■ Creating Disc Copies (Only for PP-100II/ PP-100/PP-50 76 Creating Copies Directly from Discs 76 Creating Copies from Disc Image Files 78 ■ Adjusting Print Colors 79 Maintenance 81 ■ Replacing the Ink Cartridge 81 Checking the Ink Levels 81 How to Replace the Ink Cartridges 82 ■ Checking the Print Head Nozzles 85 How to Perform a Nozzle Check 85 ■ Cleaning the Print Head 87 How to Clean the Print Head...
Users Guide for Mac
Page 18
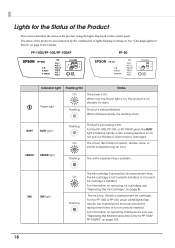
... experiencing an error. The cover, disc transport system, stacker, drive, or printer is also indicated by the combination of the product using the lights displayed on the control panel. For the PP-100II or PP-100, when all INK lights flash rapidly, the maintenance box has reached its replacement time, the ink cartridge is not correctly installed, or incorrect ink cartridge is not correctly inserted. For the PP-100II, PP-100, or PP-100AP, when the BUSY light is flashing rapidly...
... experiencing an error. The cover, disc transport system, stacker, drive, or printer is also indicated by the combination of the product using the lights displayed on the control panel. For the PP-100II or PP-100, when all INK lights flash rapidly, the maintenance box has reached its replacement time, the ink cartridge is not correctly installed, or incorrect ink cartridge is not correctly inserted. For the PP-100II, PP-100, or PP-100AP, when the BUSY light is flashing rapidly...

Users Guide for Mac
Page 111
... with different thicknesses? The product supports discs for all your printing needs. 111 This product performs color adjustment based on use of the same disc product type is shifted from the printing position when moving from right to left is recommended. (See "Aligning the Print Head" on page 90 for details. • "Checking the Print Head Nozzles" on page 85 • "Cleaning the Print Head" on inkjet printer discs? When bidirectional printing is set, printing is...
... with different thicknesses? The product supports discs for all your printing needs. 111 This product performs color adjustment based on use of the same disc product type is shifted from the printing position when moving from right to left is recommended. (See "Aligning the Print Head" on page 90 for details. • "Checking the Print Head Nozzles" on page 85 • "Cleaning the Print Head" on inkjet printer discs? When bidirectional printing is set, printing is...

Users Guide for Mac
Page 126
... problem. Please contact Customer Support if this product, and its serial number. 126 When making inquiries, please provide information about your operating environment (including the PC model, names and versions of software applications, and other peripheral models), name of the above checks still does not resolve the problem, the software may not be installed correctly. See Setup Guide for Mac for the software uninstallation procedure. Uninstall (delete) the software...
... problem. Please contact Customer Support if this product, and its serial number. 126 When making inquiries, please provide information about your operating environment (including the PC model, names and versions of software applications, and other peripheral models), name of the above checks still does not resolve the problem, the software may not be installed correctly. See Setup Guide for Mac for the software uninstallation procedure. Uninstall (delete) the software...
Users Guide for Mac
Page 142
... to the latest drivers and FAQs. If you cannot solve the problem using the troubleshooting information in the United States and Canada Contacts for your local distributor or Epson sales company. If customer support for information, support, and services are : Web site URL: http://www. Web site URL: http://www. Customer support will provide the end user with access to help you much more...
... to the latest drivers and FAQs. If you cannot solve the problem using the troubleshooting information in the United States and Canada Contacts for your local distributor or Epson sales company. If customer support for information, support, and services are : Web site URL: http://www. Web site URL: http://www. Customer support will provide the end user with access to help you much more...

Product Information Guide
Page 5
... in Stacker 1. 2. Follow instructions on the unit 1. Use a soft clean cloth to solve the problem using discs of the Windows screen. Prevent water from the Start menu in Stacker 1. 2. Epson Discproducer PP-100 Running the Nozzle Check If printing is faint or dots are on, no lights indicate errors, and disc cover is closed. 2. You must replace the ink cartridge first. Then click the Utility tab and Print Head Alignment. 4. Place an unprinted disc...
... in Stacker 1. 2. Follow instructions on the unit 1. Use a soft clean cloth to solve the problem using discs of the Windows screen. Prevent water from the Start menu in Stacker 1. 2. Epson Discproducer PP-100 Running the Nozzle Check If printing is faint or dots are on, no lights indicate errors, and disc cover is closed. 2. You must replace the ink cartridge first. Then click the Utility tab and Print Head Alignment. 4. Place an unprinted disc...

Product Information Guide
Page 7
.... 2. Drive tray open . Load discs. Turn off , unplug, and check inside for foreign objects. 2. Nearly full message displayed by software, not lights. If a problem persists after error may not be damaged. 4. Disc pickup error 1. Or, use other discs. 4. Run Epson Total Disc Setup and resume. Turn back on previous page to below . Power Busy Error ON - - ON - - Remove published discs from disc type in the table below red line. 3 = ON Stacker 3 overloaded. 1. Replace ink cartridge, or reinstall it correctly. 2.
.... 2. Drive tray open . Load discs. Turn off , unplug, and check inside for foreign objects. 2. Nearly full message displayed by software, not lights. If a problem persists after error may not be damaged. 4. Disc pickup error 1. Or, use other discs. 4. Run Epson Total Disc Setup and resume. Turn back on previous page to below . Power Busy Error ON - - ON - - Remove published discs from disc type in the table below red line. 3 = ON Stacker 3 overloaded. 1. Replace ink cartridge, or reinstall it correctly. 2.


