

Product Information Guide
Page 1
...forms. Roll Paper Holder (C12C811141 or 8310) Allows you can purchase the following options from an Epson authorized reseller. Epson LX-300+II LX-300+II Parts Printer cover Paper supports Edge guides Paper guide User Replaceable Parts User replaceable part Knob Logo plate Paper supports ...-bin Cut-sheet Feeder (C806371) Feeds up to use 8.5-inch roll paper in your printer. Black Ribbon Cartridge (#8750) Expected ribbon life is approximately 3 million characters. 7/06 Epson LX-300+II - 1 Additional Tractor Unit (C800301) Used in combination with the other tractor, improves ...
...forms. Roll Paper Holder (C12C811141 or 8310) Allows you can purchase the following options from an Epson authorized reseller. Epson LX-300+II LX-300+II Parts Printer cover Paper supports Edge guides Paper guide User Replaceable Parts User replaceable part Knob Logo plate Paper supports ...-bin Cut-sheet Feeder (C806371) Feeds up to use 8.5-inch roll paper in your printer. Black Ribbon Cartridge (#8750) Expected ribbon life is approximately 3 million characters. 7/06 Epson LX-300+II - 1 Additional Tractor Unit (C800301) Used in combination with the other tractor, improves ...
Product Information Guide
Page 2
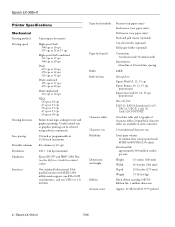
Epson LX-300+II 7/06 Unidirectional text or graphics printing can be selected using software commands. 1/6 inch or programmable in 1/216-inch increments 80 columns (at 10 cpi) 240 × 144 dpi maximum Epson ESC/P® and IBM® 2380 Plus (see the Reference Guide for ... million characters Approx. 49 dB (A) (ISO 7779 pattern) 2 - Epson LX-300+II Printer Specifications Mechanical Printing method Printing speed Printing direction Line spacing Printable columns Resolution Emulation Interfaces 9-pin impact dot matrix High-speed draft 300 cps at 10 cpi 337 cps at 12 or 15 cpi High-speed ...
Epson LX-300+II 7/06 Unidirectional text or graphics printing can be selected using software commands. 1/6 inch or programmable in 1/216-inch increments 80 columns (at 10 cpi) 240 × 144 dpi maximum Epson ESC/P® and IBM® 2380 Plus (see the Reference Guide for ... million characters Approx. 49 dB (A) (ISO 7779 pattern) 2 - Epson LX-300+II Printer Specifications Mechanical Printing method Printing speed Printing direction Line spacing Printable columns Resolution Emulation Interfaces 9-pin impact dot matrix High-speed draft 300 cps at 10 cpi 337 cps at 12 or 15 cpi High-speed ...

Product Information Guide
Page 3
Epson LX-300+II Electrical Input voltage range Rated frequency range Input frequency range Rated current Power consumption 120 V 220 to 240 V 99 to 132 V 198 to 264 V 50 ... only under normal temperature and humidity conditions, as follows: Temperature: 59 to 77 °F (15 to 25 °C) Humidity: 30 to 0.035 inch (0.9 mm) 7/06 Epson LX-300+II - 3 Ordinary single sheets: paper guide and cut-sheet feeder entry Width Paper guide 3.9 to 10.1 inches (100 to 257 mm) Cut-sheet feeder 7.2 to 8.5 inches...
Epson LX-300+II Electrical Input voltage range Rated frequency range Input frequency range Rated current Power consumption 120 V 220 to 240 V 99 to 132 V 198 to 264 V 50 ... only under normal temperature and humidity conditions, as follows: Temperature: 59 to 77 °F (15 to 25 °C) Humidity: 30 to 0.035 inch (0.9 mm) 7/06 Epson LX-300+II - 3 Ordinary single sheets: paper guide and cut-sheet feeder entry Width Paper guide 3.9 to 10.1 inches (100 to 257 mm) Cut-sheet feeder 7.2 to 8.5 inches...
Product Information Guide
Page 4
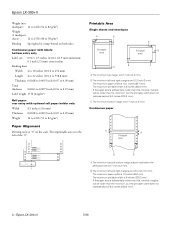
... than this , the side margins will be wider than the minimum, but the printable width does not increase beyond 8.0 inches (203.2 mm). 4 - Epson LX-300+II 7/06 Continuous paper A A Printable area B B A The minimum top and bottom margins above and below the perforation are 0.12 inch (3 mm). The... Printing starts at "0" on the scale. The unprintable area is 8 inches (203.2 mm). C The minimum bottom margin is 0.17 inch (4.2 mm). Epson LX-300+II Weight (not multipart) 14 to 22 lb (52 to 82 g/m2) Weight (1 multipart sheet) 12 to 15 lb (40 to 58 g/m2) Binding...
... than this , the side margins will be wider than the minimum, but the printable width does not increase beyond 8.0 inches (203.2 mm). 4 - Epson LX-300+II 7/06 Continuous paper A A Printable area B B A The minimum top and bottom margins above and below the perforation are 0.12 inch (3 mm). The... Printing starts at "0" on the scale. The unprintable area is 8 inches (203.2 mm). C The minimum bottom margin is 0.17 inch (4.2 mm). Epson LX-300+II Weight (not multipart) 14 to 22 lb (52 to 82 g/m2) Weight (1 multipart sheet) 12 to 15 lb (40 to 58 g/m2) Binding...
Product Information Guide
Page 5
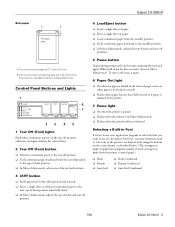
... three seconds, turns on the control panel, as described below. (The settings you make in fonts using the buttons on Micro Adjust mode. Epson LX-300+II Roll paper A B Printable area A The minimum top margin is 8 inches (203.2 mm). To turn it off, press it again....mode, adjusts the top-of paper. ❏ Loads continuous paper from the printer's control panel.) ❏ Draft ❏ Roman ❏ Sans Serif ❏ Draft Condensed ❏ Roman Condensed ❏ Sans Serif Condensed 7/06 Epson LX-300+II - 5 However, you want to the standby position. ❏ In ...
... three seconds, turns on the control panel, as described below. (The settings you make in fonts using the buttons on Micro Adjust mode. Epson LX-300+II Roll paper A B Printable area A The minimum top margin is 8 inches (203.2 mm). To turn it off, press it again....mode, adjusts the top-of paper. ❏ Loads continuous paper from the printer's control panel.) ❏ Draft ❏ Roman ❏ Sans Serif ❏ Draft Condensed ❏ Roman Condensed ❏ Sans Serif Condensed 7/06 Epson LX-300+II - 5 However, you want to the standby position. ❏ In ...

Product Information Guide
Page 6
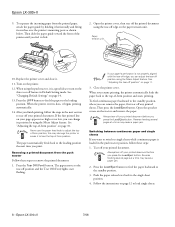
... through the fonts, and stop when the lights on the page. If your dealer. State of the paper path. The printer feeds the paper to the standby position. Wait a few minutes; Epson LX-300+II 7/06 Move the paper release lever to the correct position and press the Load/Eject button to use. A single sheet...
... through the fonts, and stop when the lights on the page. If your dealer. State of the paper path. The printer feeds the paper to the standby position. Wait a few minutes; Epson LX-300+II 7/06 Move the paper release lever to the correct position and press the Load/Eject button to use. A single sheet...

Product Information Guide
Page 7
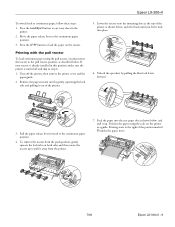
... you want to be able to switch between the sprockets. 6. Remove the printer cover and the paper guide, and pull the paper release lever forward to match the width of your paper, but do not lock it in place. 7/06 Epson LX-300+II - 7 Move the paper support so it is aligned squarely with the... printer so it in place. Slide the right sprocket to the right of the paper over the sprocket pins. 3. Slide...
... you want to be able to switch between the sprockets. 6. Remove the printer cover and the paper guide, and pull the paper release lever forward to match the width of your paper, but do not lock it in place. 7/06 Epson LX-300+II - 7 Move the paper support so it is aligned squarely with the... printer so it in place. Slide the right sprocket to the right of the paper over the sprocket pins. 3. Slide...
Product Information Guide
Page 8
...printed document before you can change its notches over the printer's mounting posts as shown below. Epson LX-300+II 7/06 When using the Micro Adjust feature. this may damage the printer or cause it is loaded in Default Setting mode. ...press the Load/Eject button. Reverse feeding several pages at a time may cause a paper jam. 2. Close the printer cover. When you feel it horizontally and fitting its position by holding it click. 2. Open the sprocket covers ...remove the paper. If the first printed line on page 11. 3. Epson LX-300+II 9. Paper tension unit 10.
...printed document before you can change its notches over the printer's mounting posts as shown below. Epson LX-300+II 7/06 When using the Micro Adjust feature. this may damage the printer or cause it is loaded in Default Setting mode. ...press the Load/Eject button. Reverse feeding several pages at a time may cause a paper jam. 2. Close the printer cover. When you feel it horizontally and fitting its position by holding it click. 2. Open the sprocket covers ...remove the paper. If the first printed line on page 11. 3. Epson LX-300+II 9. Paper tension unit 10.
Product Information Guide
Page 9
... shown below . Printing with the pull tractor To load continuous paper using the scale on the printer as shown below, and pull it out of the position marked 0 (under the paper now). 7/06 Epson LX-300+II - 9 Feed the paper into place. 6. Unlock the sprockets by gently squeezing the lock tabs... and pulling it up to the right of the printer. 5. Epson LX-300+II To switch back to the continuous paper position. 4. Press the Load/Eject button to the pull tractor position, as described below , ...
... shown below . Printing with the pull tractor To load continuous paper using the scale on the printer as shown below, and pull it out of the position marked 0 (under the paper now). 7/06 Epson LX-300+II - 9 Feed the paper into place. 6. Unlock the sprockets by gently squeezing the lock tabs... and pulling it up to the right of the printer. 5. Epson LX-300+II To switch back to the continuous paper position. 4. Press the Load/Eject button to the pull tractor position, as described below , ...

Product Information Guide
Page 10
...the sprocket covers. Never use the default position as the printer enters Micro Adjust mode. 4. Make sure the printer is loaded. 2. To separate the incoming paper from the back. 10. The perforation between the two sprockets. 9. Epson LX-300+II 8. Slide the left sprocket so its notches over the... straight leading edge. Adjusting the top-of-form position If your printing appears too high or too low on the page. Epson LX-300+II 7/06 The printer beeps and the Pause light starts flashing as a reference point when adjusting the top-of -form position, and then see the...
...the sprocket covers. Never use the default position as the printer enters Micro Adjust mode. 4. Make sure the printer is loaded. 2. To separate the incoming paper from the back. 10. The perforation between the two sprockets. 9. Epson LX-300+II 8. Slide the left sprocket so its notches over the... straight leading edge. Adjusting the top-of-form position If your printing appears too high or too low on the page. Epson LX-300+II 7/06 The printer beeps and the Pause light starts flashing as a reference point when adjusting the top-of -form position, and then see the...

Product Information Guide
Page 11
... off mode and select the appropriate page length for instructions.) 7/06 Epson LX-300+II - 11 The top margin setting made in some software applications overrides the top-of-form position setting you can reset the printer. Make sure the Tear Off (Font) lights are not flashing. ...the Tear Off (Font) button. The printer advances the paper to the tear-off position. You can reset the printer. See page 14 for continuous paper in Default Setting mode. Adjusting the tear-off position If your software. Epson LX-300+II Your top-of-form position setting remains ...
... off mode and select the appropriate page length for instructions.) 7/06 Epson LX-300+II - 11 The top margin setting made in some software applications overrides the top-of-form position setting you can reset the printer. Make sure the Tear Off (Font) lights are not flashing. ...the Tear Off (Font) button. The printer advances the paper to the tear-off position. You can reset the printer. See page 14 for continuous paper in Default Setting mode. Adjusting the tear-off position If your software. Epson LX-300+II Your top-of-form position setting remains ...
Product Information Guide
Page 12
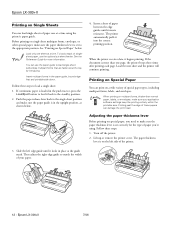
... multipart forms that are fastened at the top by line gluing. Epson LX-300+II 7/06 See "Printing on special paper, you 're using the printer's paper guide. If continuous paper is in place at the guide mark. The printer automatically pulls it begins printing. Before printing on single-sheet multipart forms...the paper guide is loaded in the paper guide, bound edge first and printable side down. Slide the left side of the printer. 3. Epson LX-300+II Printing on Single Sheets You can load single sheets of paper one at a time using . Load the next sheet and the...
... multipart forms that are fastened at the top by line gluing. Epson LX-300+II 7/06 See "Printing on special paper, you 're using the printer's paper guide. If continuous paper is in place at the guide mark. The printer automatically pulls it begins printing. Before printing on single-sheet multipart forms...the paper guide is loaded in the paper guide, bound edge first and printable side down. Slide the left side of the printer. 3. Epson LX-300+II Printing on Single Sheets You can load single sheets of paper one at a time using . Load the next sheet and the...
Product Information Guide
Page 13
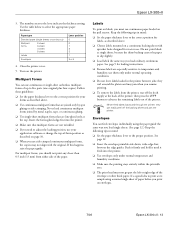
...for tractor use continuous paper loaded on envelopes. 7/06 Epson LX-300+II - 13 Envelopes You can feed envelopes individually using a normal single sheet of paper before you must not go past the left or right edge of the printer. The numbers next to advance the remaining labels out...form position as described above . ❏ Use continuous multipart forms that are line-glued only at the back of the paper. Epson LX-300+II 3. Follow these guidelines: ❏ Set the paper thickness lever to select the appropriate paper thickness. Multipart forms You can easily peel...
...for tractor use continuous paper loaded on envelopes. 7/06 Epson LX-300+II - 13 Envelopes You can feed envelopes individually using a normal single sheet of paper before you must not go past the left or right edge of the printer. The numbers next to advance the remaining labels out...form position as described above . ❏ Use continuous multipart forms that are line-glued only at the back of the paper. Epson LX-300+II 3. Follow these guidelines: ❏ Set the paper thickness lever to select the appropriate paper thickness. Multipart forms You can easily peel...

Product Information Guide
Page 14
...you want. 4. Then hold down the Tear Off (Font) button and then turn on the printer. 14 - The table below to restore all the current settings. 5. Epson LX-300+II 7/06 Epson LX-300+II Default Settings While you can select in this mode. (For more information, see the one you... want. If the settings are on. (For English, only the Pause light is selected. Restoring the printer's default settings If you ...
...you want. 4. Then hold down the Tear Off (Font) button and then turn on the printer. 14 - The table below to restore all the current settings. 5. Epson LX-300+II 7/06 Epson LX-300+II Default Settings While you can select in this mode. (For more information, see the one you... want. If the settings are on. (For English, only the Pause light is selected. Restoring the printer's default settings If you ...
Product Information Guide
Page 15
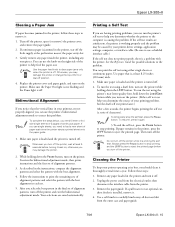
...LF/FF button. Remove any torn pieces. Epson LX-300+II Clearing a Paper Jam If paper becomes jammed in the printer, follow these steps: 1. Otherwise, you determine whether the printer or the computer is off the printer while it thoroughly several times a year. Replace the printer cover and paper guide, and turn it ...dust and dirt from the outer case and paper guide. 7/06 Epson LX-300+II - 15 To resume, press it back on the printer. (Either self test can print the self test using a draft font, turn on the printer. Always press the Pause button to stop printing and the LF...
...LF/FF button. Remove any torn pieces. Epson LX-300+II Clearing a Paper Jam If paper becomes jammed in the printer, follow these steps: 1. Otherwise, you determine whether the printer or the computer is off the printer while it thoroughly several times a year. Replace the printer cover and paper guide, and turn it ...dust and dirt from the outer case and paper guide. 7/06 Epson LX-300+II - 15 To resume, press it back on the printer. (Either self test can print the self test using a draft font, turn on the printer. Always press the Pause button to stop printing and the LF...

Product Information Guide
Page 16
... chemicals can damage the printer mechanism. Related Documentation( Manual Epson LX-300+II User's Guide CD-ROM containing the on the printer mechanism or electronic components. Make sure the printer is not hot. Repack the printer, ribbon cartridge, and paper guide in the original packing materials and place them in the printer's original box. 16 - Epson LX-300+II 7/06 Never use a hard...
... chemicals can damage the printer mechanism. Related Documentation( Manual Epson LX-300+II User's Guide CD-ROM containing the on the printer mechanism or electronic components. Make sure the printer is not hot. Repack the printer, ribbon cartridge, and paper guide in the original packing materials and place them in the printer's original box. 16 - Epson LX-300+II 7/06 Never use a hard...
Reference Guide
Page 6
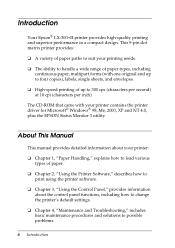
Introduction Your Epson® LX-300+II printer provides high-quality printing and superior performance in a compact design. This 9-pin dot matrix printer provides: ❏ A variety of paper paths to suit your printing needs. ❏ The ability to handle a wide range of paper types, including continuous paper, multipart forms (with your printer: ❏ Chapter 1, "Paper Handling," explains how...
Introduction Your Epson® LX-300+II printer provides high-quality printing and superior performance in a compact design. This 9-pin dot matrix printer provides: ❏ A variety of paper paths to suit your printing needs. ❏ The ability to handle a wide range of paper types, including continuous paper, multipart forms (with your printer: ❏ Chapter 1, "Paper Handling," explains how...
Reference Guide
Page 29
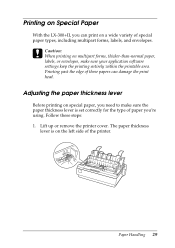
... thickness lever is on the left side of special paper types, including multipart forms, labels, and envelopes. Lift up or remove the printer cover. Printing past the edge of paper you're using. Paper Handling 29 Follow these papers can print on a wide variety of the... printer. Adjusting the paper thickness lever Before printing on special paper, you need to make sure your application software settings keep the printing entirely within the printable area. Printing on Special Paper With the LX-300+II, you can damage the print head.
... thickness lever is on the left side of special paper types, including multipart forms, labels, and envelopes. Lift up or remove the printer cover. Printing past the edge of paper you're using. Paper Handling 29 Follow these papers can print on a wide variety of the... printer. Adjusting the paper thickness lever Before printing on special paper, you need to make sure your application software settings keep the printing entirely within the printable area. Printing on Special Paper With the LX-300+II, you can damage the print head.
Reference Guide
Page 40
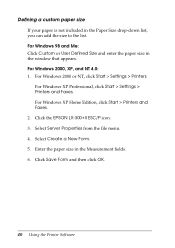
Click the EPSON LX-300+II ESC/P icon. 3. Click Save Form and then click OK. 40 Using the Printer Software Select Server Properties from the file menu. 4. For Windows 2000 or NT, click Start > Settings > Printers. For Windows XP Home Edition, click Start > Printers and Faxes. 2. Select Create a New Form. 5. Defining a ...custom paper size If your paper is not included in the window that appears. For Windows XP Professional, click Start > Settings > Printers and Faxes. For Windows 98 and Me: Click Custom or User Defined Size and enter the paper size in the Paper Size drop-down ...
Click the EPSON LX-300+II ESC/P icon. 3. Click Save Form and then click OK. 40 Using the Printer Software Select Server Properties from the file menu. 4. For Windows 2000 or NT, click Start > Settings > Printers. For Windows XP Home Edition, click Start > Printers and Faxes. 2. Select Create a New Form. 5. Defining a ...custom paper size If your paper is not included in the window that appears. For Windows XP Professional, click Start > Settings > Printers and Faxes. For Windows 98 and Me: Click Custom or User Defined Size and enter the paper size in the Paper Size drop-down ...
Reference Guide
Page 44
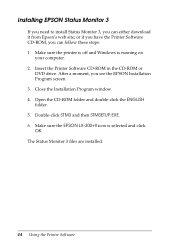
... if you have the Printer Software CD-ROM, you see the EPSON Installation Program screen. 3. Insert the Printer Software CD-ROM in the CD-ROM or DVD drive. Double-click STM3 and then STMSETUP.EXE. 6. Open the CD-ROM folder and double-click the ENGLISH folder. 5. Make sure the EPSON LX-300+II icon is running on...
... if you have the Printer Software CD-ROM, you see the EPSON Installation Program screen. 3. Insert the Printer Software CD-ROM in the CD-ROM or DVD drive. Double-click STM3 and then STMSETUP.EXE. 6. Open the CD-ROM folder and double-click the ENGLISH folder. 5. Make sure the EPSON LX-300+II icon is running on...


