

Product Information Guide
Page 11
...-off edge When the push tractor is installed, you try to adjust the tear-off position beyond these steps to the printer's tearoff edge when you turn on the Auto tear off mode and select the appropriate page length for instructions. Hold down the Pause button for instructions.) 7/06 Epson LX-300+II - 11 Tear-off the...
...-off edge When the push tractor is installed, you try to adjust the tear-off position beyond these steps to the printer's tearoff edge when you turn on the Auto tear off mode and select the appropriate page length for instructions. Hold down the Pause button for instructions.) 7/06 Epson LX-300+II - 11 Tear-off the...

Product Information Guide
Page 14
... the steps below lists the default settings (in bold) and options you can often set for tractor Skip over perforation Auto tear-off the printer to change them again or reset the printer's defaults. The current language is on.) 3. If the settings are on. (For English,..., turn on the printer. Epson LX-300+II Default Settings While you can select in this mode. (For more information, see the one you want. Epson LX-300+II 7/06 If you want a different language, press the LF/FF button until you see the Reference Guide.) ) Settings Page length for Italic table Manual...
... the steps below lists the default settings (in bold) and options you can often set for tractor Skip over perforation Auto tear-off the printer to change them again or reset the printer's defaults. The current language is on.) 3. If the settings are on. (For English,..., turn on the printer. Epson LX-300+II Default Settings While you can select in this mode. (For more information, see the one you want. Epson LX-300+II 7/06 If you want a different language, press the LF/FF button until you see the Reference Guide.) ) Settings Page length for Italic table Manual...
Reference Guide
Page 67
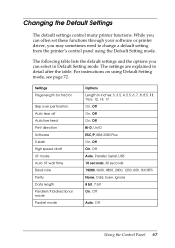
...While you can often set these functions through your software or printer driver, you can select in Default Setting mode. For instructions on using the Default Setting mode. Settings Page length for tractor Skip over perforation Auto tear off Auto line feed Print direction...printer's control panel using Default Setting mode, see page 72. The settings are explained in inches: 3, 3.5, 4, 5.5, 6, 7, 8, 8.5, 11, 70/6, 12, 14, 17 On, Off On, Off On, Off Bi-D, Uni-D ESC/P, IBM 2380 Plus On, Off On, Off Auto, Parallel, Serial, USB 10 seconds, 30 seconds 19200, 9600, 4800, 2400, 1200, 600, 300...
...While you can often set these functions through your software or printer driver, you can select in Default Setting mode. For instructions on using the Default Setting mode. Settings Page length for tractor Skip over perforation Auto tear off Auto line feed Print direction...printer's control panel using Default Setting mode, see page 72. The settings are explained in inches: 3, 3.5, 4, 5.5, 6, 7, 8, 8.5, 11, 70/6, 12, 14, 17 On, Off On, Off On, Off Bi-D, Uni-D ESC/P, IBM 2380 Plus On, Off On, Off Auto, Parallel, Serial, USB 10 seconds, 30 seconds 19200, 9600, 4800, 2400, 1200, 600, 300...
Reference Guide
Page 68
When you cannot set the page length (in most applications override margin settings made from the control panel, you should use this setting only if you select On, the printer provides a one-inch (25.4 mm) margin between the last line printed on one page and the first line printed on... France, Italic Germany, Italic U.K., Italic Denmark1, Italic Sweden, Italic Italy, Italic Spain1 1 second, 1.5 seconds, 2 seconds, 3 seconds On, Off On, Off Table1, Table2 Page length for tractor This setting allows you to set your top and bottom margins using your application. 68 Using the Control Panel
When you cannot set the page length (in most applications override margin settings made from the control panel, you should use this setting only if you select On, the printer provides a one-inch (25.4 mm) margin between the last line printed on one page and the first line printed on... France, Italic Germany, Italic U.K., Italic Denmark1, Italic Sweden, Italic Italy, Italic Spain1 1 second, 1.5 seconds, 2 seconds, 3 seconds On, Off On, Off Table1, Table2 Page length for tractor This setting allows you to set your top and bottom margins using your application. 68 Using the Control Panel

Reference Guide
Page 84
... may not match the size of the continuous paper you are using. Remove the continuous paper. See page 67. Check the Page length for the printer to the single-sheet position. Regular gaps occur in Default Setting mode. Paper Handling Single sheets do Continuous paper may be set. ...The printer's page length setting may be left in the printer. Insert a new sheet. The paper on the paper guide is positioned too far to the left or right for tractor setting in the printout.
... may not match the size of the continuous paper you are using. Remove the continuous paper. See page 67. Check the Page length for the printer to the single-sheet position. Regular gaps occur in Default Setting mode. Paper Handling Single sheets do Continuous paper may be set. ...The printer's page length setting may be left in the printer. Insert a new sheet. The paper on the paper guide is positioned too far to the left or right for tractor setting in the printout.
Reference Guide
Page 126
Index A Accessing printer driver, 34 to 37 Accessories, 97 Accoustic noise, 112 Additional tractor, 98, 102 to 103, 112 Adjusting paper thickness lever, 29 to 30 tear... to 78 using, 63 to 73 Custom paper size, 40 Cut-sheet feeder, 88, 98 to 101, 112 D Data length, 67, 71 Default Setting mode, 67 to 73 Default settings changing, 67 to 73 restoring, 73 E Edge guides, 109... Electronic specifications, 113 to 114 Envelopes, 29 to 30, 32, 117 Environmental specifications, 115 EPSON, help, 96 to 97 EPSON Status Monitor 3, 33, 41 to 44, 59 to 61 Error lights, 77 to 78 ESC/P, 33, 122 to...
Index A Accessing printer driver, 34 to 37 Accessories, 97 Accoustic noise, 112 Additional tractor, 98, 102 to 103, 112 Adjusting paper thickness lever, 29 to 30 tear... to 78 using, 63 to 73 Custom paper size, 40 Cut-sheet feeder, 88, 98 to 101, 112 D Data length, 67, 71 Default Setting mode, 67 to 73 Default settings changing, 67 to 73 restoring, 73 E Edge guides, 109... Electronic specifications, 113 to 114 Envelopes, 29 to 30, 32, 117 Environmental specifications, 115 EPSON, help, 96 to 97 EPSON Status Monitor 3, 33, 41 to 44, 59 to 61 Error lights, 77 to 78 ESC/P, 33, 122 to...

Reference Guide
Page 127
H Help, EPSON, 96 to 97 High speed draft, 67, 70 Hot parts caution symbol, 7 I I/F mode, 67, 70 IBM character table, ... N Network, 45 to 58 O Options problems, 87 to 89 purchasing, 97 using, 98 to 108 P Packet mode, 67, 71 Page length for tractor, 67 to 68, 84 Paper feed knob, 109 feed speed, 112 guide, 14, 109 handling, 11 to 32 jam, clearing, 93 to... 70, 110 Parity, 67, 70 Power cord, 110 Power supply problems, 79 to 80 Printable columns, 111 Print direction, 67, 69 Printer cleaning, 74 to 75 cover, 109 parts, 109 to 110 server, 45 to 49 sharing, 45 to 58 specifications, 111 to 124 transporting...
H Help, EPSON, 96 to 97 High speed draft, 67, 70 Hot parts caution symbol, 7 I I/F mode, 67, 70 IBM character table, ... N Network, 45 to 58 O Options problems, 87 to 89 purchasing, 97 using, 98 to 108 P Packet mode, 67, 71 Page length for tractor, 67 to 68, 84 Paper feed knob, 109 feed speed, 112 guide, 14, 109 handling, 11 to 32 jam, clearing, 93 to... 70, 110 Parity, 67, 70 Power cord, 110 Power supply problems, 79 to 80 Printable columns, 111 Print direction, 67, 69 Printer cleaning, 74 to 75 cover, 109 parts, 109 to 110 server, 45 to 49 sharing, 45 to 58 specifications, 111 to 124 transporting...
User's Guide
Page 25
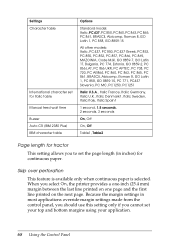
..., the paper is in Default Setting mode. Advancing paper to the tear-off edge When the push tractor is installed, you can use the tear-off feature in two ways: ❏ Manually, by pressing the printer's Tear Off (Font) button ❏ Automatically, by no more data. Using the Tear Off button After... by turning on the Auto tear off function in Default Setting mode. When you need to the tear-off mode and select the appropriate page length for continuous paper in the tear-off position. The printer advances the paper to turn on page 36.
..., the paper is in Default Setting mode. Advancing paper to the tear-off edge When the push tractor is installed, you can use the tear-off feature in two ways: ❏ Manually, by pressing the printer's Tear Off (Font) button ❏ Automatically, by no more data. Using the Tear Off button After... by turning on the Auto tear off function in Default Setting mode. When you need to the tear-off mode and select the appropriate page length for continuous paper in the tear-off position. The printer advances the paper to turn on page 36.

User's Guide
Page 36
For detailed descriptions, see your software or printer driver, you can often change one or more of the printer's default settings from the printer's control panel using the Default Setting mode. Setting Page length for tractor Skip over perforation Auto tear off Auto line feed Print direction Software 0 slash High speed draft mode I/F (... Off Bi-D, Uni-D ESC/P, IBM 2380 On, Off On, Off Auto, Parallel, Serial, USB 10 seconds, 30 seconds 19200, 9600, 4800, 2400, 1200, 600, 300 BPS None, Odd, Even, Ignore 8 bit, 7 bit On, Off Auto, Off Italic, PC 437, PC 850, PC 860, PC 863, PC 865, PC 861...
For detailed descriptions, see your software or printer driver, you can often change one or more of the printer's default settings from the printer's control panel using the Default Setting mode. Setting Page length for tractor Skip over perforation Auto tear off Auto line feed Print direction Software 0 slash High speed draft mode I/F (... Off Bi-D, Uni-D ESC/P, IBM 2380 On, Off On, Off Auto, Parallel, Serial, USB 10 seconds, 30 seconds 19200, 9600, 4800, 2400, 1200, 600, 300 BPS None, Odd, Even, Ignore 8 bit, 7 bit On, Off Auto, Off Italic, PC 437, PC 850, PC 860, PC 863, PC 865, PC 861...