Installation Guide
Page 38
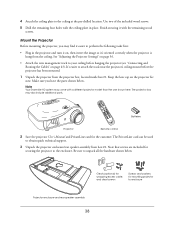
... the image so it's oriented correctly when the projector is hung from box #2. It's easier to the ceiling at the pre-drilled location. Note Your Ensemble HD system may come with the remaining wood screws. The projector box may find it with a different projector model than the one shown here. Be sure to... mounting the projector, you have the parts shown below . Make sure you may also include additional parts. Batteries Projector Remote control 2 Save the projector User's Manual and PrivateLine card for wrapping excess cable;
... the image so it's oriented correctly when the projector is hung from box #2. It's easier to the ceiling at the pre-drilled location. Note Your Ensemble HD system may come with the remaining wood screws. The projector box may find it with a different projector model than the one shown here. Be sure to... mounting the projector, you have the parts shown below . Make sure you may also include additional parts. Batteries Projector Remote control 2 Save the projector User's Manual and PrivateLine card for wrapping excess cable;

Installation Guide
Page 62
... done playing all the manuals included with your calculation. Then turn the LEVEL switch to the corresponding -dB setting, based on the graph where the volume is built into the system. 9 Calculate the average... of capabilities and how to use a sound-level meter to measure the volume from the usual seating area. For an introduction to the home theater's... system. This will reduce the volume of the Ensemble HD system is provided for future reference. For detailed instructions on the back of the test tones and use them, watch the Ensemble HD DVD...
... done playing all the manuals included with your calculation. Then turn the LEVEL switch to the corresponding -dB setting, based on the graph where the volume is built into the system. 9 Calculate the average... of capabilities and how to use a sound-level meter to measure the volume from the usual seating area. For an introduction to the home theater's... system. This will reduce the volume of the Ensemble HD system is provided for future reference. For detailed instructions on the back of the test tones and use them, watch the Ensemble HD DVD...
Installation Guide
Page 68
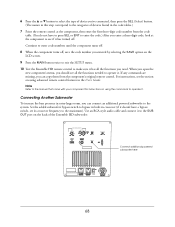
... to exit the SETUP menu. 10 Test the Ensemble HD remote control to operate it . Connecting Another Subwoofer To increase the bass presence in extra-large rooms, you can connect an additional powered subwoofer to the system. Note Refer to the manual that came with your component for instructions on using... of device you've connected, then press the SEL (Select) button. (The names in this step correspond to the categories of the Ensemble HD subwoofer: BASS CONTOUR CONTROL FREQ 61 82 47 98 99 LEVEL PWR ON MODE SUB OUT Connect additional powered subwoofer here MASTER POWER 68 ...
... to exit the SETUP menu. 10 Test the Ensemble HD remote control to operate it . Connecting Another Subwoofer To increase the bass presence in extra-large rooms, you can connect an additional powered subwoofer to the system. Note Refer to the manual that came with your component for instructions on using... of device you've connected, then press the SEL (Select) button. (The names in this step correspond to the categories of the Ensemble HD subwoofer: BASS CONTOUR CONTROL FREQ 61 82 47 98 99 LEVEL PWR ON MODE SUB OUT Connect additional powered subwoofer here MASTER POWER 68 ...
User's Guide - PowerLite Home Cinema 8100 / 8500 UB
Page 3
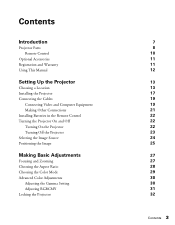
Contents Introduction Projector Parts Remote Control Optional Accessories Registration and Warranty Using This Manual Setting Up the Projector Choosing a Location Installing the Projector Connecting the Cables Connecting Video and Computer Equipment Making Other Connections Installing Batteries in the Remote ...
Contents Introduction Projector Parts Remote Control Optional Accessories Registration and Warranty Using This Manual Setting Up the Projector Choosing a Location Installing the Projector Connecting the Cables Connecting Video and Computer Equipment Making Other Connections Installing Batteries in the Remote ...

User's Guide - PowerLite Home Cinema 8100 / 8500 UB
Page 12
...to view FAQs (Frequently Asked Questions) or product information and e-mail your questions to your equipment. If you need to use the Epson PrivateLine® Support service. Need additional help , you can use the projector, in addition to avoid bodily injury. Note: Contains ...important information about your projector. 12 Introduction Take advantage of Epson's automated support services 24 hours a day at www.epson.com/support. Using This Manual This book contains all the information you need more help ? Please follow these guidelines as you...
...to view FAQs (Frequently Asked Questions) or product information and e-mail your questions to your equipment. If you need to use the Epson PrivateLine® Support service. Need additional help , you can use the projector, in addition to avoid bodily injury. Note: Contains ...important information about your projector. 12 Introduction Take advantage of Epson's automated support services 24 hours a day at www.epson.com/support. Using This Manual This book contains all the information you need more help ? Please follow these guidelines as you...
User's Guide - PowerLite Home Cinema 8100 / 8500 UB
Page 47
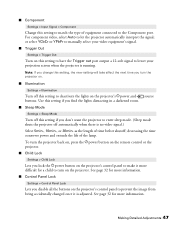
...; Trigger Out Settings > Trigger Out Turn on this setting to deactivate the lights on the projector's Ppower and buttons. or select YCbCr or YPbPr to manually select your projection screen when the projector is no video signal.) Select 5min., 10min., or 30min. Making Detailed Adjustments 47 ■ Component Settings > Input Signal...
...; Trigger Out Settings > Trigger Out Turn on this setting to deactivate the lights on the projector's Ppower and buttons. or select YCbCr or YPbPr to manually select your projection screen when the projector is no video signal.) Select 5min., 10min., or 30min. Making Detailed Adjustments 47 ■ Component Settings > Input Signal...
User's Guide - PowerLite Home Cinema 8100 / 8500 UB
Page 60
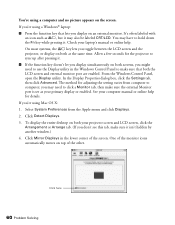
... screens, you might need to make sure that lets you don't see this tab, make sure the external Monitor port is set as your computer manual or online help . You're using Mac OS X: 1. See your primary display or enabled. The method for details. Click Detect Displays. 3. If you ...the LCD screen and the projector, or display on both at the same time. On most systems, the key lets you 're using a Windows® laptop: ■ Press the function key that both your laptop's manual or online help for adjusting the setting varies from the Apple menu and click Displays. 2. ...
... screens, you might need to make sure that lets you don't see this tab, make sure the external Monitor port is set as your computer manual or online help . You're using Mac OS X: 1. See your primary display or enabled. The method for details. Click Detect Displays. 3. If you ...the LCD screen and the projector, or display on both at the same time. On most systems, the key lets you 're using a Windows® laptop: ■ Press the function key that both your laptop's manual or online help for adjusting the setting varies from the Apple menu and click Displays. 2. ...
User's Guide - PowerLite Home Cinema 8100 / 8500 UB
Page 70
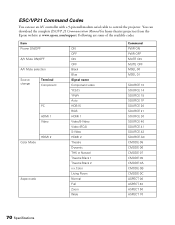
... 0C ASPECT 00 ASPECT 40 ASPECT 50 ASPECT 70 70 Specifications ESC/VP21 Command Codes You can download the complete ESC/VP 21 Communication Manual for home theater projectors from the Epson website at www.epson.com/support. You can use an AV controller with a 9-pin null modem serial cable to control the projector.
... 0C ASPECT 00 ASPECT 40 ASPECT 50 ASPECT 70 70 Specifications ESC/VP21 Command Codes You can download the complete ESC/VP 21 Communication Manual for home theater projectors from the Epson website at www.epson.com/support. You can use an AV controller with a 9-pin null modem serial cable to control the projector.
User's Guide
Page 6
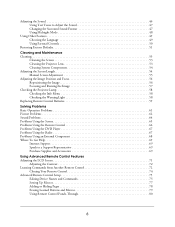
... Parental Controls 50 Restoring Factory Defaults 51 Cleaning and Maintenance Cleaning 53 Cleaning the Screen 53 Cleaning the Projector Lens 53 Cleaning System Components 54 Adjusting the Screen Length 54 Manual Screen Adjustment 55 Adjusting the Image Position and Focus 56 Repositioning the Image 56 Focusing and Resizing the Image 57 Checking...
... Parental Controls 50 Restoring Factory Defaults 51 Cleaning and Maintenance Cleaning 53 Cleaning the Screen 53 Cleaning the Projector Lens 53 Cleaning System Components 54 Adjusting the Screen Length 54 Manual Screen Adjustment 55 Adjusting the Image Position and Focus 56 Repositioning the Image 56 Focusing and Resizing the Image 57 Checking...
User's Guide
Page 15
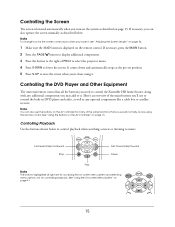
...See "Using the Buttons on the AV Controller" on -screen menu system and selecting menu options, not for controlling playback. If necessary, press the MAIN button. 2 Press the PAGE button to display additional components. 3 Press the button to control the Ensemble HD home theater, along with any optional components like a cable box or satellite... at right are for many of the same functions that you 're done using the remote control. Note You can also operate the screen manually as any additional components you may add to raise the screen when you would normally access using it .
...See "Using the Buttons on the AV Controller" on -screen menu system and selecting menu options, not for controlling playback. If necessary, press the MAIN button. 2 Press the PAGE button to display additional components. 3 Press the button to control the Ensemble HD home theater, along with any optional components like a cable box or satellite... at right are for many of the same functions that you 're done using the remote control. Note You can also operate the screen manually as any additional components you may add to raise the screen when you would normally access using it .

User's Guide
Page 29
Tuning to the Desired Station 1 Select the RADIO option on the remote control to activate the radio: MAIN DVD CABLE SAT HD RADIO 1 OF 2 Select RADIO Note To use the AV controller to receive AM or FM radio broadcasts. to change the frequency: • Press the button ... the BAND option on the remote control, then select AUD1. Listening to AM/FM Radio You can use the radio, it to change the frequency manually. • Or press and hold the button to find the next available station automatically. The tuner searches until a station of the AV controller, as described...
Tuning to the Desired Station 1 Select the RADIO option on the remote control to activate the radio: MAIN DVD CABLE SAT HD RADIO 1 OF 2 Select RADIO Note To use the AV controller to receive AM or FM radio broadcasts. to change the frequency: • Press the button ... the BAND option on the remote control, then select AUD1. Listening to AM/FM Radio You can use the radio, it to change the frequency manually. • Or press and hold the button to find the next available station automatically. The tuner searches until a station of the AV controller, as described...
User's Guide
Page 38
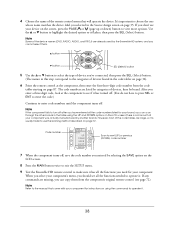
...Source Assign screen on the screen, press the PAGE or (page up or down) button to the manual that came with your component for your device on page 35. If any commands are listed by ... selected in this step correspond to the categories of the code tables are already used by the Ensemble HD system, and you cannot select them from the code tables starting on page 36). 6 Point the ...on the LCD screen. 8 Press the MAIN button twice to exit the SETUP menu. 9 Test the Ensemble HD remote control to highlight the desired option so it is a chance that will operate the device. When...
...Source Assign screen on the screen, press the PAGE or (page up or down) button to the manual that came with your component for your device on page 35. If any commands are listed by ... selected in this step correspond to the categories of the code tables are already used by the Ensemble HD system, and you cannot select them from the code tables starting on page 36). 6 Point the ...on the LCD screen. 8 Press the MAIN button twice to exit the SETUP menu. 9 Test the Ensemble HD remote control to highlight the desired option so it is a chance that will operate the device. When...
User's Guide
Page 40
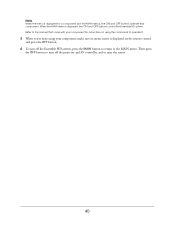
... it. 3 When you're done using the commands to raise the screen. 40 Refer to the manual that came with your component, make sure its menu screen is displayed, the ON and OFF buttons control the Ensemble HD system. When the MAIN menu is displayed on using your component for a component (not the MAIN... buttons operate that component. Note When the menu is displayed for instructions on the remote control and press the OFF button. 4 To turn off the Ensemble HD system, press the MAIN button to return to the MAIN menu.
... it. 3 When you're done using the commands to raise the screen. 40 Refer to the manual that came with your component, make sure its menu screen is displayed, the ON and OFF buttons control the Ensemble HD system. When the MAIN menu is displayed on using your component for a component (not the MAIN... buttons operate that component. Note When the menu is displayed for instructions on the remote control and press the OFF button. 4 To turn off the Ensemble HD system, press the MAIN button to return to the MAIN menu.
User's Guide
Page 54
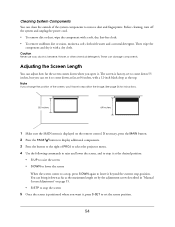
...to lower the screen When the screen comes to a stop, press S-DWN again to reposition the image. These can clean the outside of the system components to remove dust and fingerprints. If necessary, press the MAIN button. 2 Press the PAGE button to display additional components. 3 Press the ... down as far as the maximum length set by the adjustment screw described in "Manual Screen Adjustment" on the remote control. The screen is displayed on page 55. • S-STP to stop -position. Cleaning System Components You can damage components. Caution Never use wax, alcohol, benzene, thinner,...
...to lower the screen When the screen comes to a stop, press S-DWN again to reposition the image. These can clean the outside of the system components to remove dust and fingerprints. If necessary, press the MAIN button. 2 Press the PAGE button to display additional components. 3 Press the ... down as far as the maximum length set by the adjustment screw described in "Manual Screen Adjustment" on the remote control. The screen is displayed on page 55. • S-STP to stop -position. Cleaning System Components You can damage components. Caution Never use wax, alcohol, benzene, thinner,...
User's Guide
Page 55
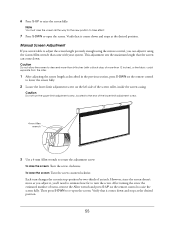
... 4-mm Allen wrench that came with a black drop of an inch. Caution Do not allow the screen to descend more than 64 inches (with your system. Verify that it comes down . After turning the screw the estimated number of turns, remove the Allen wrench and press S-UP on the left side... of the lower-limit adjustment screw. 4-mm Allen wrench 3 Use a 4-mm Allen wrench to raise the screen fully. Manual Screen Adjustment If you can come down and stops at the desired position. Caution Do not turn the upper-limit adjustment screw, located to the...
... 4-mm Allen wrench that came with a black drop of an inch. Caution Do not allow the screen to descend more than 64 inches (with your system. Verify that it comes down . After turning the screw the estimated number of turns, remove the Allen wrench and press S-UP on the left side... of the lower-limit adjustment screw. 4-mm Allen wrench 3 Use a 4-mm Allen wrench to raise the screen fully. Manual Screen Adjustment If you can come down and stops at the desired position. Caution Do not turn the upper-limit adjustment screw, located to the...
User's Guide
Page 67
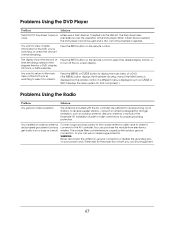
... designed for proper grounding protection. Press the INFO button on -screen display. You installed an outdoor antenna and properly grounded it displays the menu system for the DVD you're watching, or check the amount of both you get poor radio reception. Or you 're watching to the coaxial ... or SAT, it , but you and your equipment. 67 You want to return to the main menu of a DVD. (The MENU button displays the Ensemble HD setup menu if the MAIN menu is displayed on your antenna's manual or the Ensemble HD Installation Guide to receive strong, local stations.
... designed for proper grounding protection. Press the INFO button on -screen display. You installed an outdoor antenna and properly grounded it displays the menu system for the DVD you're watching, or check the amount of both you get poor radio reception. Or you 're watching to the coaxial ... or SAT, it , but you and your equipment. 67 You want to return to the main menu of a DVD. (The MENU button displays the Ensemble HD setup menu if the MAIN menu is displayed on your antenna's manual or the Ensemble HD Installation Guide to receive strong, local stations.
User's Guide
Page 121
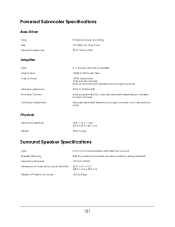
... Built into projector enclosure; also removable for ceiling installation 100 Hz to 20 kHz ±2dB 5 pre-programmed EQs, manually selectable depending on installed location of Projector Enclosure 4" (10 cm) coaxial speaker; smooths room-induced bass peak Physical Dimensions ...35 lb (16 kg) Surround Speaker Specifications Type Speaker Mounting Frequency Response Dimensions of Projector Enclosure (W×H×D) Weight of screen Manually selectable frequency and gain; Powered Subwoofer Specifications Bass Driver Type Size Frequency Response Ported enclosure, front-firing 10" (254 mm), ...
... Built into projector enclosure; also removable for ceiling installation 100 Hz to 20 kHz ±2dB 5 pre-programmed EQs, manually selectable depending on installed location of Projector Enclosure 4" (10 cm) coaxial speaker; smooths room-induced bass peak Physical Dimensions ...35 lb (16 kg) Surround Speaker Specifications Type Speaker Mounting Frequency Response Dimensions of Projector Enclosure (W×H×D) Weight of screen Manually selectable frequency and gain; Powered Subwoofer Specifications Bass Driver Type Size Frequency Response Ported enclosure, front-firing 10" (254 mm), ...

