
Users Guide
Page 3
Contents ES-400/ES-500W User's Guide ...7 Scanner Basics...8 Scanner Parts Locations ...8 Scanner Parts...8 Scanner Buttons and Lights...11 User Replaceable Epson Scanner Parts and Accessories 14 Changing the Power Off and Sleep Timer Settings 15 Loading Originals...17 Loading Originals in the Input ... Connection Setup ...40 Connecting to an Existing Wi-Fi Network 41 Manually Connecting to a Wi-Fi Router Using EpsonNet Config 42 Setting Up Network Scanning...43 Determining the Scanner's IP Address 46 Direct Wi-Fi Mode Setup ...46 Enabling a Direct Wi-Fi (AP Mode) Connection 47 Using WPS...
Contents ES-400/ES-500W User's Guide ...7 Scanner Basics...8 Scanner Parts Locations ...8 Scanner Parts...8 Scanner Buttons and Lights...11 User Replaceable Epson Scanner Parts and Accessories 14 Changing the Power Off and Sleep Timer Settings 15 Loading Originals...17 Loading Originals in the Input ... Connection Setup ...40 Connecting to an Existing Wi-Fi Network 41 Manually Connecting to a Wi-Fi Router Using EpsonNet Config 42 Setting Up Network Scanning...43 Determining the Scanner's IP Address 46 Direct Wi-Fi Mode Setup ...46 Enabling a Direct Wi-Fi (AP Mode) Connection 47 Using WPS...
Users Guide
Page 4
... ...52 Restoring Default Network Settings...52 Scanning ...54 Starting a Scan...54 Starting a Scan from a Scanner Button 54 Assigning Start Button Settings or Scan Jobs 55 Starting a Scan Using the Epson Scan 2 Icon 57 Starting a Scan from the ADF with Document Capture Pro and Document Capture 61 Scanning in Epson Scan 2 ...63 Additional Scanning Settings - Windows 76 Convert Scanned Documents to a SharePoint Server or...
... ...52 Restoring Default Network Settings...52 Scanning ...54 Starting a Scan...54 Starting a Scan from a Scanner Button 54 Assigning Start Button Settings or Scan Jobs 55 Starting a Scan Using the Epson Scan 2 Icon 57 Starting a Scan from the ADF with Document Capture Pro and Document Capture 61 Scanning in Epson Scan 2 ...63 Additional Scanning Settings - Windows 76 Convert Scanned Documents to a SharePoint Server or...

Users Guide
Page 5
...Scanner Button Does Not Work as Expected 118 Scanning Software Does Not Operate Correctly 119 Cannot Start Epson Scan 2 ...120 Original Feeds Incorrectly in Scanner 120 Original Jams in Scanner...121 Scanning is Slow ...123 Solving Network Scanning Problems 124 Cannot Scan Over a Network ...124 Scanner Cannot Connect ... 127 Ripple Patterns Appear in an Image 128 Spots or Lines Appear in All Scanned Images 128 Scanned Image is Cropped ...130 Resetting the Epson Scan 2 Settings 130 Solving Flatbed Scanner Dock Problems 131 Scanned Image Edges are Cropped 131 Line of Dots Appears in All...
...Scanner Button Does Not Work as Expected 118 Scanning Software Does Not Operate Correctly 119 Cannot Start Epson Scan 2 ...120 Original Feeds Incorrectly in Scanner 120 Original Jams in Scanner...121 Scanning is Slow ...123 Solving Network Scanning Problems 124 Cannot Scan Over a Network ...124 Scanner Cannot Connect ... 127 Ripple Patterns Appear in an Image 128 Spots or Lines Appear in All Scanned Images 128 Scanned Image is Cropped ...130 Resetting the Epson Scan 2 Settings 130 Solving Flatbed Scanner Dock Problems 131 Scanned Image Edges are Cropped 131 Line of Dots Appears in All...
Users Guide
Page 15
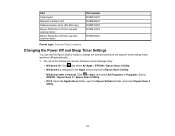
... scanner dock (ES-400 only) Epson Perfection V19 (for use with scanner dock) Epson Perfection V39 (for use with scanner dock) Part number B12B819291 B12B808441 B12B819001 B11B231201 B11B232201 Parent topic: Scanner Parts Locations Changing the Power Off and Sleep Timer Settings You can use the Epson Scan 2 Utility to the Apps screen and select Epson Scan 2 Utility. •...
... scanner dock (ES-400 only) Epson Perfection V19 (for use with scanner dock) Epson Perfection V39 (for use with scanner dock) Part number B12B819291 B12B808441 B12B819001 B11B231201 B11B232201 Parent topic: Scanner Parts Locations Changing the Power Off and Sleep Timer Settings You can use the Epson Scan 2 Utility to the Apps screen and select Epson Scan 2 Utility. •...

Users Guide
Page 16
Click the Power Save tab. 3. Select the length of time after which you want the scanner to sleep as the Power Off Timer setting. 5. 2. Select the length of time after which you want the scanner to go to automatically turn off when not in use as the Sleep Timer setting. 4. Parent topic: Scanner Basics 16 Close the Epson Scan 2 Utility.
Click the Power Save tab. 3. Select the length of time after which you want the scanner to sleep as the Power Off Timer setting. 5. 2. Select the length of time after which you want the scanner to go to automatically turn off when not in use as the Sleep Timer setting. 4. Parent topic: Scanner Basics 16 Close the Epson Scan 2 Utility.

Users Guide
Page 22
Note: If thicker paper does not eject properly or falls from the scanner as shown. 8. If necessary during scanning, adjust the position of the stopper on the output tray extension to eject freely onto the surface below the scanner, try placing the scanner on ...the edge of a table where the ejected originals can drop freely. 22 If the scanned images are 15.5 inches (393.7 mm) or longer, support the original as it enters into and ejects from the output tray, push in the output...
Note: If thicker paper does not eject properly or falls from the scanner as shown. 8. If necessary during scanning, adjust the position of the stopper on the output tray extension to eject freely onto the surface below the scanner, try placing the scanner on ...the edge of a table where the ejected originals can drop freely. 22 If the scanned images are 15.5 inches (393.7 mm) or longer, support the original as it enters into and ejects from the output tray, push in the output...

Users Guide
Page 23
...Multiple Sizes of Originals in the Input Tray Original Document Specifications Parent topic: Loading Originals Related references Original Document Specifications Related topics Scanning Loading Multiple Sizes of Originals in the Input Tray You can load originals of different sizes, paper types, and thicknesses at... load photos, or valuable original documents or artwork, directly into the input tray. Note: If scanning thin or wrinkled paper causes paper jams, press the slow mode button once before scanning to normal speed. press it again to return to slow down the feeding speed; Open the...
...Multiple Sizes of Originals in the Input Tray Original Document Specifications Parent topic: Loading Originals Related references Original Document Specifications Related topics Scanning Loading Multiple Sizes of Originals in the Input Tray You can load originals of different sizes, paper types, and thicknesses at... load photos, or valuable original documents or artwork, directly into the input tray. Note: If scanning thin or wrinkled paper causes paper jams, press the slow mode button once before scanning to normal speed. press it again to return to slow down the feeding speed; Open the...

Users Guide
Page 25
...to eject freely onto the surface below the scanner, try placing the scanner on the output tray extension to fit the ejected originals. If the scanned images are slightly angled in descending order of the widest original. 6. Slide the edge guides against the edges of paper size with the largest...top edges are affected by the originals ejecting below the scanner. Load the originals in the input tray in the input tray. If necessary during scanning, adjust the position of the stopper on the edge of a table where the ejected originals can drop freely. 25 Slide them in the output...
...to eject freely onto the surface below the scanner, try placing the scanner on the output tray extension to fit the ejected originals. If the scanned images are slightly angled in descending order of the widest original. 6. Slide the edge guides against the edges of paper size with the largest...top edges are affected by the originals ejecting below the scanner. Load the originals in the input tray in the input tray. If necessary during scanning, adjust the position of the stopper on the edge of a table where the ejected originals can drop freely. 25 Slide them in the output...

Users Guide
Page 31
Slide the edge guides against the edges of the card. 5. Turn off the Detect Double Feed setting on the Main Settings tab in Epson Scan 2 when scanning the cards. 4. Press the double feed detection skip button to disable the Detect Double Feed feature, and scan again. 31 Note: If you do not disable the Detect Double Feed setting and a double feed error occurs, remove the plastic or laminated card from the input tray and then reload it.
Slide the edge guides against the edges of the card. 5. Turn off the Detect Double Feed setting on the Main Settings tab in Epson Scan 2 when scanning the cards. 4. Press the double feed detection skip button to disable the Detect Double Feed feature, and scan again. 31 Note: If you do not disable the Detect Double Feed setting and a double feed error occurs, remove the plastic or laminated card from the input tray and then reload it.

Users Guide
Page 32
...(0.76 mm) or 5 cards (horizontal) less 0.03 inch (0.8 mm) or 1 card less Note: Plastic cards with glossy surfaces may not scan properly. Parent topic: Loading Plastic and Laminated Cards in the Input Tray Loading Special Originals You can load a photo or large, thick, or ...folded original in Epson Scan 2. 1. Plastic and Laminated Card Specifications Parent topic: Loading Originals Related references Plastic and Laminated Card Specifications Related topics Scanning Plastic and Laminated Card Specifications You can load original plastic and laminated ...
...(0.76 mm) or 5 cards (horizontal) less 0.03 inch (0.8 mm) or 1 card less Note: Plastic cards with glossy surfaces may not scan properly. Parent topic: Loading Plastic and Laminated Cards in the Input Tray Loading Special Originals You can load a photo or large, thick, or ...folded original in Epson Scan 2. 1. Plastic and Laminated Card Specifications Parent topic: Loading Originals Related references Plastic and Laminated Card Specifications Related topics Scanning Plastic and Laminated Card Specifications You can load original plastic and laminated ...

Users Guide
Page 38
... inches [210 × 297 mm]) less (excluding the thickness of the stopper on the output tray extension to fit the ejected originals. If necessary during scanning, adjust the position of the carrier sheet) 4.49 × 6.38 inches (114 × 162 mm) (standard size) 0.015 inch (0.38 mm...) 5 envelopes or less 4.33 × 8.66 inches (110 × 220 mm) (standard size) 38 If the scanned images are affected by the originals ejecting below the scanner. 8. Paper type Large originals (plain paper, fine paper, or recycled paper) (load only in a carrier...
... inches [210 × 297 mm]) less (excluding the thickness of the stopper on the output tray extension to fit the ejected originals. If necessary during scanning, adjust the position of the carrier sheet) 4.49 × 6.38 inches (114 × 162 mm) (standard size) 0.015 inch (0.38 mm...) 5 envelopes or less 4.33 × 8.66 inches (110 × 220 mm) (standard size) 38 If the scanned images are affected by the originals ejecting below the scanner. 8. Paper type Large originals (plain paper, fine paper, or recycled paper) (load only in a carrier...

Users Guide
Page 40
... and a router or access point, do the following to manually connect to your scanner through the optional Epson Network Interface Unit (ES-400/ES-500W) or through a direct connection to a network: 1. Set up network scanning to your scanner (ES-500W). Parent topic: Wi-Fi Networking Related tasks Enabling a Direct Wi-Fi (AP Mode) Connection Manually Connecting...
... and a router or access point, do the following to manually connect to your scanner through the optional Epson Network Interface Unit (ES-400/ES-500W) or through a direct connection to a network: 1. Set up network scanning to your scanner (ES-500W). Parent topic: Wi-Fi Networking Related tasks Enabling a Direct Wi-Fi (AP Mode) Connection Manually Connecting...

Users Guide
Page 41
Connecting to an Existing Wi-Fi Network You can be connected to a Wi-Fi Router Using EpsonNet Config Setting Up Network Scanning Parent topic: Wi-Fi Networking 41 The wireless router or access point can set up your scanner to communicate with your computer over a wireless or wired network. 1 Epson scanner 2 Wireless router or access point 3 Computer with a wireless interface 4 Computer 5 Internet 6 Ethernet cable (used only for wired connection to the wireless router or access point) Manually Connecting to your computer using a wireless router or access point.
Connecting to an Existing Wi-Fi Network You can be connected to a Wi-Fi Router Using EpsonNet Config Setting Up Network Scanning Parent topic: Wi-Fi Networking 41 The wireless router or access point can set up your scanner to communicate with your computer over a wireless or wired network. 1 Epson scanner 2 Wireless router or access point 3 Computer with a wireless interface 4 Computer 5 Internet 6 Ethernet cable (used only for wired connection to the wireless router or access point) Manually Connecting to your computer using a wireless router or access point.

Users Guide
Page 42
... Start, and select All Programs or Programs. Select EpsonNet > EpsonNet Config > EpsonNet Config. • OS X: Open the Applications folder, select Epson Software > EpsonNet > EpsonNet Config > EpsonNet Config. 4. Select your computer. 42 Set up the connection. 1. Click Transmit. 8. Disconnect the ... Basic (Wireless). 6. Turn off the scanner. 10. Note: You must have a computer with a wireless adapter to set up network scanning on your scanner from the list and click Configuration. 5. Do one of the following settings for your infrastructure connection: • Communication mode...
... Start, and select All Programs or Programs. Select EpsonNet > EpsonNet Config > EpsonNet Config. • OS X: Open the Applications folder, select Epson Software > EpsonNet > EpsonNet Config > EpsonNet Config. 4. Select your computer. 42 Set up the connection. 1. Click Transmit. 8. Disconnect the ... Basic (Wireless). 6. Turn off the scanner. 10. Note: You must have a computer with a wireless adapter to set up network scanning on your scanner from the list and click Configuration. 5. Do one of the following settings for your infrastructure connection: • Communication mode...
Users Guide
Page 43
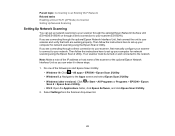
...on and connected to the Apps screen and select Epson Scan 2 Utility. • Windows (other versions): Click or Start > All Programs or Programs > EPSON > Epson Scan 2 > Epson Scan 2 Utility. • OS X: Open the Applications folder, click Epson Software, and click Epson Scan 2 Utility. 2. Select Settings from the Scanner ...one of the scanner or the optional Epson Network Interface Unit so you are working properly. Then follow the instructions here to set up network scanning to your scanner through the optional Epson Network Interface Unit (ES-400/ES-500W) or through a direct connection...
...on and connected to the Apps screen and select Epson Scan 2 Utility. • Windows (other versions): Click or Start > All Programs or Programs > EPSON > Epson Scan 2 > Epson Scan 2 Utility. • OS X: Open the Applications folder, click Epson Software, and click Epson Scan 2 Utility. 2. Select Settings from the Scanner ...one of the scanner or the optional Epson Network Interface Unit so you are working properly. Then follow the instructions here to set up network scanning to your scanner through the optional Epson Network Interface Unit (ES-400/ES-500W) or through a direct connection...

Users Guide
Page 45
... for Network, select the IP address of your Epson Network Interface Unit and click Add. • Select the Enter address setting, type in the IP address or host name of your settings and close Epson Scan 2 Utility. 7. Click OK to save your Epson Network Interface Unit or scanner, and click Add.... 5. If you are setting up network scanning using the optional Network Interface Unit, see a screen like this: 4. You see...
... for Network, select the IP address of your Epson Network Interface Unit and click Add. • Select the Enter address setting, type in the IP address or host name of your settings and close Epson Scan 2 Utility. 7. Click OK to save your Epson Network Interface Unit or scanner, and click Add.... 5. If you are setting up network scanning using the optional Network Interface Unit, see a screen like this: 4. You see...

Users Guide
Page 46
.... Select EpsonNet > EpsonNet Config > EpsonNet Config. • OS X: Open the Applications folder and select EPSON Software > EpsonNet > EpsonNet Config > EpsonNet Config. 2. Parent topic: Setting Up Network Scanning Direct Wi-Fi Mode Setup You can set up network scanning. 1. Locate your computer or another device without requiring a wireless router or access point. Parent topic...
.... Select EpsonNet > EpsonNet Config > EpsonNet Config. • OS X: Open the Applications folder and select EPSON Software > EpsonNet > EpsonNet Config > EpsonNet Config. 2. Parent topic: Setting Up Network Scanning Direct Wi-Fi Mode Setup You can set up network scanning. 1. Locate your computer or another device without requiring a wireless router or access point. Parent topic...
Users Guide
Page 49
... to the network. 49 When the Wi-Fi on/off light flashes blue. 3. Parent topic: Wi-Fi Protected Setup (WPS) Related tasks Setting Up Network Scanning Using WPS PIN Mode to Connect to a Network If you have a WPS-enabled wireless router or access point, you can use Wi-Fi Protected Setup...
... to the network. 49 When the Wi-Fi on/off light flashes blue. 3. Parent topic: Wi-Fi Protected Setup (WPS) Related tasks Setting Up Network Scanning Using WPS PIN Mode to Connect to a Network If you have a WPS-enabled wireless router or access point, you can use Wi-Fi Protected Setup...
Users Guide
Page 50
... a direct Wi-Fi connection. Parent topic: Wi-Fi Protected Setup (WPS) Related tasks Setting Up Network Scanning Epson DocumentScan App for iOS/Android You can find more information about Epson DocumentScan by searching for the app on , the connection failed. error light turns on the App Store (iOS) or Google Play (Android). Press...
... a direct Wi-Fi connection. Parent topic: Wi-Fi Protected Setup (WPS) Related tasks Setting Up Network Scanning Epson DocumentScan App for iOS/Android You can find more information about Epson DocumentScan by searching for the app on , the connection failed. error light turns on the App Store (iOS) or Google Play (Android). Press...

Users Guide
Page 51
... Parent topic: Using the Network Interface Unit Related tasks Setting Up Network Scanning 51 After connecting the Network Interface Unit, you need to set up ...settings, and maintenance options) 4 Reset button (returns the LCD to the default screen) 5 Stop button (cancels scanning) 6 OK button and arrows (use the arrows to highlight an option and the OK button to select it... Panel 1 power button (turns the unit on connecting it ) 7 start button (starts scanning when networking is enabled) Parent topic: Using the Network Interface Unit Connecting the Network Interface Unit See...
... Parent topic: Using the Network Interface Unit Related tasks Setting Up Network Scanning 51 After connecting the Network Interface Unit, you need to set up ...settings, and maintenance options) 4 Reset button (returns the LCD to the default screen) 5 Stop button (cancels scanning) 6 OK button and arrows (use the arrows to highlight an option and the OK button to select it... Panel 1 power button (turns the unit on connecting it ) 7 start button (starts scanning when networking is enabled) Parent topic: Using the Network Interface Unit Connecting the Network Interface Unit See...


