

Product Information Guide
Page 1
...proceeding, familiarize yourself with the printer. Cleaning pad Cotton swab Paper and paper delivery Paper specifications: Epson does not recommend or guarantee the use the printer, you install certain parts. landscape 10 cpi ...seconds at 73°F (23°C) with 512K RAM. 6 font styles: Courier 12 pt. EPL-6000 LASER PRINTER 1 Assembling the Printer 1 Before you can use of any particular brand of paper.... portrait 10 cpi Courier Bold 12 pt. portrait 10 cpi Courier 12 pt. Drum type: OPC Exposure: Laser beam scanning Fusing: Heat fixing 300 x 300 dpi 6 pages per ...
...proceeding, familiarize yourself with the printer. Cleaning pad Cotton swab Paper and paper delivery Paper specifications: Epson does not recommend or guarantee the use the printer, you install certain parts. landscape 10 cpi ...seconds at 73°F (23°C) with 512K RAM. 6 font styles: Courier 12 pt. EPL-6000 LASER PRINTER 1 Assembling the Printer 1 Before you can use of any particular brand of paper.... portrait 10 cpi Courier Bold 12 pt. portrait 10 cpi Courier 12 pt. Drum type: OPC Exposure: Laser beam scanning Fusing: Heat fixing 300 x 300 dpi 6 pages per ...
Product Information Guide
Page 2
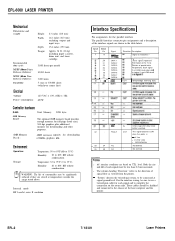
... I" 20 21 22 23 24 25 26 / 27 10 I26 DATA 1 DATA 2 DATA 3 DATA 4 DATA 5 DATA 6 DATA 7 I DATA 6 lm I - EPL-6000 LASER PRINTER Mechanical Dimensions and weight: Recommended duty cycle: MPBF (Mean Prints Between Failures): MTBF (Mean Time Between Failures): Durability: Electrical Voltage: Power consumption: Height...210 mm) 16.1 inches (410 mm) excluding output and input trays. 15.4 inches (390 mm) Approx. 36 lb. (16 kg) including paper cassette, drum unit, and toner cartridge. 3,000 sheets per month 30,000 sheets 3,000 hours 5 years or 300,000 sheets (whichever comes first) 120 VAC ±...
... I" 20 21 22 23 24 25 26 / 27 10 I26 DATA 1 DATA 2 DATA 3 DATA 4 DATA 5 DATA 6 DATA 7 I DATA 6 lm I - EPL-6000 LASER PRINTER Mechanical Dimensions and weight: Recommended duty cycle: MPBF (Mean Prints Between Failures): MTBF (Mean Time Between Failures): Durability: Electrical Voltage: Power consumption: Height...210 mm) 16.1 inches (410 mm) excluding output and input trays. 15.4 inches (390 mm) Approx. 36 lb. (16 kg) including paper cassette, drum unit, and toner cartridge. 3,000 sheets per month 30,000 sheets 3,000 hours 5 years or 300,000 sheets (whichever comes first) 120 VAC ±...

Product Information Guide
Page 5
...(If you have set up on your printer. l For more information on before performing the self test. 2. Open the printer cover by an authorized Epson dealer. They are : Line printer Line printer 8.5 point 8.5 point portrait landscape In addition, the cartridge slots on your printer is too light or ... test: WARNING: Never open the printer cover while the 1 1J % 1 EPL-6000 is important to press the buttons at 100,000 pages by lifting up your printer correctly and that your printer let you replace the drum unit, it is too light or too dark. see whether you release the...
...(If you have set up on your printer. l For more information on before performing the self test. 2. Open the printer cover by an authorized Epson dealer. They are : Line printer Line printer 8.5 point 8.5 point portrait landscape In addition, the cartridge slots on your printer is too light or ... test: WARNING: Never open the printer cover while the 1 1J % 1 EPL-6000 is important to press the buttons at 100,000 pages by lifting up your printer correctly and that your printer let you replace the drum unit, it is too light or too dark. see whether you release the...

Product Information Guide
Page 6
...22 ERROR 40 When the AUTO CONT SelecType option is shown below . Note: Increasing the print density increases toner consumption. CHANGE DRUM The drum unit may not have been fixed. When you release the buttons, STATUS PRINT appears on current printer settings, such as paper ...the drum unit. Press the A and V buttons at the same time. 2. l Certain problem require that your printer resumes priming even though the problem may not be installed. To perform the font print test, press the RESET/CONTINUE and the SPECIAL buttons at the same time. 3. EPL-6000 LASER...
...22 ERROR 40 When the AUTO CONT SelecType option is shown below . Note: Increasing the print density increases toner consumption. CHANGE DRUM The drum unit may not have been fixed. When you release the buttons, STATUS PRINT appears on current printer settings, such as paper ...the drum unit. Press the A and V buttons at the same time. 2. l Certain problem require that your printer resumes priming even though the problem may not be installed. To perform the font print test, press the RESET/CONTINUE and the SPECIAL buttons at the same time. 3. EPL-6000 LASER...

Product Information Guide
Page 7
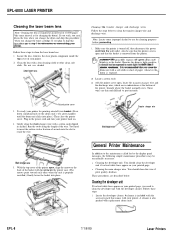
... printer components regularly to purchase the optional 2MB memory board available for service. EPL-6000 LASER PRINTER If the message remains, the drum unit and the drum replacement cartridge must replace the toner cartridge. Make sure that does not match your authorized Epson dealer for this chapter. Press the RESET/CONTINUE button to clear the...
... printer components regularly to purchase the optional 2MB memory board available for service. EPL-6000 LASER PRINTER If the message remains, the drum unit and the drum replacement cartridge must replace the toner cartridge. Make sure that does not match your authorized Epson dealer for this chapter. Press the RESET/CONTINUE button to clear the...
Product Information Guide
Page 8
... cover. These procedures are in the basket. If you cover the drum unit with replacement drum units. Raised printer cover 3. Plug in alcohol. You should clean this wire if print quality declines. EPL-8 7/18/89 Laser Printers To ready your printer for information on reassembling...a soft cloth or sheet of paper whenever the drum is exposed. 2 Locate a cotton swab. 3. WARNING: This procedure exposes the green drum unit, which are described below to clean the developer unit with your printed page. EPL-6000 LASER PRINTER Cleaning the laser beam lens Note: ...
... cover. These procedures are in the basket. If you cover the drum unit with replacement drum units. Raised printer cover 3. Plug in alcohol. You should clean this wire if print quality declines. EPL-8 7/18/89 Laser Printers To ready your printer for information on reassembling...a soft cloth or sheet of paper whenever the drum is exposed. 2 Locate a cotton swab. 3. WARNING: This procedure exposes the green drum unit, which are described below to clean the developer unit with your printed page. EPL-6000 LASER PRINTER Cleaning the laser beam lens Note: ...

Product Support Bulletin(s)
Page 2
... Lr Release lever error LE Envelope lever error dP Data processing FF Depress the Form Feed button EPL=6000/ActionLaser/ActionLaser+ LCD Codes CHANGE DRUM The drum needs to be defective. PSB No: P-0077 Page: 2 of 11 EPl-4000 cont. COVER OPEN Printer cover is open CPU ERROR Printer's CPU has made a calculation ... overrun error ERROR 22 Receive buffer overflow ERROR 30 Memory error ERROR 31 Scanner error ERROR 32 Heater (Heat Roller Unit) error The drum cartridge may not be installed, the cartridge may not be installed properly or the cartridge may be changed.
... Lr Release lever error LE Envelope lever error dP Data processing FF Depress the Form Feed button EPL=6000/ActionLaser/ActionLaser+ LCD Codes CHANGE DRUM The drum needs to be defective. PSB No: P-0077 Page: 2 of 11 EPl-4000 cont. COVER OPEN Printer cover is open CPU ERROR Printer's CPU has made a calculation ... overrun error ERROR 22 Receive buffer overflow ERROR 30 Memory error ERROR 31 Scanner error ERROR 32 Heater (Heat Roller Unit) error The drum cartridge may not be installed, the cartridge may not be installed properly or the cartridge may be changed.

Product Support Bulletin(s)
Page 11
U1 U2 PSB No: P-0077 Page: 11 of 11 Replace the collector unit and lens shield. GQ-3500 cont. Replace the drum cartridge and lens shield.
U1 U2 PSB No: P-0077 Page: 11 of 11 Replace the collector unit and lens shield. GQ-3500 cont. Replace the drum cartridge and lens shield.

Product Support Bulletin(s)
Page 12
EPSON AMERICA, INC. In the event of the Transfer Corona Wire due to paper jams. The figure below shows the path the paper takes through the ... of a paper jam, the paper may become folded under and around the Transfer Charger wire (as shown below the OPC Drum where it picks up the toner. EPSON Product Support Bulletin Subject: EPL-6000/ActionLaser Paper Jams Date: 4/3/91 Page(s): 1 of 2 PSB No: P-0074 Originator JV This bulletin is to the page. The Paper...
EPSON AMERICA, INC. In the event of the Transfer Corona Wire due to paper jams. The figure below shows the path the paper takes through the ... of a paper jam, the paper may become folded under and around the Transfer Charger wire (as shown below the OPC Drum where it picks up the toner. EPSON Product Support Bulletin Subject: EPL-6000/ActionLaser Paper Jams Date: 4/3/91 Page(s): 1 of 2 PSB No: P-0074 Originator JV This bulletin is to the page. The Paper...

Product Support Bulletin(s)
Page 13
... print will cause a change in darkness. If it is broken, the Transfer Unit must remove the processing tray (which includes the Developer Unit and the Drum Unit). Replace the processing tray and close the printer cover. Breakage of removing a paper jam is to the right (toward the paper supply tray) as...
... print will cause a change in darkness. If it is broken, the Transfer Unit must remove the processing tray (which includes the Developer Unit and the Drum Unit). Replace the processing tray and close the printer cover. Breakage of removing a paper jam is to the right (toward the paper supply tray) as...

Product Support Bulletin(s)
Page 20
... 1, and the UDP 65 - FX Identity Cartridge #IBS100 Replacement Toner Cartridge #IBS300 Drum Unit #IBS301 Optional 2MB Memory Board #IBS401 What Font cartridges have not been tested by Epson at this time. NOTES: 1. Listed below are the part numbers for the EPL- 6000 options and supplies? Collection. lf using font cartridge slot 2, only 1 or...
... 1, and the UDP 65 - FX Identity Cartridge #IBS100 Replacement Toner Cartridge #IBS300 Drum Unit #IBS301 Optional 2MB Memory Board #IBS401 What Font cartridges have not been tested by Epson at this time. NOTES: 1. Listed below are the part numbers for the EPL- 6000 options and supplies? Collection. lf using font cartridge slot 2, only 1 or...
User Manual
Page 10
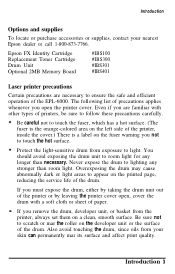
... by taking the drum unit out of the EPL-6000. You should avoid exposing the drum unit to ensure the safe and efficient operation of the printer or by leaving the printer cover open the printer cover. If you remove the drum, developer unit, or basket from your nearest Epson dealer or call 1-800-873-7766...
... by taking the drum unit out of the EPL-6000. You should avoid exposing the drum unit to ensure the safe and efficient operation of the printer or by leaving the printer cover open the printer cover. If you remove the drum, developer unit, or basket from your nearest Epson dealer or call 1-800-873-7766...

User Manual
Page 24
... is useful for details. Setting Up the Printer 1-11 Usage of the drum. Be sure not to install internal components, including the drum unit, drum replacement cartridge, cleaning pad, and developer unit. Also avoid touching the drum, since oils from the paper guide. See Chapter 6 for removing excess ..., cleaning pad, and toner cartridge (which is attached to the developer unit) need to be replaced periodically. WARNING: When handling the drum, developer unit, or basket, always set them on your skin can permanently mar its surface and affect print quality. The magnetic cleaner ...
... is useful for details. Setting Up the Printer 1-11 Usage of the drum. Be sure not to install internal components, including the drum unit, drum replacement cartridge, cleaning pad, and developer unit. Also avoid touching the drum, since oils from the paper guide. See Chapter 6 for removing excess ..., cleaning pad, and toner cartridge (which is attached to the developer unit) need to be replaced periodically. WARNING: When handling the drum, developer unit, or basket, always set them on your skin can permanently mar its surface and affect print quality. The magnetic cleaner ...

User Manual
Page 26
...it may break Also, never touch the wire. Setting Up the Printer 1-13 Also, do not touch the surface of the green drum inside a slot directly over the drum. Assembling the Printer 4. WARNING: The main charger wire is exposed. Do not press on a clean, smooth surface and locate ...the cotton swab. It is recommended that you cover the drum with a soft cloth or sheet of paper whenever the drum is very delicate. Locate the drum unit, which extends along the length of the drum. 5. WARNING: Do not expose the photosensitive drum to light any longer than necessary (a few minutes at most...
...it may break Also, never touch the wire. Setting Up the Printer 1-13 Also, do not touch the surface of the green drum inside a slot directly over the drum. Assembling the Printer 4. WARNING: The main charger wire is exposed. Do not press on a clean, smooth surface and locate ...the cotton swab. It is recommended that you cover the drum with a soft cloth or sheet of paper whenever the drum is very delicate. Locate the drum unit, which extends along the length of the drum. 5. WARNING: Do not expose the photosensitive drum to light any longer than necessary (a few minutes at most...

User Manual
Page 27
WARNING: Do not touch the roller on the developer unit. 1-14 Setting Up the Printer Set the drum unit aside for a moment and locate the developer unit. Gently clean the main charger wire with the cotton swab by rubbing the swab along the length of an inch into the slot to insert the cotton swab a fraction of the wire. Assembling the Printer 6. You need to reach the wire. 7.
WARNING: Do not touch the roller on the developer unit. 1-14 Setting Up the Printer Set the drum unit aside for a moment and locate the developer unit. Gently clean the main charger wire with the cotton swab by rubbing the swab along the length of an inch into the slot to insert the cotton swab a fraction of the wire. Assembling the Printer 6. You need to reach the wire. 7.

User Manual
Page 28
Install the drum unit (lifting it by its green handles) and the developer unit in the basket. Setting Up the Printer 1-15 Hold the developer unit horizontally, with the toner cartridge label right side up. Gently shake the unit back and forth a few times to distribute the toner. 9. Assembling the Printer 8.
Install the drum unit (lifting it by its green handles) and the developer unit in the basket. Setting Up the Printer 1-15 Hold the developer unit horizontally, with the toner cartridge label right side up. Gently shake the unit back and forth a few times to distribute the toner. 9. Assembling the Printer 8.

User Manual
Page 30
Assembling the Printer 11. Setting Up the Printer 1-17 Unfasten the tape holding the clear plastic film in place on the drum unit's two green handles until the drum unit clicks into place. 12. Press down simultaneously on the initial toner cartridge, which is attached to the developer unit.
Assembling the Printer 11. Setting Up the Printer 1-17 Unfasten the tape holding the clear plastic film in place on the drum unit's two green handles until the drum unit clicks into place. 12. Press down simultaneously on the initial toner cartridge, which is attached to the developer unit.

User Manual
Page 31
Press down on the cartridge until the other end of the film comes out of the cassette. 14. Insert the drum replacement cartridge in place, pull out the film. (pull the film up and out toward the back of the printer.) Pull firmly until it firmly in the slot at the right rear comer of the printer. Make sure that the indicator light faces the front of the printer frame (with the printer cover open). Pressing down on the toner cartridge to hold it clicks into place. 1-18 Setting Up the Printer Assembling the Printer 13.
Press down on the cartridge until the other end of the film comes out of the cassette. 14. Insert the drum replacement cartridge in place, pull out the film. (pull the film up and out toward the back of the printer.) Pull firmly until it firmly in the slot at the right rear comer of the printer. Make sure that the indicator light faces the front of the printer frame (with the printer cover open). Pressing down on the toner cartridge to hold it clicks into place. 1-18 Setting Up the Printer Assembling the Printer 13.

User Manual
Page 116
Toner empty message . . . . . . . . . . . . . . . . . . . . . . . . . . . . . . . . . . . . . . . . . . . . . . . . . . . . . . . . 6-3 6-3 Change drum message 6-12 Routine Printer Cleaning Cleaning schedule Cleaning the transfer charger and discharge wires . . . . developer unit . . . . . . Cleaning the main charger wire . . . . . . . . . . . . . . . . . . . . . . . . . . . . . . . . . . . . . . . . . . . . . . . . . . . . . . . . . . . . 6-24 6-24 6-28 Service ...
Toner empty message . . . . . . . . . . . . . . . . . . . . . . . . . . . . . . . . . . . . . . . . . . . . . . . . . . . . . . . . 6-3 6-3 Change drum message 6-12 Routine Printer Cleaning Cleaning schedule Cleaning the transfer charger and discharge wires . . . . developer unit . . . . . . Cleaning the main charger wire . . . . . . . . . . . . . . . . . . . . . . . . . . . . . . . . . . . . . . . . . . . . . . . . . . . . . . . . . . . . 6-24 6-24 6-28 Service ...

User Manual
Page 117
...750 pages.) A TONER EMPTY message appears when it is time to replace the drum unit more often. A CHANGE DRUM message appears when it is also necessary to replace the drum unit at 100,000 pages by an authorized Epson dealer. A service overhaul must be performed at the same time you install the... eighth toner cartridge.) When you replace the drum unit, it is time to change is described in detail in...
...750 pages.) A TONER EMPTY message appears when it is time to replace the drum unit more often. A CHANGE DRUM message appears when it is also necessary to replace the drum unit at 100,000 pages by an authorized Epson dealer. A service overhaul must be performed at the same time you install the... eighth toner cartridge.) When you replace the drum unit, it is time to change is described in detail in...