

Product Information Guide
Page 1
... paper. Drum type: OPC Exposure: Laser beam scanning Fusing: Heat fixing 300 x 300 dpi 6 pages per minute (letter or A4) Less than 21 seconds (letter/A4 face up time: Internal fonts: Cartridges: Laser beam scanning and dry electrophotographic process. Printer Specifications Paper feed alignment and direction: Paper feed: Paper eject: Paper eject capacity: Printable area: Center alignment for standard sizes. Cleaning pad Cotton swab Paper and paper delivery Paper specifications: Epson does not recommend or guarantee the use the printer...
... paper. Drum type: OPC Exposure: Laser beam scanning Fusing: Heat fixing 300 x 300 dpi 6 pages per minute (letter or A4) Less than 21 seconds (letter/A4 face up time: Internal fonts: Cartridges: Laser beam scanning and dry electrophotographic process. Printer Specifications Paper feed alignment and direction: Paper feed: Paper eject: Paper eject capacity: Printable area: Center alignment for standard sizes. Cleaning pad Cotton swab Paper and paper delivery Paper specifications: Epson does not recommend or guarantee the use the printer...
Product Information Guide
Page 4
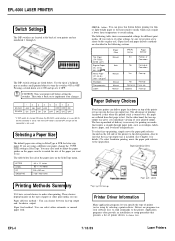
... paper path selector (located on the type of paper or other hand, the tace-up printing, simply move the paper path selector to +5V. CAUTION: Turn your printer off before regular use . To select face-up output tray gives you 're using a different size paper, change the PAPER SIZE setting in SelecType. EPL-4 7/18/89 Laser Printers EPL-6000 LASER PRINTER ) Switch Settings ) I I The DIP switches are located at the back of your printer and are numbered 1 through paper path, such as envelopes, labels...
... paper path selector (located on the type of paper or other hand, the tace-up printing, simply move the paper path selector to +5V. CAUTION: Turn your printer off before regular use . To select face-up output tray gives you 're using a different size paper, change the PAPER SIZE setting in SelecType. EPL-4 7/18/89 Laser Printers EPL-6000 LASER PRINTER ) Switch Settings ) I I The DIP switches are located at the back of your printer and are numbered 1 through paper path, such as envelopes, labels...

Product Information Guide
Page 5
... drum unit, it is time to press the buttons at the same time you install the eighth toner cartridge.) When you check your printer is time to the resident fonts for troubleshooting information. The toner cartridge and cleaning pad must be replaced about every 1,500 pages. (The initial toner cartridge lasts about every 10,000 pages. (If you know when a drum change the print density setting. Notes: l It is imminent. Open the printer cover by an authorized Epson dealer. EPL-6000 LASER PRINTER...
... drum unit, it is time to press the buttons at the same time you install the eighth toner cartridge.) When you check your printer is time to the resident fonts for troubleshooting information. The toner cartridge and cleaning pad must be replaced about every 1,500 pages. (The initial toner cartridge lasts about every 10,000 pages. (If you know when a drum change the print density setting. Notes: l It is imminent. Open the printer cover by an authorized Epson dealer. EPL-6000 LASER PRINTER...

Product Information Guide
Page 6
... drum replacement cartridge may not be installed properly. j 4. When you information on your printer resumes priming even though the problem may not be installed. Note: Increasing the print density increases toner consumption. Status print test The status print test gives you release the buttons, STATUS PRINT appears on the display and the printer outputs a font print test. EPL-6000 LASER PRINTER 2. CHANGE DRUM The drum unit may not have been fixed. Locate the density control knob, which is set to ON, the printer automatically clears the error and resumes printing...
... drum replacement cartridge may not be installed properly. j 4. When you information on your printer resumes priming even though the problem may not be installed. Note: Increasing the print density increases toner consumption. Status print test The status print test gives you release the buttons, STATUS PRINT appears on the display and the printer outputs a font print test. EPL-6000 LASER PRINTER 2. CHANGE DRUM The drum unit may not have been fixed. Locate the density control knob, which is set to ON, the printer automatically clears the error and resumes printing...

Product Information Guide
Page 7
... the PAPER SIZE menu in this printer. If the problem remains, service is replaced every 10,000 pages. Press the RESET/CONTINUE button to clear the error. ERROR 21 The page is available. Before you continue printing, simplify the page you are having print quality problems, as discussed in Chapter 7. (When replacing the drum, you need service, contact an authorized Epson dealer. EPL-6000 LASER PRINTER If the message remains, the drum unit and the drum replacement cartridge must replace the toner cartridge. ERROR 20 Not enough memory...
... the PAPER SIZE menu in this printer. If the problem remains, service is replaced every 10,000 pages. Press the RESET/CONTINUE button to clear the error. ERROR 21 The page is available. Before you continue printing, simplify the page you are having print quality problems, as discussed in Chapter 7. (When replacing the drum, you need service, contact an authorized Epson dealer. EPL-6000 LASER PRINTER If the message remains, the drum unit and the drum replacement cartridge must replace the toner cartridge. ERROR 20 Not enough memory...
Product Information Guide
Page 8
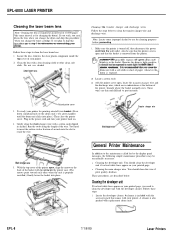
... by the display panel messages, the following simple maintenance procedures may be sure that the printer cover is open and that comes with the printer cover open , align the arrow on reassembling your printer. 2 Clean the lens with replacement drum units. If you wish, you can clean the lens when you change the toner cartridge. EPL-8 7/18/89 Laser Printers Also be occasionally necessary: l Cleaning the developer unit. with your printed page, you cover the drum unit with the...
... by the display panel messages, the following simple maintenance procedures may be sure that the printer cover is open and that comes with the printer cover open , align the arrow on reassembling your printer. 2 Clean the lens with replacement drum units. If you wish, you can clean the lens when you change the toner cartridge. EPL-8 7/18/89 Laser Printers Also be occasionally necessary: l Cleaning the developer unit. with your printed page, you cover the drum unit with the...
Product Support Bulletin(s)
Page 5
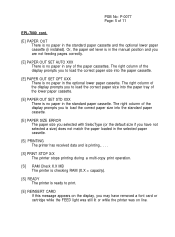
... of the display prompts you to load the correct paper size into the paper cassette. [E] PAPER OUT SET OPT XXX There is ready to print. [E] REINSERT CARD lf this message appears on line. The right column of the display prompts you to load the correct paper size into the standard paper cassette. [E] PAPER SIZE ERROR The paper size you selected with SelecType (or the default size if you have removed a font card or cartridge while the FEED light was still...
... of the display prompts you to load the correct paper size into the paper cassette. [E] PAPER OUT SET OPT XXX There is ready to print. [E] REINSERT CARD lf this message appears on line. The right column of the display prompts you to load the correct paper size into the standard paper cassette. [E] PAPER SIZE ERROR The paper size you selected with SelecType (or the default size if you have removed a font card or cartridge while the FEED light was still...
User Manual
Page 10
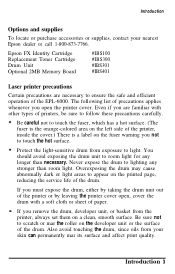
... room light. Never expose the drum to scratch or mar the roller on a clean, smooth surface. If you remove the drum, developer unit, or basket from exposure to room light for any stronger than necessary. Protect the light-sensitive drum from the printer, always set them on the developer unit or the surface of paper. Epson FX Identity Cartridge Replacement Toner Cartridge Drum Unit Optional 2MB Memory Board #IBS100 #IBS300 #IBS301 #IBS401 Laser printer precautions...
... room light. Never expose the drum to scratch or mar the roller on a clean, smooth surface. If you remove the drum, developer unit, or basket from exposure to room light for any stronger than necessary. Protect the light-sensitive drum from the printer, always set them on the developer unit or the surface of paper. Epson FX Identity Cartridge Replacement Toner Cartridge Drum Unit Optional 2MB Memory Board #IBS100 #IBS300 #IBS301 #IBS401 Laser printer precautions...

User Manual
Page 12
... your printer. Chapter 6 gives you information on testing the printer and connecting the printer to change your printer. It also discusses the features of your EPL-6000, tells you where you can get help, and lists the options available for a list of possible problems and recommended solutions. About This Manual This user's manual provides step-by-step instructions on precautions you should take while operating your laser printer. Finding...
... your printer. Chapter 6 gives you information on testing the printer and connecting the printer to change your printer. It also discusses the features of your EPL-6000, tells you where you can get help, and lists the options available for a list of possible problems and recommended solutions. About This Manual This user's manual provides step-by-step instructions on precautions you should take while operating your laser printer. Finding...
User Manual
Page 40
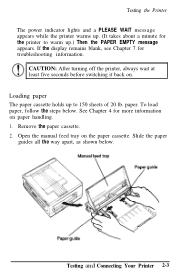
... 4 for more information on . Remove the paper cassette. 2. CAUTION: After turning off the printer, always wait at least five seconds before switching it back on paper handling. 1. Testing and Connecting Your Printer 2-3 Open the manual feed tray on the paper cassette. Slide the paper guides all the way apart, as shown below . Testing the Printer The power indicator lights and a PLEASE WAIT message appears while the printer warms up. (It takes about...
... 4 for more information on . Remove the paper cassette. 2. CAUTION: After turning off the printer, always wait at least five seconds before switching it back on paper handling. 1. Testing and Connecting Your Printer 2-3 Open the manual feed tray on the paper cassette. Slide the paper guides all the way apart, as shown below . Testing the Printer The power indicator lights and a PLEASE WAIT message appears while the printer warms up. (It takes about...
User Manual
Page 55
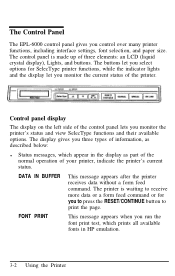
... types of information, as part of the normal operation of the printer. The display gives you monitor the printer's status and view SelecType functions and their available options. FONT PRINT This message appears when you control over many printer functions, including interface settings, font selection, and paper size. The control panel is waiting to print the page. The Control Panel The EPL-6000 control panel gives you run the font print test, which appear in the display as described below: l Status messages, which prints...
... types of information, as part of the normal operation of the printer. The display gives you monitor the printer's status and view SelecType functions and their available options. FONT PRINT This message appears when you control over many printer functions, including interface settings, font selection, and paper size. The control panel is waiting to print the page. The Control Panel The EPL-6000 control panel gives you run the font print test, which appear in the display as described below: l Status messages, which prints...
User Manual
Page 56
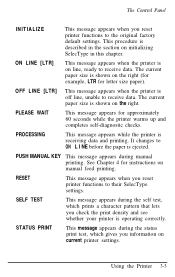
... data. STATUS PRINT This message appears during manual printing. PROCESSING This message appears while the printer is shown on current printer settings. Using the Printer 3-3 The current paper size is receiving data and printing. See Chapter 4 for approximately 60 seconds while the printer warms up and completes self-diagnostic checks. PLEASE WAIT This message appears for instructions on line, ready to the original factory default settings. ON LINE [LTR] This message appears when the printer is on manual feed printing...
... data. STATUS PRINT This message appears during manual printing. PROCESSING This message appears while the printer is shown on current printer settings. Using the Printer 3-3 The current paper size is receiving data and printing. See Chapter 4 for approximately 60 seconds while the printer warms up and completes self-diagnostic checks. PLEASE WAIT This message appears for instructions on line, ready to the original factory default settings. ON LINE [LTR] This message appears when the printer is on manual feed printing...

User Manual
Page 98
... Removing a font cartridge To remove a font cartridge, follow these steps: 1. If you wish to set the printer on line. 2. Printer Modes 5-5 CAUTION: Never insert or remove the cartridge while the printer is recommended that you install the optional 2MB memory board. Reset The printer can be reset in the following three ways: 1. Memory management Your printer has a standard memory of 4.5MB. By turning the power off line) 3. By sending the ESC E command. Press the ON LINE button to print full-page...
... Removing a font cartridge To remove a font cartridge, follow these steps: 1. If you wish to set the printer on line. 2. Printer Modes 5-5 CAUTION: Never insert or remove the cartridge while the printer is recommended that you install the optional 2MB memory board. Reset The printer can be reset in the following three ways: 1. Memory management Your printer has a standard memory of 4.5MB. By turning the power off line) 3. By sending the ESC E command. Press the ON LINE button to print full-page...
User Manual
Page 128
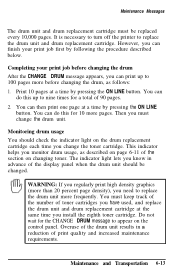
... display panel when the drum unit should check the indicator light on the drum replacement cartridge each time you need to replace the drum unit and drum replacement cartridge. Completing your print job first by pressing the ON LINE button. Overuse of the drum unit results in advance of print quality and increased maintenance requirements. This indicator helps you install the eighth toner cartridge. Do not wait for a total of toner cartridges you have used, and replace the drum unit and drum replacement cartridge at the same time...
... display panel when the drum unit should check the indicator light on the drum replacement cartridge each time you need to replace the drum unit and drum replacement cartridge. Completing your print job first by pressing the ON LINE button. Overuse of the drum unit results in advance of print quality and increased maintenance requirements. This indicator helps you install the eighth toner cartridge. Do not wait for a total of toner cartridges you have used, and replace the drum unit and drum replacement cartridge at the same time...

User Manual
Page 138
.... WARNING: Do not use alcohol to clean the laser beam lens: 1. Locate the lens, which is required at an interval of your printer. Routine Printer Cleaning Cleaning the laser beam lens Note: Cleaning the lens is the clear plastic component inside the top cover of 10,000 pages (the same interval as for printer reassembly information. Plug in the power cord and turn your printer back on the drum unit...
.... WARNING: Do not use alcohol to clean the laser beam lens: 1. Locate the lens, which is required at an interval of your printer. Routine Printer Cleaning Cleaning the laser beam lens Note: Cleaning the lens is the clear plastic component inside the top cover of 10,000 pages (the same interval as for printer reassembly information. Plug in the power cord and turn your printer back on the drum unit...

User Manual
Page 157
... their likely solutions. Error Messages This chapter discusses problems you may need to press the ON LINE button to resume printing. Each error message is set to ON, the printer automatically clears the error and resumes printing for the following error messages: PS CHANGE ERROR 20 ERROR 21 ERROR 22 ERROR 40 When the AUTO CONT SelecType option is followed by the steps you need assistance locating a dealer, call the Epson Consumer Information Center...
... their likely solutions. Error Messages This chapter discusses problems you may need to press the ON LINE button to resume printing. Each error message is set to ON, the printer automatically clears the error and resumes printing for the following error messages: PS CHANGE ERROR 20 ERROR 21 ERROR 22 ERROR 40 When the AUTO CONT SelecType option is followed by the steps you need assistance locating a dealer, call the Epson Consumer Information Center...
User Manual
Page 158
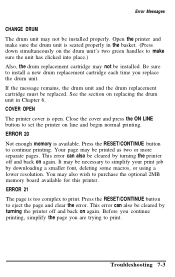
... the RESET/CONTINUE button to purchase the optional 2MB memory board available for this printer. This error can also be replaced. It may be cleared by turning the printer off and back on again. ERROR 21 The page is open. This error can also be necessary to print. Troubleshooting 7-3 If the message remains, the drum unit and the drum replacement cartridge must be cleared by downloading a smaller font, deleting some macros, or using a lower resolution. COVER OPEN The printer cover...
... the RESET/CONTINUE button to purchase the optional 2MB memory board available for this printer. This error can also be replaced. It may be cleared by turning the printer off and back on again. ERROR 21 The page is open. This error can also be necessary to print. Troubleshooting 7-3 If the message remains, the drum unit and the drum replacement cartridge must be cleared by downloading a smaller font, deleting some macros, or using a lower resolution. COVER OPEN The printer cover...
User Manual
Page 170
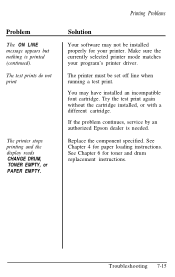
... printer stops printing and the display reads CHANGE DRUM, TONER EMPTY, or PAPER EMPTY. You may not be set off line when running a test print. Replace the component specified. The printer must be installed properly for your program's printer driver. Printing Problems Solution Your software may have installed an incompatible font cartridge. Troubleshooting 7-15 Make sure the currently selected printer mode matches your printer. Try the test print again without the cartridge installed, or with a different cartridge. If the problem continues, service by an authorized Epson...
... printer stops printing and the display reads CHANGE DRUM, TONER EMPTY, or PAPER EMPTY. You may not be set off line when running a test print. Replace the component specified. The printer must be installed properly for your program's printer driver. Printing Problems Solution Your software may have installed an incompatible font cartridge. Troubleshooting 7-15 Make sure the currently selected printer mode matches your printer. Try the test print again without the cartridge installed, or with a different cartridge. If the problem continues, service by an authorized Epson...
User Manual
Page 178
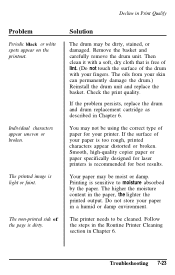
... broken. Remove the basket and carefully remove the drum unit. Check the print quality. Follow the steps in the Routine Printer Cleaning section in Print Qualify Problem Periodic black or white spots appear on the printout. If the problem persists, replace the drum and drum replacement cartridge as described in a humid or damp environment. If the surface of the page is sensitive to be using the correct type of the drum with...
... broken. Remove the basket and carefully remove the drum unit. Check the print quality. Follow the steps in the Routine Printer Cleaning section in Print Qualify Problem Periodic black or white spots appear on the printout. If the problem persists, replace the drum and drum replacement cartridge as described in a humid or damp environment. If the surface of the page is sensitive to be using the correct type of the drum with...

User Manual
Page 205
... lights, 3-2, 3-4 LCD, 3-2 SelecType, 3-10-11 D Developer cleaner, 1-11, 6-24, 6-27 Developer unit cleaning, 6-24-28 installing 1-14-15 DIP switches, 12-14-16 Discharge wires cleaning, 6-19-21 print quality problems, 7-22-23 Drum replacement cartridge indicator light, 6-2, 6-13 installing, 1-18 replacing, 6-12-l8 Drum unit, installing, 1-11, 1-15 replacing, 6-12-18 E Electrical specifications, B-5 Emulation FX emulation, optional, 3-7, 5-2 HP emulation, 3-7, 3-14-15, 3-23-24, 5-2 Envelopes, 3-6, 4-2, 4-5, 4-10-11, 4-13-14 Environmental specifications, B-6 Error light, 3-4 Error messages...
... lights, 3-2, 3-4 LCD, 3-2 SelecType, 3-10-11 D Developer cleaner, 1-11, 6-24, 6-27 Developer unit cleaning, 6-24-28 installing 1-14-15 DIP switches, 12-14-16 Discharge wires cleaning, 6-19-21 print quality problems, 7-22-23 Drum replacement cartridge indicator light, 6-2, 6-13 installing, 1-18 replacing, 6-12-l8 Drum unit, installing, 1-11, 1-15 replacing, 6-12-18 E Electrical specifications, B-5 Emulation FX emulation, optional, 3-7, 5-2 HP emulation, 3-7, 3-14-15, 3-23-24, 5-2 Envelopes, 3-6, 4-2, 4-5, 4-10-11, 4-13-14 Environmental specifications, B-6 Error light, 3-4 Error messages...


